
Introduction
According to Microsoft, Microsoft Graph is:
…your entry to automate things in the cloud via the Microsoft Graph API. This API gives you access to AzureAD, Excel, Intune, Outlook, OneDrive, OneNote, SharePoint, and more.
Microsoft Graph is a RESTful web API that enables you to access Microsoft Cloud service resources. After you register your app and get authentication tokens for a user or service, you can make requests to the Microsoft Graph API. This API uses the following HTTP methods:
- Get
- Post
- Patch
- Put
- Delete
For example, here is a Post action to RemoteLock a device:
POST https://graph.microsoft.com/Beta/managedDevices/fd3e81ec-a7d0-4f35-af7c-1478213f56c7/remoteLock
If you’d like to play with it right now then you can also check out Graph Explorer, which is a web based (web browser) gui for controlling Graph and it’s available here.
OK that’s already a bit complicated for some people, so what does this mean in real terms for a Microsoft Intune admin that wants to automate things using PowerShell.
In this guide I’ll show you step-by-step how to get up and running with Graph for Intune and how to begin automating actions using PowerShell. This is not for the feint hearted but I encourage you to take the time and effort to try this for yourself, you’ll be glad you did !
Note: In this guide I assume that you already have a Microsoft test Intune tenant setup and configured and that you have some PowerShell knowledge. At the time of writing (August 2017), Graph for Intune is still in Beta and is subject to change. Use of these APIs in production applications is not supported by Microsoft.
Step 1. Download the sample PowerShell scripts
Before you get started, you’ll need to download the PowerShell sample scripts. You can download the Graph PowerShell Intune samples from Github at the following address:
https://github.com/microsoftgraph/powershell-intune-samples
Make sure you have the latest scripts
If you have the latest scripts, then skip this section. The scripts are updated from time to time, so if you downloaded them in the past, go to Github again and download the latest copy of the scripts, chances are that the scripts have been updated and that can mean bugs are fixed or behavior has changed.
For example The following script Invoke_DeviceActionSet.ps1 had this content in June 2017 in the ManagedDevices section
param
(
[switch]$RemoteLock,
[switch]$ResetPasscode,
[switch]$Wipe,
[switch]$Retire,
[Parameter(Mandatory=$true,HelpMessage=”DeviceId (guid) for the Device you want to take action on must be specified:”)]
$DeviceID
)
The same script in August 2017 has been updated to include more ability
param
(
[switch]$RemoteLock,
[switch]$ResetPasscode,
[switch]$Wipe,
[switch]$Retire,
[switch]$Delete,
[switch]$Sync,
[Parameter(Mandatory=$true,HelpMessage=”DeviceId (guid) for the Device you want to take action on must be specified:”)]
$DeviceID
)
In addition there can be behavior changes within the script, for example in the below section (from June 2017) it invokes a RemoteLock action by default
write-host “User” $User.userPrincipalName “has device” $Device.deviceName
Invoke-DeviceAction -DeviceID $Device.id -RemoteLock -Verbose
#Invoke-DeviceAction -DeviceID $Device.id -Retire -Verbose
#Invoke-DeviceAction -DeviceID $Device.id -Wipe -Verbose
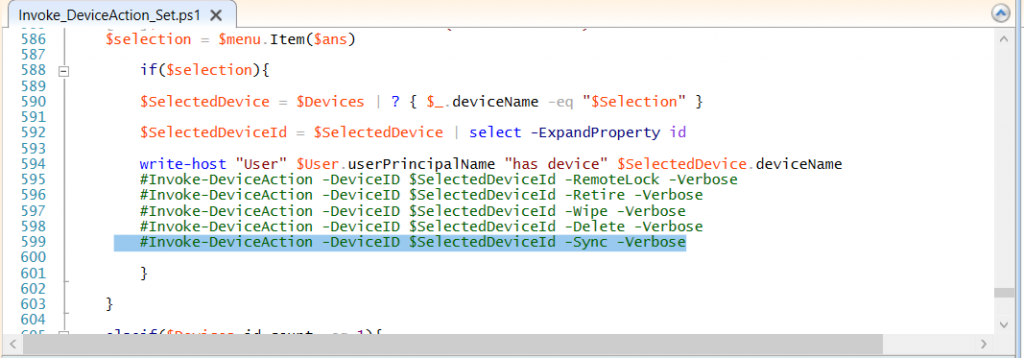
The same script in August 2017 does not do any action by default, you’d need to un- comment the appropriate line if you want it to perform a specific action or just edit the script to your liking.
write-host “User” $User.userPrincipalName “has device” $SelectedDevice.deviceName
#Invoke-DeviceAction -DeviceID $SelectedDeviceId -RemoteLock -Verbose
#Invoke-DeviceAction -DeviceID $SelectedDeviceId -Retire -Verbose
#Invoke-DeviceAction -DeviceID $SelectedDeviceId -Wipe -Verbose
#Invoke-DeviceAction -DeviceID $SelectedDeviceId -Delete -Verbose
#Invoke-DeviceAction -DeviceID $SelectedDeviceId -Sync -Verbose
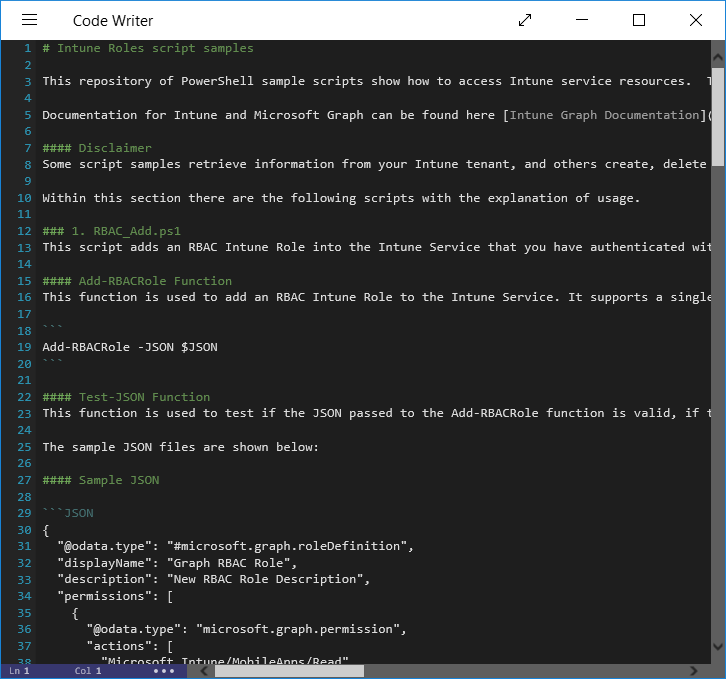
What’s in the script samples ?
The script samples are neatly organized into 15 different sections listed below:
- AppleEnrollment
Applications
AppProtectionPolicy
Authentication
CheckStatus
CompanyPortalBranding
CompliancePolicy
DeviceConfiguration
EnrollmentRestrictions
ManagedDevices
Paging
RBAC
RemoteActionAudit
TermsAndConditions
UserPolicyReport
Within each section you’ll find one or more sample PowerShell scripts and there is a readme.md file included in each section which gives more details about what functions are contained in the scripts and what the scripts actually do.
Step 2. Install the AzureAD PowerShell module
The first time you attempt to run one of the scripts, a function within the script will check for the AzureAD PowerShell module and if not found it will prompt the user to install the module and it will then exit from the script.
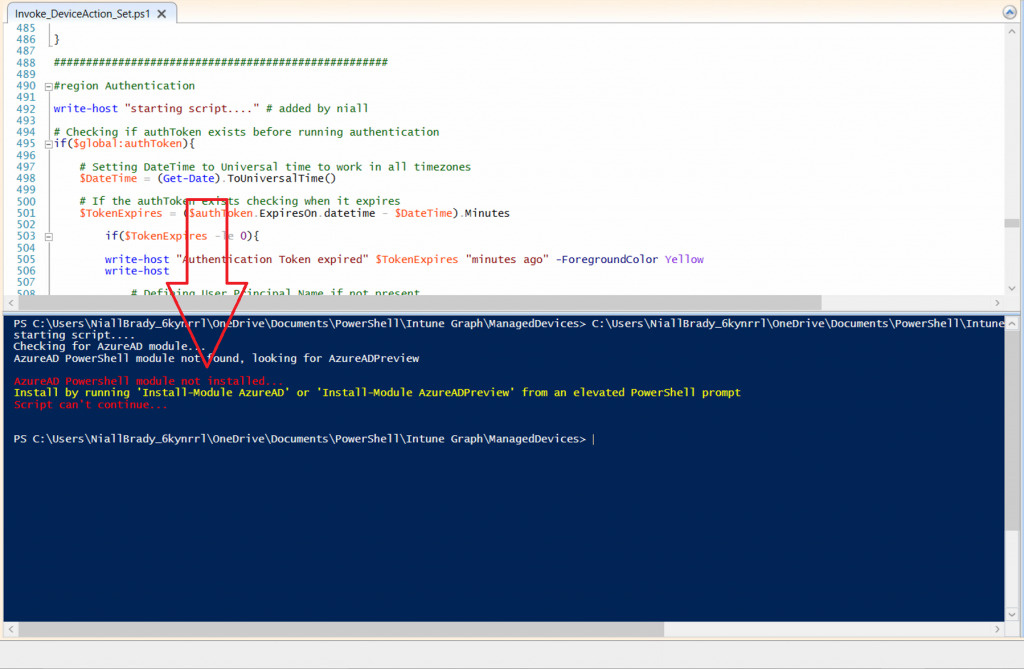
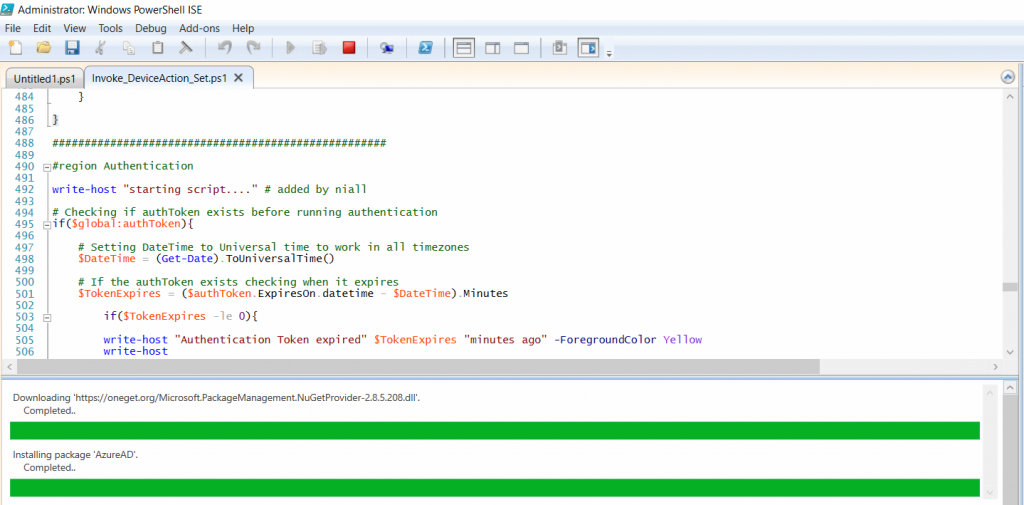
To avoid this, start PowerShell ISE as administrator, then issue the following command:
Install-Module AzureAD
After entering that command, you’ll get one or more popups asking if it’s OK to download and install NuGet, answer yes to all.
![]()
and then it will start installing the module.
You are now ready to test the scripts.
Step 3. AzureAD admin versus target user
When you run one of the sample scripts (for the first time after installing the AzureAD module) you’ll get prompted for AzureAd credentials to access Intune resources, these are the credentials that you’d normally use to do administrative work in the Intune service in Azure.
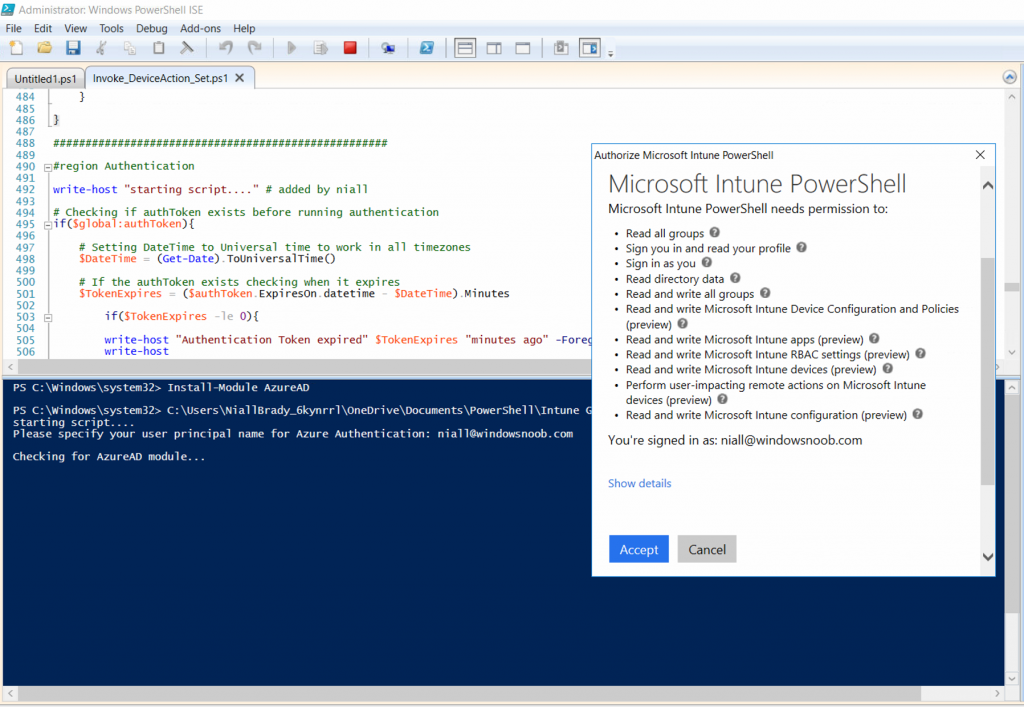
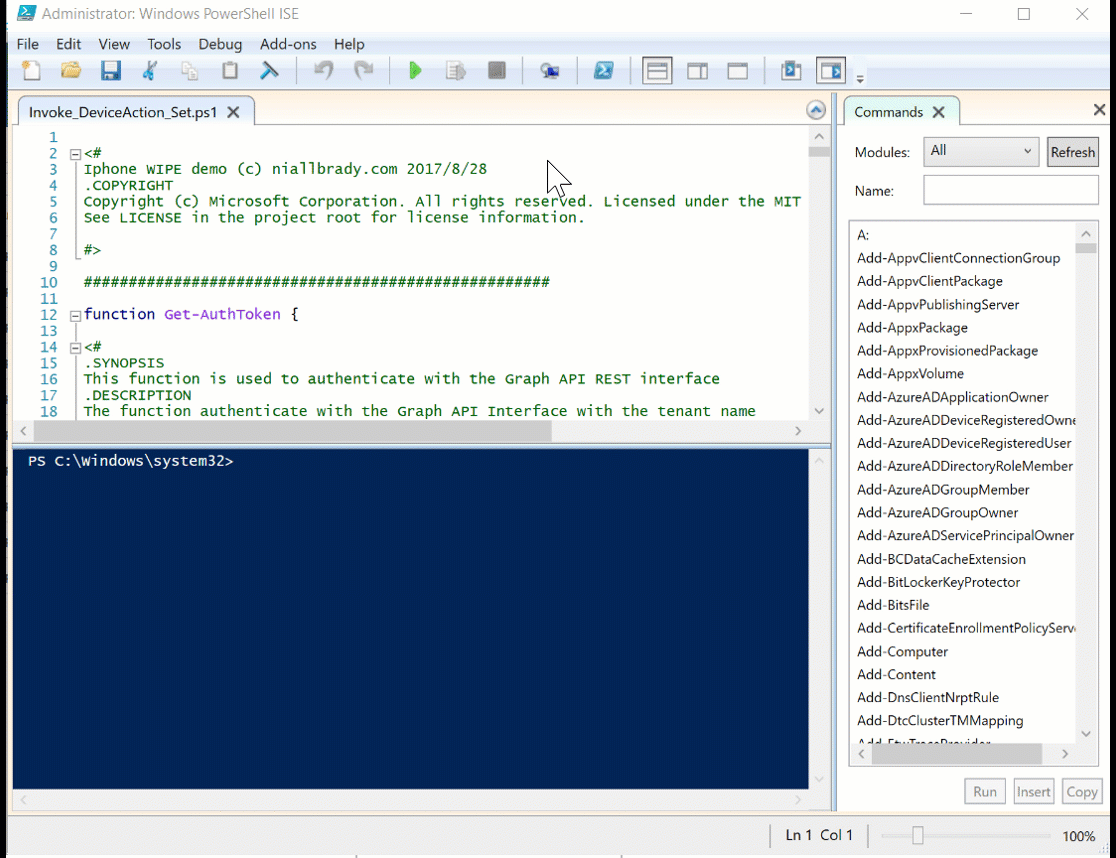
In this example you’ll use the Invoke_DeviceAction_set.ps1 script in the ManagedDevices section, open that script using PowerShell ISE as administrator.
Click on the green triangle to Run the script. As you can see it prompts for the user principal name for Azure authentication.
![]()
For this blogpost, I’m connecting to Azure using a user that is a Global Administrator.
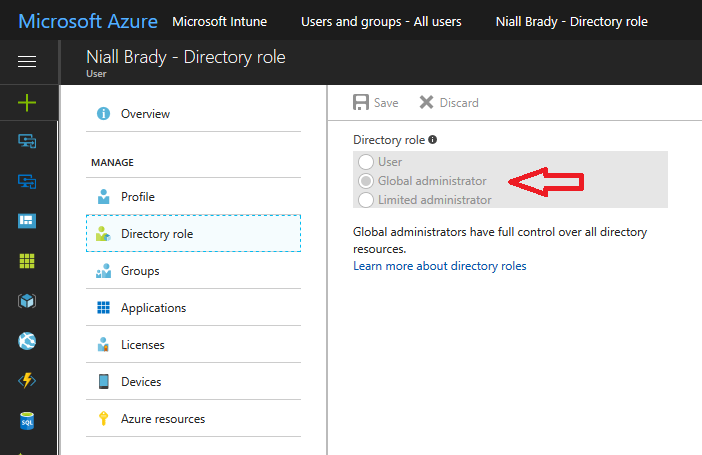
Tip: You can verify the directory role a user has in Intune, by selecting Users and groups – all users, user, Directory role. Global administrators have full control over all directory resources, if that’s not what you want you can customize the permissions using Limited Administrator and selecting the various options available.
After entering the AzureAD user principal name, you’ll see a popup requesting permission to access various Intune resources, click Accept.
The currently available actions in the Invoke_DeviceAction_Set.ps1 script are
• RemoteLock
• Retire
• Wipe
• Delete
• Sync
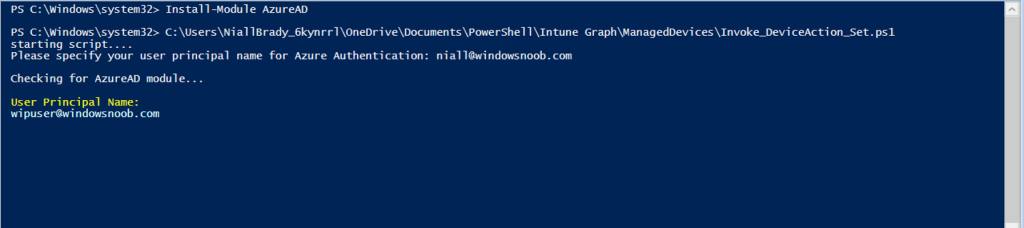
To use any of those actions on a device you’ll need to identify a target user (and their associated devices). To do this, enter the user principle name of that target user when prompted. This user is a regular user in Intune and not a Limited or Global Administrator.
Step 4. Perform a Sync action
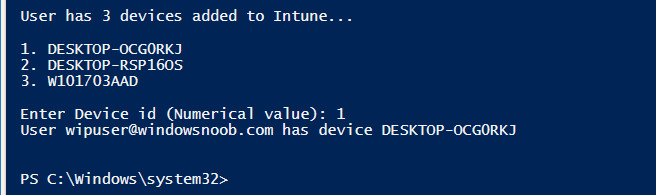
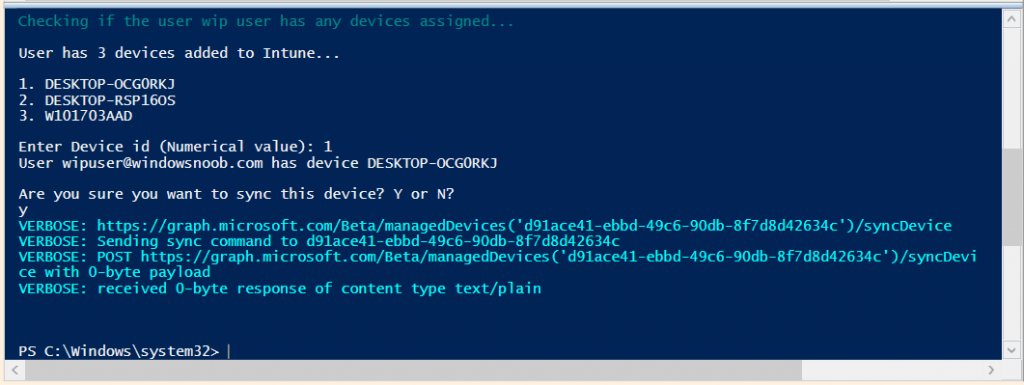
Once entered, you’ll see any devices registered to that user, in this example, the specified user has 3 devices assigned.
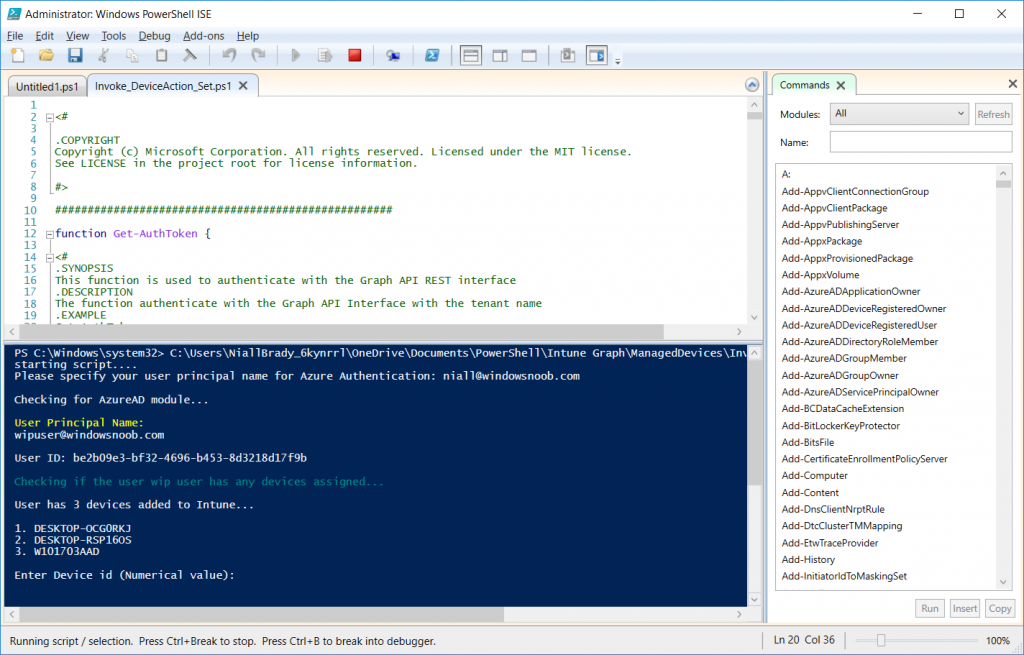
Press a number matching the device and… nothing will happen, the script exits.
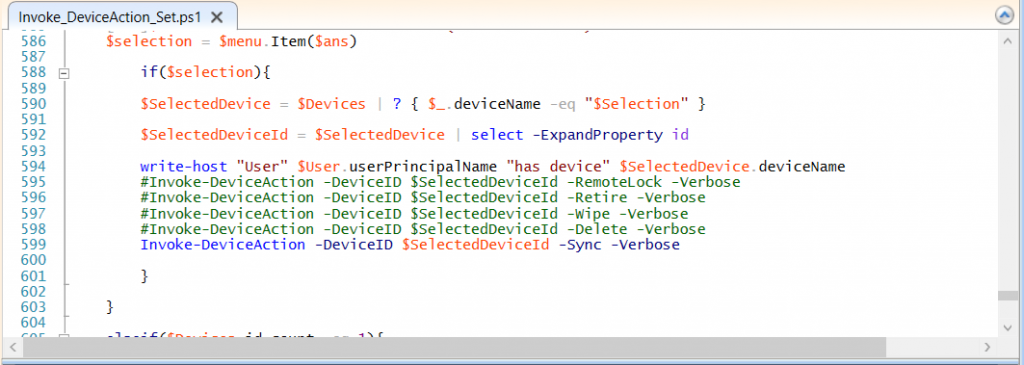
This is ok as the behavior of the script is modified to perform this way, let’s make a change so that instead of simply exiting, that it will perform a device Sync action.
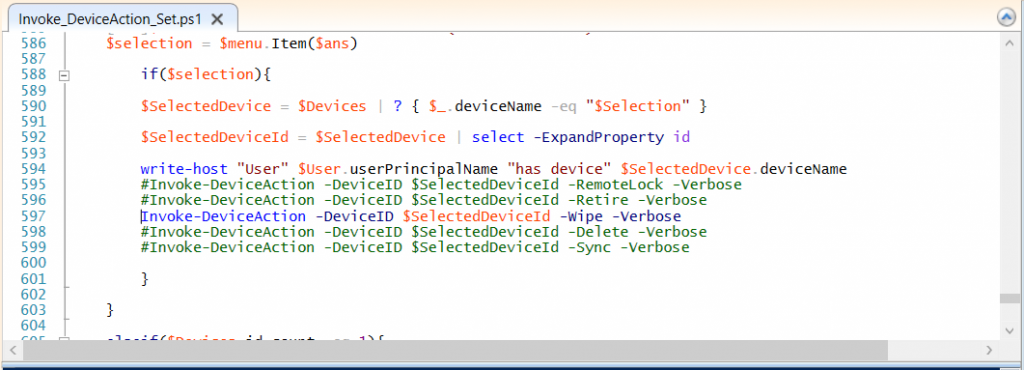
Locate line 599 in the script which contains this text
and remove the hash in front of that line. Save the file.
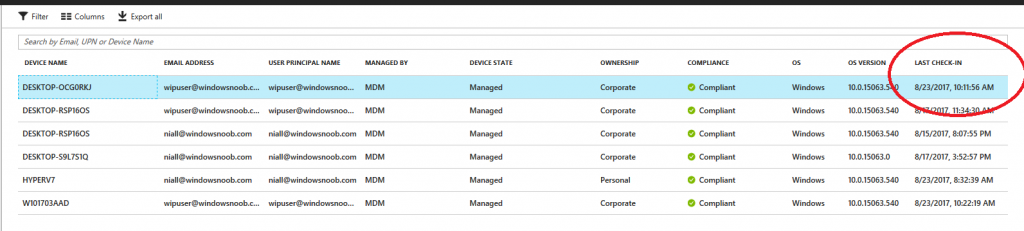
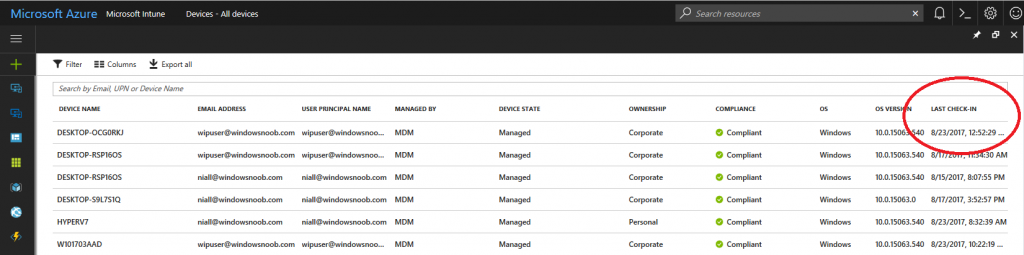
Before running the script again, verify the last sync time of the device you want to test automation against. You can verify last sync time by selecting All Devices, find the device in question and look at the Last check-in time column.
Run the script again and notice the difference, now you are prompted if you want to sync the device.
Go back into Intune and verify the Last Check-in time. It will have changed for that device.
Success ! You’ve accomplished your first automation using PowerShell in Intune.
Step 5. Perform a device Wipe
Note: A Wipe will reset a device to it’s default settings, and as part of that process remove all apps and data on the device including all personal and company data.
Next, let’s try another action and one that would be very useful to Automate, that is the ability to remove company data on a device (Wipe).
In PowerShell ISE, place a # infront of the Sync line again, and remove the # from the Wipe line. Sve the changes.
Run the script again, notice that you are prompted if you want to to wipe the device this time.
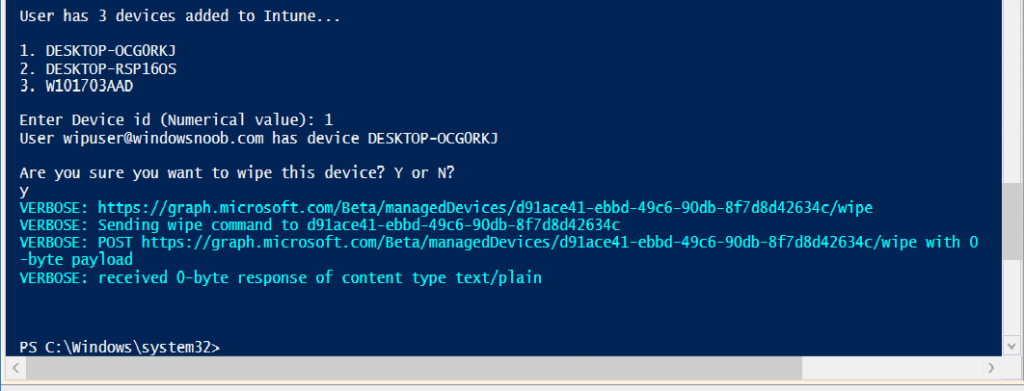
and look what happens next !
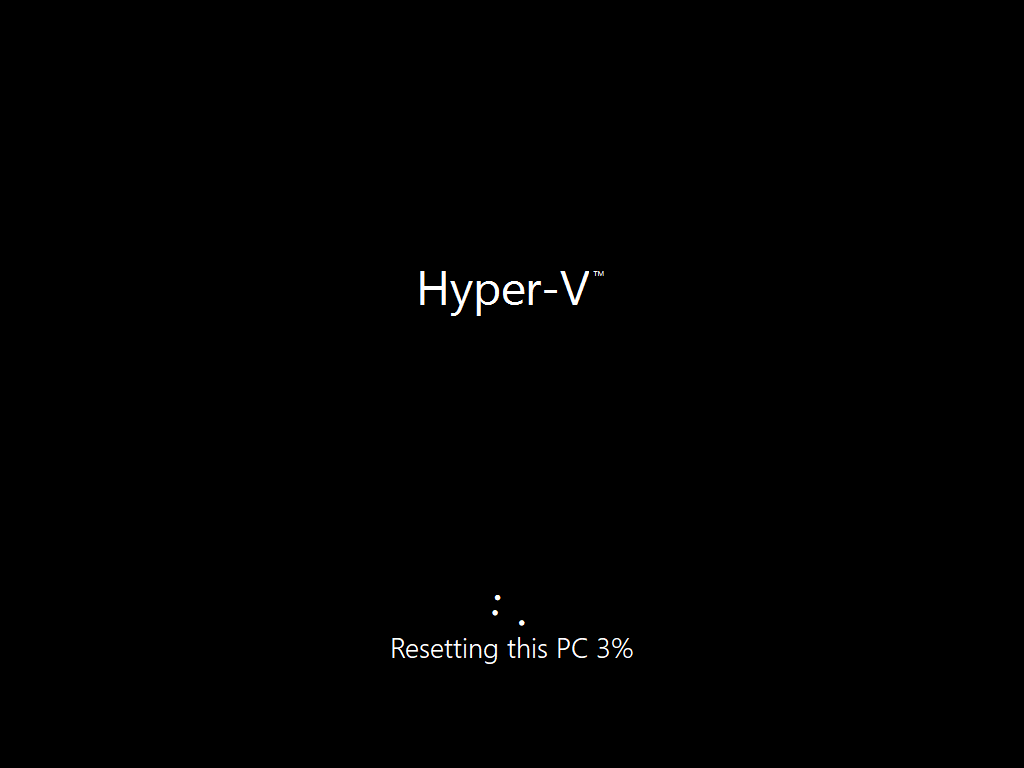
and in the Intune service in Azure you can see this

Note: Just because you can see actions in a script does not necessarily mean that those actions will apply to your scenario, and they may infact generate an error, an example of that is the RemoteLock functionality which is not supported on Windows 10 desktop.
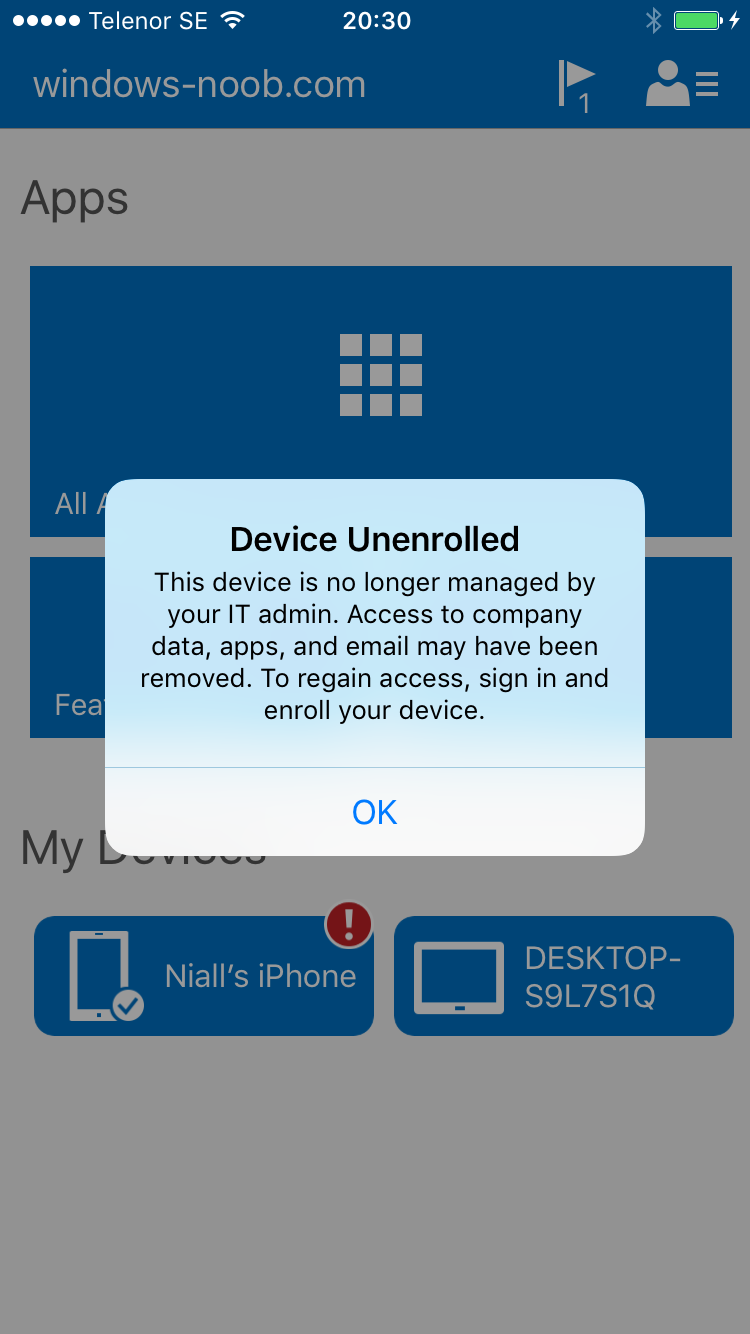
Step 5. Perform a device Retire
Note: a Retire action will un-enroll a device from Intune, and remove company data including the management profiles, meaning it is un-managed. All personal apps, data, photos on the device will remain untouched.
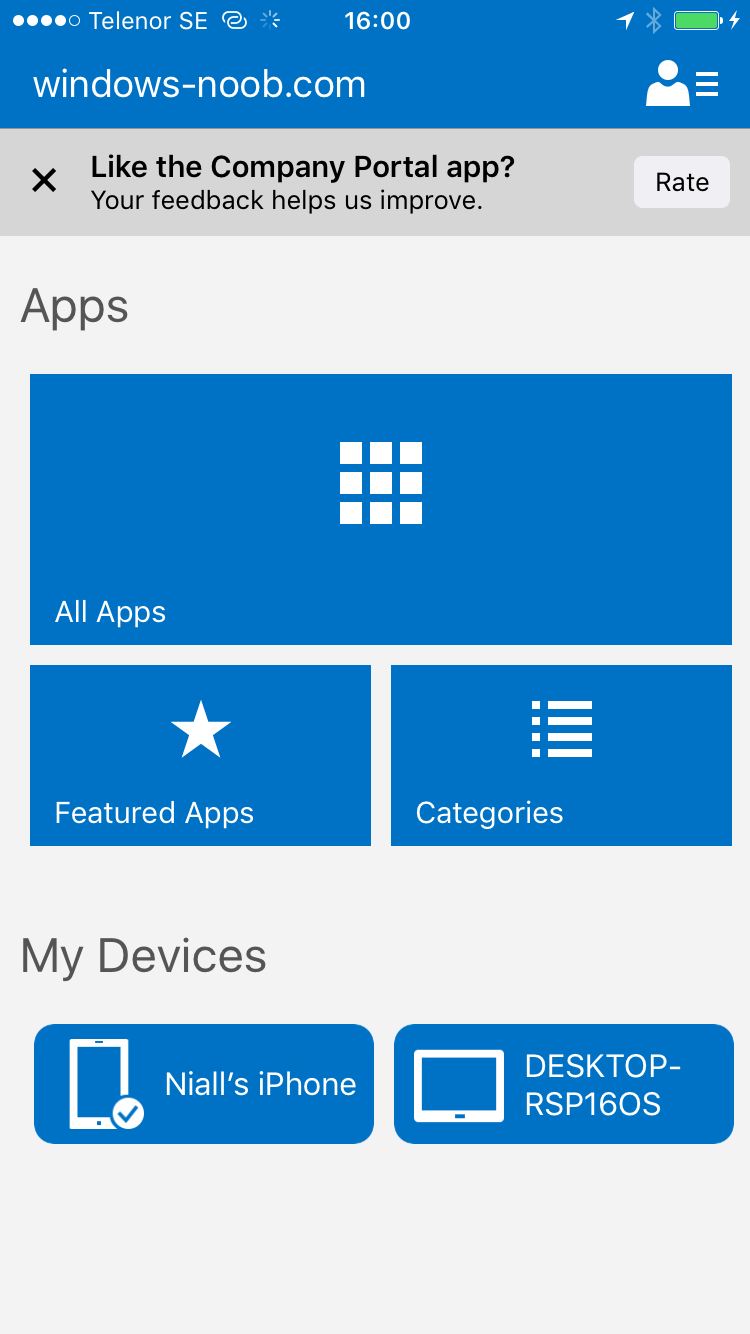
In the screenshot below, you can see the Company Portal app installed on an Iphone.
 And below you can see the Retire action on that same iPhone. In this GIF you can see the line used for the Retire action, and then the fact that the iphone shows up as a device for the user.
After running the action it no longer appears in the device list for that user as it has been removed from device management and is no longer enrolled.
Summary
In this blog post you learned a bit about Microsoft Graph, and how you can use it to automate the management of Intune using PowerShell. Awesome, really awesome.
Recommended reading
Sign up for Intune trial https://docs.microsoft.com/en-us/intune/free-trial-sign-up
Get Intune PowerShell samples for Intune https://blogs.technet.microsoft.com/enterprisemobility/2017/05/15/get-intune-powershell-samples-for-microsoft-graph-api/
Download the scripts https://github.com/microsoftgraph/powershell-intune-samples
Working with Azure Active directory Graph API from PowerShell https://blogs.technet.microsoft.com/paulomarques/2016/03/21/working-with-azure-active-directory-graph-api-from-powershell/

Pingback: Microsoft releases PowerShell Intune samples on GitHub | just another windows noob ?
Pingback: Learn how to leverage Intune support for Microsoft Graph and PowerShell to enable powerful automation and IT security- my notes | just another windows noob ?