
Introduction
I bought a second hand replacement laptop for a mis-behaving Surface Pro 4 (jittery screen) and to save my time (the computer wasn’t mine) I decided to image it. Anyway, long story short, after I restored 82GB of data on the target laptop (HP 830 G5), I tried to boot it but got a HP bios error stating something like no operating system found, please reinstall the operating system.
So I booted from some usb based Windows installation media and checked the partitions, all the data was there, Windows was there, it all looked good but obviously the boot loader was broken.
I googled and found the following suggestions.
Bootrec /fixmbr

Bootrec /fixboot (Note: If this fails with access denied try BOOTSECT /NT60 SYS and then issue the command again)

Bootrec /scanos

Bootrec /rebuildbcd
The problem however, is that after issuing Bootrec /rebuildbcd it stated
“Total identified Windows installations: 0”
which of course, didn’t leave me feeling super confident that this would work. The value should be 1 at a minimum.
Another quick google and the advice out there all stated something like the following…
bcdedit /export C:\BCD_Backup

C:

cd boot
But that gave me the following error
“The system cannot find the path specified”
because there was no C:\boot folder. This folder doesn’t exist as this computer (Windows 10) is UEFI based and not legacy based as I guess the gazillion guides out there assumed.
Due to the format change (legacy versus UEFI) this computer uses an EFI partition to store the boot files, but that partition doesn’t have a drive letter and the path to the BCD is different to all the guides out there, so how do you fix that ?
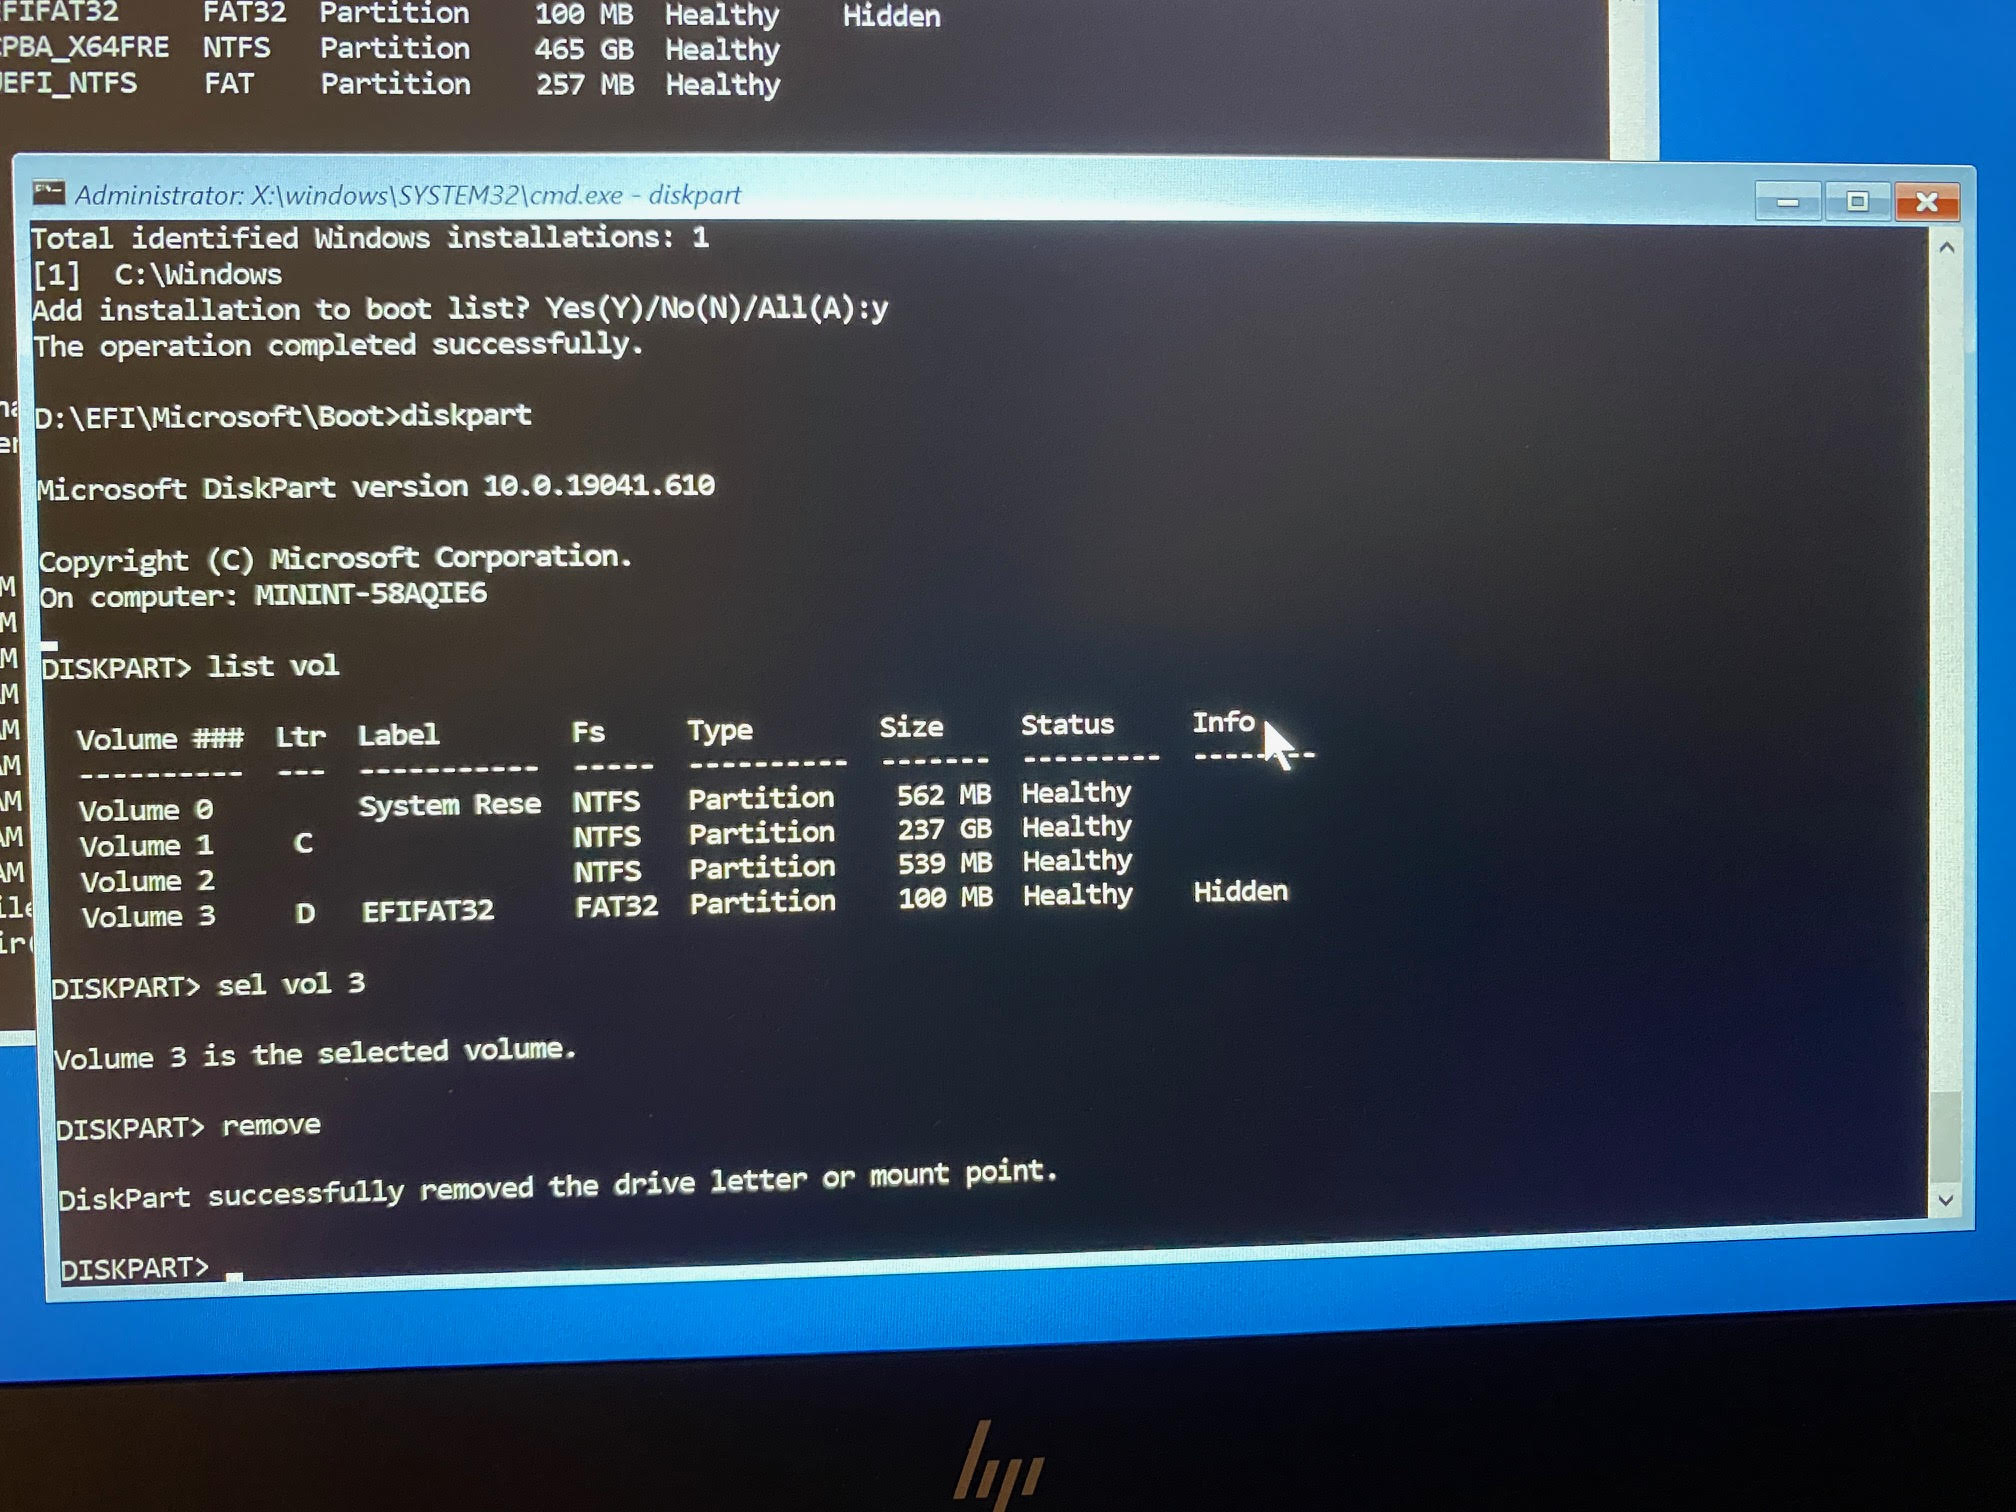
To find the efi partition, boot from the Windows installation disc, and select Install. Next click on Repair your computer then select ->Advanced Options ->Troubleshoot ->Command Prompt.
Once done, launch diskpart and then select the disk on your computer (most likely disk 0) like so
diskpart
sel disk 0
list vol
that will show you the partitions on your computer. Then I selected each of the two SYSTEM partitions, and assigned a drive letter to them so I could view the files on them using
sel vol x (where x is the volume number)

assign
After assigning a drive letter and exiting diskpart I could browse to that drive in another command prompt by typing it’s drive letter, for example:
D:
and view the files on it using:
DIR
I did this a few times to identify the correct drive, after I was done with that drive I removed the drive letter in the diskpart command prompt using:
remove
Once I identified the EFI partition I navigated to where the bcd files were located using:
cd D:\EFI\Microsoft\Boot
and that path was D:\EFI\Microsoft\Boot as shown below, note your EFI partition may end up on a different drive letter using the ASSIGN command.
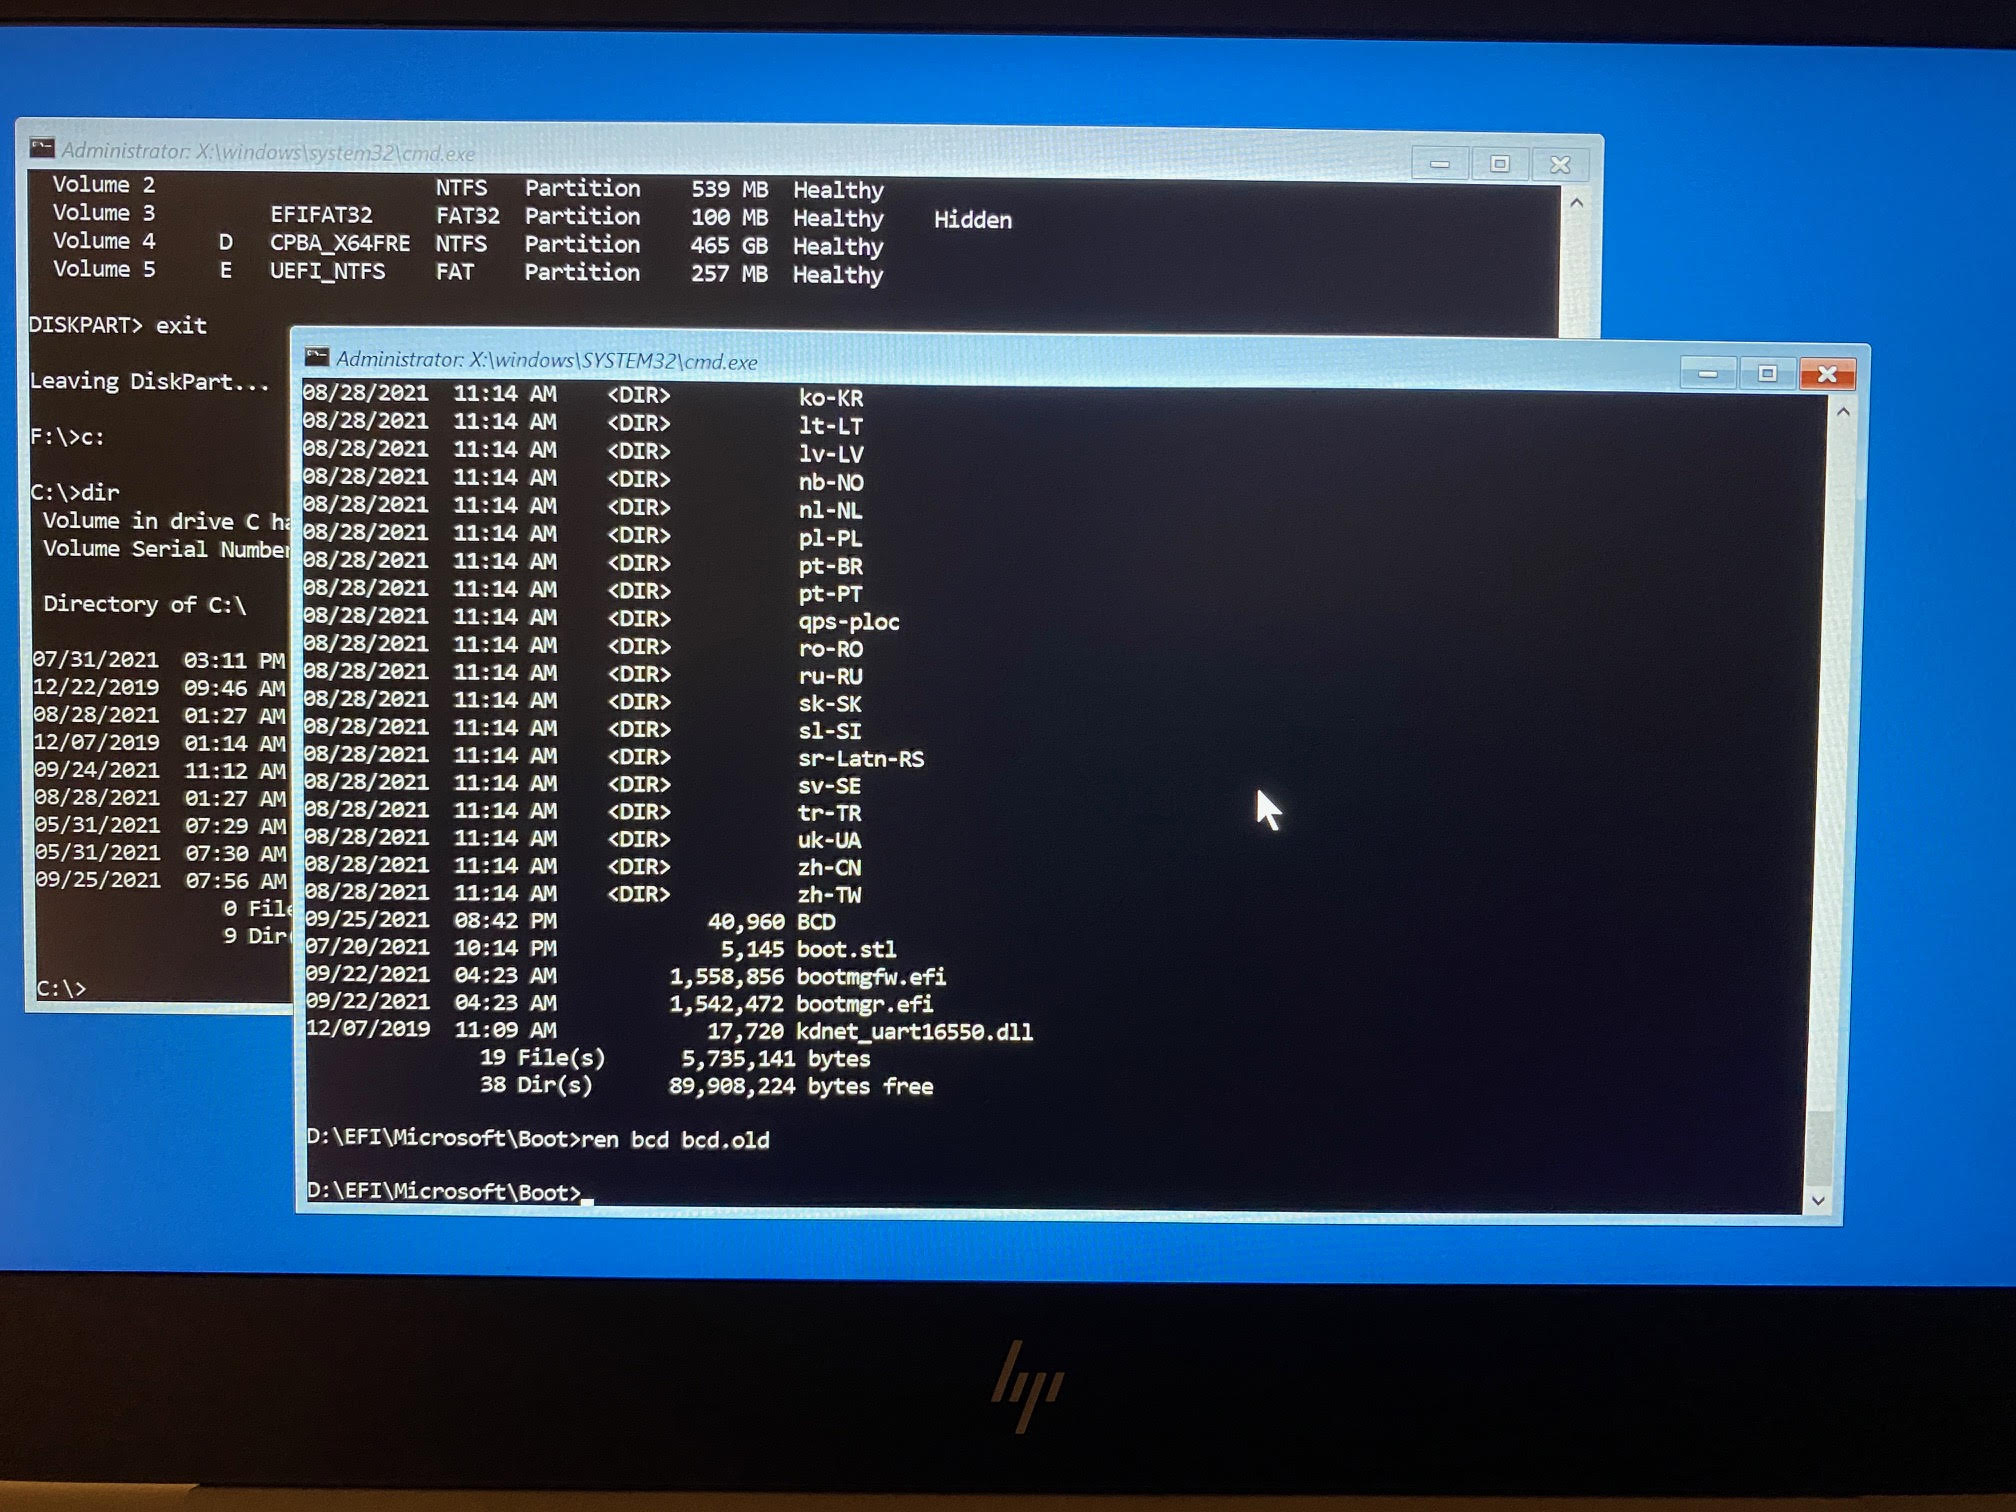 Now that I found the BCD, shown above, I removed the SYSTEM, READ ONLY and HIDDEN attributes from it before renaming it to bcd.old and then rebuilt the BCD.
attrib bcd -s -h -r
ren bcd bcd.old
bootrec /RebuildBcd
And that was it , all I had to do before rebooting was to un-assign the drive letter using the remove command.
 and finally, reboot the computer cleanly using
wpeutil reboot
I hope you found this useful, if you do please leave a comment and share this with others
cheers
niall

Thank you so much! I searched all over the internet for a guide that actually worked and finally found yours.
I’d like to highlight that this line right here seems to have made all of the difference: Bootrec /fixboot (Note: If this fails with access denied try BOOTSECT /NT60 SYS and then issue the command again). If like me you overlooked this part, the odds are good that the changes won’t stick.
thanks !
I second porsche95turbo
Very helpful guide. Thank you.
thanks Ed !
I wished I had came across your post earlier. I spent countless hours to fix my bcd but your guide just resolved all issues I was facing which all guides were Legacy based, but didn’t mention clearly.
I’m happy it helped ! thanks for posting
I have followed the steps found the bcd renamed it and applied rebuild command but still get the same error: 0 windows installations.
hi, you must have done something wrong or differently then, please post or email some photos of the output so I can see what you’ve tried
I got the same error too: 0 windows installations.
Finally, something that worked! The callout for the EFI volume and navigating to boot there was the thing most other guides were missing. Thank you so much.
I’m glad it helped !
Thank you!
I had three computers in front of me with the same issues, and everything in this post worked like a charm.
NO other website or post on reddit was able to help me but this.
awesome !
Thank you so much!
You saved me from panic.
thanks for replying !
You truly are the 🐐
thank you !
you rock bro 👊
thanks !
Thank you – this has absolutely saved me today after upgrading to an NVME drive and getting a series of seemingly arcane errors. The bootrec access denied error in particular was one I couldn’t get round.
I’m happy it helped Tom, thanks for the positive feedback
I tried and followed all the steps but it still didn’t detect my windows installation. Any idea how to help?
i’d suggest you re-read the entire article to verify you haven’t missed a step or mis-read it, if it’s still failing then feel free to email me detailed photos of the steps you carried out along with the results seen, make sure to capture the screen clearly
email to niall at windowsnoob dot com
cheers
niall
To anyone else still struggeling, i had to format the system volume for fat32, and then run:
bcdboot C:\Windows /s Z: /f UEFI
And then:
diskpart
select partition X
set id=c12a7328-f81f-11d2-ba4b-00a0c93ec93b
exit
Restarted, and Windows boot manager was visible.
Wow! That was what finally fixed it for me (after following guide from article, I was still unable to boot with error inaccessible_boot_device).
After I followed your steps above, windows finally booted. Thanks!
This is as far as I can get. https://imgur.com/a/anaFwtc I presume the partitions should have a file system other than RAW, but I’m not having any luck figuring out how to change it. Paid for AOMEI Partition Assistant and it can’t even see the hard drive. It only sees the flash drive it’s on.
this blog was aimed at fixing invalid boot partitions, not recovering data on faulty hdd’s which is what your’s sounds like, can you give me some more info on your scenario here please
Fixing it is what I was trying to do. I was hoping to avoid the hassle and frustration of reformatting and reinstalling or replacing the hard drive. Essentially, yesterday my computer froze and was unresponsive for minutes, so I hard reset it. When I turned it back on it blue screened with the error as “UNMOUNTABLE_BOOT_VOLUME”. Your blog and some other websites are what I’ve been using to try and fix the MBR. I was wrong about what the partition assistant could see. It could see the hard drive, but believed it had 0 kb on it. Using it to rebuild the MBR (as it was advertised as doing) did nothing at all. It would complete immediately and nothing would change. I suspect there’s no rescuing it, but I commented hoping that you might know of some other fix for my problem that I’ve yet to try. Thanks.
is your drive a spinning disk, if so what make/model ? so you hard powered off when the computer was hanging and now it fails to boot with unmountable boot volume… some more info about your hardware (hdd/ssd/nvme) would be helpful here
Thank you so much. You guide was exactly what I needed to fix the issue I was having. Do you have any insight as to how my original bcd file got corrupted? I was installing a Windows update when this occurred. This is the second Windows update in about a month that I have had to do some extensive Googling to figure out how to fix a computer. The last issue I had, after I rebooted my computer, I got a message that bit locker was enabled. I’ve never used bit locker! If I had not had some level of experience with the command line prompt and a working knowledge of Windows, I’m not sure I would have been able to address either of these issues.
great to hear it Mike, I know that a lot of recent updates patch the Windows Recovery Environment (WinRE) and that may have been what broke your boot configuration data (BCD), for example > https://support.microsoft.com/en-us/topic/kb5042320-windows-recovery-environment-update-for-windows-10-version-21h2-and-22h2-january-9-2024-f5784a62-2b82-4522-b5b2-c31b67049526
i’m not saying the above patch breaks WinRE or your BCD but it (or another cumulative update) may have contributed to it
This guide was a LIFESAVER for us in our Horizon environment. We’re unfortunate victims of the Windows 11 24H2 update to our golden templates in vCenter (which were hacked to not have TPM as per official guidance) and ever since Horizon fails after SYSPREP and injection of vTPM by Horizon on the persistent clones made by them (non-persistent ones work fine cuz they can get away with ClonePrep and that succeeds still). All our persistent clones get made and stuck at this blue screen of winload.efi death!
Your guide, with the steps performed on the generated clone, makes the thing succeed (gets renamed, joined to the domain etc) and the clone becomes available for assignment in Horizon!
thanks for the kind words Billy and for adding context to how it helped you ! Hopefully this will also assist others trying to do the same thing in Vmware Horizon
Hi, I’ve followed your guide and I’m able to find the bcd file, rename it to bcd.old, rebuild it, and even remove the drive letter. But once I reboot it just goes back to booting from my recovery drive, and when I check the cmd total installations are back to zero despite the new and old bcd file appearing. I’ve sent an email with more context and clear images to niall (at) windowsnoob (dot) com, thanks.
Same issue here. Did you figure it out?
email me at the address niall AT windowsnoob DOT com and i’ll assist, but please do me a favor and make it very clear (with photos whatever) of what the issue you are seeing exactly
Hi, I’ve followed your guide and I’m able to find the bcd file, rename it to bcd.old, rebuild it, and even remove the drive letter. But once I reboot it just goes back to booting from my recovery drive, and when I check the cmd total installations are back to zero despite the new and old bcd file appearing. I’ve sent an email with more context and clear images to niall (at) windowsnoob (dot) com, thanks.
I have the same. How do you fix it?
Hello, I followed your guide unfortunately after I type the /rebuildbcd the result is still “Total identified Windows installations 0” I am stump what to do Thanks
can you share photos of your steps and the output to my email > niall AT windowsnoob DOT com
Thank you! I have 35+ years of experience supporting Windows but I had never seen a corrupt BCD before. Your article saved my customer a lot of time and money because we didn’t have to recover the entire server from backup. Well written too!
thank you !
many many thanks for this article!! i had a laptop where the bcd was corrupted during a firmware update, and like you, found many guides on how to do this for a legacy computer, but i failed to make the connection that the boot configuration files were located in c:/boot in legacy systems.
the part where you “remove” the old bcd was exactly the part i was missing, and i could fix the laptop so it now boots again!
i’m happy to hear it !
Hi, thank you for the help, I was able to recover my laptop with your steps. However I am having an issue with the clone of the drive i made. I have attached it to the laptop and booted into recovery and gone though the steps but when running bbotrec /rebuildbcd, the command runsd and shows (1) installation found (which is the one on the external drive at D:/windows) but when i answer Y to the add installations to boot list, it says cannot find the path specified. any idea of what’s wrong?
are you sure it’s as I explained in my guide ? are you only using one drive in the laptop or two, my guide is for the cloned drive only, not two discs attached
You really are the goat 🐐
I have suggestions to improve your step
“After assigning a drive letter and exiting diskpart I could browse …. ”
You should tell us to cd command the drive and using dir to locate EFI
Anyway, how to prevent this from happening again? Before, I updated my driver (vga, sata control, sound, etc) install some softwares, etc. and the next morning i got this problem.
thanks i’ve modified some of the text to make it clearer. As regards preventing it from happening, did you also run windows update ? that may have modified your Windows Recovery Environment and caused the issue.
Shocking that a random blog can get the the root of this problem, and the MS site is just some clueless support guy pasting the same instructions over and over. Probably means he didn’t understand them.
I will click on some of your ads as thanks 🙂
awesome Steve!
Thank you so much! This was a tremendous help.
and thank you too!
Thank you, trying to fix a windows update message it seems, and this is the trick I needed to at least fix the bootloader.
great, do tell us about the errors you saw that led you here if you remember
Thank you this was just what I needed and very clearly and simply explained.
In my case W11 24H2 will not upgrade and gives me the usual helpful message ‘there was a problem’ However each time it attempts it it appears to create a new Windows boot installation so that when I booted I had to choose from eventually 3 identical installations with the same name and then on the next attempted upgrade it corrupted the BCD file – this file was approximately 4 times the size of a single installation file.
After doing the rebuild command I got the number of installations as 1 but scanos still reported 0 as did a subsequent rebuild command despite which everything now works OK and I have done several reboots.
happy to hear it!
Hi, I cant change the attribute of the bcd file ;( It tells me unable to change attribute. Anyone have experience with this issue?
what error do you get exactly, and are you following my guide above ?
This is a great guide. Well-written. Laid out nicely.
I am experiencing an error when I try to change the attributes of the BCD file. The error message says: “Unable to change attribute.”
I tried moving on to the rename step and got this error: “The media is write protected.”
The file is on a FAT32 partition
thanks for the thanks!
so to be clear here you booted from media to do the changes right ?
it almost sounds to me that you are trying to change the files on the boot media and not on the C:\ itself
I found the EFI directory on the G drive. The volume wasn’t mapped at first, the G drive letter was the result of the “assign” command.
After running the assignment command, I exited the diskpart and I used the “dir” command to browse the volume and locate the bcd file. Then I tried to change the attributes. I did not run the remove command in diskpart before trying to change the attributes. Do I need to run the remove command before trying to change the attributes.
Thank you so much for that post. Saved my life
i’m happy to hear it !
For the people that are having issues with a RAW partition, i was having an issue with it not locating windows because it was on this partition which was corrupted. What i did was assign a letter to the RAW partition and then did chkdsk x:/f and this repaired the partition. Once it was done i was able to rebuild the bcd following all of the steps and it resolved my issue. 1000 kudos to you my friend for saving my OS!!!
thanks for your comments David, i’m sure it’ll help someone else with a similar issue
Thank you for taking the time to write this blog, saved me a windows reinstall and all the woe that goes with that.
I read somewhere else that we should set the attributes back using
attrib c:\boot\bcd +h +r +s
I’m not sure if this is important or not?
Thanks again.
thanks for the comment David!
You got me all fixed up. Thanks for the guide! This will teach me to screw up my grub next time. I’m back in windows. Thankfully I had my BitLocker recovery key backed up.
nice to hear it!
My man you are the best!!
I cant thank you enough!
I’m happy it helped !
I just CANT THANK YOU ENOUGH I’ve got really basic command line knowledge and I thought my pc was screwed or that my disk got broken.
I followed your guide without knowing what I was doing and worked like a charm!!
U saved my day!
Blessingsssss!!
how to do all this if you have to use ausb instead of cd
same method, except configure the bios of your computer to boot first from USB in the boot order section of the bios, then insert the USB media, and boot from it. All the other commands above will be the same, in fact, my post even mentions that I booted from USB as that laptop didn’t have a CD.
If you don’t know how to create USB bootable media, then get a copy of the Windows 10/Windows 11 ISO file from Microsoft (free download) and burn it to USB media using a tool called Rufus
Thank you so much! I tried everything after trying to set windows back up on my machine following a series of modifications. Nothing worked and I finally ended up locking myself out. Your guide is very straightforward and got things working again, appreciate it!
happy to hear it Weisshs! 🙂
My machine died and windows couldn’t recover itself. These steps saved me so much time and effort: Thank you!
hi Chandler,
thanks for posting this, i’m so happy that this blog post saved your day,
cheers !
niall
And what if I get the 0 error, build a bootable USB and plug it in.
1) It does take me to the page to choose… reboot with a new version or REPAIR, and I choose REPAIR.
2) Unfortunately for me… it just restarts then, and takes me back to that same page, so I never get the options : Repair your computer then select ->Advanced Options ->Troubleshoot ->Command Prompt.
So what then????
Hope you have seen it before! (I did check, the RAM and other hardware seems fine), if I go into the dir I can see Windows still lying there (hopefully not dead). The reason I am trying so hard is because this is my wife’s PC and she is a designer with quite expensive software installed and I don’t wanna buy it over again (about £3 000)… I was on the I-net for days now.
so are you able to get a command prompt up or not ?
when i say ‘boot from installation media’ i mean use a Windows 10 or Windows 11 USB media (ISO burned to USB Via Rufus or similar).
so are you able to boot from the USB media correctly ? most laptops give you the option to temporarily boot from USB
Yes, it is a ISO file made a bootable USB on RUFUS. If I boot with that (after I changed the boot order in the BIOS to USB 1st…. now it does not read “trying to repair your PC”) it takes me to the 1st page to choose the language, then after that to the page where I can choose SETUP or REPAIR as 2 options. I have not tried SETUP as I obviously don’t wanna go that route, but if I choose REPAIR, the screen goes dark, the PC reboots and I end up again on the screen to choose the language? So it seems to boot over from the USB connection. The fact is…. if I put this USB in my PC, change the BIOS, and boot, I get the same screens with the option to choose repair, BUT then it does go that route…. so the USB works! It is only on that specific PC that it does not want to.
don’t continue through the windows OOBE screens, instead, press left shift+F10 to raise a command prompt, from there you can access the hdd to fix the partitions/bcd