
Introduction
In part 1 I showed you how to prepare Azure for the PC Buyback app, in part 2 you added the Win32 app, deployed it and saw how it behaved on a Windows Autopilot registered device. In this part we’ll add some additional functionality namely logging to Azure tables so that we have a record of when the PC went through the process of PC Buyback. To set this up we’ll add another 2 http triggers, and then configure their integration.
Note: If you are new to this it might seem overwhelming, don’t panic, take your time and follow my guide, if you do it correctly you’ll get a successful result.
This mini series is broken down into the following parts:
- PC Buyback for Windows Autopilot devices – part 1
- PC Buyback for Windows Autopilot devices – part 2
- PC Buyback for Windows Autopilot devices – part 3 <— You are here
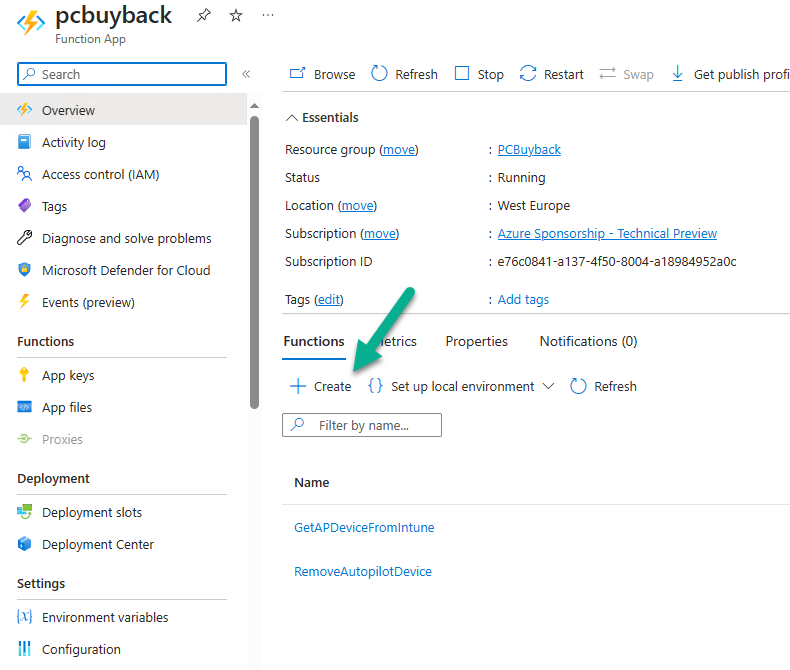
Step 1. Create the AddDataToAzure http trigger
In the previously created PCBuyback Function app, create a new http trigger called AddDataToAzure
In the newly created Http trigger, click on Code + Test and paste in the following code to overwrite the existing code…
#######################################################################################################################################
# use this code in a http trigger as part of a function app
# Niall Brady, 2024/05/08
# for more info see https://www.windows-noob.com/forums/topic/23414-pc-buyback-for-windows-autopilot-devices-part-3
# https://docs.microsoft.com/en-us/azure/azure-functions/functions-reference-powershell?tabs=portal
#######################################################################################################################################


using namespace System.Net;
using namespace System;
#using namespace System.DateTime;

# Input bindings are passed in via param block.
param($Request, $TriggerMetadata, $inputTable)

$Tenant = "windowsnoob.com"
$triggerName = "ADD data TO Azure Table"
# Write to the Azure Functions log stream.
Write-Host "PowerShell HTTP trigger function processed a request."

# Interact with query parameters or the body of the request.
$ComputerName = $Request.Query.ComputerName
if (-not $ComputerName) {
    $ComputerName = $Request.Body.ComputerName
}
$UserName = $Request.Query.UserName
if (-not $UserName) {
    $UserName = $Request.Body.UserName
}
$Model = $Request.Query.Model
if (-not $Model) {
    $Model = $Request.Body.Model
}
$Manufacturer = $Request.Query.Manufacturer
if (-not $Manufacturer) {
    $Manufacturer = $Request.Body.Manufacturer
}
$Serial = $Request.Query.Serial
if (-not $Serial) {
    $Serial = $Request.Body.Serial
}
#$DateReset = $Request.Query.DateReset
#if (-not $DateReset) {
#    $DateReset = $Request.Body.DateReset
#}
$Status = $Request.Query.Status
if (-not $Status) {
    $Status = $Request.Body.Status
}
$Reason = $Request.Query.Reason
if (-not $Reason) {
    $Reason = $Request.Body.Reason
}
$ResetType = $Request.Query.ResetType
if (-not $ResetType) {
    $ResetType = $Request.Body.ResetType
}

    $a = Get-Date
    $body = $body + "$a ------------------------------------`n"
    $a = Get-Date
    $body = $body + "$a Starting the following trigger:  '$triggerName'.`n"
    $a = Get-Date
    $body = $body + "$a Connected to tenant: '$Tenant'.`n"

if ($ComputerName) {
    $a = Get-Date
    $body = $body + "$a Adding this computer to Azure Tables: '$ComputerName'.`n"
#}

#fix the date
#$NewDate = $(get-date($DateReset) -UFormat '+%Y-%m-%dT%H:%M:%S.000Z')
#$DateReset = $NewDate

$a = Get-Date
$body = $body + "$a Get next row key....`n"
#$nextRowKey=$([int]$(($inputTable.RowKey|measure -Maximum).Maximum)+1)
$nextRowKey=Get-Random
$a = Get-Date
$body = $body + "$a nextRowKey = '$nextRowKey'.`n" # this will be the row key that we insert in this operation

# Input row into DB
#$tableStorageItems = @()

Add-Type @"
public struct rowitem {
public System.String PartitionKey;
public System.String RowKey;
public System.String ComputerName;
public System.String UserName;
public System.String Model;
public System.String Manufacturer;
public System.String Serial;
public System.String Status;
public System.String Reason;
public System.String ResetType;
}
"@

$PCBuyback = New-Object rowitem
$PCBuyback.PartitionKey = 1
$PCBuyback.RowKey = $nextRowKey.ToString()
$PCBuyback.ComputerName = $ComputerName
$PCBuyback.UserName = $UserName
$PCBuyback.Model = $Model
$PCBuyback.Manufacturer = $Manufacturer
$PCBuyback.Serial = $Serial
$PCBuyback.Status = $Status
$PCBuyback.Reason = $Reason
$PCBuyback.ResetType = $ResetType
#$tableStorageItems += $PCBuyback

# insert the data
$Result = Push-OutputBinding -Name outputTable -Value $PCBuyback

$body = $body + " Adding the data returned (usually blank...): $Result `n"

}
$a = get-date
$body = $body + "$a Exiting Azure function.`n"
$a = Get-Date
$body = $body + "$a ------------------------------------`n"

# Associate values to output bindings by calling 'Push-OutputBinding'.
Push-OutputBinding -Name Response -Value ([HttpResponseContext]@{
    StatusCode = [HttpStatusCode]::OK
    Body = $body
})
Save the changes, like so…

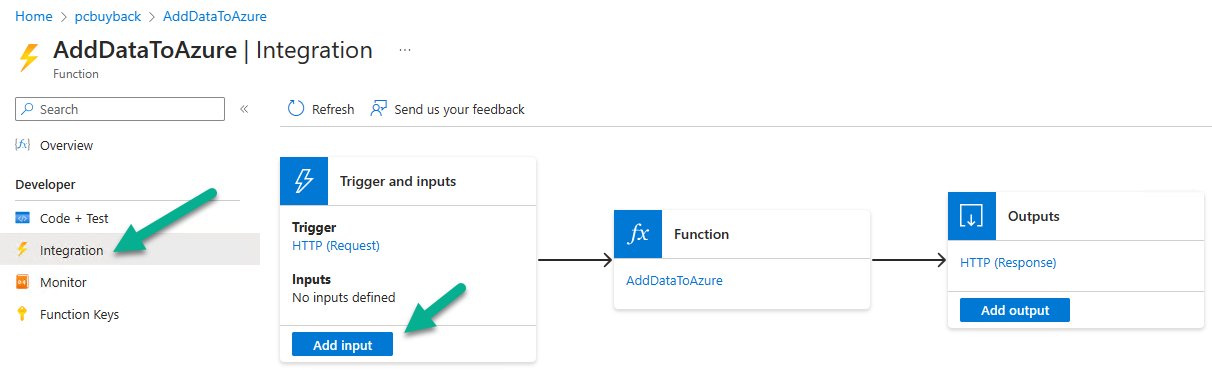
Step 2. Modify the http trigger Integration
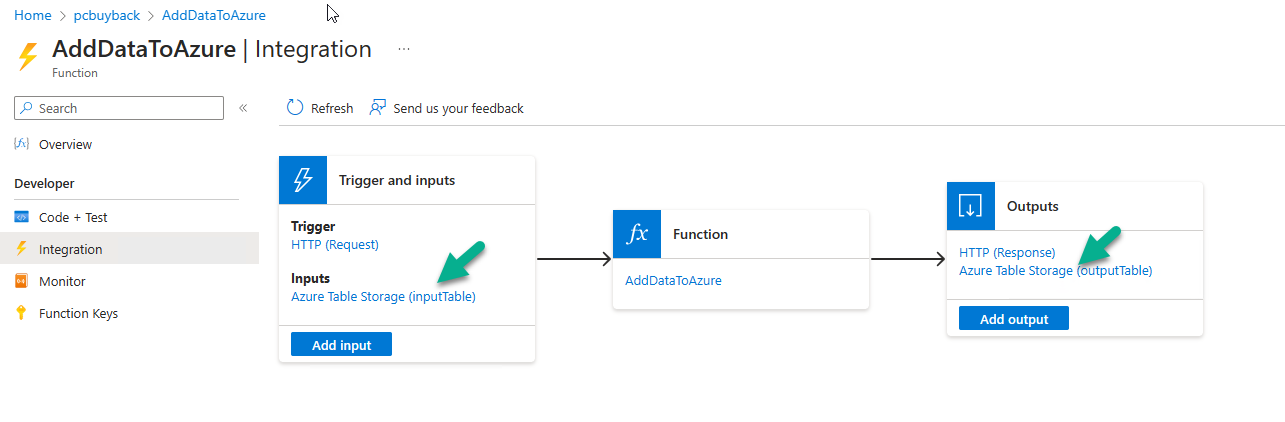
In the new http trigger AddDataToAzure, click on Integration and then click on Add input
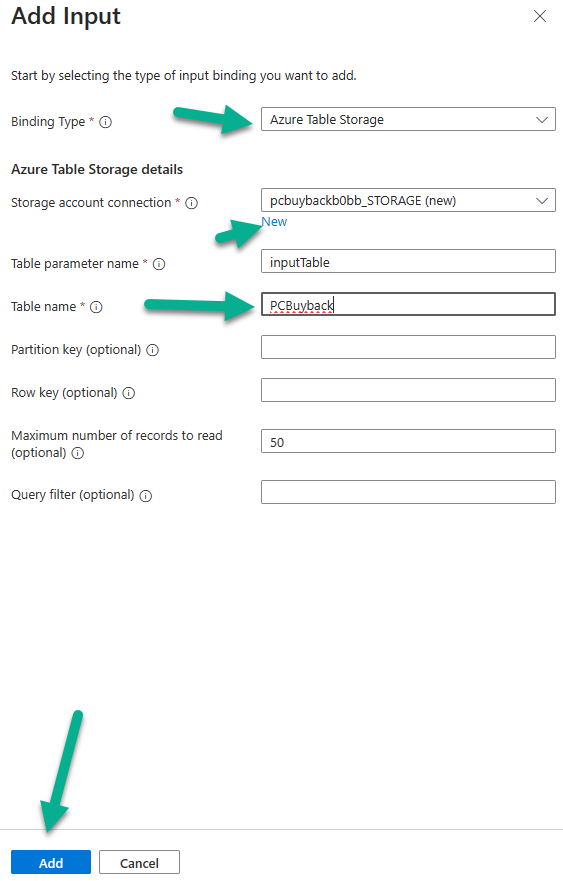
In the Binding Type drop down menu, select Azure Table Storage, in the Storage account connection click on New and select your pcbuyback storage account (which was created during part 1 in the initial creation of the function app. Change the Table name to PCBuyback. When done, click on Add.
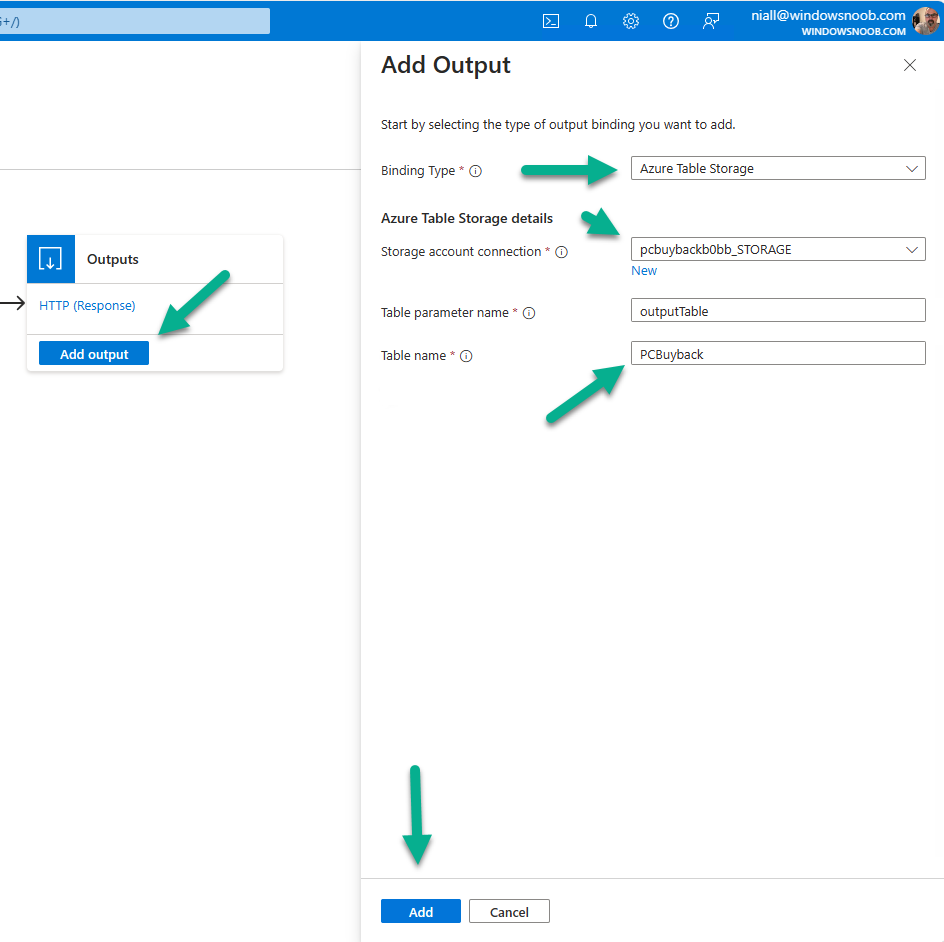
Next, do the same thing for Output by clicking on Add output, then configure it as shown in the screenshot below. Finally click Add.
After adding both the input and output, the integration should appear like this.
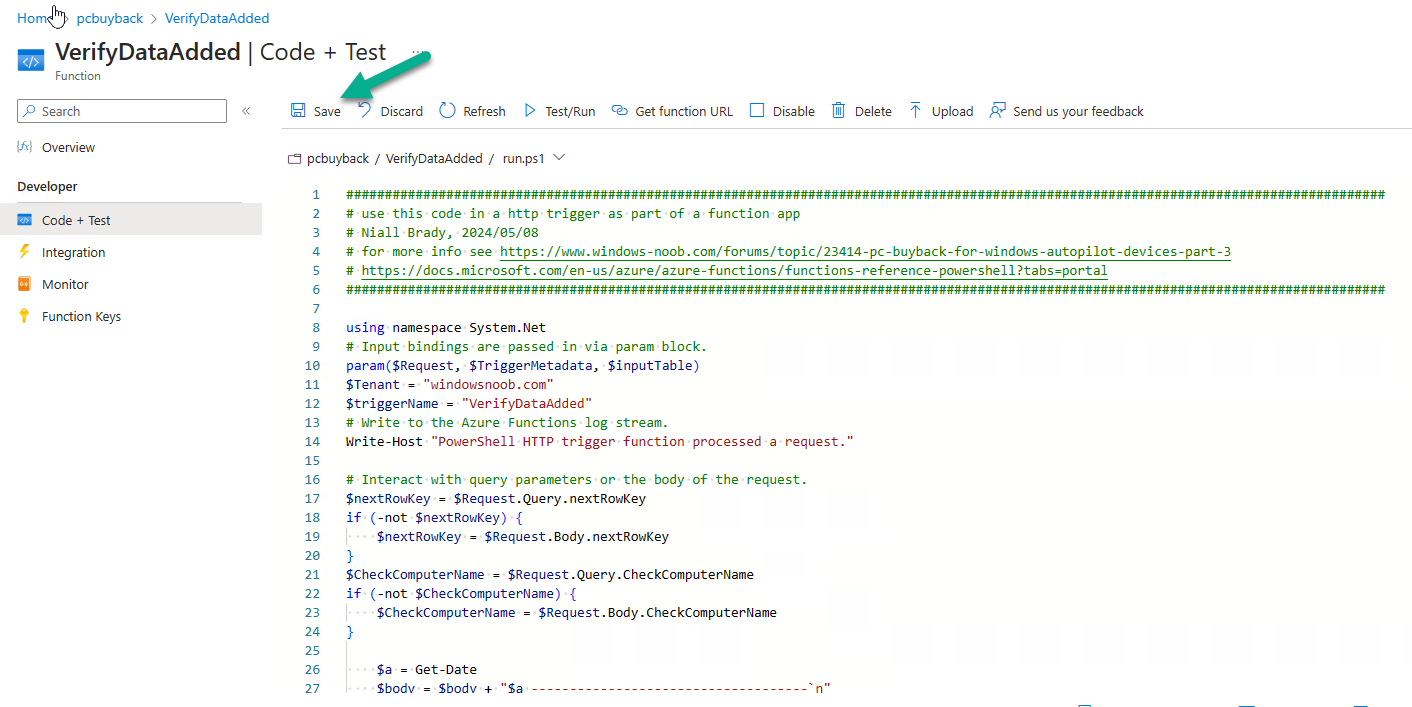
Step 3. Create the VerifyDataAdded http trigger
In the previously created PCBuyback Function app, create a new http trigger called VerifyDataAdded
In the newly created Http trigger, click on Code + Test and paste in the following code to overwrite the existing code…
#######################################################################################################################################
# use this code in a http trigger as part of a function app
# Niall Brady, 2024/05/08
# for more info see https://www.windows-noob.com/forums/topic/23414-pc-buyback-for-windows-autopilot-devices-part-3
# https://docs.microsoft.com/en-us/azure/azure-functions/functions-reference-powershell?tabs=portal
#######################################################################################################################################

using namespace System.Net
# Input bindings are passed in via param block.
param($Request, $TriggerMetadata, $inputTable)
$Tenant = "windowsnoob.com"
$triggerName = "VerifyDataAdded"
# Write to the Azure Functions log stream.
Write-Host "PowerShell HTTP trigger function processed a request."

# Interact with query parameters or the body of the request.
$nextRowKey = $Request.Query.nextRowKey
if (-not $nextRowKey) {
    $nextRowKey = $Request.Body.nextRowKey
}
$CheckComputerName = $Request.Query.CheckComputerName
if (-not $CheckComputerName) {
    $CheckComputerName = $Request.Body.CheckComputerName
}

    $a = Get-Date
    $body = $body + "$a ------------------------------------`n"
    $a = Get-Date
    $body = $body + "$a Starting the following trigger:  '$triggerName'.`n"
    $a = Get-Date
    $body = $body + "$a Connected to tenant: '$Tenant'.`n"

if ($nextRowKey -and $CheckComputerName) {
    $a = Get-Date
    $body = $body + "$a Checking the following row: '$nextRowKey'.`n"
    $body = $body + "$a Looking for this computername: '$CheckComputerName'.`n"

#}

#Put all table rows into $table
$table=""
foreach($row in $inputTable){
    $table+="$($row.PartitionKey) - $($row.RowKey) - $($row.ComputerName) - $($row.UserName) - $($row.Model) - $($row.Manufacturer) - $($row.Serial) - $($row.Status) - $($row.Reason) - $($row.ResetType)
   "
}
# print out the results...
#write-host ">>>>>$table<<<<<"

#validate section
#$body = $body + "Validate: $($($inputTable|Where-Object -Property RowKey -EQ 12).ComputerName)"
$a = Get-Date
$found = $($($inputTable|Where-Object -Property RowKey -EQ $nextRowKey).ComputerName)
$body = $body + "$a ComputerName found: $found`n"
#write-host "DEBUG: found " $found
if ($found -match $CheckComputerName) {
    $a = Get-Date
    $body = $body + "$a FOUND a MATCH :-)`n"
}
else
{
    $a = Get-Date
    $body = $body + "$a sorry, did not find a match :-(`n"
}
}
$a = get-date
$body = $body + "$a Exiting Azure function.`n"
$a = Get-Date
$body = $body + "$a ------------------------------------`n"

# show the output to the browser...Associate values to output bindings by calling 'Push-OutputBinding'.
Push-OutputBinding -Name Response -Value ([HttpResponseContext]@{
    StatusCode = [HttpStatusCode]::OK
    Body = $body
})
Click Save after adding the code above to the new trigger.
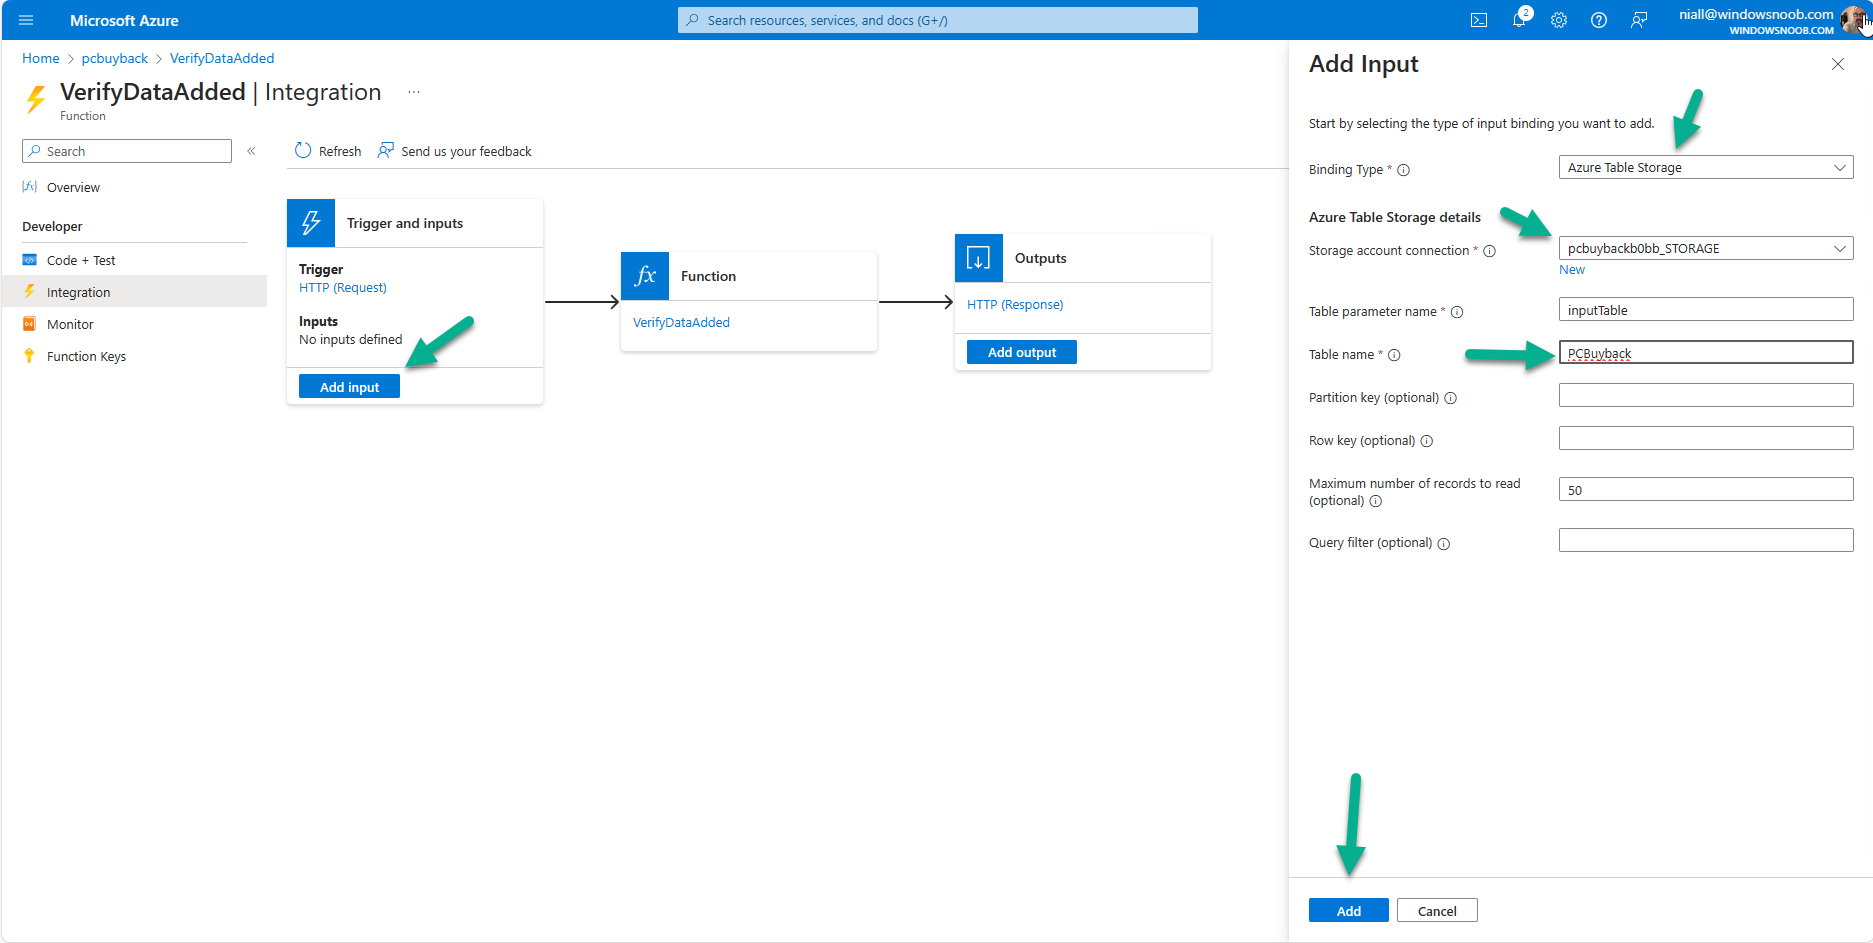
Step 4. Modify the http trigger Integration
In the new http trigger VerifyDataAdded, click on Integration and then click on Add input, configure it like so
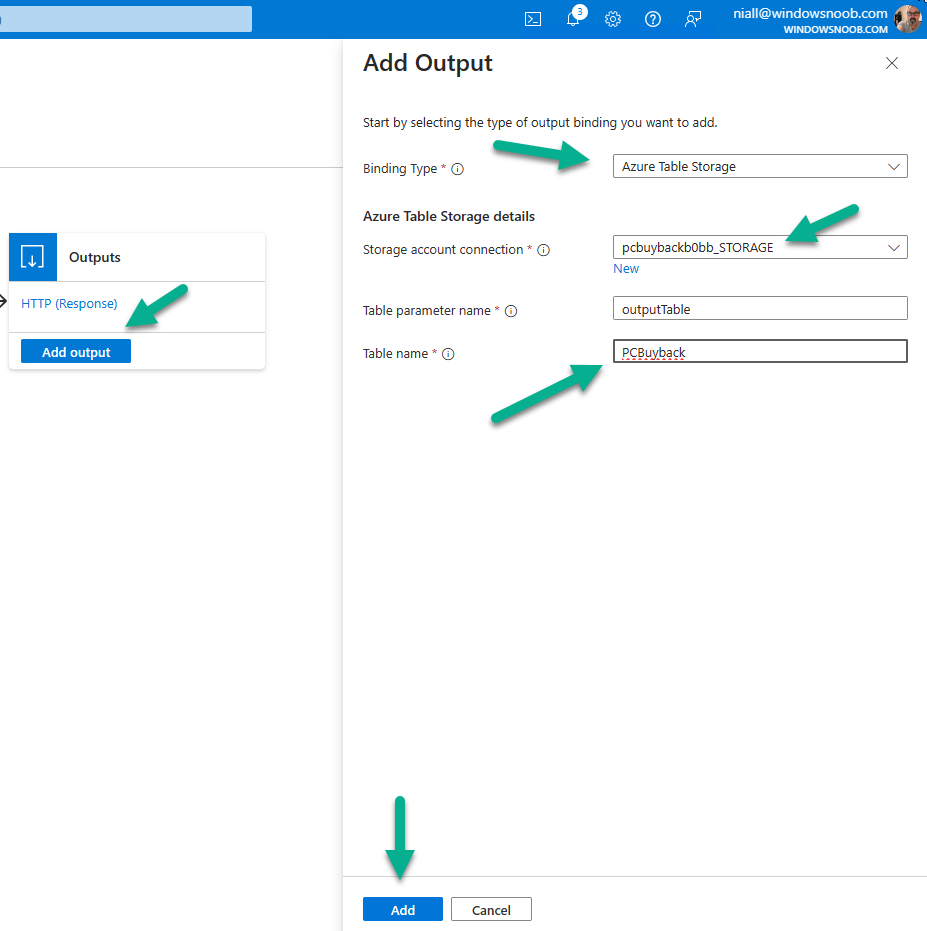
And next, make the following changes to the output.
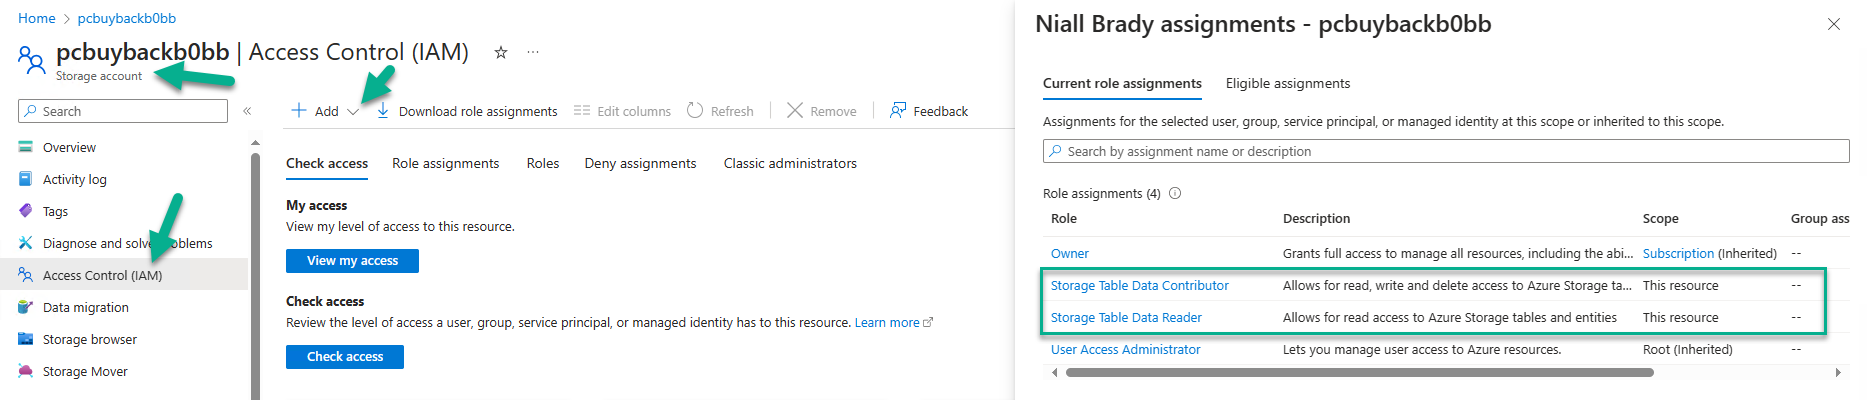
Step 5. Modify PCBuyback Azure table permissions
In your PCBuyback storage (contained within the PCBuyback resource group) modify the Access control (IAM) and add the following role assignments to your user that you want to create the Azure Table in the next step.
- Storage Table Data Contributor
- Storage Table Data Reader
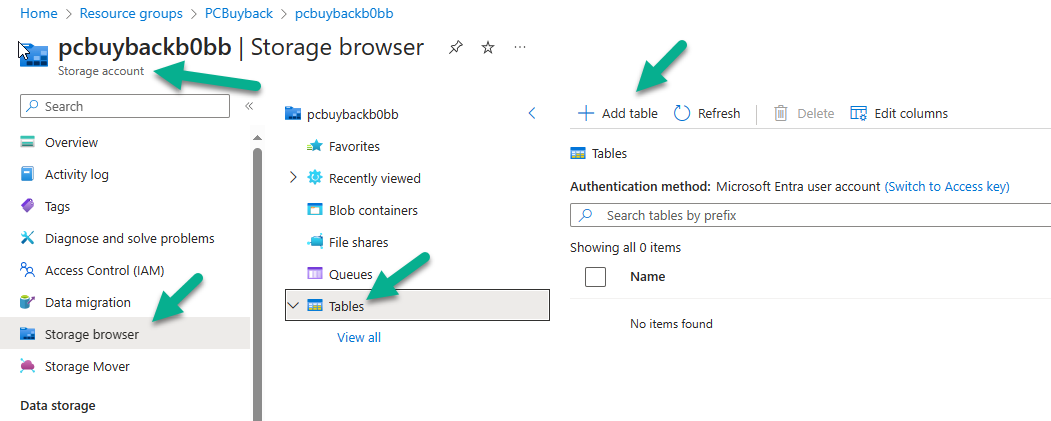
Step 6. Create the PCBuyback Azure table
In your PCBuyback storage (contained within the PCBuyback resource group) which may be named differently depending on how you setup the functionapp, using the Storage browser option in the menu, browse to Tables and click on + Add table as shown here.
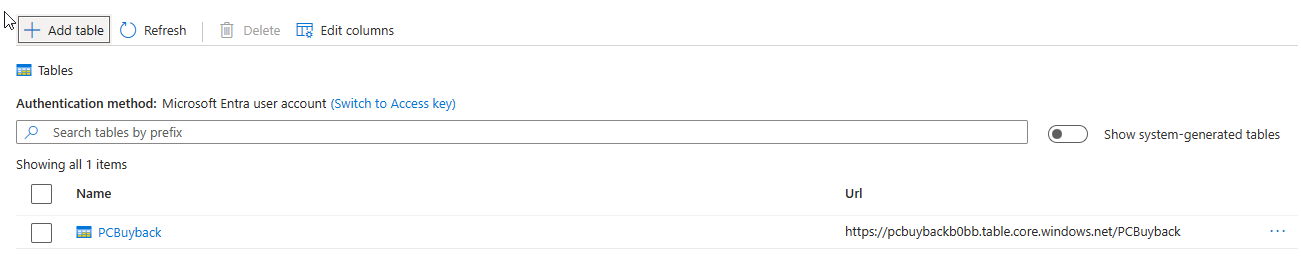
The Table name must be PCBuyback as shown here, click OK when done.

The created PCBuyback table is shown.
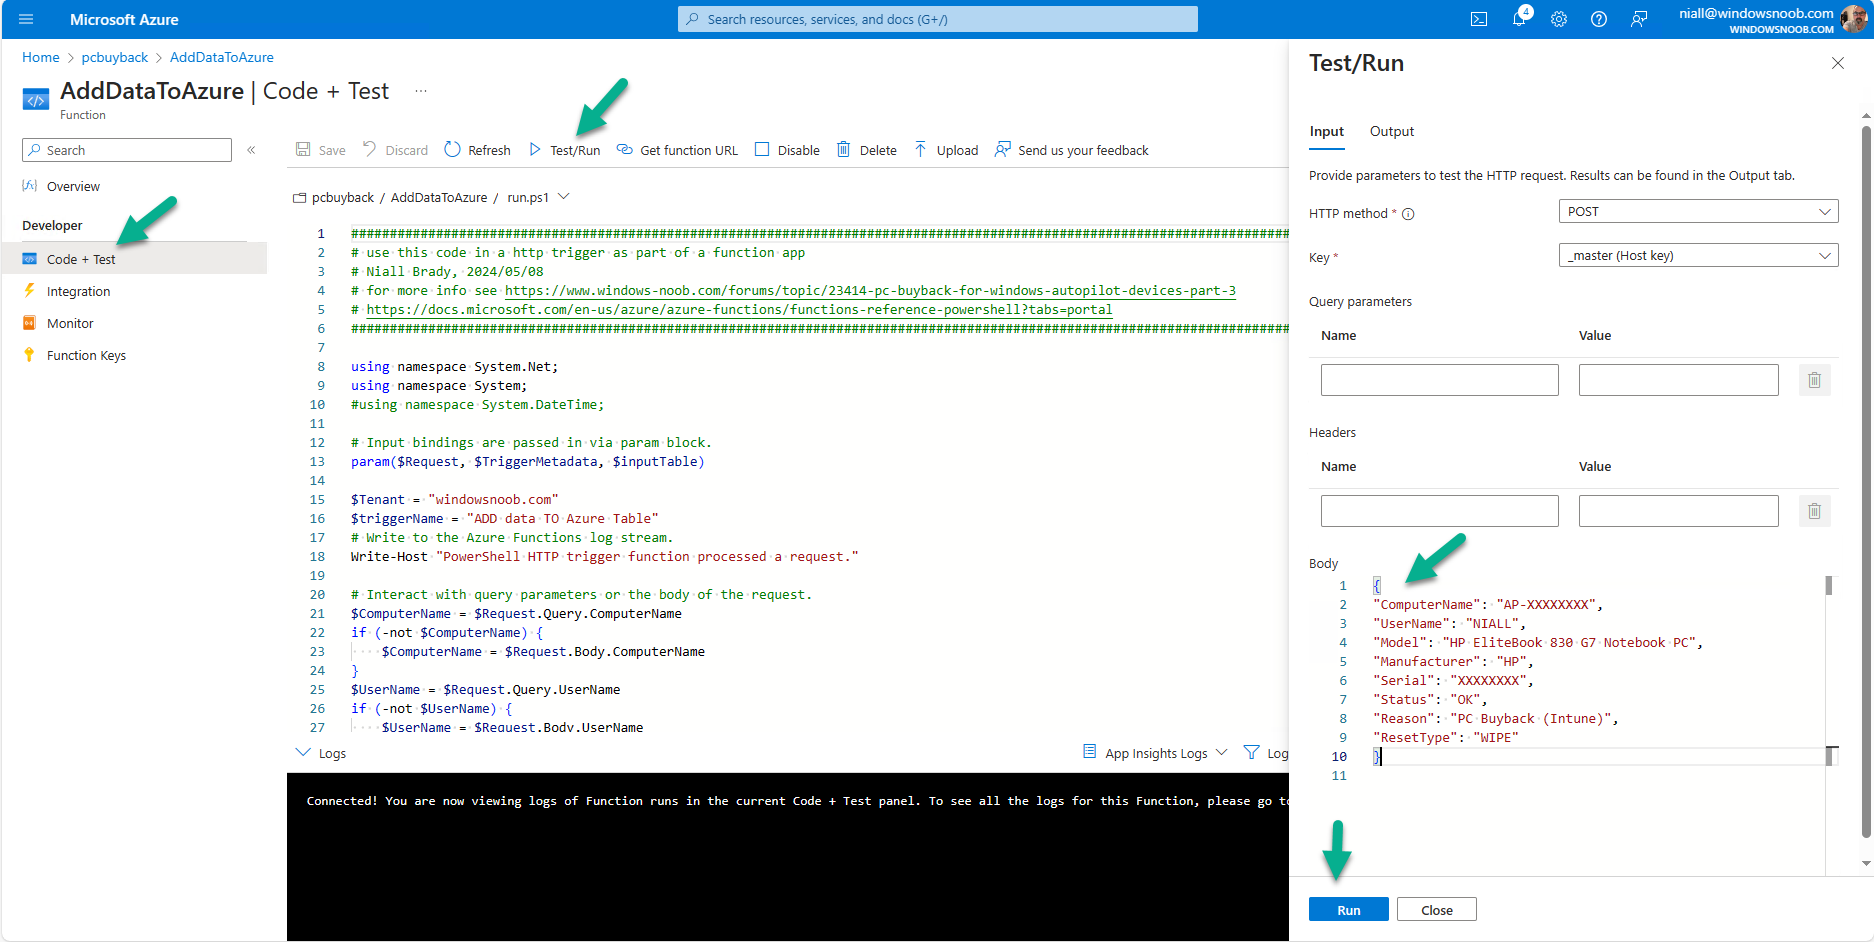
Step 7. Verify the http triggers
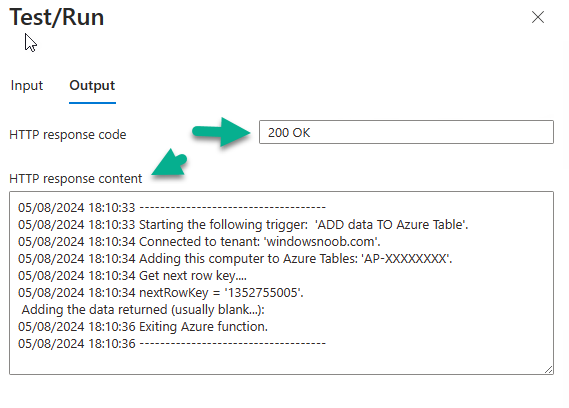
Now that you’ve created the triggers and modified the integration, you’ll need to verify that they do what they are supposed to do. Let’s start with the AddDataToAzure trigger. To test this, paste in the following text and click on Test/Run.
{
"ComputerName": "AP-XXXXXXXX",
"UserName": "NIALL",
"Model": "HP EliteBook 830 G7 Notebook PC",
"Manufacturer": "HP",
"Serial": "XXXXXXXX",
"Status": "OK",
"Reason": "PC Buyback (Intune)",
"ResetType": "WIPE"
}
as shown here…
If you did everything correctly it’ll return a 200 HTTP response code along with the HTTP response content, if not, verify the steps above again.
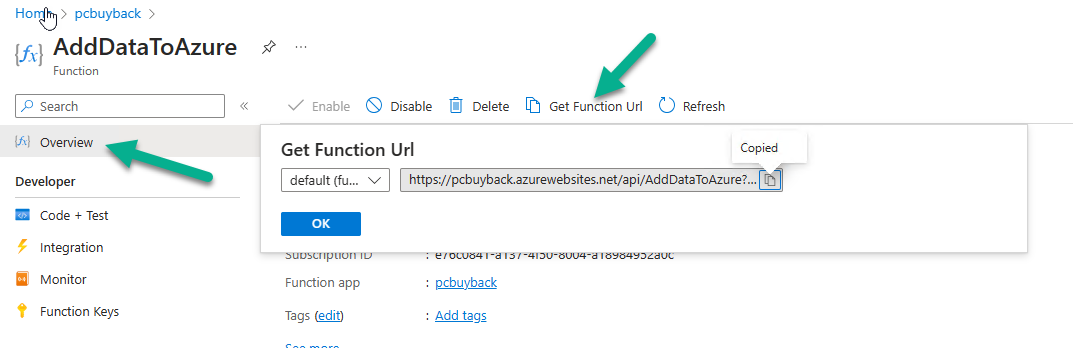
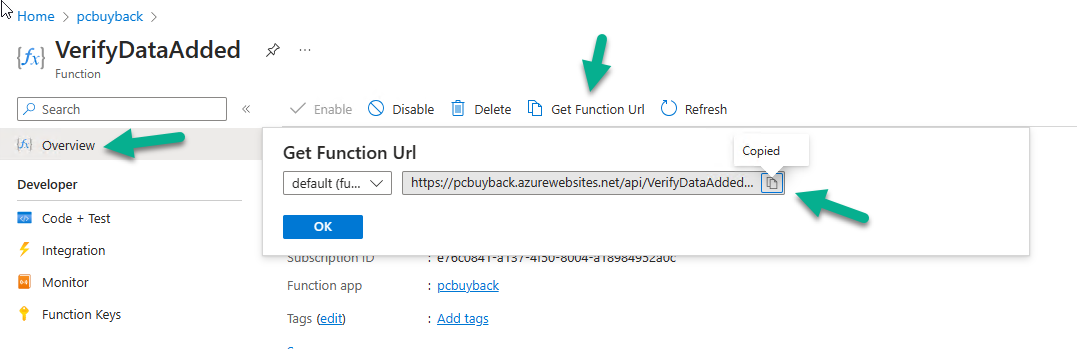
Once the above trigger is tested successfully, click on Overview in the http trigger, and copy the function URL somewhere useful.
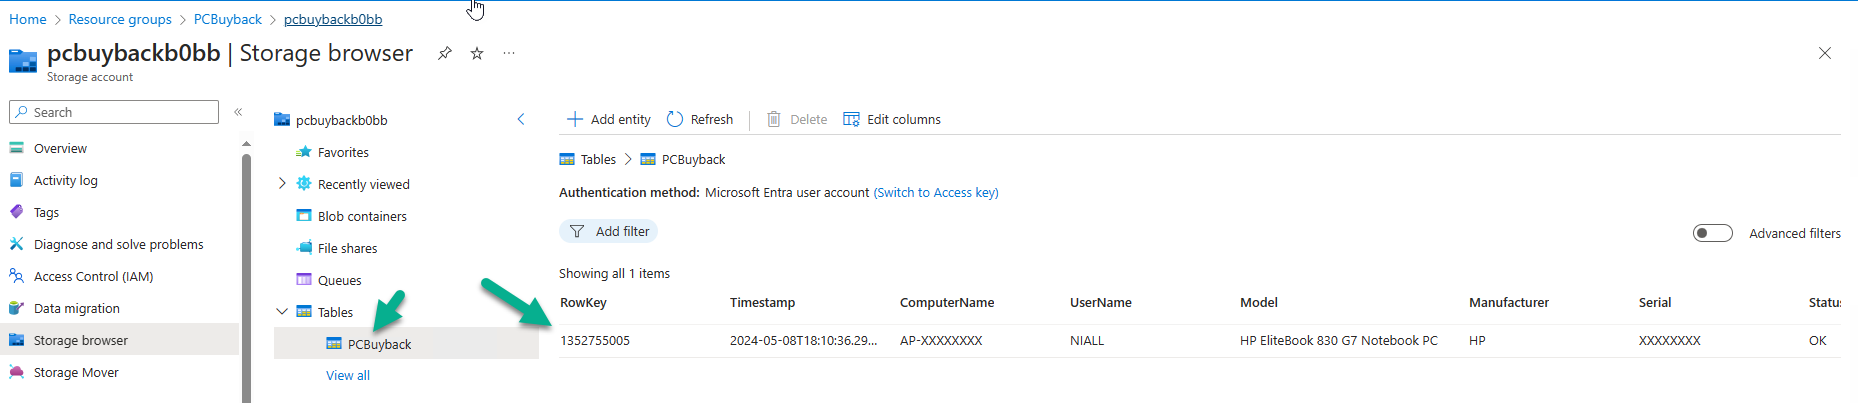
Finally, you can verify that it actually has poked the data into Azure tables, by browsing to the PCBuyback table and reviewing the data added.
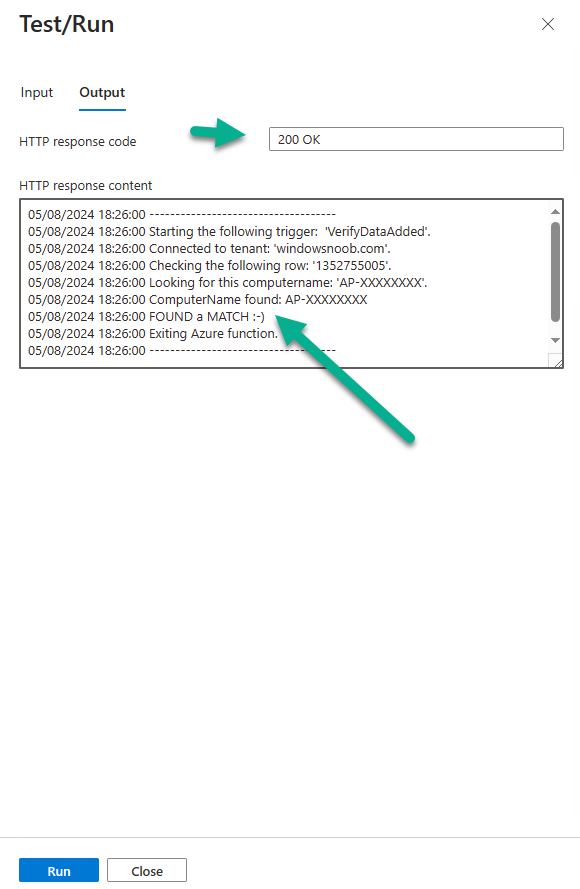
Now that you have the RowKey and ComputerName, you can use that data to verify the other trigger in this part, namely the VerifyDataAdded trigger. Use the following code in that Test/Run and modify it as appropriate for your environment.
Note: The nextRowKey value will be revealed in the previous test and will be random, you need to provide the exact one from the previous test or copy it from the PCBuyback Azure tables. In other words, the nextRowKey value I’m showing below is unique to my environment and will most likely NOT work in your verification test.
{
    "nextRowKey": "1352755005",
    "CheckComputerName": "AP-XXXXXXXX"
}
After running that test, Success ! It found a MATCH.
Once the above trigger is tested successfully, click on Overview in the http trigger, and copy the function URL somewhere useful.
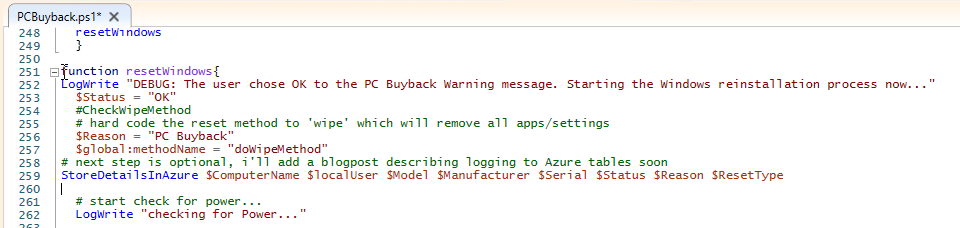
Step 8. Modify the PCBuyback.ps1 script
At this point we are done with the Azure changes and now need to modify the PCBuyback.ps1 PowerShell script. In PowerShell ISE (or VSCode) find this line and remove the # infront of StoreDetailsInAzure as shown below, also remove the $DateReset variable as we don’t need it.

so that the line looks like this.
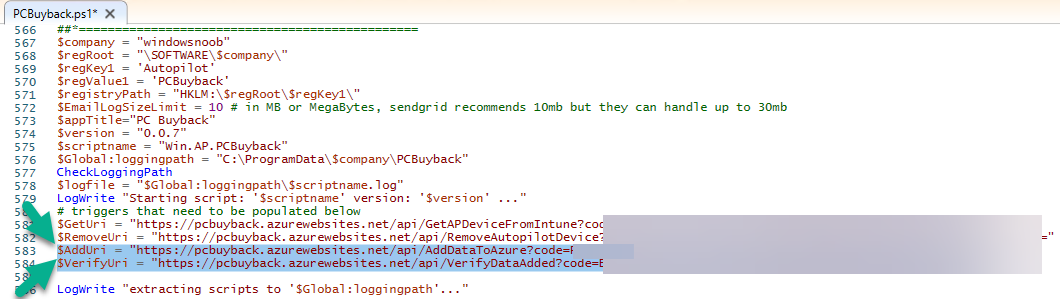
Next, locate the URI section here and add the two function URLS you copied in the steps above.
Save the script
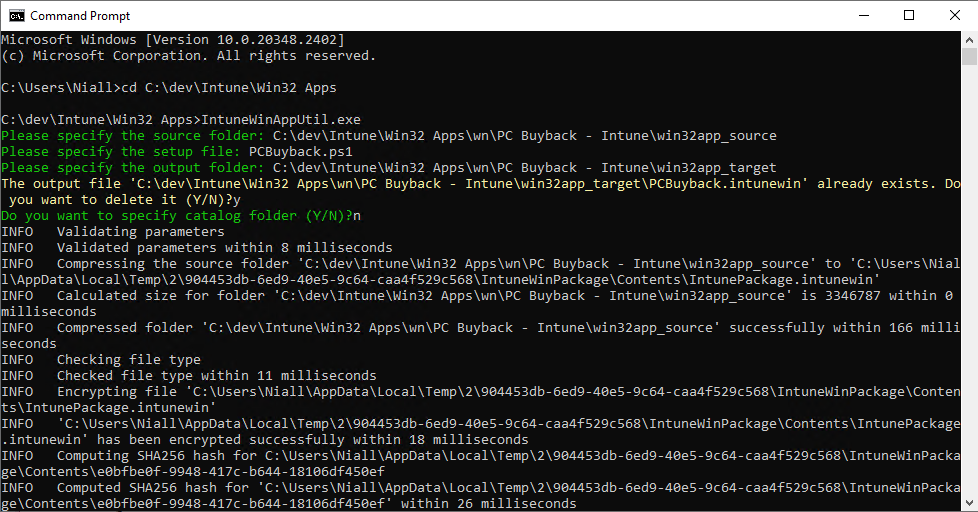
Step 9. Upload changes to Intune
Use the IntuneWinAppUtil.exe to create a new version of the app that we created in Step 6, part 2 here,
After uploading the new intunewin version, log onto a test PC targeted with the PC Buyback app and test it.
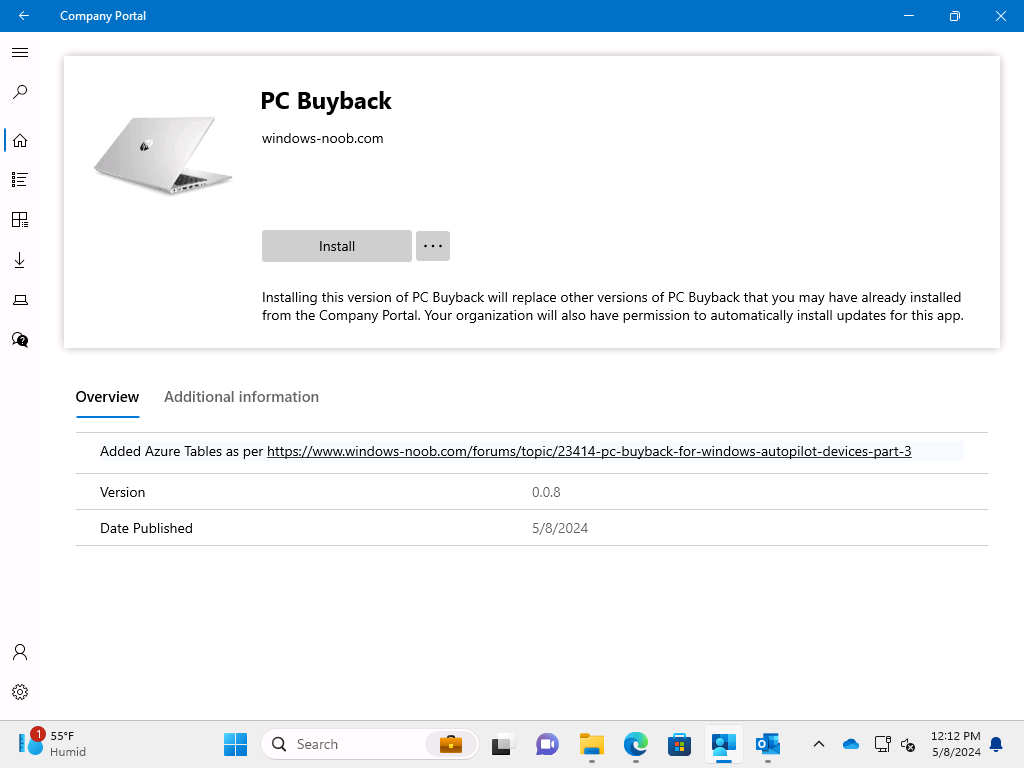
The app launches by the user clicking on it…
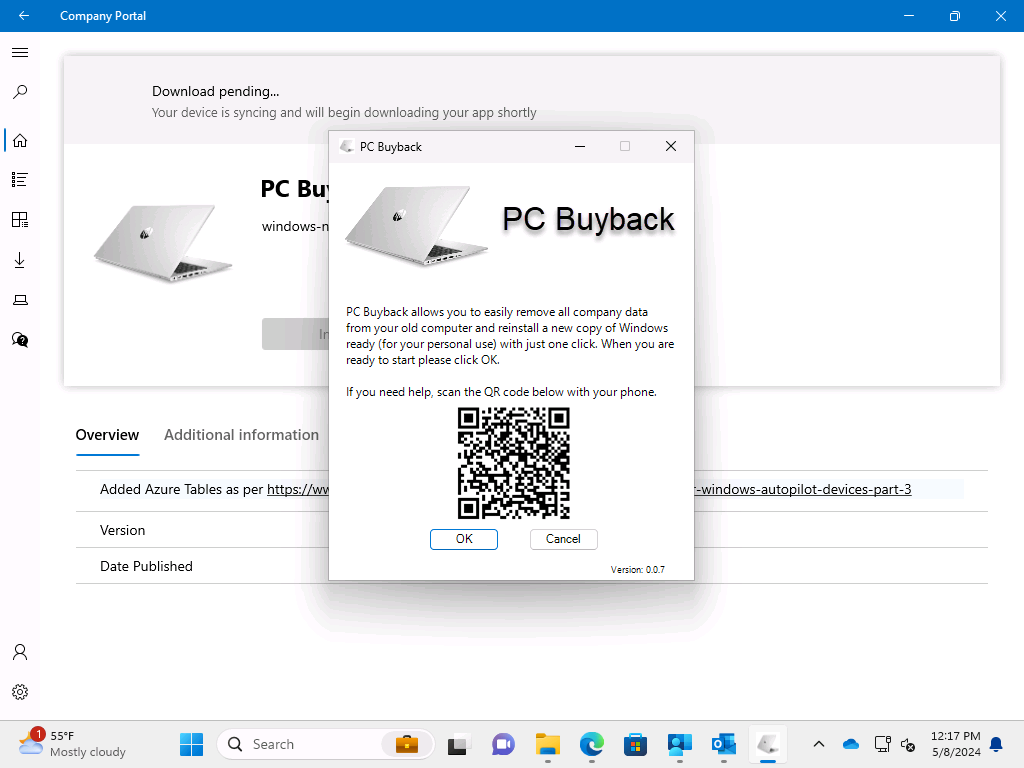
and after clicking OK and reading the warning, the PC Buyback process begins in earnest.
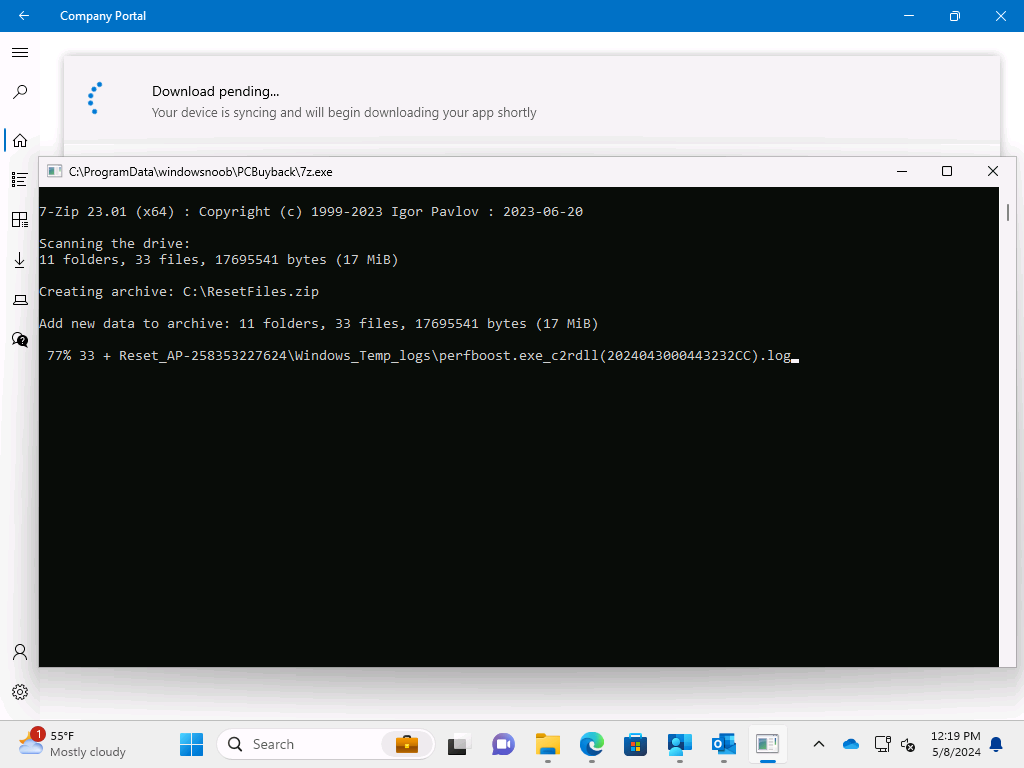
and while the PC is busy resetting itself as described in Part 2, a record was added to our PCBuyback Azure tables, confirming that the user actually did buy back their PC.
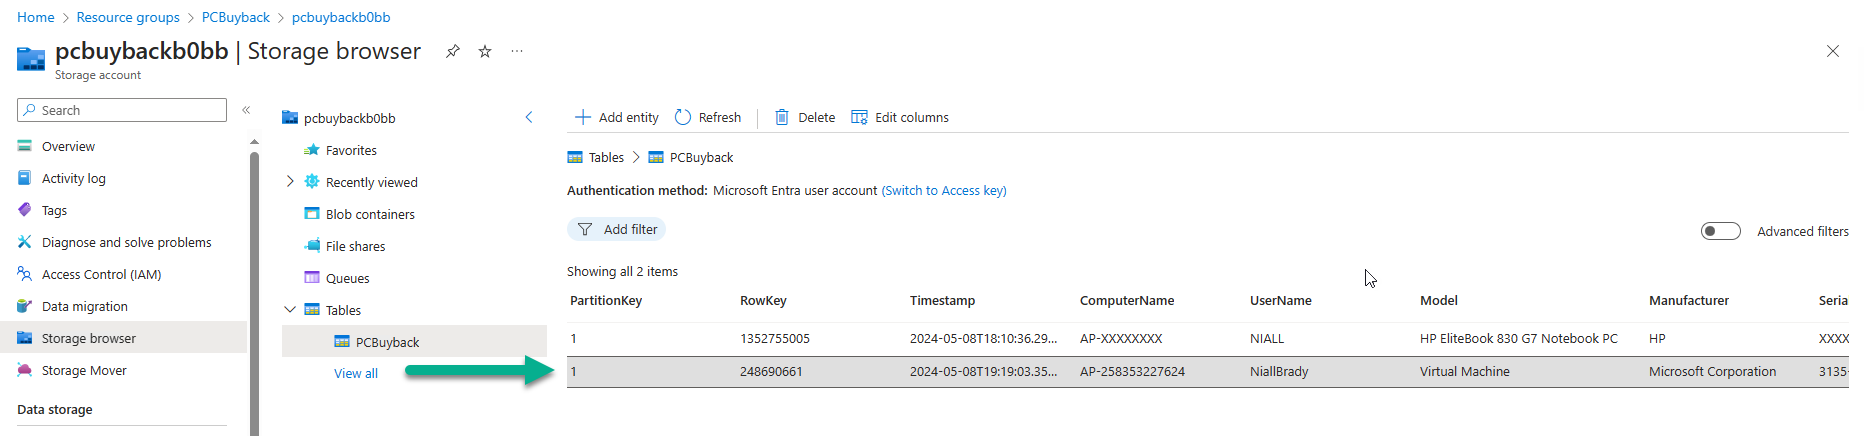
Success !
that’s it for this blog series, see you in the next one,
cheers
Niall
