
In Part 1 of this series we got our AD and SCCM servers ready, and then we installed System Center 2012 Configuration Manager as a standalone Primary site. In Part 2 we configured the SCCM server further by adding some Windows Server roles necessary for the following Configuration Manager 2012 functionality, Software Update Point (SUP) and Operating System Deployment. In Part 3 we configured the server further by Enabling some Discovery methods and creating Boundary’s and Boundary Groups. In Part 4 we configured Client Settings, Added roles and Distributed the Configmgr Client to our Computers within the LAB, now we will enable the Endpoint Protection Role and configure Endpoint Protection settings and we will target All Windows 7 Computers with these settings and policies.
Note: In Part 2 we selected Definition Updates in the Classifications
screen to support Endpoint Protection as part of the SUP role setup, if
you havn’t completed that part then do so now before continuing.
Below is an Introduction to Endpoint Protection in Configuration Manager, for more info see the following on Technet – http://technet.micro…y/hh508781.aspx
When you use Endpoint Protection with Configuration Manager, you benefit from the following:
- You
can configure antimalware policies and Windows Firewall settings to
selected groups of computers, by using custom antimalware policies and
client settings. - You can use Configuration Manager software
updates to download the latest antimalware definition files to keep
client computers up-to-date. - You can send email
notifications, use in-console monitoring, and view reports to keep
administrative users informed when malware is detected on client
computers.
Endpoint Protection installs its own client, which is in addition to the
Configuration Manager client. The Endpoint Protection client has the
following capabilities:
- Malware and Spyware detection and remediation.
- Rootkit detection and remediation.
- Critical vulnerability assessment and automatic definition and engine updates.
- Integrated Windows Firewall management.
- Network vulnerability detection via Network Inspection System.
Recommended Reading:-
Prerequisites for Endpoint Protection in Configuration Manager – http://technet.micro…y/hh508780.aspx
Best Practices for Endpoint Protection in Configuration Manager – http://technet.micro…y/hh508771.aspx
Administrator Workflow for Endpoint Protection in Configuration Manager – http://technet.micro…y/hh526775.aspx
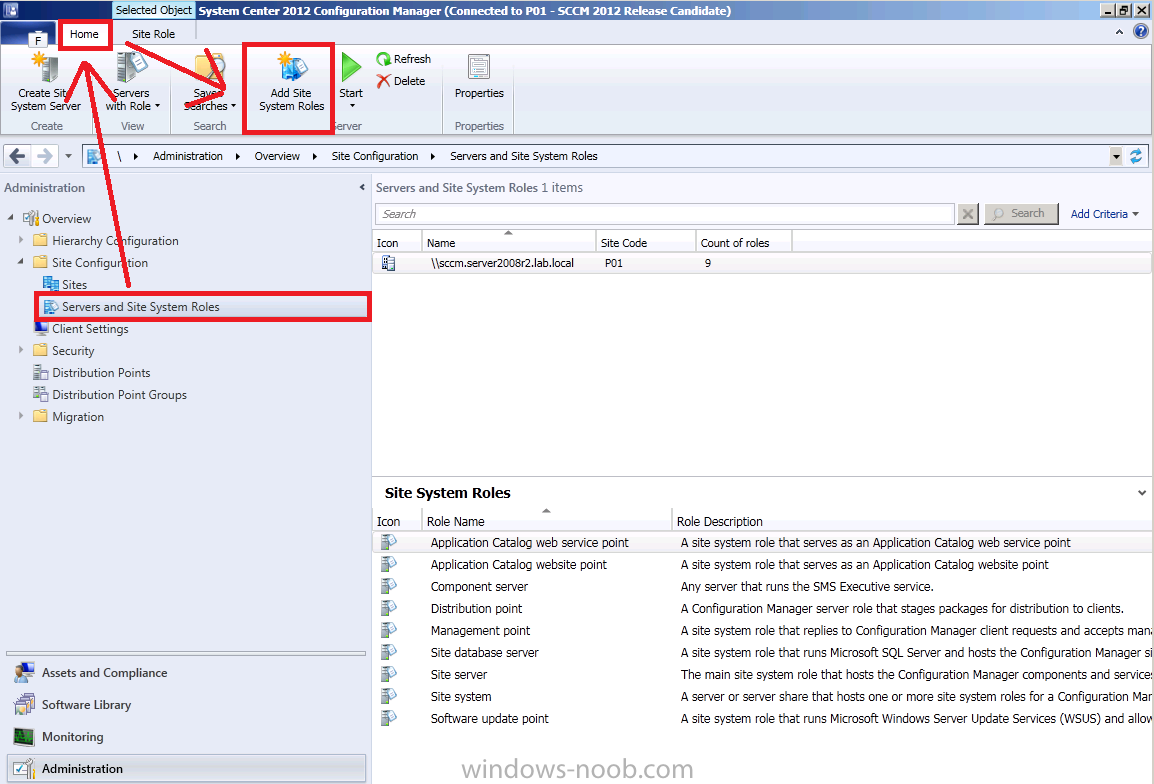
Step 1. Configure the Endpoint Protection Role
Perform the following on the SCCM server as SMSadmin
Note: The Endpoint Protection point site system role must be installed before you can use Endpoint Protection or before you can set EndPoint Protection client settings. It must be installed on one site system server only and it must be installed at the top of the hierarchy on a central administration site or a standalone primary site.
In the configmgr console, click on Administration, expand Overview and expand Site Configuration, select Servers and Site System Roles and click on Home in the Ribbon and click on Add Site System Roles.
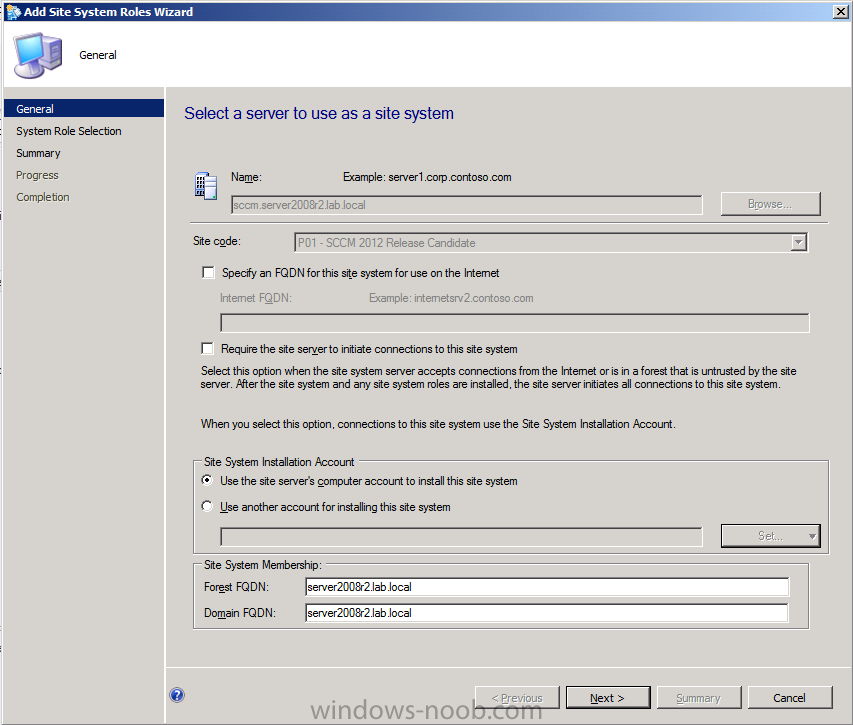
when the wizard appears click next
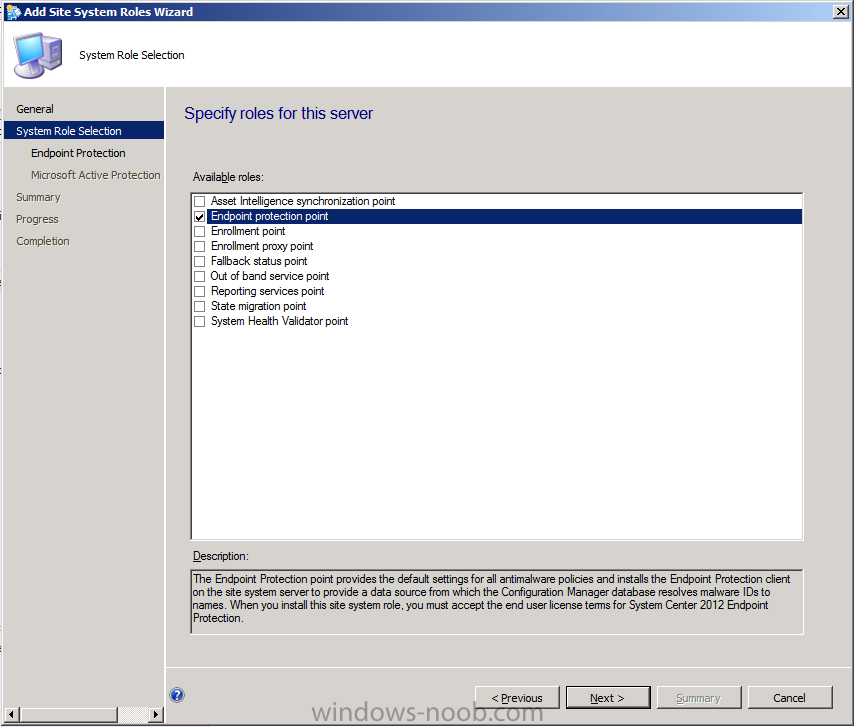
Select the Endpoint Protection Point role and click next
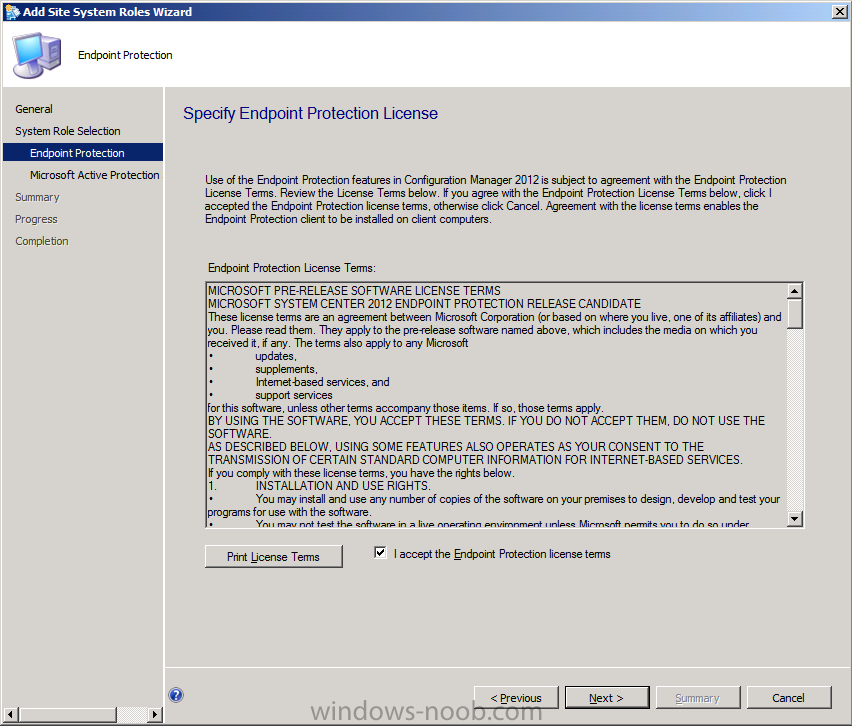
Read and then accept the License Agreement terms
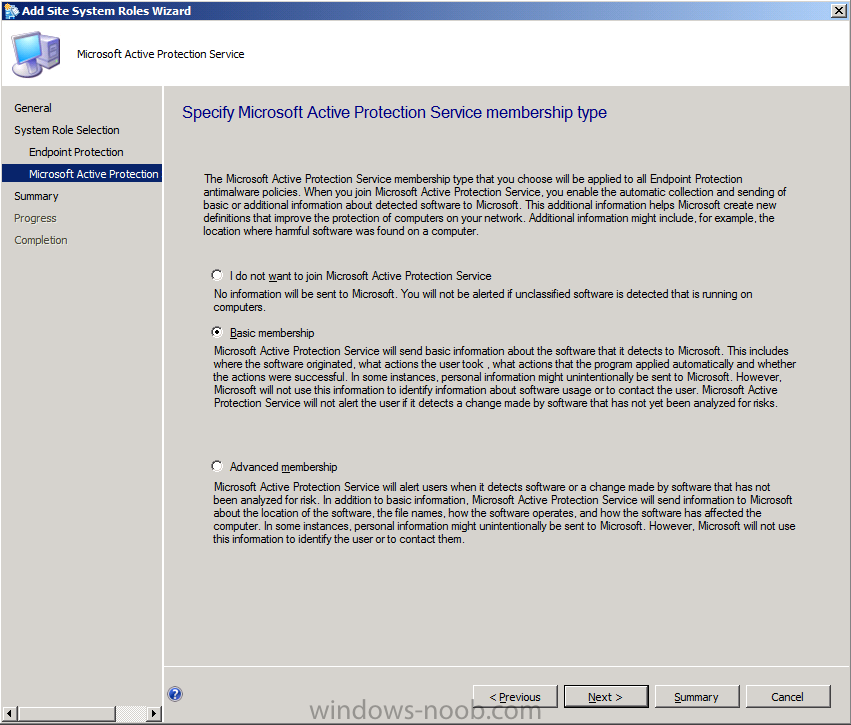
Next you get some choices about Microsoft Active Protection service, you can opt in, or opt out, let’s select Basic Membership.
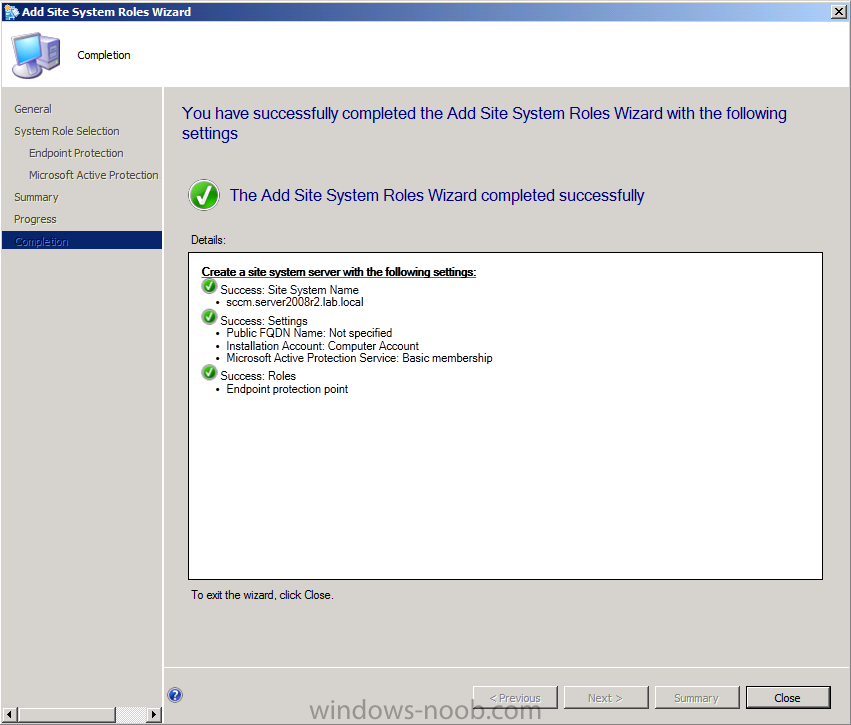
click next at the summary and review the status on the completion screen.
within a few minutes you’ll see the Endpoint Protection client appear in
the System Tray of your ConfigMgr Server (this is normal behaviour and
is expected, you must have the SCEP client installed on your ConfigMgr
Server hosting the Endpoint Protection role).
Note: you can review the EPSetup.log on the server to monitor role installation progress.
Step 2. Configure alerts for Endpoint Protection
Perform the following on the SCCM server as SMSadmin
Note: Alerts inform the administrator when specific events have
occurred, such as a malware infection. Alerts can be displayed in the
Configuration Manager console, through reports, or optionally can be
emailed to specified users. You can configure Endpoint Protection alerts in System Center 2012 Configuration Manager to notify administrative users when specific security events occur in your hierarchy. Notifications display in the Endpoint Protection dashboard in the Configuration Manager console, in reports, and you can configure them to be emailed to specified recipients.
Configure Email Notification (Optional)
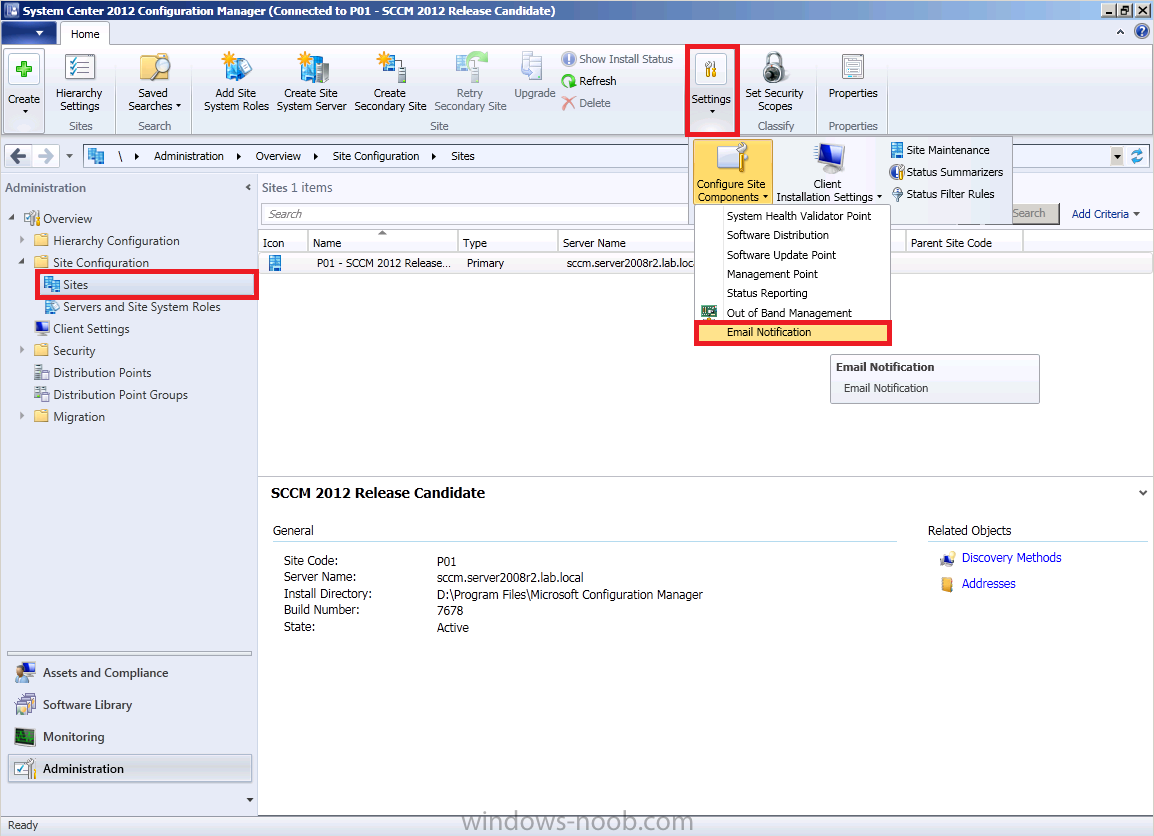
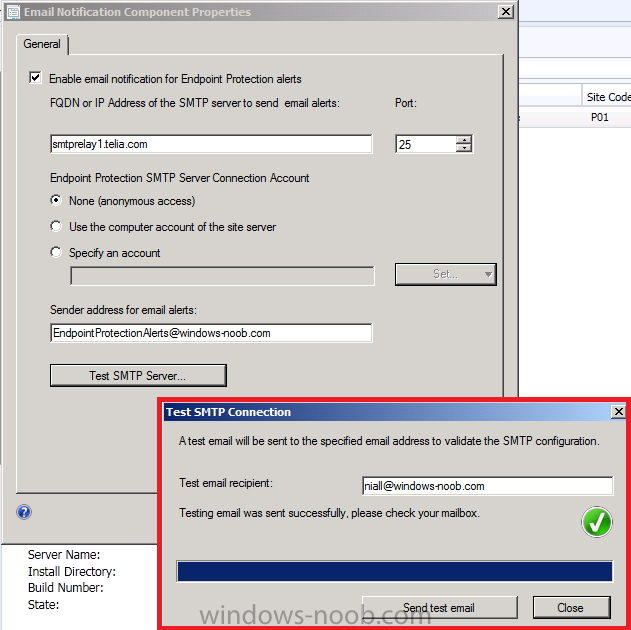
If you have access to an SMTP server then you can optionally configure Email Notification Alerts. In the configmgr console, click on Administration, expand Overview and expand Site Configuration, select Sites and click on Settings in the ribbon and click on Configure Site Components and select Email Notification.
enter your desired settings for SMTP and click Apply. Note that you can test your SMTP settings also.
Configure Alerts for Collections
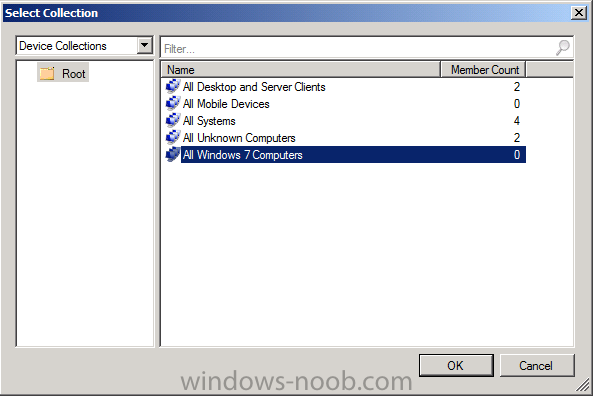
Next let’s configure Alerts for a Collection, but first let’s create a collection called All Windows 7 Computers (in a LAB this is fine for what we want to do, in Production you should create EndPoint Protection specific Collections).
Note:- You cannot configure alerts for User Collections.Click on Assets and Complicance in the console,click on Device Collections and in the ribbon click on Create Device Collection.
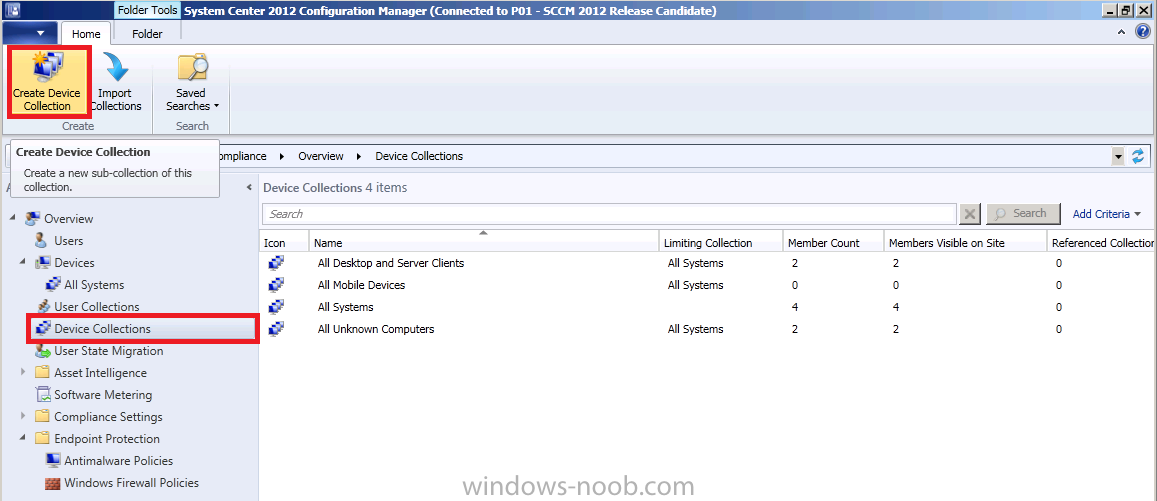
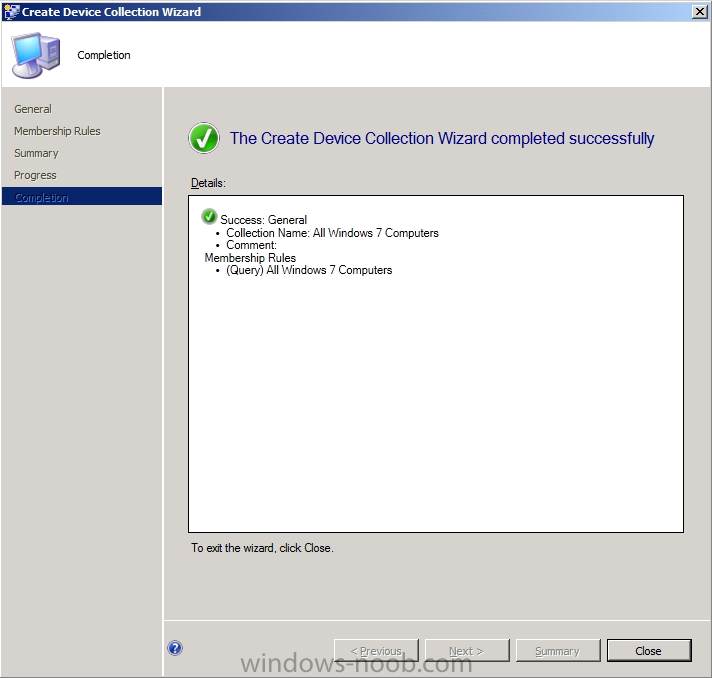
Call the collection All Windows 7 Computers and limit it to All Systems
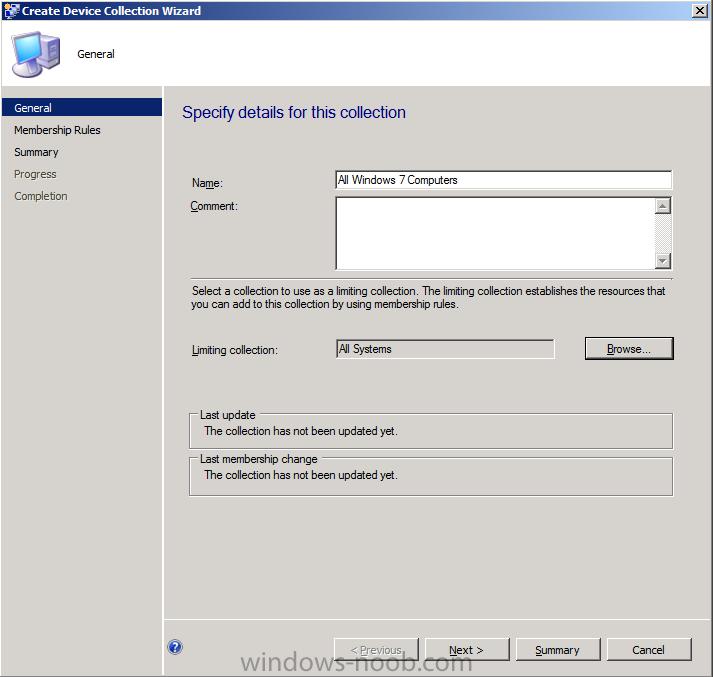
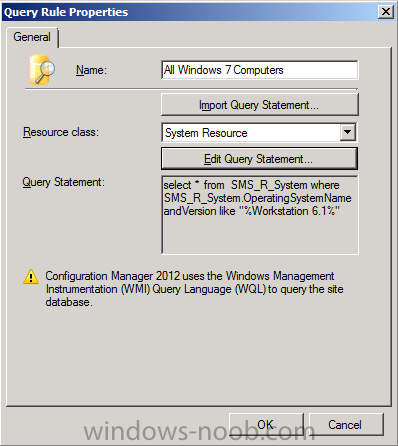
click next, choose Query Rule from the drop down menu and fill in a Query like so (edit query statement, criteria, show query language and replace the code with the below)
select * from SMS_R_System where SMS_R_System.OperatingSystemNameandVersion like "%Workstation 6.1%"
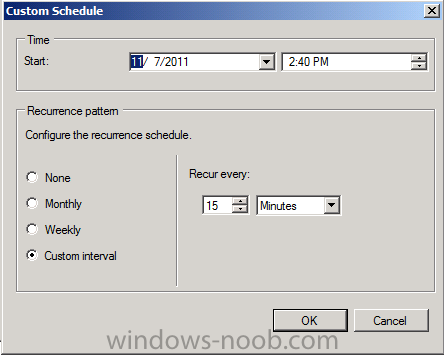
set the schedule as follows (it’s a LAB)
click next through the wizard, the collection is now created.
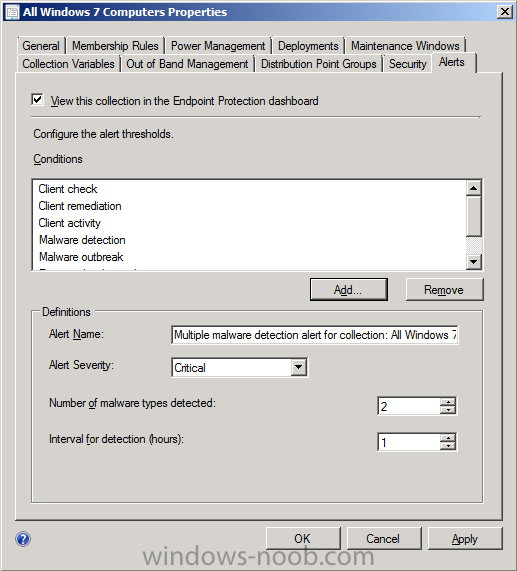
In Assets and Compliance select Devices and choose Device Collections, select the All Windows 7 Computers collection (we have no computers in this collection yet but we will have soon), choose properties
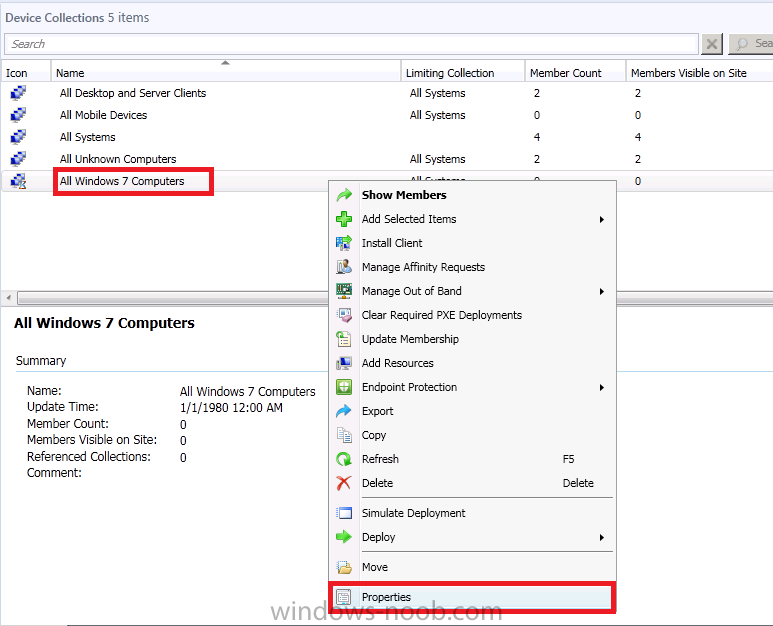
Click on the Alerts tab and place a checkmark in View this collection in the Endpoint Protection Dashboard
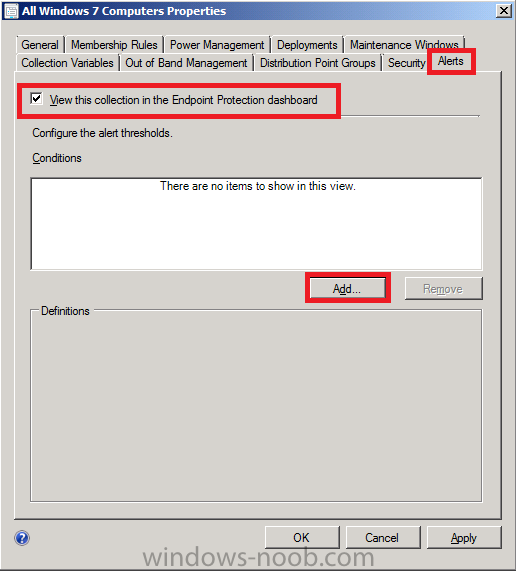
click on Add and select all the options
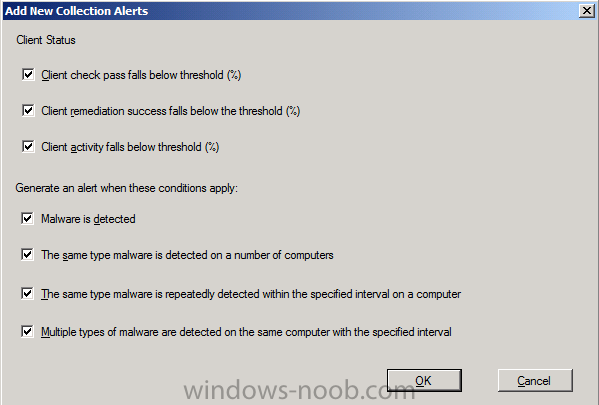
click ok and leave the other Alert settings as they are
Step 3. Configure the SUP Products to Sync and Perform a Sync
Perform the following on the SCCM server as SMSadmin
Click on Administration, expand Overview and expand Site Configuration, select Sites and click on Settings in the ribbon and click on Configure Site Components and select Software Update Point.
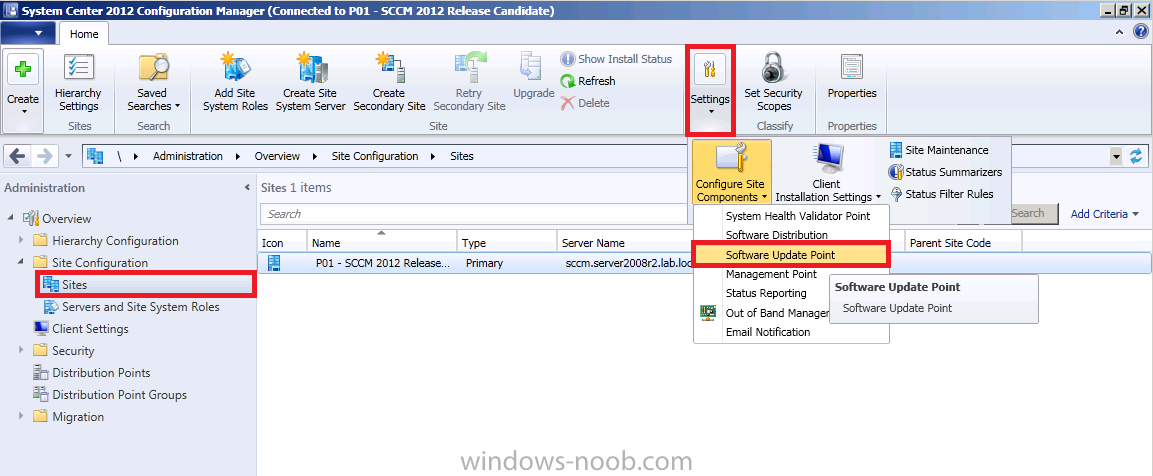
In the Products tab ensure that the product Forefront Endpoint Protection 2010 check box is selected.

change the Sync Schedule to 1 days

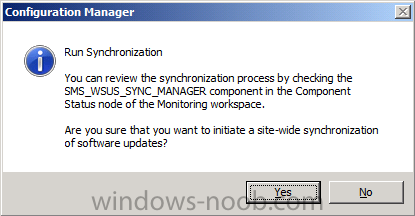
Click on Software Library, Software Updates, right click on All Software Updates and choose Synchronize Software Updates
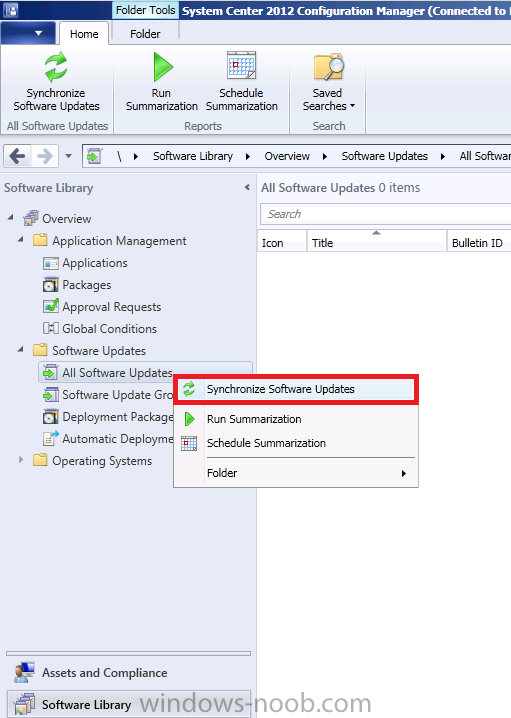
answer Yes to the Sync
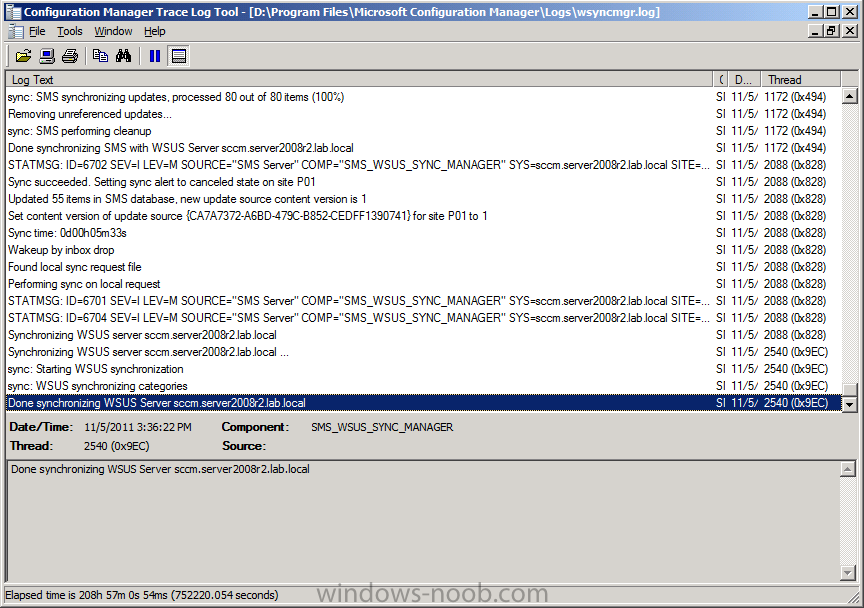
at this point you can review the Wsyncmgr.log in CMtrace
Step 4. Configure SUP to deliver Definition Updates using an Automatic Deployment Rule
Perform the following on the SCCM server as SMSadmin
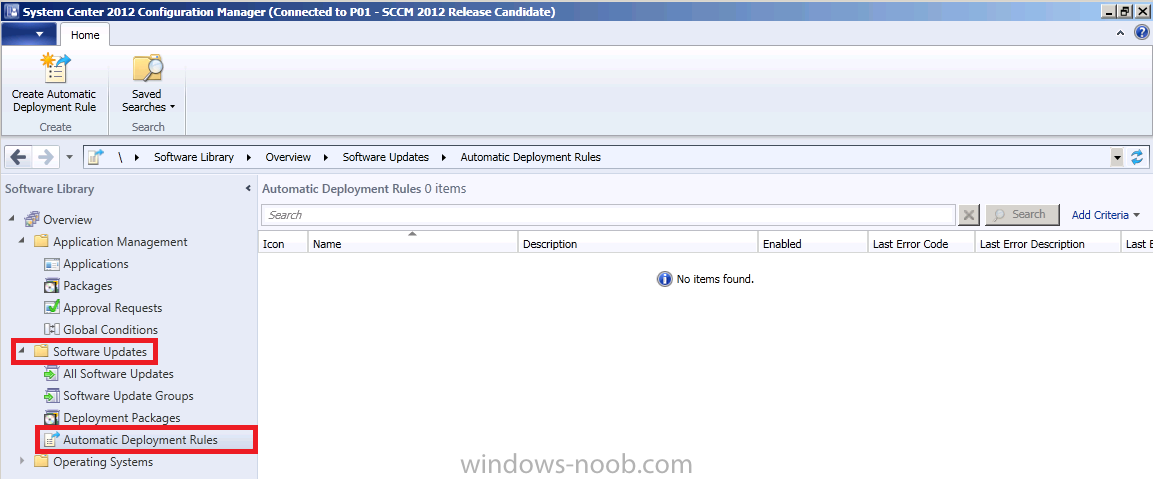
In the Configuration Manager console, click Software Library, expand Software Updates and click on Automatic Deployment Rules
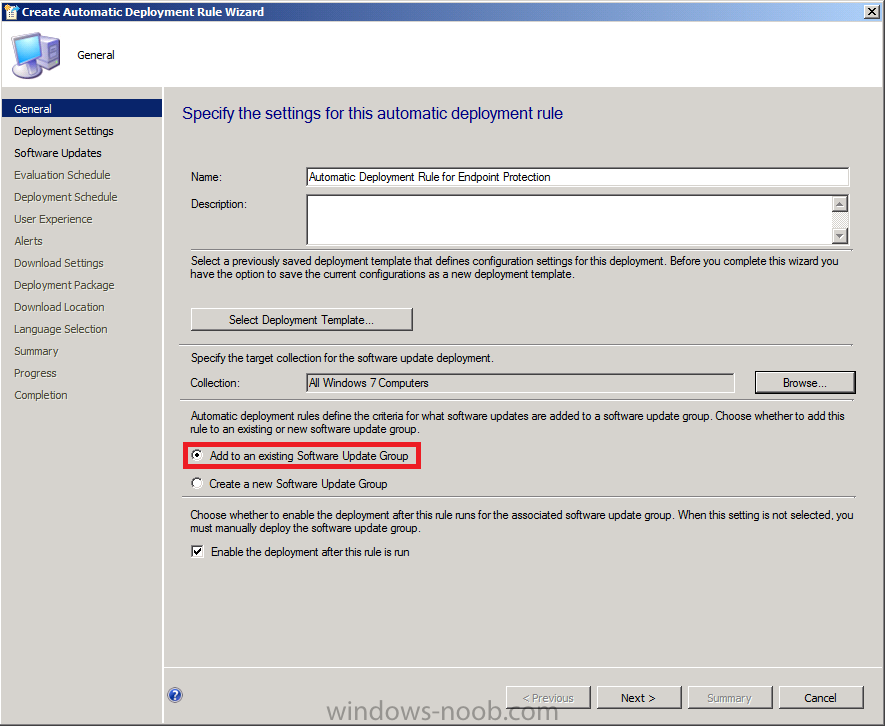
in the Ribbon click on Create Automatic Deployment Rule and the wizard appears, give the rule a suitable name like Automatic Deployment Rule for Endpoint Protection and point it to our previously created All Windows 7 Computers collection, select add to an exisiting software update group
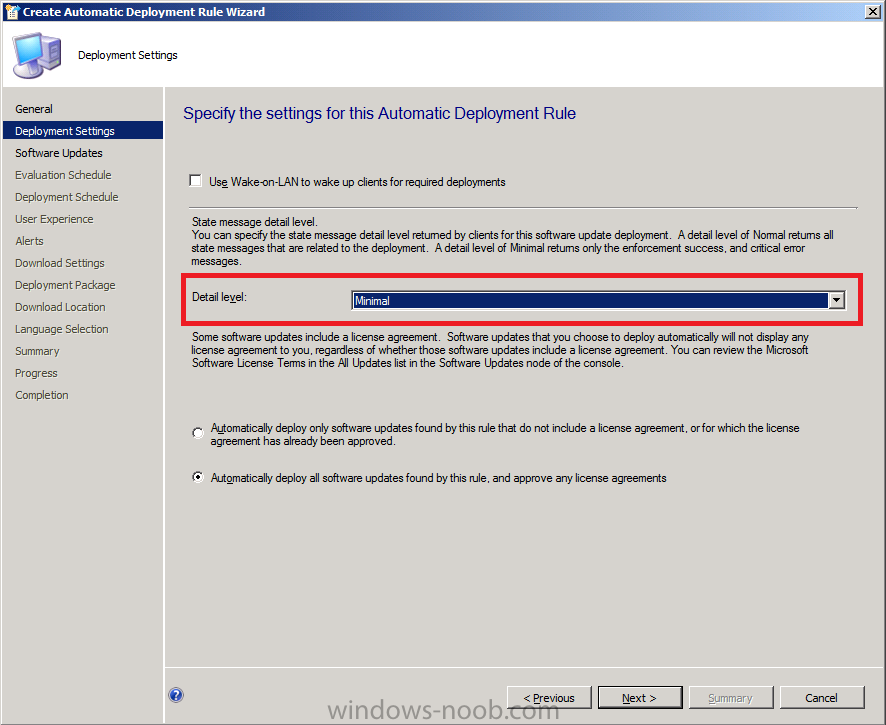
On the Deployment Settings page of the wizard select Minimal from the Detail level drop-down list and then click Next this reduces State Messages returned and thus reduces Configuration Manager server load
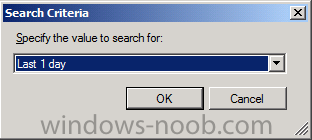
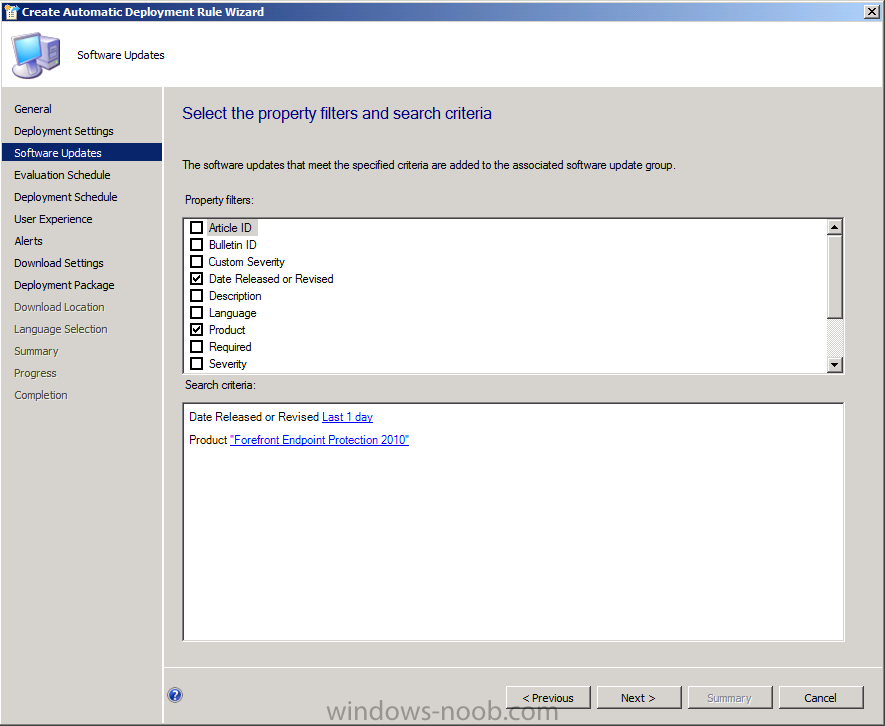
on the Software Updates page select Date Released or Revised
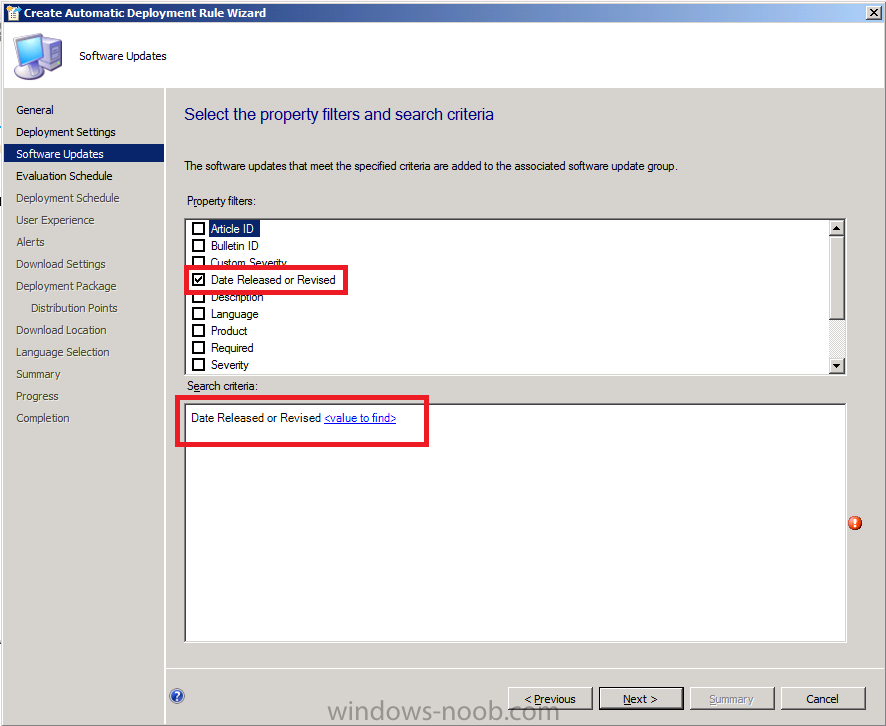
in the Search Criteria pane, click on Value to find and select Last 1 day
In the Products tab ensure that the product Forefront Endpoint Protection 2010 check box is selected.
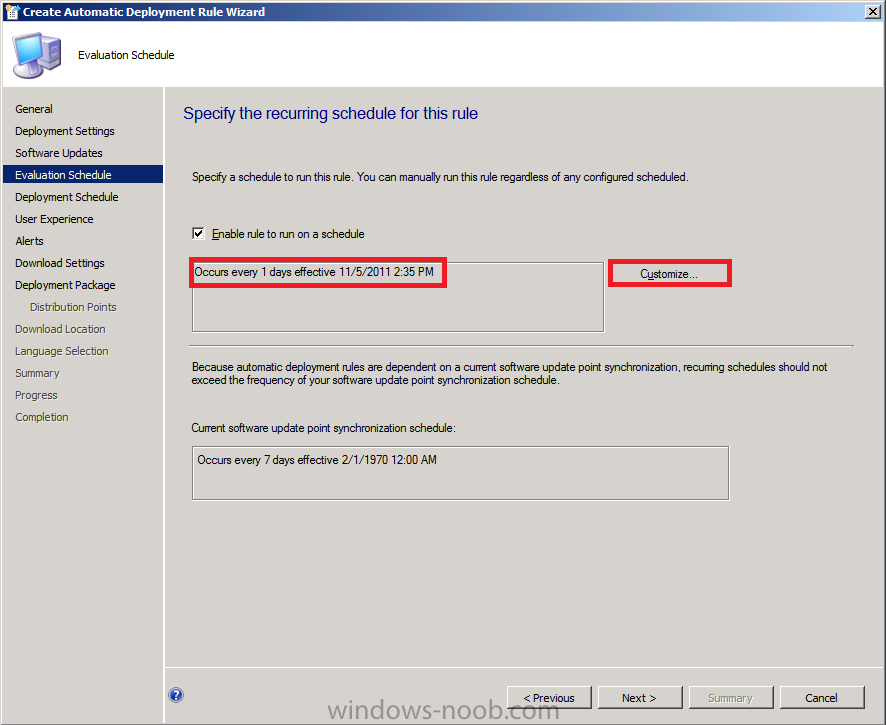
for Evaluation Schedule, click on Customize and set it to run every 1 days
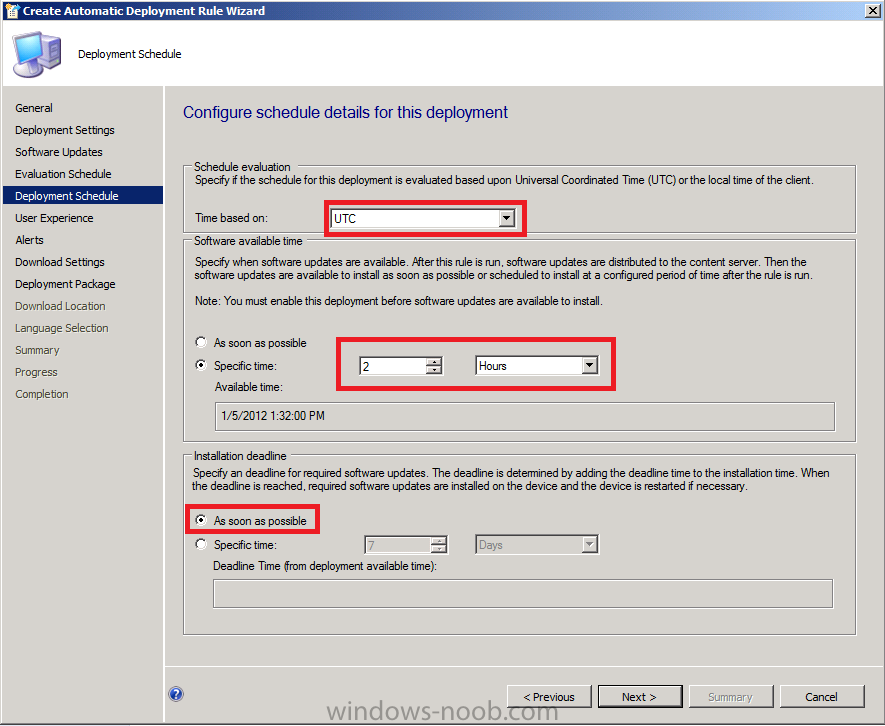
for Deployment Schedule set Time based on: UTC
(if you want all clients in the hierarchy to install the latest
definitions at the same time. This setting is a recommended best
practice.), for software available select 2 hours to allow sufficient time for the Deployment to reach all Distribution Points and select As soon as possible for the installation Deadline.
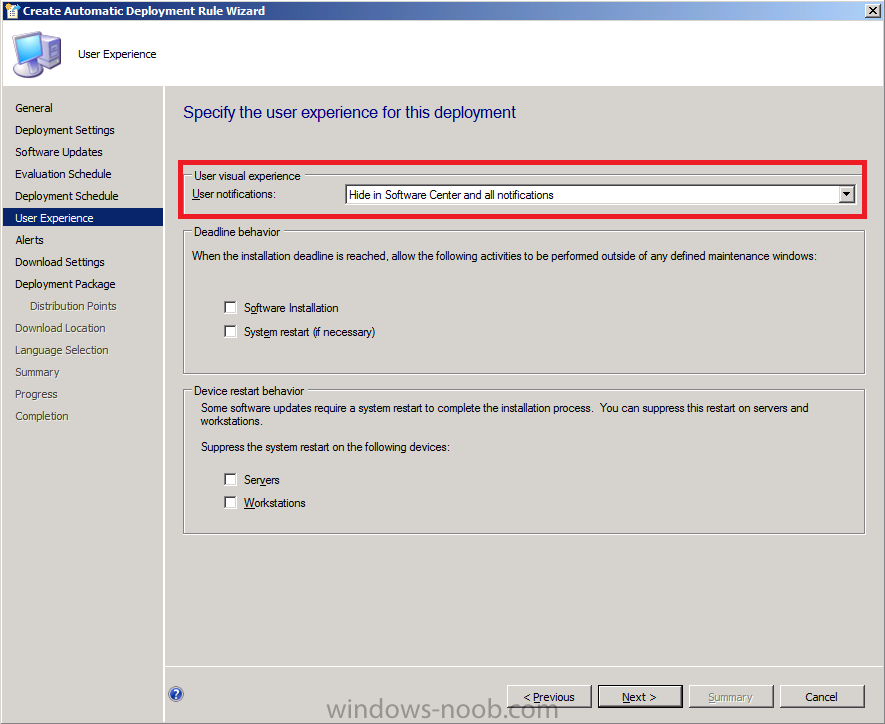
for the User Visual Experience select Hide from the drop down menu
for Alerts enable the option to generate an alert

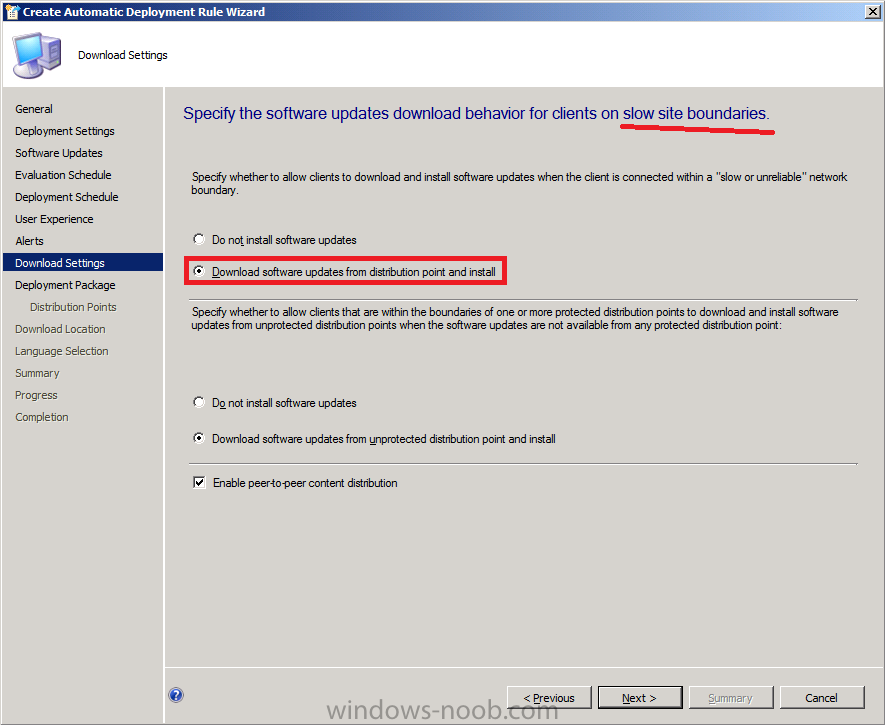
for download settings as the definition updates are important let’s download them even if on slow networks
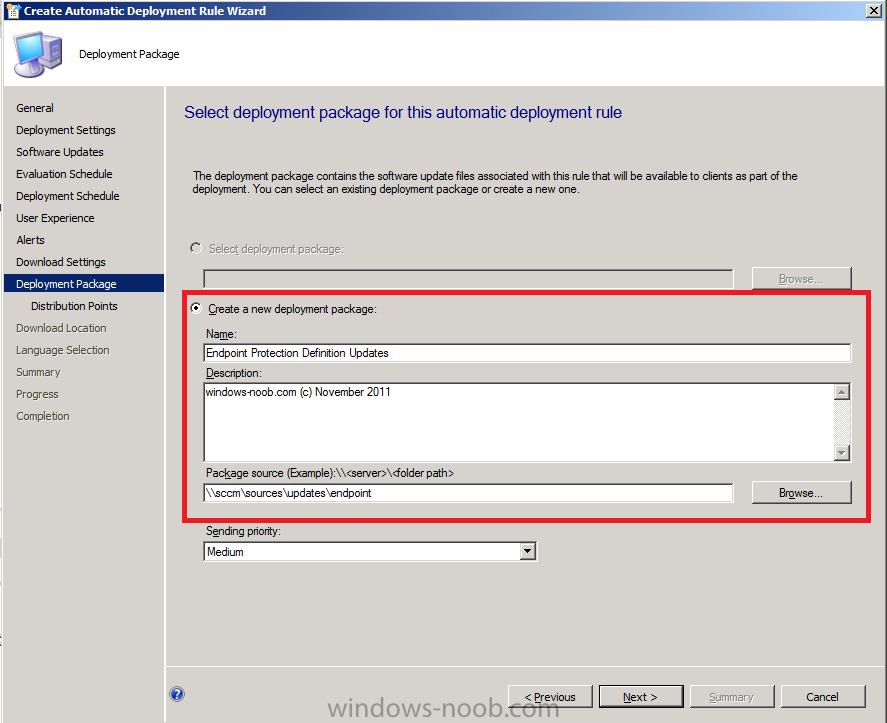
For Deployment Package we are creating a new one so give it a suitable name like Endpoint Protection Definition Updates and point it to a previously created folder
Note: Make sure that \\sccm\sources\updates\Endpoint
(or whatever path you choose) exists otherwise the wizard will fail
below when it tries to Download as the Network Path won’t exist. In
addition Everytime this ADR runs it
will want to create a new deployment package as specified above, we do
not want this to happen so after running the ADR once, retire it and
create a new ADR except this time point the deployment package to the
packaged which is now created called Endpoint Protection Definition
Updates.
click your way through the rest of the Wizard till completion
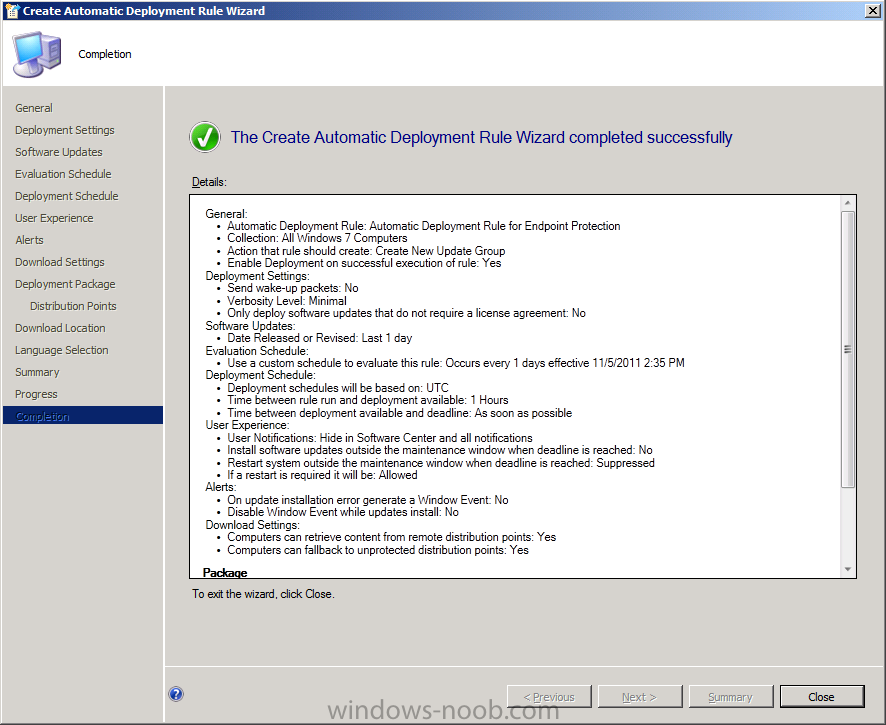
if you scroll to the right you’ll see nothing has been downloaded, yet…(because our Automatic Deployment Rule hasn’t run yet since the sync)

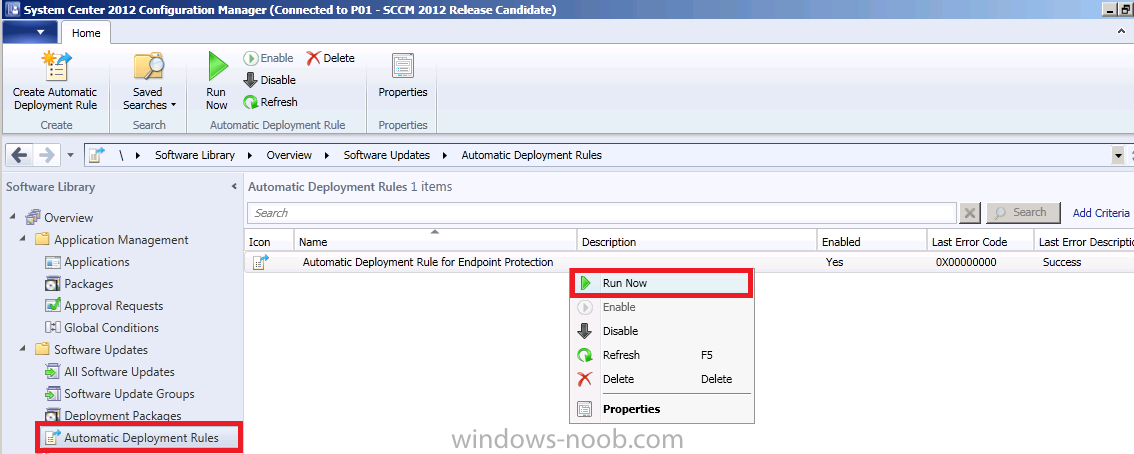
so let’s force the Automatic Deployment Rule to run now, right click on our ADR and choose Run Now
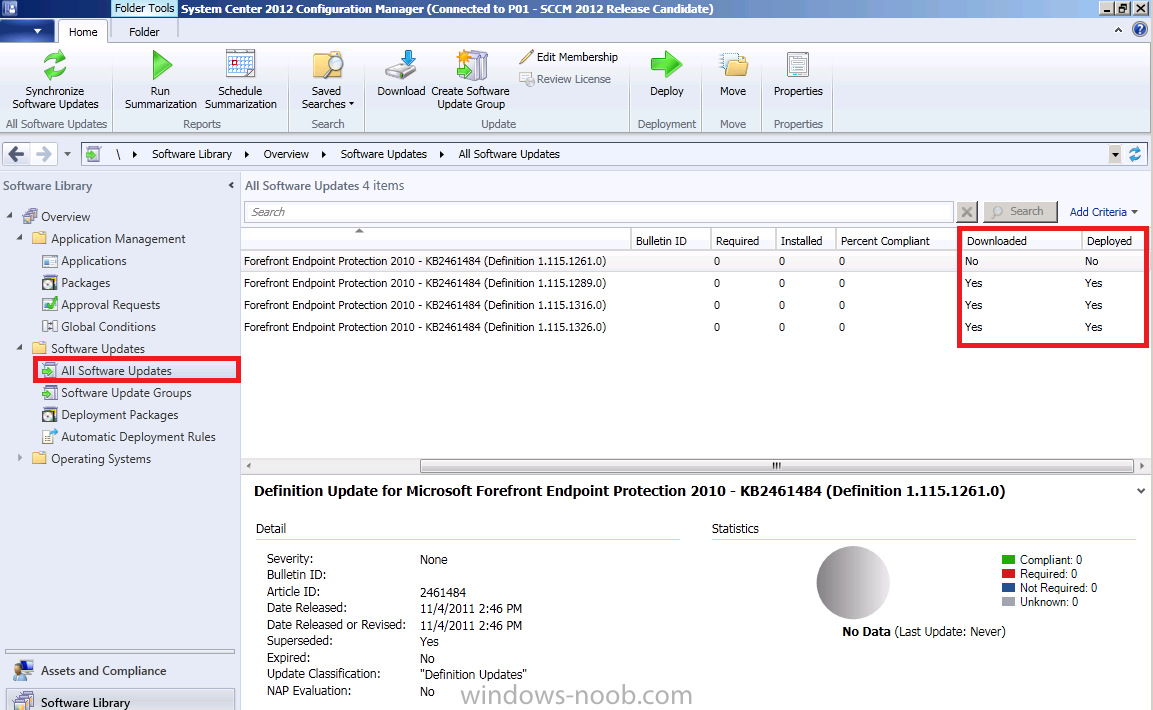
and after a few minutes look at our Definition Updates again, notice the difference ?
Step 5. Configure Custom Client Settings for Endpoint Protection
Perform the following on the SCCM server as SMSadmin
Note: Do not configure the default Endpoint Protection client settings unless you are sure that you want these applied to all computers in your hierarchy.
Below is an explanation of the EndPoint Protection settings available:-
Quote
Manage Endpoint Protection client on client computers
- Select True if you want to manage existing Endpoint Protection clients on computers in your hierarchy.
- Select
this option if you have already installed the Endpoint Protection
client and want to manage it with Configuration Manager. - You
should also select this option if you want to create a script to
uninstall an existing antimalware solution, install the Endpoint
Protection client and deploy this script using a Configuration Manager
application or package and program.
Install Endpoint Protection client on client computers
- Select True to install and enable the Endpoint Protection client on client computers where it is not already installed.
Automatically remove previously installed antimalware software before Endpoint Protection is installed
- Select True to uninstall existing antimalware software.
 Note Endpoint Protection uninstalls the following antimalware software only:
All current Microsoft antimalware products except for Windows InTune and Microsoft Security Essentials
Symantec AntiVirus Corporate Edition version 10
Symantec Endpoint Protection version 11
Symantec Endpoint Protection Small Business Edition version 12
Mcafee VirusScan Enterprise version 8
Trend Micro OfficeScan
Suppress any required computer restart after the Endpoint Protection client installed
- Select True to suppress a computer restart if it is required after the Endpoint Protection client installs.
Allowed period of time users can postpone a required restart to complete the Endpoint Protection installation (hours)
- Specify
the number of hours that users can postpone a computer restart if this
is required after the Endpoint Protection client installs.
Disable alternate sources (such as Windows Update,
Microsoft Windows Server Update Services or UNC shares) for the initial
definition update on client computers
- Select True
if you want to allow only Configuration Manager to install the initial
definition update on client computers. This setting can be helpful to
avoid unnecessary network connections and reduce network bandwidth
during the initial installation of the definition update.
In the Configuration Manager console, click Administration, click Client Settings and on the Home tab in the Create group, click Create Custom Client Device Settings.
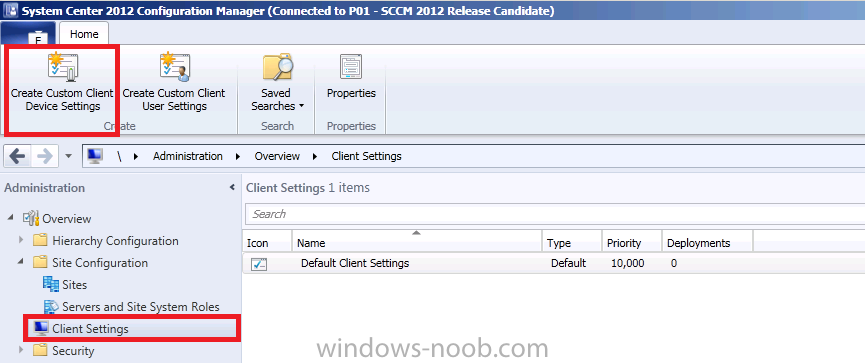
Select Endpoint Protection and call it Custom Client Device Endpoint Protection Settings
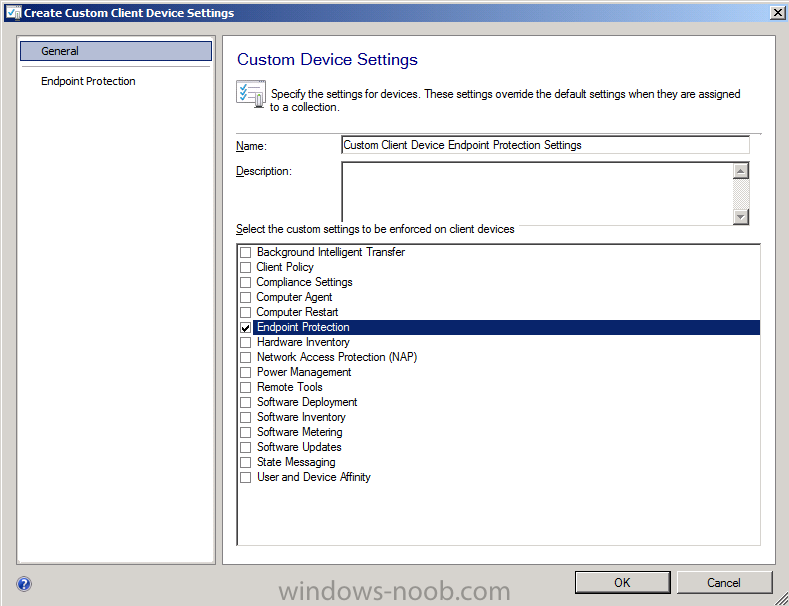
click on Endpoint Protection and review the settings, change them to as follows:-
- Manage Endpoint Protection Client on Client Computers = True
- Install Endpoint Protection Client on Client Computers = True
- Automatically remove previously installed antimalware software before Endpoint Protection is installed = True
- Suppress any required computer restart after the Endpoint Protection client installed = False
- Allowed period of time users can postpone a required restart to complete the Endpoint Protection installation (hours) = 1
- Disable
alternate sources (such as Windows Update, Microsoft Windows Server
Update Services or UNC shares) for the initial definition update on
client computers = True
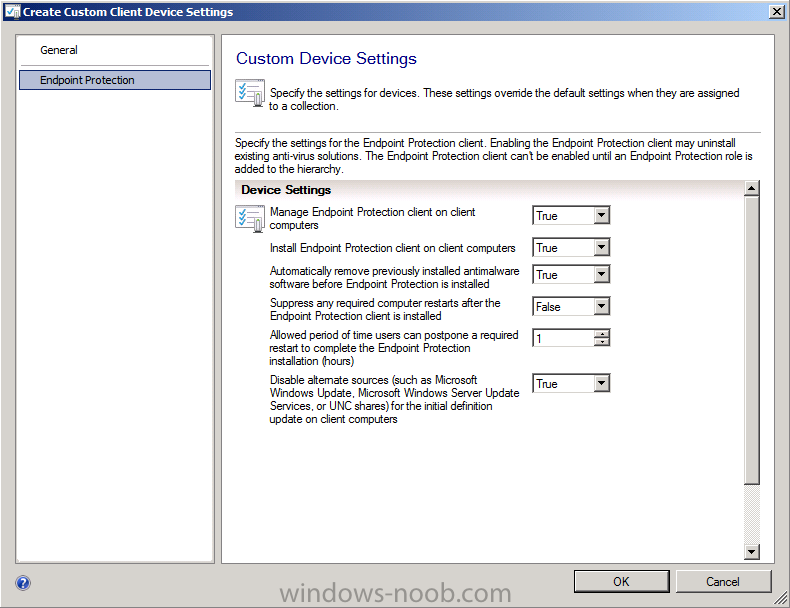
click ok when done, right click on the new custom settings and choose Deploy
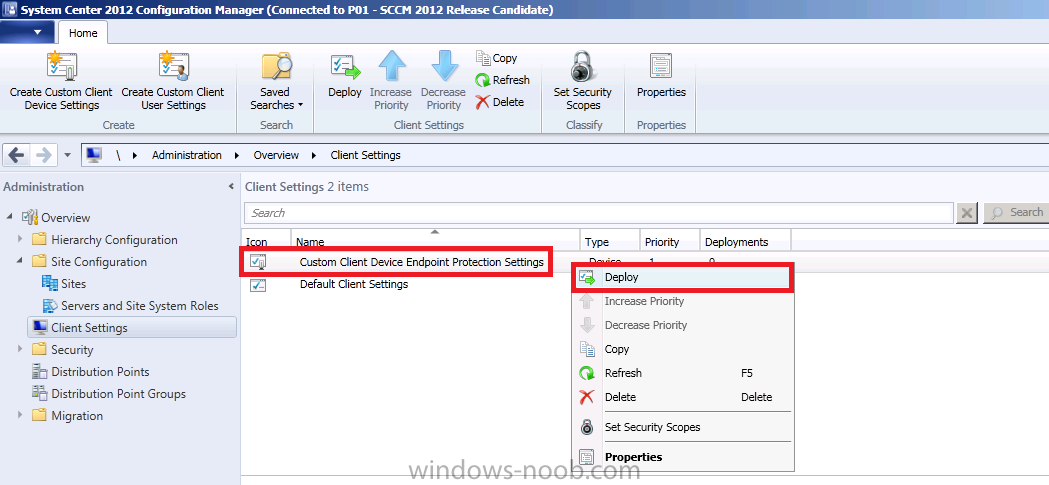
select our All Windows 7 Computers collection and choose Ok.
Step 6. Configure Custom AntiMalware Policies
Perform the following on the SCCM server as SMSadmin
Note: Do not configure the default client Malware Policy unless you are sure that you want these applied to all computers in your hierarchy.
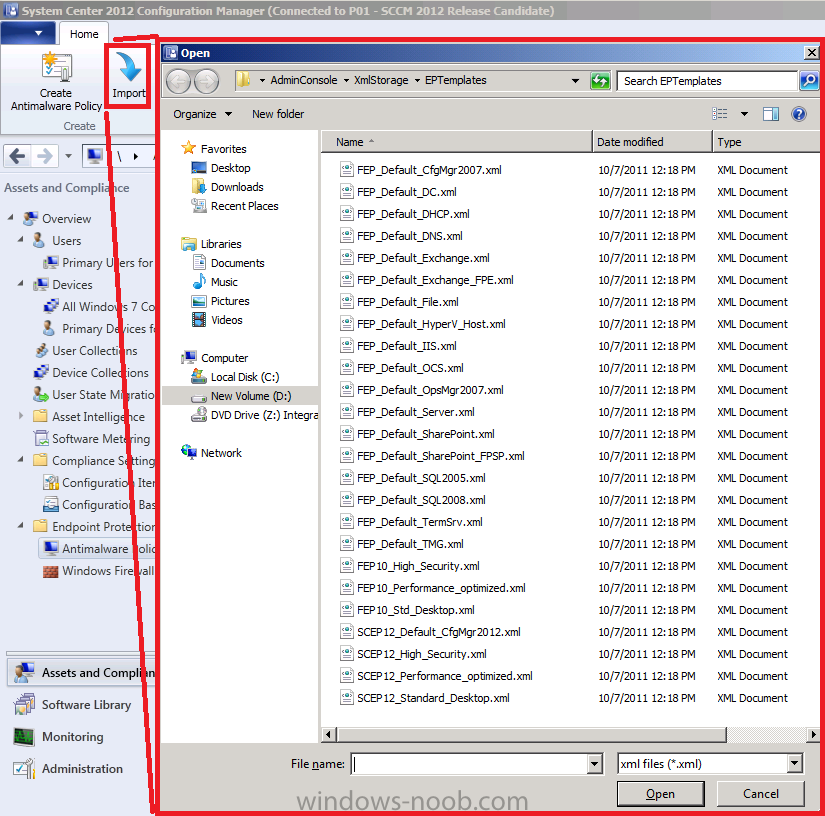
There are several pre-created AntiMalware Policies available, to review/use them click on Import. (see screenshot below)
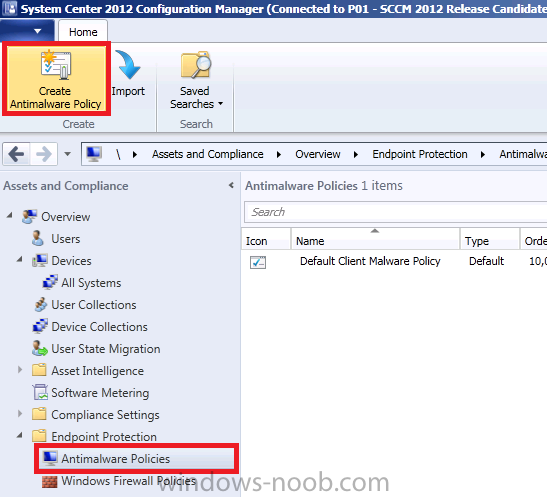
We will create our own policy in this LAB so in the Configuration Manager console, click Assets and Compliance, click Endpoint Protection, select Antimalware Policies. In the ribbon select Create Antimalware Policy
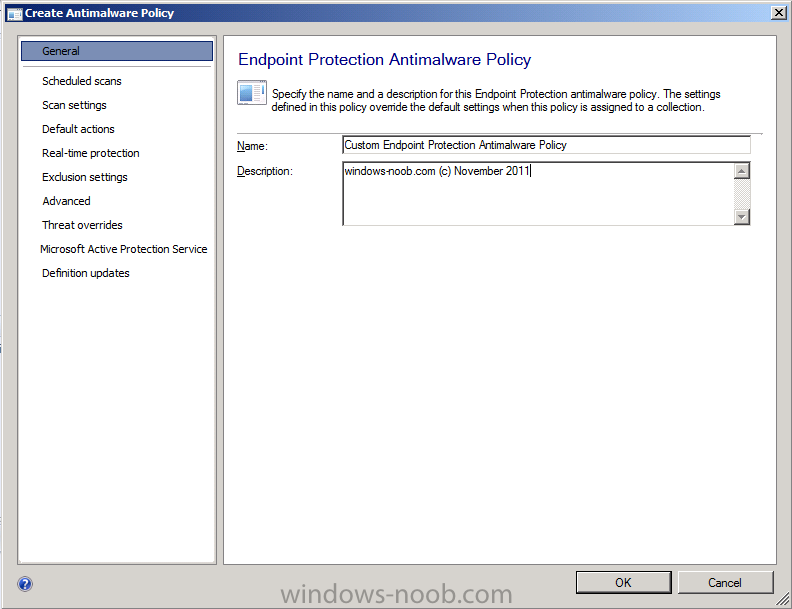
give the policy a name like Custom Endpoint Protection Antimalware Policy
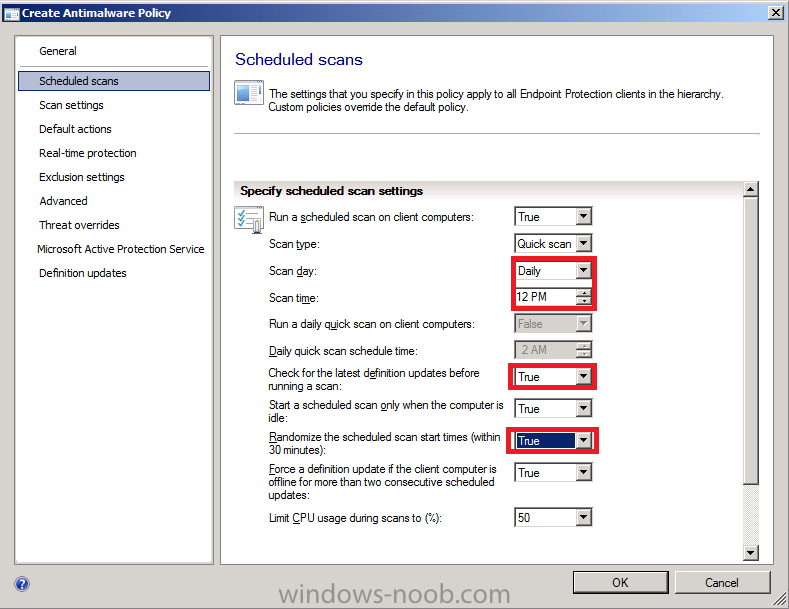
for Scheduled scans change to Daily at 12 pm
(default was Saturday, 2am) and set it to check for latest definition
updates before the scan and to randomize the scan start time
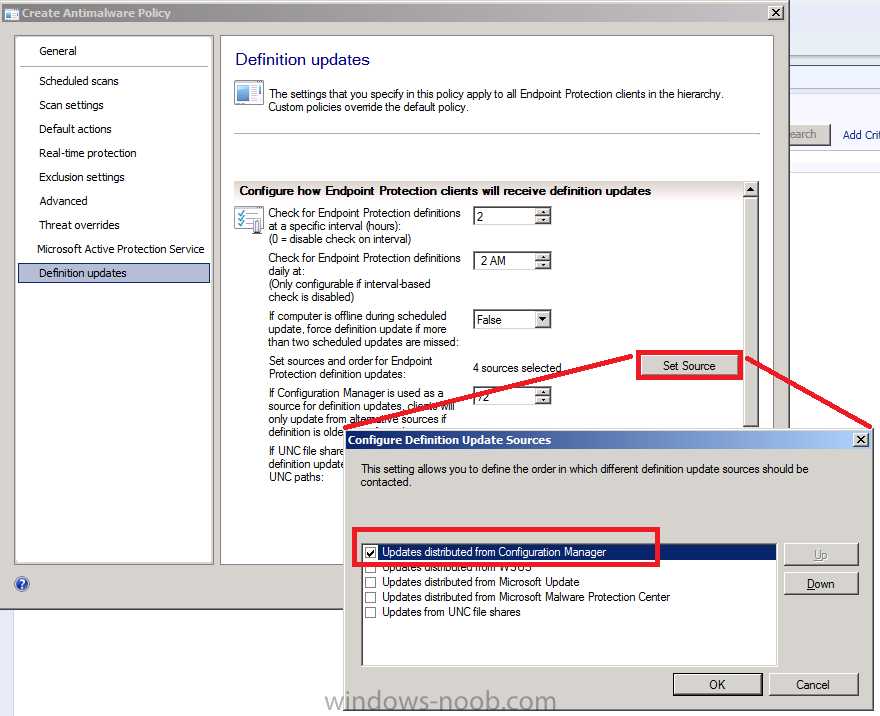
for Definition Updates set the check to 2 hours and click on set source, only select Updates distributed from Configuration Manager (deselet the other options)
Note: if your SCCM server has no internet access you can configure it to check for updates from UNC file shares
Click Ok, Ok.
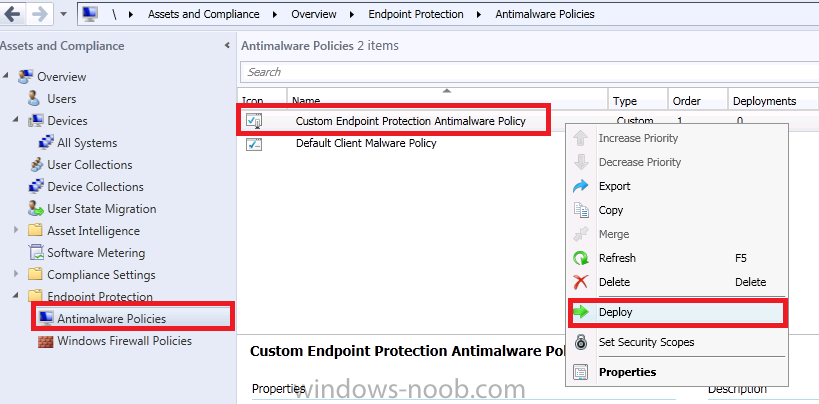
Right click our Custom Endpoint Protection Antimalware Policy and select Deploy, choose our All Windows 7 Computers Collection as we did for the Device settings above.
that’s it we are done !
we have now created custom Client Device settings and a Custom Antimalware Policy for our All Windows 7 Computers collection, in further posts we will add some computers to that collection and verify our Endpoint Protection settings.
The original post is here on windows-noob.com
