
Introduction
This is Part 7 in a new series of guides about getting started with Windows 365. This series of guides will help you to learn all about Windows 365 in a clear and insightful way. This series is co-written by Niall & Paul, both of whom are Enterprise Mobility MVP’s with broad experience in the area of modern management. At the time of writing, Paul is a 6 times Enterprise Mobility MVP based in the UK and Niall is a 12 times Enterprise Mobility MVP based in Sweden. In this series we aim to cover everything we learn about Windows 365 and share it with you to help you to deploy it safely and securely within your own organization. In Part 1 we introduced you to Windows 365, selecting the right edition with the level of management that you need, choosing the plan that suits your users needs at a cost you can afford, or modifying the configuration to make it more suited to your individual needs, purchasing licenses and saving money for your organization via the Windows Hybrid Benefit. In Part 2 you learned how to provision an Azure Ad joined Cloud PC and take a look at the different network options available when provisioning an Azure Ad joined Cloud PC. In Part 3 you learned about the steps needed to successfully provision a Hybrid Azure Ad Joined Cloud PC. In Part 4 you saw the many different ways you can connect to your Cloud PC from many device be it Android, Mac, Windows, Linux or iPhone and you learned that not all connection options have the same abilities. In Part 5 we covered the management capabilities of your Cloud PCs and explained the different options available depending on which version (Business versus Enterprise) that you purchase. In Part 6 we looked at the built in configurable backup technology in Windows 365 which is known as Point-in-time restore, which gives the admin (or user) the ability to restore Cloud PC’s to an earlier time before a problem such as a Ransomware incident occurred.
Below you can find all parts in this series:
- Getting started with Windows 365 – Part 1. Introduction
- Getting started with Windows 365 – Part 2. Provisioning an Azure Ad Joined Cloud PC
- Getting started with Windows 365 – Part 3. Provisioning a Hybrid Azure Ad Joined Cloud PC
- Getting started with Windows 365 – Part 4. Connecting to your Cloud PC
- Getting started with Windows 365 – Part 5. Managing your Cloud PC
- Getting started with Windows 365 – Part 6. Point in time restore
- Getting started with Windows 365 – Part 7. Patching your Cloud PCs with Windows Autopatch <- you are here
- Getting started with Windows 365 – Part 8. Windows 365 boot
- Getting started with Windows 365 – Part 9. Windows 365 switch
- Getting started with Windows 365 – Part 10. Windows 365 offline
In this part we’ll cover the following:
- Introduction to Windows Autopatch
- Prerequisites
- Allow access to admins without licenses
- Enroll into Windows Autopatch
- Readiness assessment tool
- Enroll
- Device registration
- Moving devices between deployment rings
- Reports
- User Experience
- Create Provisioning policy
- Recommended reading
- Summary
Introduction to Windows Autopatch
“Do more with less”
Windows Autopatch was created to ease the pain of managing software updates by automating those tasks, improve security and thereby freeing up IT admins time. After registering devices with Windows Autopatch it can deal with multiple areas of update management including:
- Windows quality updates
- Windows feature updates
- Microsoft 365 apps for Enterprise
- Microsoft Edge
- Microsoft Teams
Windows Autopatch aims to reach the following SLO (Service Level Objective) at the time of writing.
- Windows quality updates – 95% of eligible devices on the latest quality update within 21 days
- Windows feature updates – 99% of eligible devices on a supported version
- Microsoft 365 apps for Enterprise – 90% of eligible devices on a supported version of the Monthly Enterprise Channel (MEC)
Prerequisites
Windows Autopatch like all Microsoft services has a list of prerequisites and you can review them here and it covers 4 main areas.
- Licensing
- Connectivity
- Azure Active Directory
- Device Management
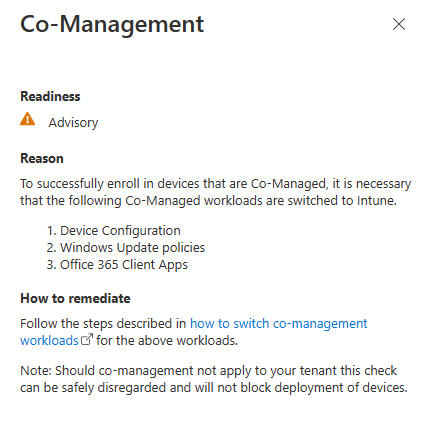
In a nutshell you must be licensed to use Windows Autopatch, Windows 10/11 Enterprise E3 (or higher) to be assigned to your users. Additionally, Azure Active Directory Premium and Microsoft Intune licenses are required. You must also allow connectivity to all endpoints specified here including mmdcustomer.microsoft.com, mmdls.microsoft.com, logcollection.mmd.microsoft.com and support.mmd.microsoft.com. Your users must be created in Azure Active Directory or synced via the latest version of Azure AD Connect. Last but not least, your devices must already be enrolled into Intune management before you try to register them with the Windows Autopatch service. They can use co-management but, if so, make sure that the following workloads are pointing to Pilot Intune or Intune.
- Windows Update policies workload to Pilot Intune or Intune.
- Device configuration workload to Pilot Intune or Intune.
- Office Click-to-Run apps workload to Pilot Intune or Intune.

Allow access to admins without licenses
When turning on Windows Autopatch for your Tenant, one of the tests that will be done is admin licensing. You can make things smoother by configuring this setting in advance. You can give administrators access to Microsoft Endpoint Manager without them requiring an Intune license, see Unlicensed admins in Microsoft Intune | Microsoft Learn
This feature applies to any administrator, including Intune administrators, global administrators, Azure AD administrators, and so on. Other features or services, such as those in Azure Active Directory (AD) Premium, may require a license for the administrator.
The Unlicensed admins option has been enabled by default on all accounts created after the 2006 release.
To flip the setting go to your Tenant admin, click on Roles, and select Endpoint Manager roles, click on Administrator Licensing and you’ll see this.
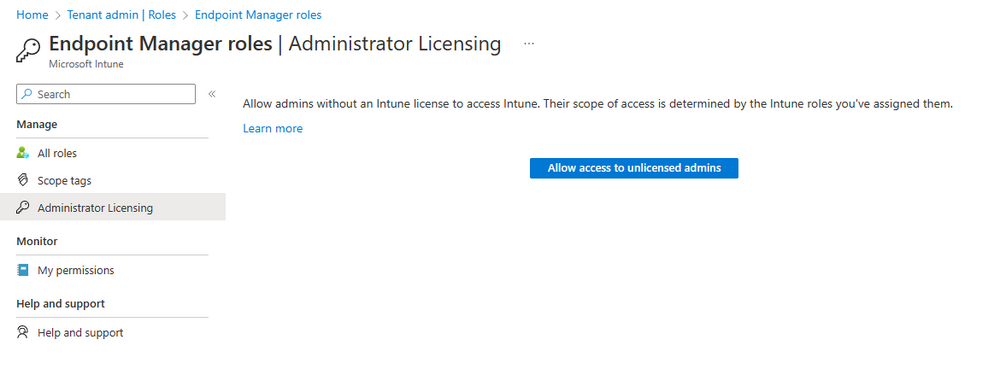
read the warning before clicking Yes (or No if you are unsure.)

Once done, there will simply be a blank space to greet you in the Administrator Licensing space.

Enroll into Windows Autopatch
Readiness assessment tool
At this point you are hopefully ready to enroll your tenant into Windows Autopatch, so let’s do it. In the Tenant Admin node, click on Tenant enrollment and select Windows Autopatch.
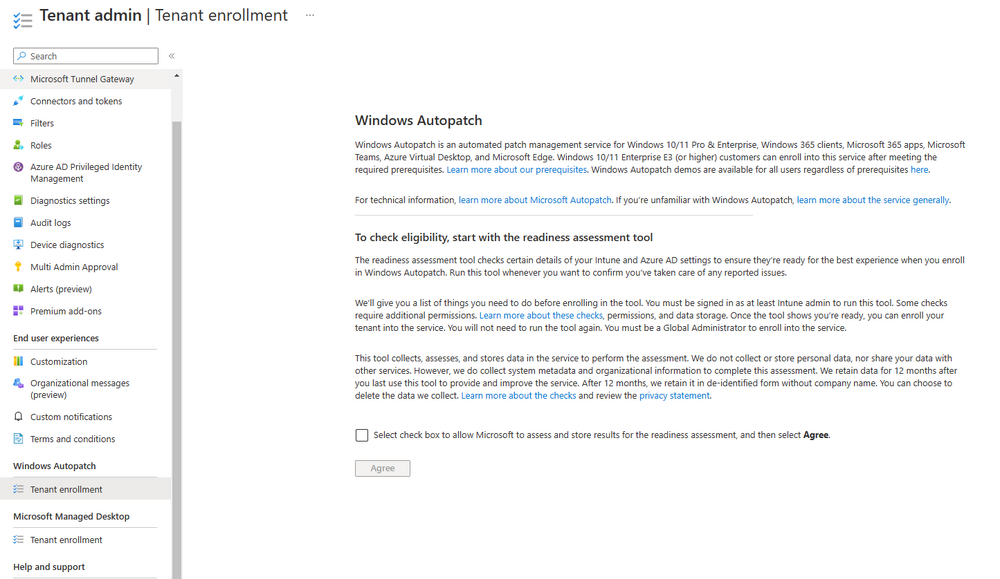
place a tick in the checkbox and click Agree. this will launch the readiness assessment tool.
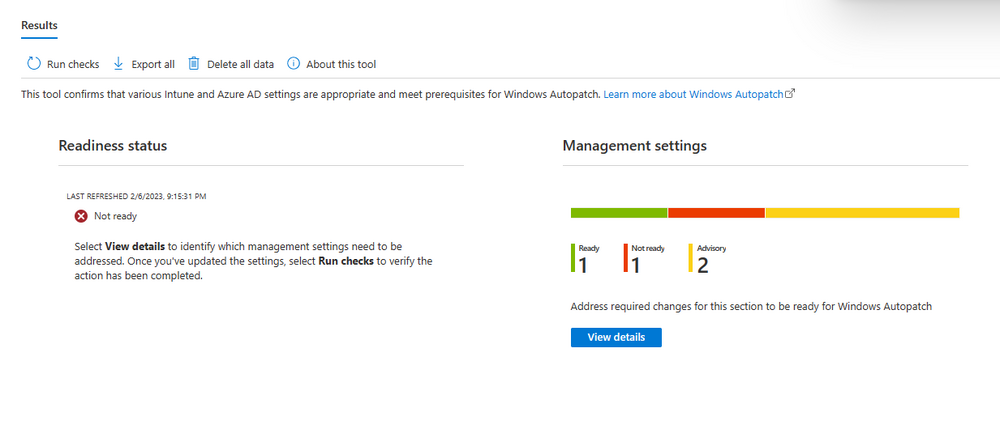
clicking on View details gives you an overview of what is OK or NOT OK in your tenant in relation to Windows Autopatch. Any errors marked in red must be fixed (notice the unlicensed admin error !)
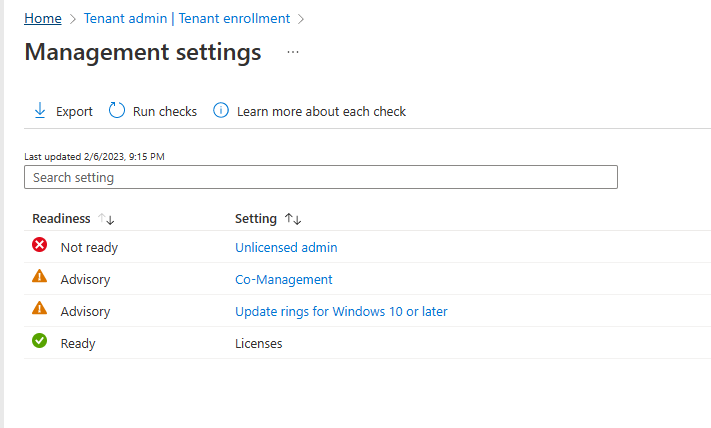
You can click on a linked entry to get details of the problem, for example here is the co-management advisory.
to read the rest of this blog post please click here.
