
SCCM 1804 Technical Preview has been released. This months new Technical Preview includes:
Configure a remote content library for the site server
To free up hard drive space on your primary site server, relocate its content library to another storage location. You can move the content library to another drive on the site server, a separate server, or fault-tolerant disks in a storage area network (SAN). We recommend a SAN as it provides elastic storage that grows or shrinks over time to meet your changing content requirements.
This remote content library is a new prerequisite for site server role high availability.
Note
This action only moves the content library on the site server. It doesn’t impact the location of the content library on distribution points.
Prerequisites
- The site server computer account needs read and write permissions to the network path to which you are moving the content library. No components are installed on the remote system.
Try it out!
Try to complete the tasks. Then send Feedback letting us know how it worked.
- In the Configuration Manager console, switch to the Administration workspace. Expand Site Configuration and select Sites. On the Summary tab at the bottom of the details pane, notice a new column for the Content Library.
- Click Manage content library on the ribbon.
- Select On a network share and enter a valid network path. This path is the location to which the site moves the content library. Click OK.
- Note the Status property in the Content Library column on the details pane. It updates to show the site’s progress in moving the content library. When in progress it displays the percentage complete. If there is an error state, it displays the error. Common errors include
access deniedordisk full. When complete it displaysOK. See the distmgr.log for details. For more information, see Site server and site system server logs.
If you need to move the content library back to the site server, repeat this process but select the option Local to the site server.
Tip
To move the content to another drive on the site server, use the Content Library Transfer tool. For more information, see Configuration Manager Toolkit.
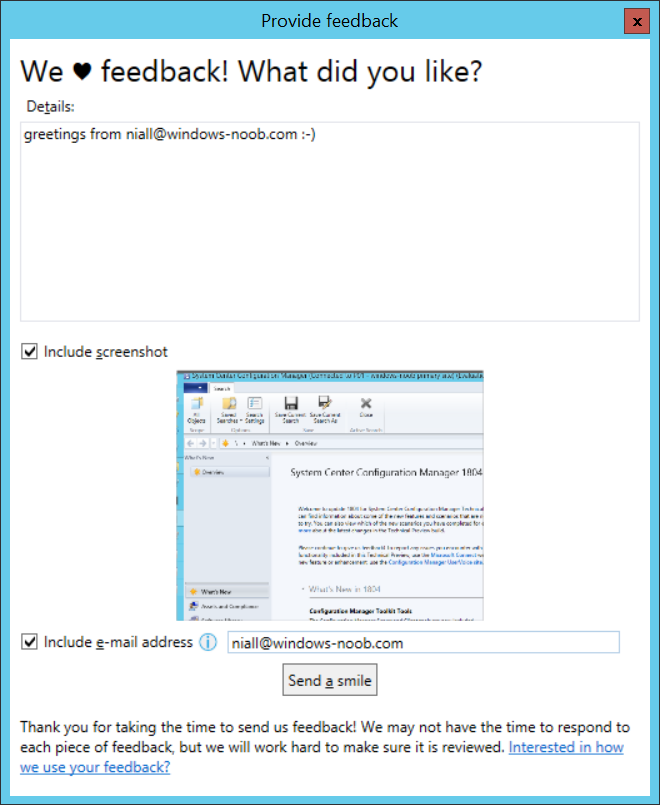
Submit feedback from the Configuration Manager console
Send a smile! You can now directly tell the Configuration Manager team about your experiences. Sending feedback is easy from the Configuration Manager console. We want to hear all of your feedback: praise, problems, and suggestions.
Try it out!
Try to complete the tasks. Then send Feedback letting us know how it worked.
- In the Configuration Manager console, click the smile button in the upper right corner above the ribbon.
- From the drop-down list, select one of the available options:
- Send a smile: You really liked something! For this option, enter the details of your feedback. Then optionally include a screenshot and your email address.
- Send a frown: You encountered a problem in the console, or something didn’t work as expected. For this option, enter the details of the potential product issue. Then optionally include a screenshot, your email address, and diagnostic data.
- Send a suggestion: You have an idea to change and improve Configuration Manager. This option opens our UserVoice site in your web browser.
This feedback goes directly to the Microsoft product team for Configuration Manager. While using the Windows 10 Feedback Hub is still supported, you’re encouraged to use the in-console feedback mechanism.
The following anonymous information is always included with the feedback for context:
- Configuration Manager console version and language
- Configuration Manager site version
- Support ID, also known as the hierarchy ID
- OS version and language for the system on which the console is running
- The exact location in the console from which you clicked the smile
This data is consistent with the collection of our diagnostics and usage data. For more information, see Diagnostics and usage data.
Known issues
If you attempt to send feedback from a device that isn’t able to access the internet, the application may unexpectedly close. To send a smile or frown, make sure the device is able to access petrol.office.microsoft.com.
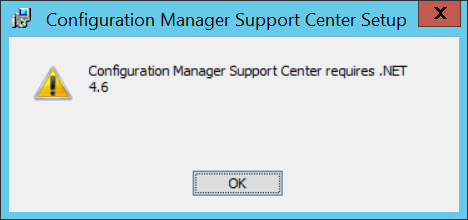
Support Center
Use Support Center for client troubleshooting, real-time log viewing, or capturing the state of a Configuration Manager client computer for later analysis. Support Center is a single tool to consolidate many administrator troubleshooting tools. A preview of the latest version of Support Center with bug fixes, improvements, and a preview of our new log viewer is available in the technical preview. Find the Support Center installer on the site server in the cd.latest\SMSSETUP\Tools\SupportCenter folder.
Tip
Legacy documentation for the existing functionality in Support Center is available on TechNet. Relevant information is in process to migrate to the docs.microsoft.com library.
New Support Center features
- A new log viewer, OneTrace. It works similar to CMTrace, and includes improvements such as a tabbed view and dockable windows.
- A new data collector feature gathers diagnostic logs from the local or a remote Configuration Manager client. It provides real-time diagnostic of inventory (replaces Client Spy), policy (replaces Policy Spy), and client cache.
Configuration Manager Toolkit
The Configuration Manager server and client tools are now included with the technical preview. Find them in the cd.latest\SMSSETUP\Tools folder on the site server. No further installation required.
Server tools
- DP Job Manager: Troubleshoots content distribution jobs to distribution points
- Collection Evaluation Viewer: View collection evaluation details
- Content Library Explorer: View contents of the content library single instance store
- Content Library Transfer: Transfers content library between drives
- Content Ownership Tool: Changes ownership of orphaned packages. These packages exist in the site without an owning site server.
- Role-based Administration and Auditing Tool: Helps administrators audit roles configuration
Client tools
- CMTrace: View logs
- Deployment Monitoring Tool: Troubleshoot applications, updates, and baseline deployments
- Policy Spy: View policy assignments
- Power Viewer Tool: View status of power management feature
- Send Schedule Tool: Trigger schedules and evaluations of DCM baselines
Important
Support Center is recommended for most use cases, as it includes the same or improved functionality for the following tools:
- Client Spy
- CMTrace1
- Deployment Monitoring Tool
- Policy Spy
- Send Schedule Tool
1 CMTrace doesn’t depend upon .NET or Windows Presentation Foundation (WPF), so is still used in Windows PE boot images.
Uninstall application on approval revocation
The behavior has changed when you revoke approval for an application. Now when you deny the request for the application, the client uninstalls the application from the user’s device.
Prerequisites
- Enable the feature Approve application requests for users per device.
Try it out!
Try to complete the tasks. Then send Feedback letting us know how it worked.
- In the Configuration Manager console, deploy to a user an application that requires approval. On the Deployment Settings tab of the deployment, enable the option An administrator must approve a request for this application on the device.
- On the Configuration Manager client in Software Center, the user requests approval to install the application.
- In the Configuration Manager console, approve the request for this user to install the application on the device. Application approval requests are displayed in the Software Library workspace, under Application Management, in the Approval Requests node.
- On the client in Software Center, the user installs the application.
- In the Configuration Manager console, deny the user’s request for the application on the device.
Known issues
- After the user installs the application on the client, update user policy. In Software Center, switch to the Options tab, expand Computer maintenance and click Sync Policy.
- The application catalog web service point must be HTTP. For more information, see Known issues in this technical preview.
Exclude Active Directory containers from discovery
To reduce the number of discovered objects, you can now exclude specific containers from Active Directory system discovery. This feature is a result of your UserVoice feedback.
Try it out!
Try to complete the tasks. Then send Feedback letting us know how it worked.
- In the Configuration Manager console, go to the Administration workspace. Expand Hierarchy Configuration and select Discovery Methods. Select Active Directory System Discovery and click Properties in the ribbon.
- Click the New icon to specify a new Active Directory container.
- In the Active Directory Container dialog box, browse to or enter the Path in the Location section to start the discovery.
- In the Search Options section, enable the option to Recursively search Active Directory child containers. Then click Add to select subcontainers to be excluded from this discovery.
- In the Select New Container dialog box, select a child container to exclude. Click OK to close the Select New Container dialog box.
- Click OK to close the Active Directory Container dialog box.
- In the Active Directory System Discovery Properties window, see the path of the Active Directory container at which discovery starts. The Recursive column shows Yes, and the new Has Exclusions column also shows Yes. Click OK to close the Active Directory System Discovery Properties window.
Specify the visibility of the Application Catalog website link in Software Center
You can now control whether the link to Open the Application Catalog web site appears in the Installation status node of Software Center.
Note
Support for the Application Catalog website user experience ends with the first update released after June 1, 2018. For more information, see Removed and deprecated features.
Try it out!
Try to complete the tasks. Then send Feedback letting us know how it worked.
- In the Configuration Manager console, Administration workspace, Client Settings node, create a custom client device settings policy.
- Select the Software Center group.
- For Software Center settings, click Customize.
- Enable the option to Hide the Application Catalog web site link in Software Center.
For more information on client settings, see Configure client settings.
Filter automatic deployment rules by software update architecture
You can now filter automatic deployment rules to exclude architectures like Itanium and ARM64.
Try it out!
Try to complete the tasks. Then send Feedback letting us know how it worked.
- In the Configuration Manager console, switch to the Software Library workspace. Expand Software Updates and select Automatic Deployment Rules. On the ribbon, select Create Automatic Deployment Rule.
- Fill in the appropriate settings for the General tab and the Deployment Settings tab.
- In the Software Updates tab, select Architecture then click on items to find in the Search criteria.
- Select the architectures you want to include in the automatic deployment rule.
- Click Next and proceed with the creation of the automatic deployment rule.
Important
Remember that there are 32-bit (x86) applications and components running on 64-bit (x64) systems. Unless you’re certain that you don’t need x86, enable it as well when you choose x64.
Known issues
After adding the architecture criteria, the automatic deployment rule properties page shows Title in the search criteria. The automatic deployment rule still functions as expected, and selects the correct software updates. However, you can’t include both Architecture and Title criteria at this time.
Improvements to OS deployment
We made the following improvements to OS deployment, some of which were the result of your user voice feedback.
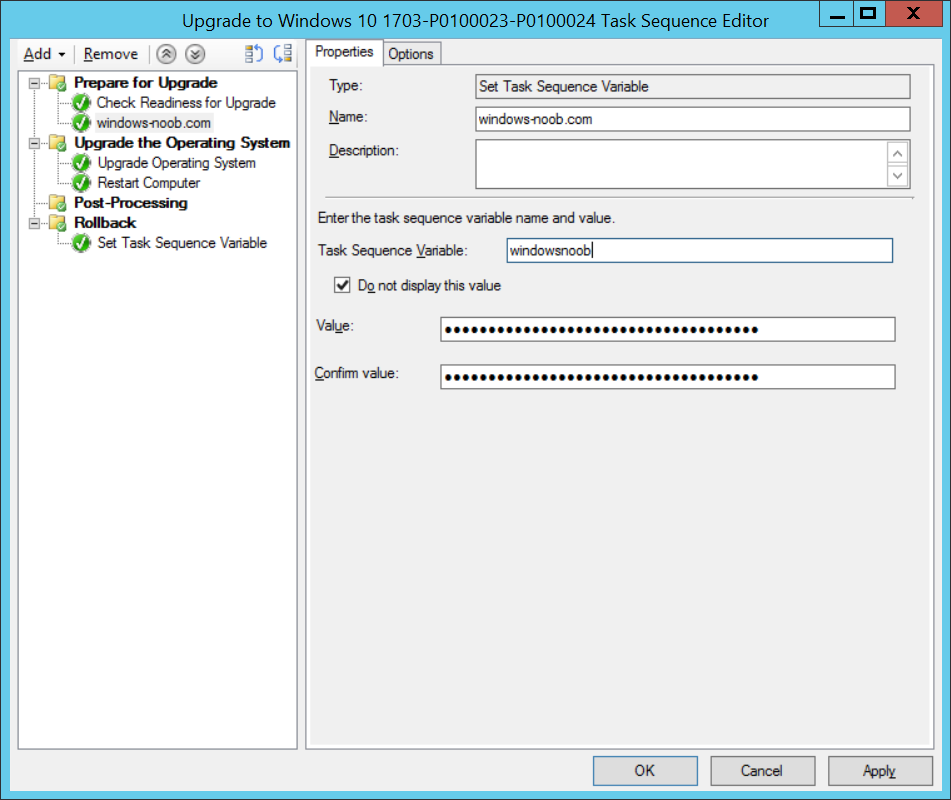
- Mask sensitive data stored in task sequence variables: In the Set Task Sequence Variable step, select the new option to Do not display this value. For example, when specifying a password. The following behaviors apply when you enable this option:
- The value of the variable isn’t displayed in smsts.log.
- The Configuration Manager console and SMS Provider handle this value the same as other secrets such as passwords.
- The value isn’t included when you export the task sequence.
- The task sequence editor doesn’t read this value when you edit the step. Retype the entire value to make changes.
Important
Variables and their values are saved with the task sequence as XML, and obfuscated in the database. When the client requests a task sequence policy from the management point, it is encrypted in transit and when stored on the client. However, all variable values are plain text in the task sequence environment in memory during runtime on the client. If the task sequence includes a step to output the value of the variable, this output is in plain text. This behavior requires an explicit action by the administrator to include such a step in the task sequence.
- Mask program name during Run Command Step of a task sequence: To prevent potentially sensitive data from being displayed or logged, set the task sequence variable OSDDoNotLogCommand to
TRUE. This variable masks the program name in the smsts.log during a Run Command Line task sequence step.
Improvements to the Configuration Manager console
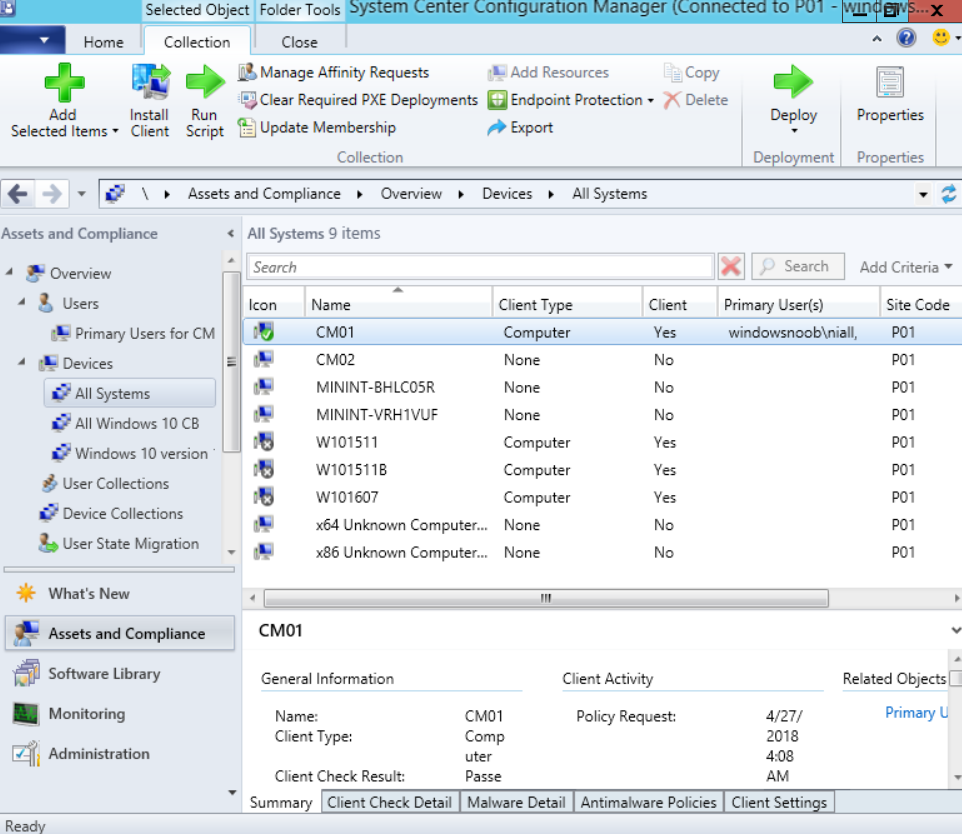
- Primary user information is now visible when viewing the members of a collection under Assets and Compliance, Device Collections.

Pingback: A summary of System Center Configuration Manager releases in 2018 and the new features – Part 2 (Technical Preview) | just another windows noob ?