
Introduction
In a previous guide I showed you how to install System Center Configuration Manager version 1511 (Current Branch) on Windows Server 2012R2. Times are changing fast in this cloud-first mobile-first world, and as a result the System Center Configuration Manager (Current Branch) releases are being released rapidly. In addition to these releases are new Windows Server and SQL Server releases.
Now that these new releases are all supported to run together, this guide will show you how to quickly install System Center Configuration Manager version 1606 (Current Branch) on Windows Server 2016 using SQL Server 2016, and then upgrade it to System Center Configuration Manager version 1610 (Current Branch).
Some PowerShell knowledge is desired. I will show you how to do most actions manually as well as automated.
Assumptions
In this guide I assume you have already installed two workgroup joined servers running Windows Server 2016 (choose Windows Server 2016 Standard (Desktop Experience)) as listed below, and that you’ve configured the network settings. I also assume you have some knowledge of PowerShell, if you don’t, start learning it now !
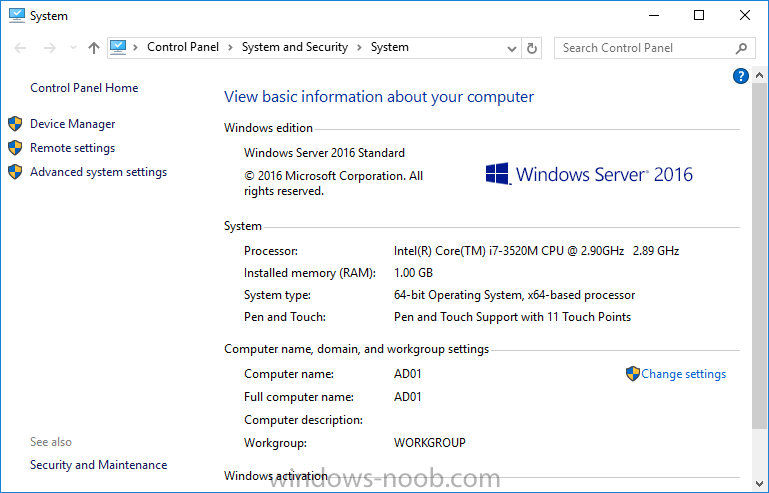
Server name: AD01
Server status: Workgroup joined
- IPv4 Address: 192.168.4.1
- Subnet Mask: 255.255.255.0
- Default Gateway: 192.168.4.199
- DNS: 192.168.4.1
Server name: CM01
Server status: Domain joined
- IPv4 Address: 192.168.4.2
- Subnet Mask: 255.255.255.0
- Default Gateway: 192.168.4.199
- DNS: 192.168.4.1
Server name: Smoothwall
Server roles: A Linux firewall for sharing internet into these virtual machines, in hyperv you can add two legacy nics to achieve this.
Scripts used in this guide
The scripts used in this guide are available at the bottom of the guide in the Downloads section, download them before beginning and extract them to C:\scripts on your destination server(s).
Step 1. Configure Active Directory Domain Services (ADDS)
Note: Perform the following on the AD01 as Local Administrator on the workgroup joined server.
To setup Active Directory Domain Services you could manually click your way through the appropriate wizard in Server Manager or automate it using PowerShell. For your benefit I’ll show you both methods below, all you have to do is choose which one suits you.
Method #1 – Do it manually
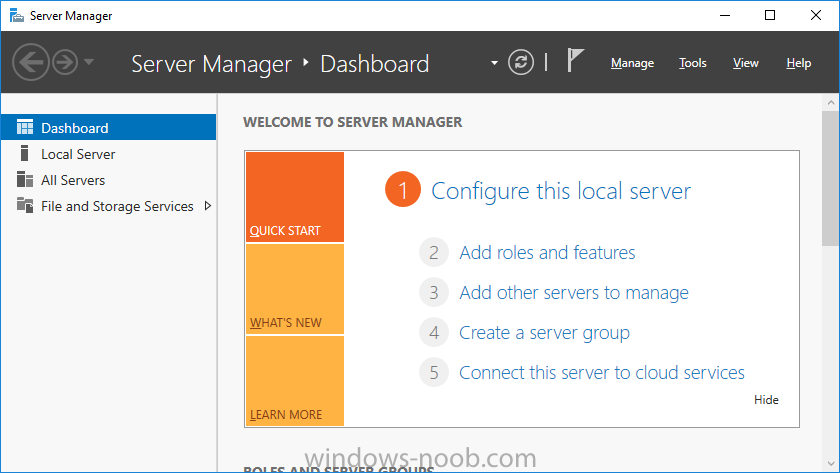
1. To manually setup ADDS, in the start screen search for Server Manager
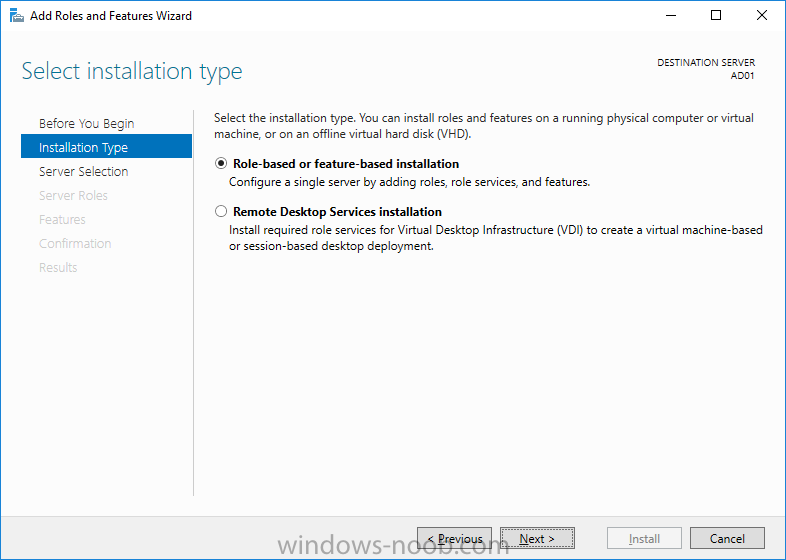
2. Click on Add roles and features, for Installation Type choose Role-based or Feature-based installation
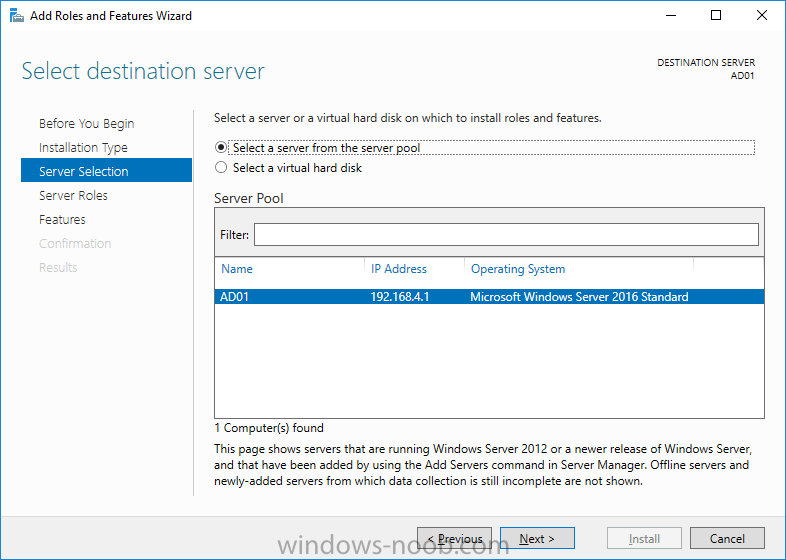
3. For Server Selection choose the local server (AD01)
4. For Server Roles select Active Directory Domain Services and DNS Server, answer yes to install any required components.
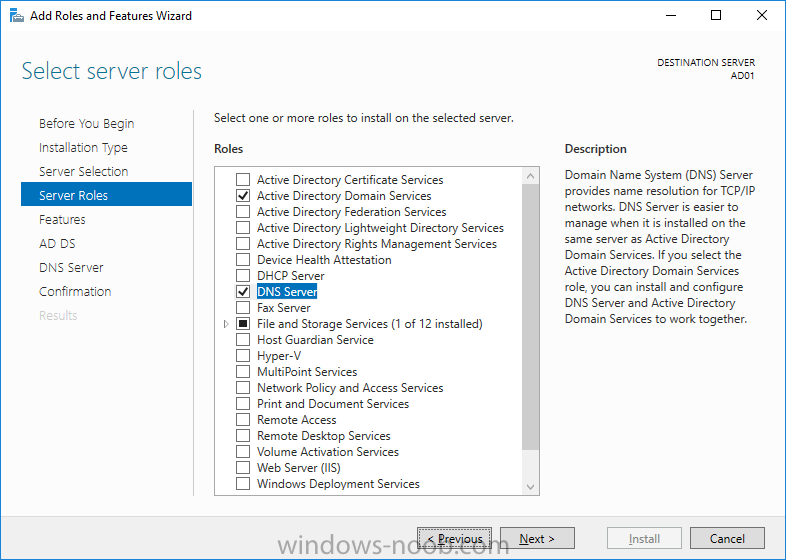
5. Continue the the wizard and click Install, then click Close to complete the wizard.
6. After it’s finished, perform the Post Deployment Configuration by clicking on Promote this server to a domain controller
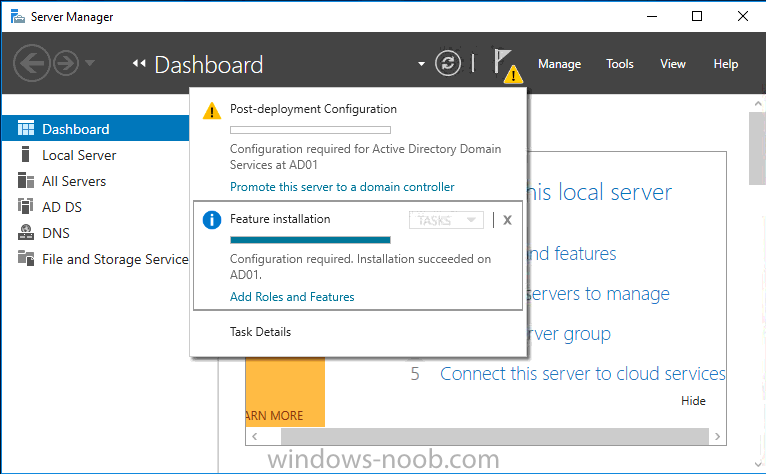
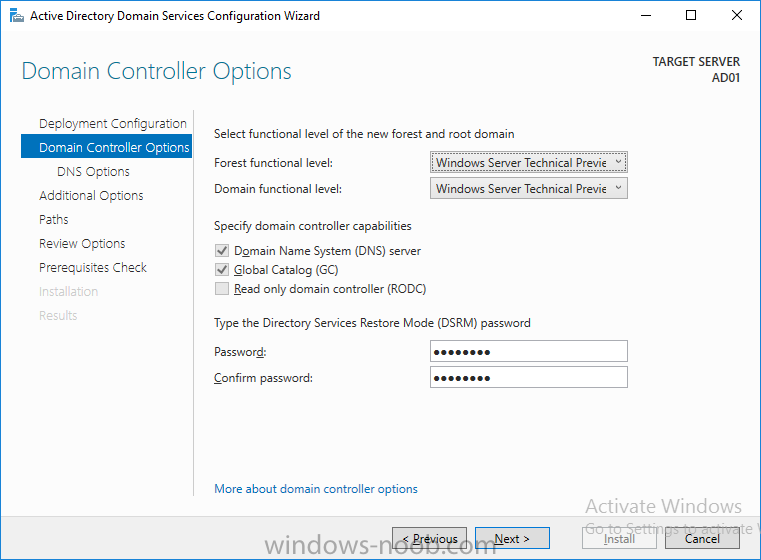
select the Add a new forest option, give it a root domain name such as windowsnoob.lab.local and click through the wizard, when prompted for the password use P@ssw0rd.
Method #2 – Automate it with PowerShell
To configure ADDS automatically, use the ConfigureADDS.ps1 PowerShell script.
1. Copy the script to C:\scripts.
2. Edit the variables as desired before running.
3. Start Windows PowerShell ISE as Administrator and run the script by clicking on the green triangle.

Step 2. Join CM01 to the domain
Note: Perform the following on the CM01 as Local Administrator on the workgroup joined server.
Method #1 – Do it manually
To join the domain manually, bring up the computer properties. Click on Change settings beside the computer name, click Change and enter the appropriate domain join details, reboot when done.

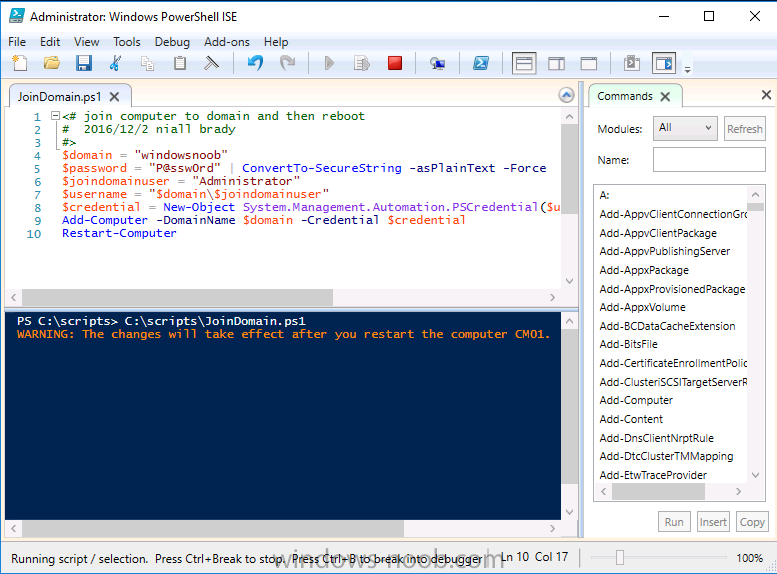
Method #2 – Automate it with PowerShell
To join the domain automatically, use the joindomain.ps1 PowerShell script.
1. Copy the script to C:\scripts.
2. Edit the variables as desired before running.
3. Start Windows PowerShell ISE as Administrator and run the script by clicking on the green triangle.
Step 3. Create users
Note: Perform the following on the Active Directory Domain Controller server (AD01) as Local Administrator
You can do this step manually or automated using the supplied PowerShell script.
Method #1 – Do it manually
To create users manually, add the following users in AD using Active Directory Users and Computers:
* <your user name>, a domain user, this user will become a local administrator on CM01
* Testuser, a domain user
* CM_BA, used for building ConfigMgr created images
* CM_JD, used for joining computers to the domain
* CM_SR used for reporting services.
* CM_CP, a domain user used when installing the Configuration Manager Client for Client Push.
* CM_NAA, a domain user, (Network Access Account) used during OSD
Method #2 – Automate it with PowerShell
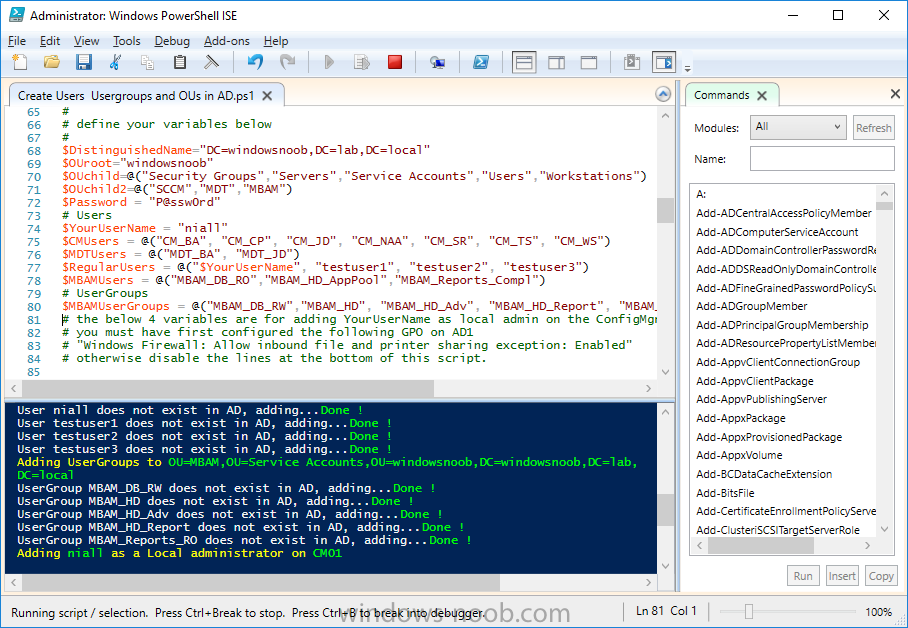
To create users automatically, use the Create Users Usergroups and OUs in AD.ps1 PowerShell script.
Tip: You need to edit the script and adjust the variables to your liking, for example if you want to change the default password. You may also want to rem out the MDT and MBAM user/groups that are created and change some of the user names within the script. To rem out a line place a # in front of it.
1. Copy the script to C:\scripts.
2. Edit the variables [lines 68-80] as desired before running.
3. Start Windows PowerShell ISE as Administrator and run the script by clicking on the green triangle.
After running the PowerShell script in Windows PowerShell ISE you’ll see something like the following.
Step 4. Create the System Management Container
Note: Perform the following on the Active Directory Domain Controller server (AD01) as Local Administrator
For details of why you are doing this see https://technet.micr…y/gg712264.aspx.
Method #1 – Do it manually
Open ADSI Edit, click on Action, Connect To and click Ok, Double Click on Default Naming Context and the DC= that appears below it. Click on the + and scroll down to CN=System. Right Click on CN=System and choose New, Object, choose Container from the options, click Next and enter System Management as the value as shown below

Method #2 – Automate it with PowerShell
To create the System Management container automatically, use the Create System Management container.ps1 PowerShell script.
Step 5. Delegate Permission
Note: Perform the following on the Active Directory Domain Controller server (AD01) as Local Administrator
Method #1 – Do it manually
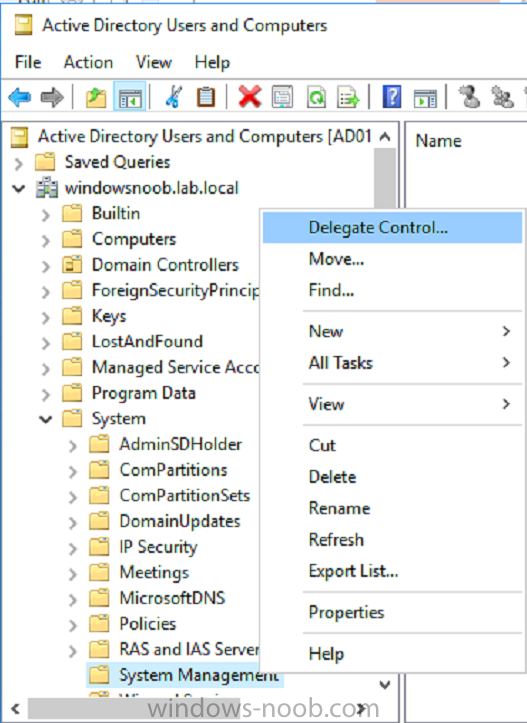
Open Active Directory Users and Computers. Click on view, select Advanced Features. Select the System Management Container, and right click it, choose All Tasks and Delegate Control.
When the Welcome to Delegation of Control Wizard appears click next, then click Add. click on Object Types, select Computers. Type in your Configuration Manager server name (CM01) and click on Check Names, it should resolve. Click Ok, then Next.
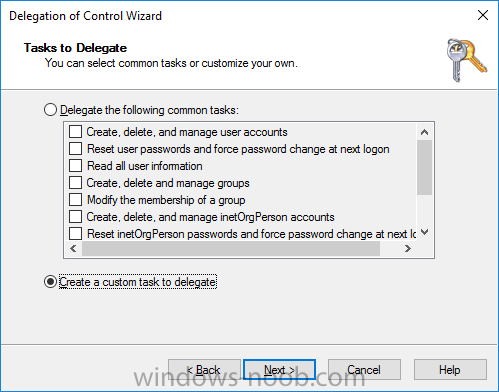
Choose Create a Custom Task to Delegate, click next, make sure This folder, existing objects in this folder and creation of new objects in this folder is selected. Click next, select the 3 permissions General, Property-Specific and Creation-deletion of specific child objects are selected then place a check mark in Full Control.
Tip: Repeat the above process for each site server that you install in a Hierarchy.
Method #2 – Automate it with PowerShell
To delegate permissions to the System Management container automatically, use the Delegate Permissions.ps1 PowerShell script on AD01.
Step 6. Install Roles and Features on CM01
Note: Perform the following on the Configuration Manager server (CM01) as a Local Administrator
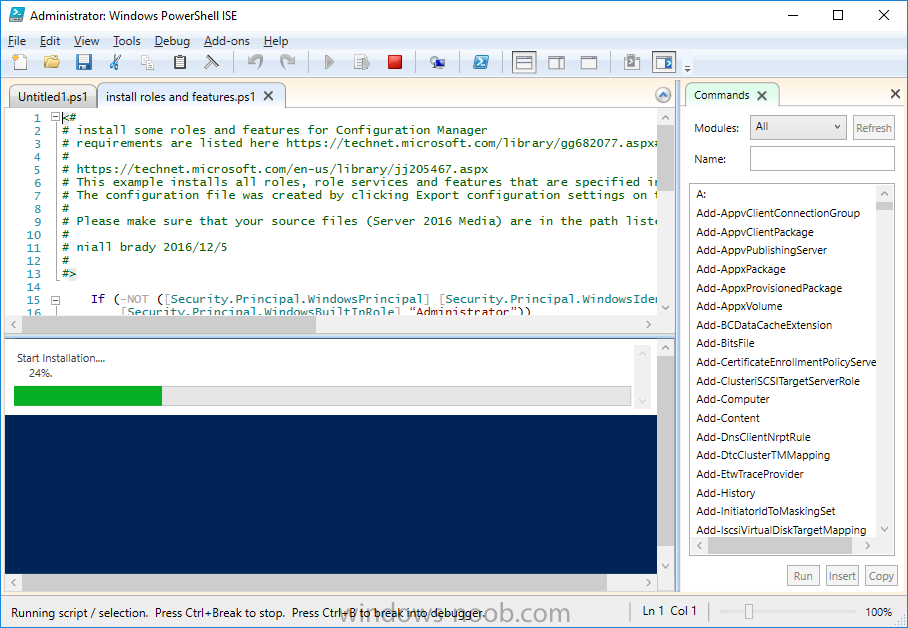
To support various features in System Center Configuration Manager, the setup wizard requires some Server Roles and Features pre-installed. On CM01, login as the username you added to the Local Administrators group and navigate to C:\scripts. The XML files within the Scripts Used in This Guide.zip were created using the Export Configuration File option in Server Manager after manually installing roles and features and the accompanying PowerShell script simply installs it.
Note: Make sure your Server 2016 media is in the drive specified in the script or edit the script to point to the location of the media.
Method #2 – Automate it with PowerShell
To install the roles and features needed, start Windows Powershell ISE as Administrator and run the install roles and features.ps1 script.
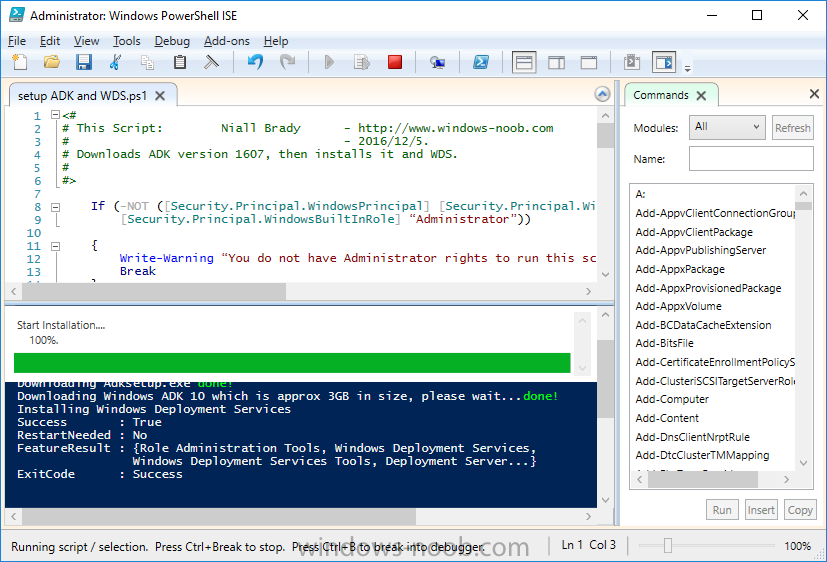
Step 7. Download and install Windows ADK 10 version 1607
Note: Perform the following on the Configuration Manager server (CM01) as a Local Administrator
The ConfigMgr prerequisite checker will check for various things, including ADK components such as USMT and Windows Preinstallation Environment (amongst others), therefore you need to install Windows ADK on your server. To do so, either download ADKsetup from here and manually install it or run the setup ADK and WDS.ps1 PowerShell script to download and install the correct components for you. This script not only downloads the components needed, it’s also installs ADK 10 and then installs Windows Deployment Services. The setup ADK and WDS.ps1 PowerShell script is available in the Scripts Used in this Guide zip file.
Method #2 – Automate it with PowerShell
To download and then install Windows ADK 10 with the components needed, start Windows Powershell ISE as Administrator and run the setup ADK and WDS.ps1 script.
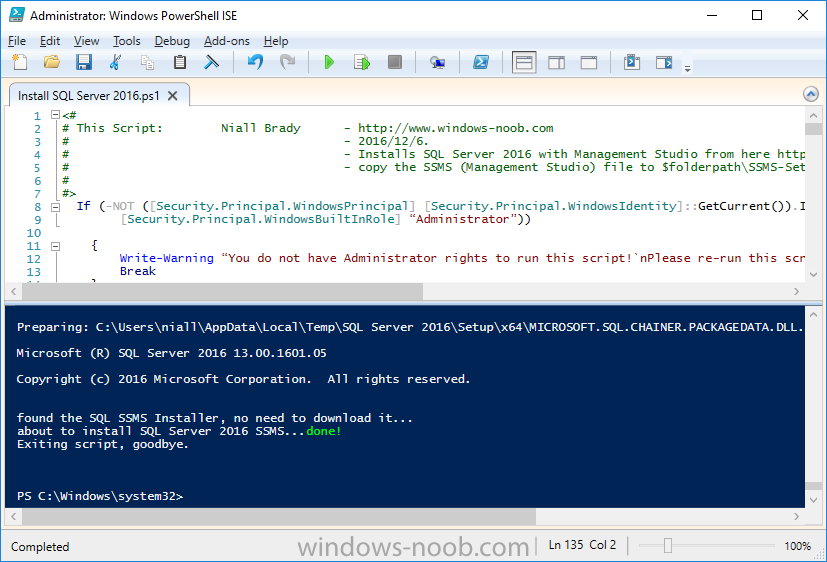
Step 8. Install SQL Server 2016
Note: Perform the following on the Configuration Manager server (CM01) as a Local Administrator
The following script will create a ConfigurationFile.ini used to automate the installation of SQL Server 2016, and after it’s installed the script will download the SSMS exe (Management Studio) and install it.
Note: Make sure your SQL Server 2016 media is in the drive specified in the script or edit the script to point to the location of the media.
Method #2 – Automate it with PowerShell
To install SQL Server2016 use the Install SQL Server 2016.ps1 script.
1. Copy the script to C:\scripts.
2. Edit the variables [lines 17-75] as desired before running.
3. Start Windows PowerShell ISE as Administrator and run the script by clicking on the green triangle.
Step 9. SQL Memory Configuration
Note: Perform the following on the Configuration Manager server (CM01) as a Local Administrator
Depending on your memory configuration and server setup, you may also want to configure SQL memory limits as per the following guidance prior to installing ConfigMgr otherwise you’ll get warnings in the Prerequisite checker when it runs the Server Readiness checks.
- Configuration Manager requires SQL Server to reserve a minimum of 8 gigabytes (GB) of memory for the central administration site and primary site and a minimum of 4 gigabytes (GB) for the secondary site. This memory is reserved by using the Minimum server memory setting under Server Memory Options and is configured by using SQL Server Management Studio. For more information about how to set a fixed amount of memory, see here.
- If your SQL Server is configured for unlimited memory usage, you should configure SQL Server memory to have a maximum limit.
Method #1 – Do it manually
Open Management Studio, select CM01, right click, choose Properties, select memory and configure the values as appropriate for your environment.
Method #2 – Automate it with PowerShell
<Coming soon>
Step 10. Restart the Server
Note: Perform the following on the Configuration Manager server (CM01) as a Local Administrator
Open an administrative command prompt and issue the following command:
shutdown /r
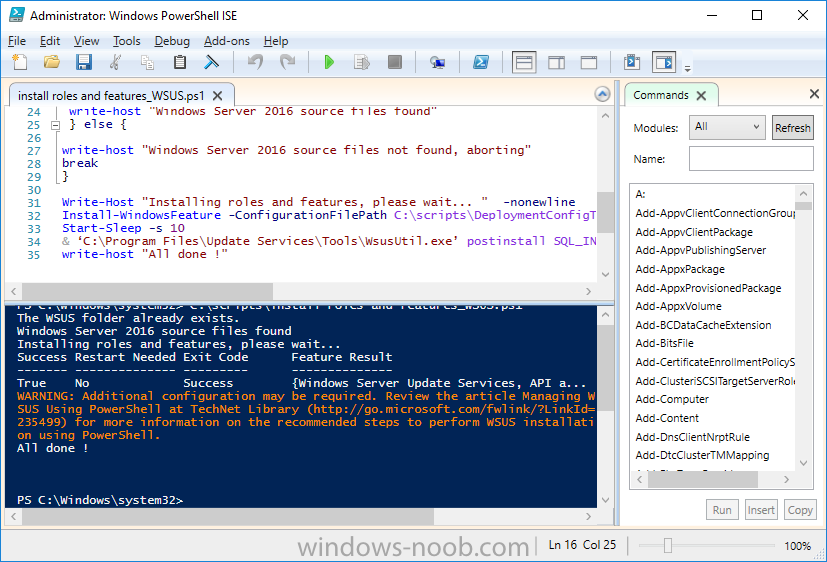
Step 11. Install the WSUS role
Note: Perform the following on the Configuration Manager server (CM01) as a Local Administrator
Now that SQL server is installed, we can utilize that for the WSUS database. To install WSUS and configure it to use the SQL servers database instead of the Windows Internal Database, do as follows:
Method #1 – Do it manually
<Coming soon>
Method #2 – Automate it with PowerShell
Browse to the location where you extracted the scripts, C:\scripts. Start Windows PowerShell ISE as administrator, open the Install roles and features_WSUS.ps1 script, edit the $servername variable and replace CM01 with the ServerName your are installing ConfigMgr on (SQL server). Make sure to have your Windows Server 2016 SXS media in the path referred to by $Sourcefiles.
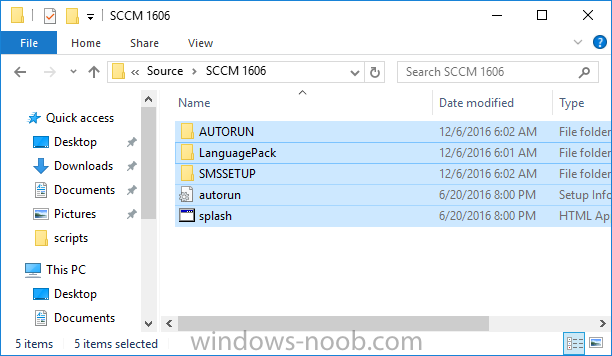
Step 12. Download and extract the content
Note: Perform the following on the Configuration Manager server (CM01) as a Local Administrator
To install System Center Configuration Manager version 1606 you’ll need to download the content. You can download it from Microsoft’s Volume license site for use in production or from MSDN for use in a lab.
Method #1 – Do it manually
For the purposes of this guide I used the 1606 release from VLSC. This iso is named SW_DVD5_Sys_Ctr_ConfigMgrClt_ML_1606_MultiLang_ConfMgr_SCEP_MLF_X21-16461.ISO and is 1.20GB in size.
Once downloaded, I mounted the ISO in Windows File Explorer and copied the contents to C:\Source\SCCM 1606 on CM01.
Step 13. Download the ConfigMgr Prerequisites
Note: Perform the following on the Configuration Manager server (CM01) as a Local Administrator
You can download the prerequisites during ConfigMgr setup or in advance. As you’ll probably want to install more than one copy of ConfigMgr (one lab, one production) it’s nice to have the prerequisites downloaded in advance. To do that, open a PowerShell prompt with administrative permissions and navigate to the following folder:
C:\Source\SCCM 1606\smssetup\bin\X64
Run the following line
.\SetupDL.exe C:\Source\Downloads
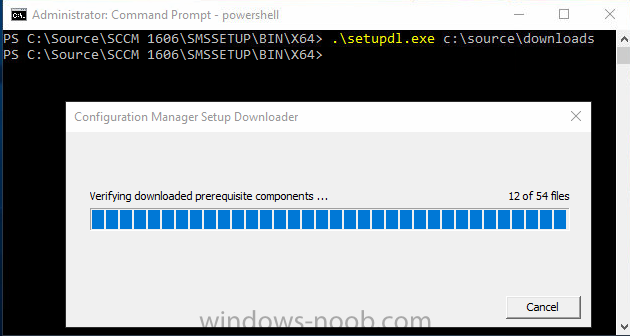
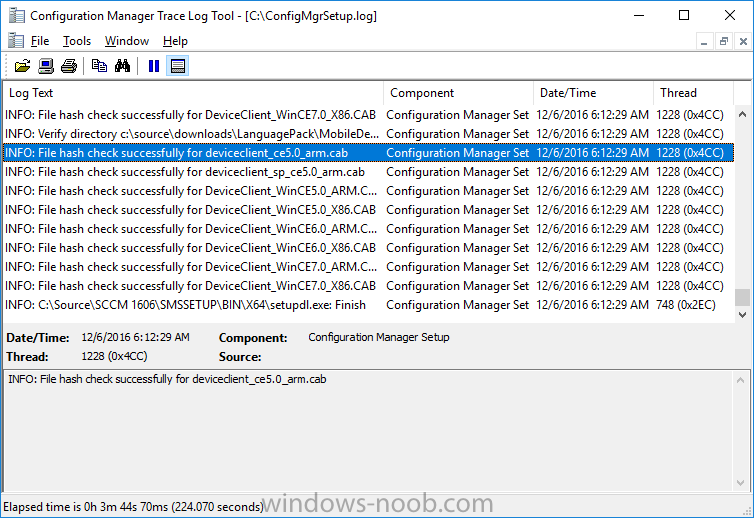
Tip: Browse to C:\source\SCCM 1606\SMSSETUP\TOOLS and double click on CMTrace.exe, answer Yes to the default logging question. Then, using Windows File Explorer, browse to C:\ and double click on ConfigMgrSetup.log which will open the log file in CMTrace. This will allow you to view any errors or problems with the download of the prerequisites in real time.
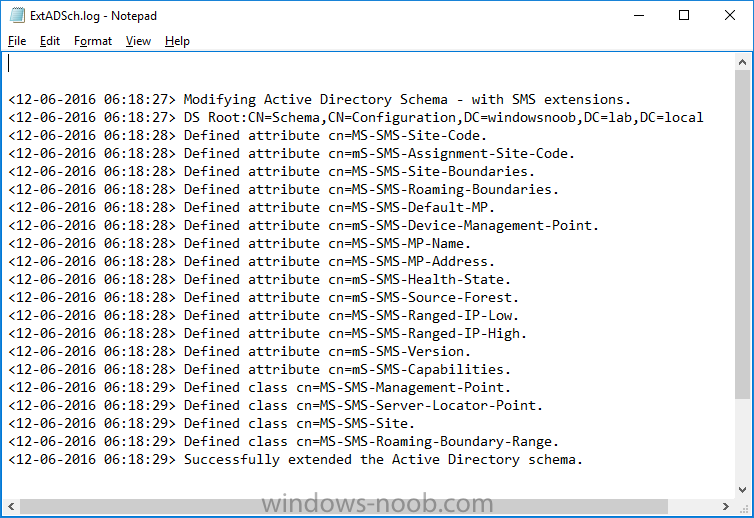
Step 14. Extend the Schema
Note: Perform the following on the Domain controller server (AD01) as Administrator. You do not have to extend the Active Directory schema if it was already extended for Configuration Manager previously.
1. Using Windows File Explorer on the Active Directory Domain Controller, browse to \\<server>\c$\Source\SCCM 1606\SMSSETUP\BIN\X64 where <server> is your ConfigMgr server
2. locate extadsch.exe, right click and choose Run As Administrator.
3. A command prompt window will appear briefly as the schema is extended, check in C:\ for a log file called ExtADSch.log it should look similar to this
Step 15. Install SCCM Current Branch (version 1606)
Note: Perform the following on the ConfigMgr server (CM01) as Administrator.
Method #1 – Do it manually
<Coming soon>
Method #2 – Automate it with PowerShell
You will need to edit the Install SCCM Current Branch version 1606.ps1 script and replace the variables inside with those that work in your environment. For example, to change the ProductId open the script in Windows ISE, locate the line that reads $ProductID= and either enter your ConfigMgr Product Key or use the evaluation version of ConfigMgr by entering the word EVAL.
1. Copy the script to C:\scripts.
2. Edit the variables [lines 16-17 & lines 32-57] as desired before running.
3. Start Windows PowerShell ISE as Administrator and run the script by clicking on the green triangle.
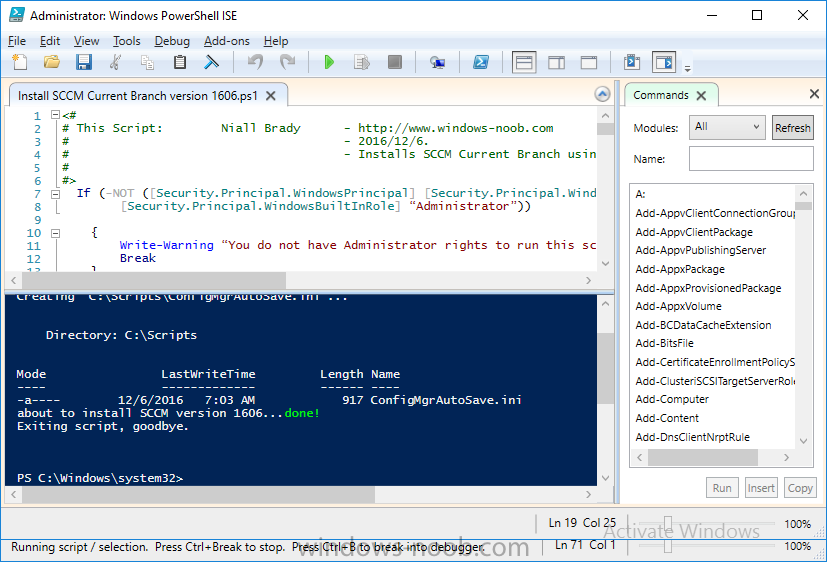
Once the script completes sucessfully, System Center Configuration Manager Current Branch (version 1606) is installed.
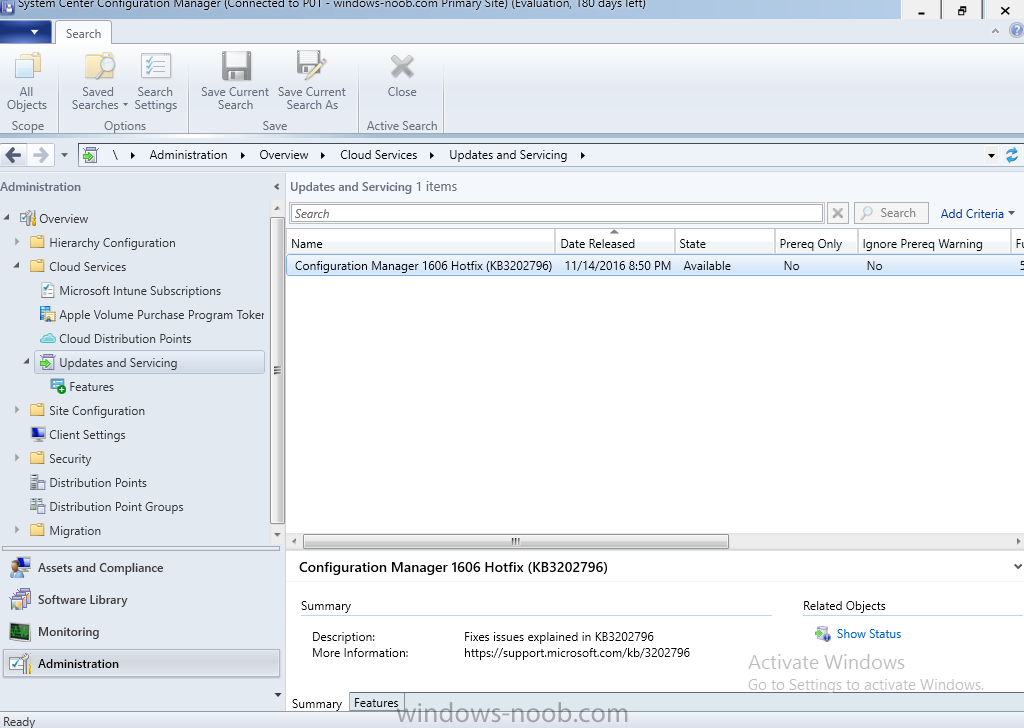
Step 16. Upgrade to SCCM Current Branch (version 1610)
Note: Perform the following on the ConfigMgr server (CM01) as Administrator.
Method #1 – Do it manually
As the upgrade process is a whole blog post by itself, please follow my guide here.
Summary
In this guide you used a lot of PowerShell to automate most of Installing System Center Configuration Manager Current Branch (version 1606), including installing and configuring SQL Server 2016 on Windows Server 2016. You then upgraded to version 1610 using Updates and Servicing.
Related Reading
- Use a command line to install System Center Configuration Manager sites – https://docs.microso…o-install-sites
- Supported operating systems for System Center Configuration Manager site system servers – https://docs.microso…-system-servers
- Install-WindowsFeature – https://technet.micr…y/jj205467.aspx
Downloads
You can download a Microsoft Word copy of this guide here dated 2016/12/6  How can I install System Center Configuration Manager version 1606 (Current Branch) on Windows Server 2016 with SQL 2016.zip 1.41MB 15 downloads
You can download the PowerShell scripts used above here Scripts Used In This Guide.zip 22.82KB 14 downloads
