
Introduction
System Center 2012 Configuration Manager was released to General Availability (GA) April 17th, 2012 at MMS 2012. If you’ve been following my previous series of Step by Step guides on System Center 2012 Configuration Manager (from Beta 1 through to Release Candidate 2) then you’ll know where this is going, we are going to install System Center 2012 Configuration Manager in a LAB from scratch and configure it, use it, test it, learn it, love it 🙂
This is Part 1 of a new series which will cover the installation, setup, configuration and usage of Microsoft System Center 2012 Configuration Manager.
To see the an index of all parts please refer to (and bookmark) this link.
Technet Recommended Reading:-
Release Notes for System Center 2012 Configuration Manager – http://technet.micro…y/hh691020.aspx
Fundamentals of Configuration Manager – http://technet.micro…y/gg682106.aspx
Supported Configurations for Configuration Manager – http://technet.micro…y/gg682077.aspx
Planning for Configuration Manager Sites and Hierarchy – http://technet.micro…y/gg682075.aspx
Getting Started with Configuration Manager 2012 – http://technet.micro…y/gg682144.aspx
What’s New in Configuration Manager – http://technet.micro…y/gg699359.aspx
Planning for Site Systems in Configuration Manager – http://technet.micro…y/gg712282.aspx
Install Sites and Create a Hierarchy for Configuration Manager – http://technet.micro…y/gg712320.aspx
Technical Reference for Site Communications in Configuration Manager – http://technet.micro…y/gg712990.aspx
Migrating from Configuration Manager 2007 to Configuration Manager 2012 – http://technet.micro…y/gg682006.aspx
Frequently Asked Questions for Configuration Manager – http://technet.micro…y/gg682088.aspx
Configuration Manager 2012 introduces the central administration site (often referred to as the CAS) and some changes to primary and secondary sites. The following tables summaries these sites and how they compare to sites in Configuration Manager 2007.
Central administration site
The central administration site coordinates inter-site data replication across the hierarchy by using Configuration Manager database replication. It also enables the administration of hierarchy-wide configurations for client agents, discovery, and other operations. Use this site for all administration and reporting for the hierarchy. You should probably only consider installing a CAS if you intend to manage more than 100,000 clients, why ? because the limit for Primary sites is 100,000 clients so if you want to manage more than that you’ll need more than one primary and therefore will need a CAS. There are other reasons for installing or not installing a CAS (and opinions too!) and a quick search on the internet will reveal them.
Here’s some information about a CAS that you need to know:-
- A central administration site can support up to 25 child primary sites.
- When using SQL Server Enterprise for the site database at the central administration site, the shared database and hierarchy supports up to 400,000 clients. The maximum number of supported clients per hierarchy depends on the SQL Server edition in the central administration site, and is independent of the SQL Server edition at primary or secondary sites. Configuration Manager supports up to 400,000 clients per hierarchy when you use the default settings for all Configuration Manager features.
- When you use SQL Server Standard for the site database at the central administration site, the shared database and hierarchy supports up to 50,000 clients. This is because of how the database is partitioned. After you install Configuration Manager, if you then upgrade the edition of SQL Server at the central administration site from Standard to Enterprise, the database does not repartition and this limitation remains.
Although this is the site at the top of the hierarchyin Configuration Manager 2012, it has the following differences from a central site in Configuration Manager 2007:
- Does not process client data.
- Does not accept client assignments.
- Does not support all site system roles.
- Participates in database replication
Primary site
Manages clients in well-connected networks. When you use SQL Server that is installed on the same computer as the site server, the primary site can support up to 50,000 clients. When you use SQL Server that is installed on a computer that is remote from the site server, the primary site can support up to 100,000 clients.
Primary sites in Configuration Manager 2012 have the following differences from primary sites in Configuration Manager 2007:
- Additional primary sites allow the hierarchy to support more clients.
- Cannot be tiered below other primary sites.
- No longer used as a boundary for client agent settings or security.
- Participates in database replication.
Secondary site
Controls content distribution for clients in remote locations across links that have limited network bandwidth.
Secondary sites in Configuration Manager 2012 have the following differences from secondary sites in Configuration Manager 2007:
- SQL Server is required and SQL Server Express will be installed during site installation if required.
- A proxy management point and distribution point are automatically deployed during the site installation.
- Secondary sites can be tiered to support content distribution to remote locations.
- Participates in database replication.
Step 1. Create the Lab Environment
In previous Guides you’ve seen how to create a standalone ConfigMgr server. For this guide you are going to create a a small hierarchy in your LAB consisting of a CAS and a Primary. In Production you should most likely not use a CAS unless you are managing over 100,000 clients (as stated above), however being familiar with how a small hierarchy works is good for you to know. I use Hyper-v exclusively in my LAB and that’s what all these virtual machines will be running on. I chose to install Windows Server 2008 R2 standard as the server OS for the three lab computers below.
Active Directory, DNS, DHCP
- AD1 512mb, 30gb hdd, server 2008r2sp1 Standard
Central Administration Site Server
- CAS 2048mb, 127gb hdd, server 2008r2sp1 standard, os on C:\ 30gb part, D:\ rest of drive
Primary Server
- P01 2048mb, 127gb hdd, server 2008r2sp1 standard, os on C:\ 30gb part, D:\ rest of drive
Once done I joined CAS and P01 to my domain (SERVER2008R2), verified DNS was working correctly via nslookup and was ready to begin the steps below.
Create AD users:
Note: Perform the following on the Active Directory Domain Controller server (AD1) as Local Administrator
In addition I created some accounts in AD, namely:
* SMSadmin, a domain user
* Testuser, a domain user
* Testuser2, a domain user
* Testuser3, a domain user
* DomJoin, a domain user,(for joining computers to the domain)
* ReportsUser, a domain user for reporting services.
* ClientInstall, a domain user used when installing the Configuration Manager Client for Client Push. This user must be a local administrator on computers you want to install the Configuration Manager Client.
* SCCMNAA, a domain user, (Network Access Account) used during OSD
Create Local Administrator accounts:
Note: Perform the following on the SCCM 2012 server as Local Administrator
On both the CAS and P01 ConfigMgr servers add the SMSadmin and ClientInstall users to the Local Administrators group.
Step 2. Get the ConfigMgr 2012 ISO and extract it
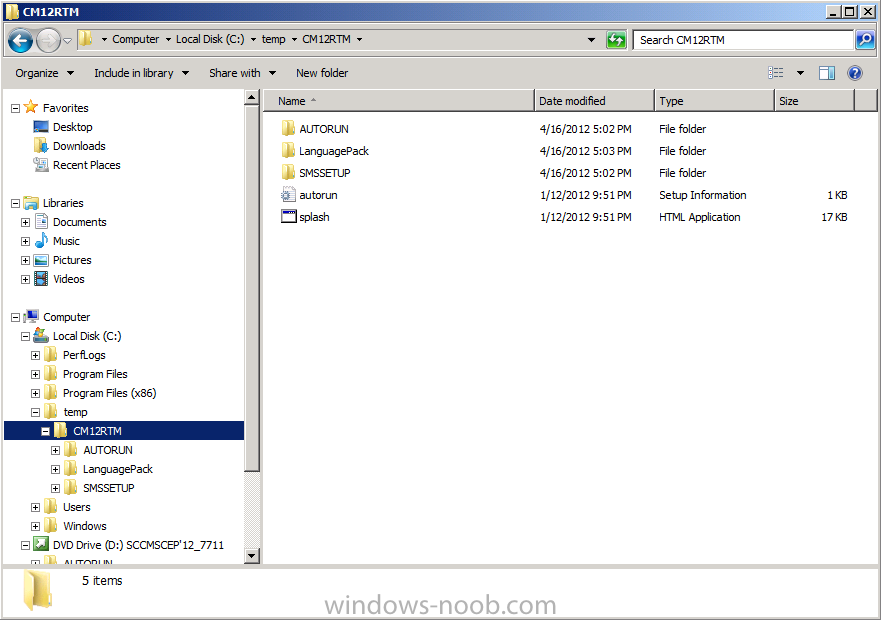
Download your Configuration Manager 2012 ISO (I used the following ISO for this Guide SW_DVD5_Sys_Ctr_ConfigMgrClt_ML_2012_MultiLang_Client_SCEP_MLF_X17-95285.ISO) from Technet or MSDN and mount the iso so that you can copy it’s contents to a temporary folder on your Active Directory computer (AD1) like so.
C:\Temp\CM12RTM
Step 3. Create The System ManageMent Container
Note: Perform the following on the Active Directory Domain Controller as a Domain Administrator
Open ADSI Edit, click on Action, Connect To and click Ok, Double Click on Default Naming Context and the DC= that appears below it. Click on the + and scroll down to CN=System.
Right Click on CN=System and choose New, Object
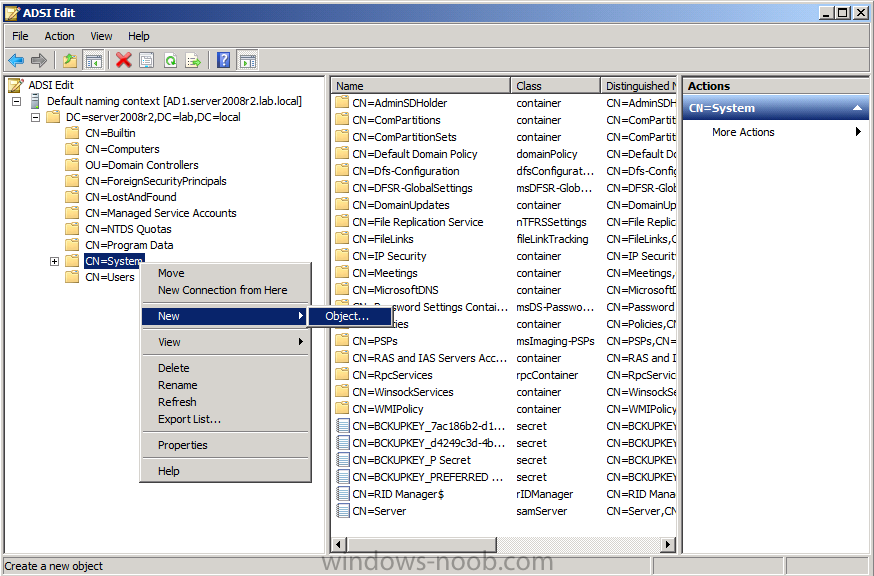
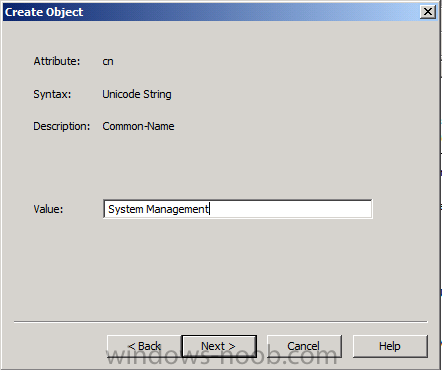
Choose Container from the options, click Next and enter System Management as the value.
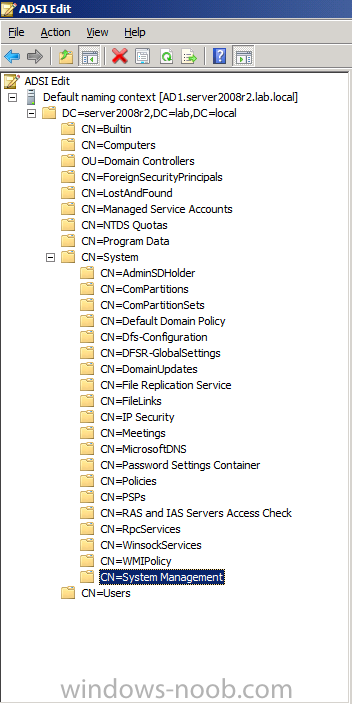
Click Next and Finish. Press F5 to refresh ADSI Edit and you should now see the new System Management Container.
Close ADSI Edit.
Step 4. Delegate Permission to the System Management Container.
Note: Perform the following on the Active Directory Domain Controller as a Domain Administrator
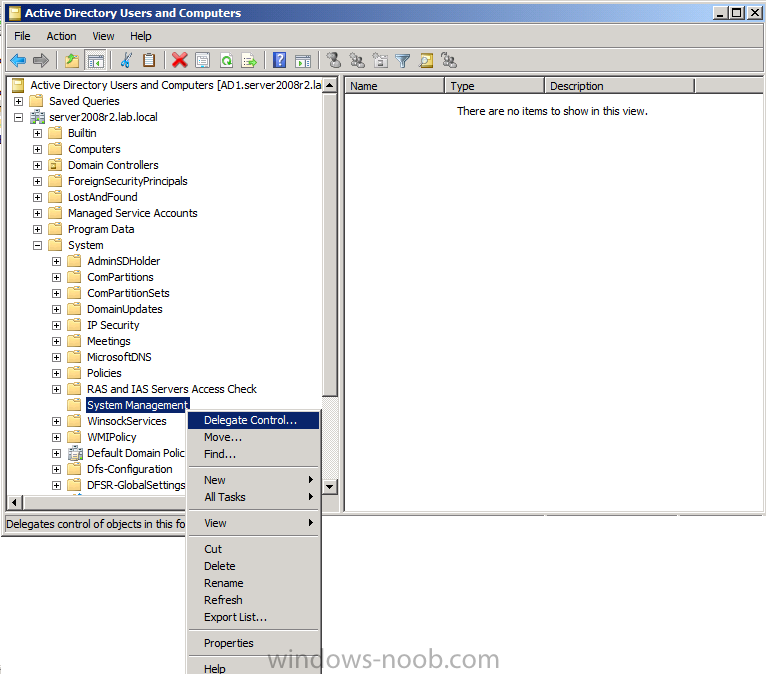
Open Active Directory Users and Computers. Click on view, select Advanced Features.
Select the System Management Container, and right click it, choose All Tasks and Delegate Control.
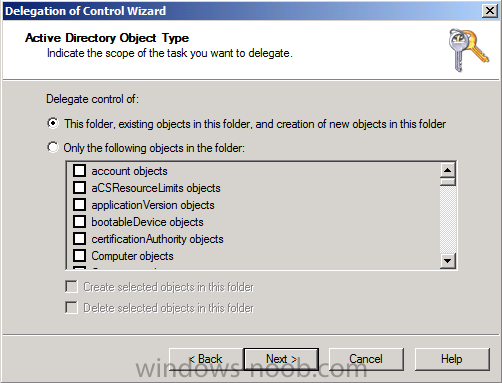
When the Welcome to Delegation of Control Wizard appears click next, then click Add. click on Object Types, select Computers. Type in your Configuration Manager server name for the CAS Server (CAS) and click on Check Names, it should resolve.

Click Ok, then Next. Choose Create a Custom Task to Delegate, click next, make sure This folder, existing objects in this folder and creation of new objects in this folder is selected.
click next, select the 3 permissions General, Property-Specific and Creation-deletion of specific child objects are selected then place a check mark in FULL CONTROL
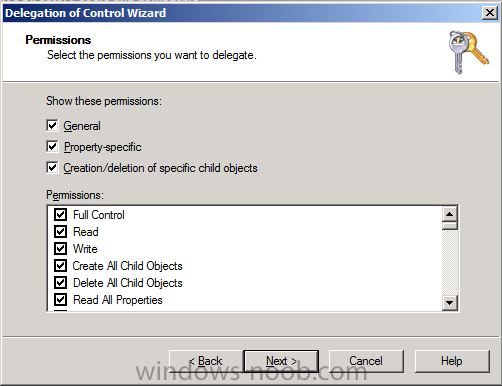
click next then Finish.

Repeat all the above steps for P01 (our Primary Server).

Failure to do the above will mean that the System Management Container in AD will NOT POPULATE with ConfigMgr site info needed by the Clients and you will see many errors in your site status warning you about this.
Note: Repeat the above for Each site server that you install in a Hierarchy.
Step 5. Extend the Active Directory schema for Configuration Manager
Note: Perform the following on the Active Directory Domain Controller as a Domain Administrator
Note:-
The Active Directory schema extensions for Configuration Manager 2012 are unchanged from those used by Configuration Manager 2007. If you extended the schema for Configuration Manager 2007, you do not need to extend the schema again for Configuration Manager 2012.
Perform the below on your Active Directory server, simply browse the network to your Active Directory server \\ad1\c$\ and locate the folder where you uncompressed ConfigMgr (temp\CM12RTM) and find \SMSSetup\Bin\x64\Extadsch.exe, right click and choose Run As Administrator.
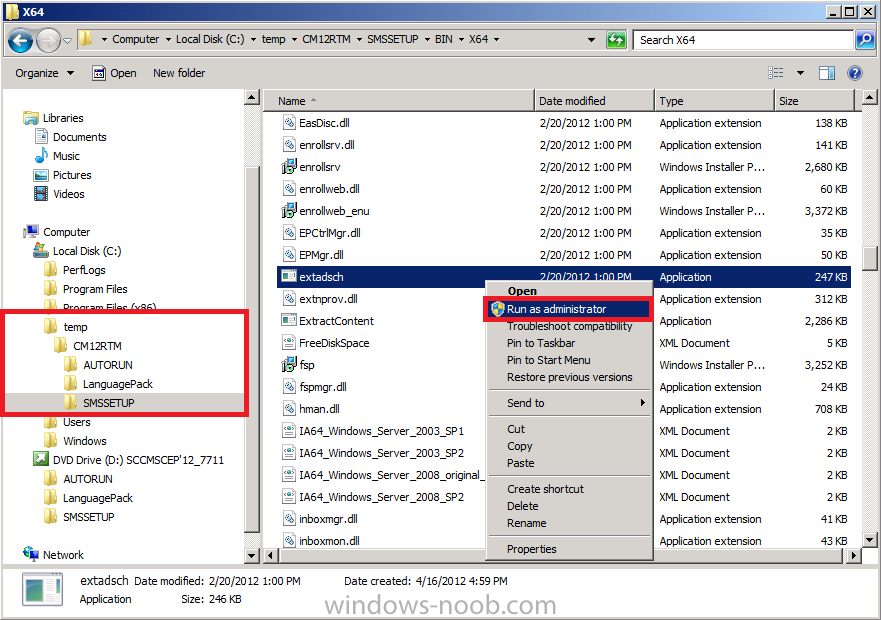
A command prompt window will appear briefly as the schema is extended, check in c:\ for a log file called ExtADSch.log it should look similar to this
Quote
<04-17-2012 21:40:59> DS Root:CN=Schema,CN=Configuration,DC=server2008r2,DC=lab,DC=local
<04-17-2012 21:41:02> Defined attribute cn=MS-SMS-Site-Code.
<04-17-2012 21:41:02> Defined attribute cn=mS-SMS-Assignment-Site-Code.
<04-17-2012 21:41:02> Defined attribute cn=MS-SMS-Site-Boundaries.
<04-17-2012 21:41:02> Defined attribute cn=MS-SMS-Roaming-Boundaries.
<04-17-2012 21:41:02> Defined attribute cn=MS-SMS-Default-MP.
<04-17-2012 21:41:03> Defined attribute cn=mS-SMS-Device-Management-Point.
<04-17-2012 21:41:03> Defined attribute cn=MS-SMS-MP-Name.
<04-17-2012 21:41:03> Defined attribute cn=MS-SMS-MP-Address.
<04-17-2012 21:41:03> Defined attribute cn=mS-SMS-Health-State.
<04-17-2012 21:41:03> Defined attribute cn=mS-SMS-Source-Forest.
<04-17-2012 21:41:03> Defined attribute cn=MS-SMS-Ranged-IP-Low.
<04-17-2012 21:41:03> Defined attribute cn=MS-SMS-Ranged-IP-High.
<04-17-2012 21:41:03> Defined attribute cn=mS-SMS-Version.
<04-17-2012 21:41:03> Defined attribute cn=mS-SMS-Capabilities.
<04-17-2012 21:41:05> Defined class cn=MS-SMS-Management-Point.
<04-17-2012 21:41:06> Defined class cn=MS-SMS-Server-Locator-Point.
<04-17-2012 21:41:07> Defined class cn=MS-SMS-Site.
<04-17-2012 21:41:07> Defined class cn=MS-SMS-Roaming-Boundary-Range.
<04-17-2012 21:41:08> Successfully extended the Active Directory schema.<04-17-2012 21:41:08> Please refer to the ConfigMgr documentation for instructions on the manual
<04-17-2012 21:41:08> configuration of access rights in active directory which may still
<04-17-2012 21:41:08> need to be performed. (Although the AD schema has now be extended,
<04-17-2012 21:41:08> AD must be configured to allow each ConfigMgr Site security rights to
<04-17-2012 21:41:08> publish in each of their domains.)
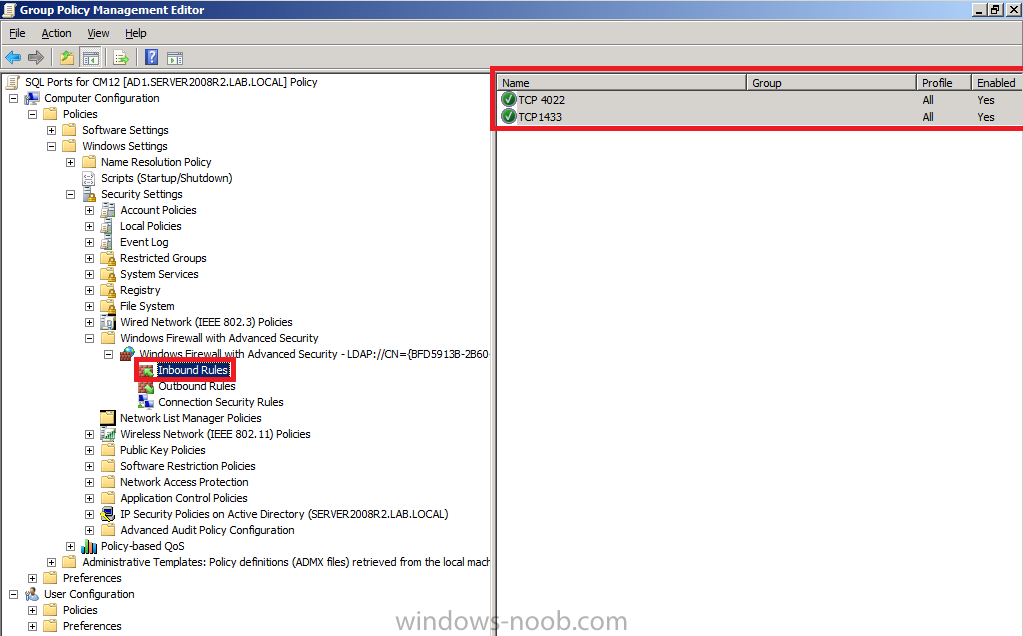
Step 6. Open TCP port 1433 and 4022 for SQL replication
Note: Perform the following on the Active Directory Domain Controller as a Domain Administrator
Start the Group Policy Management tool and create a new GPO.
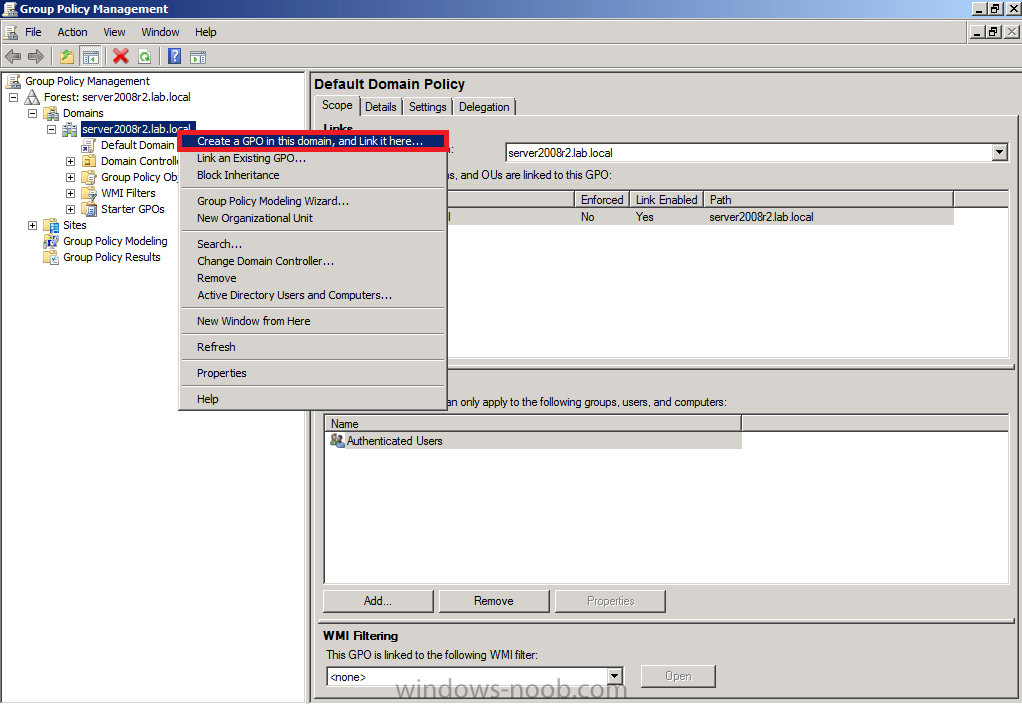
Give the GPO a name such as SQL Ports for CM12. When done, right click on the GPO and choose Edit.
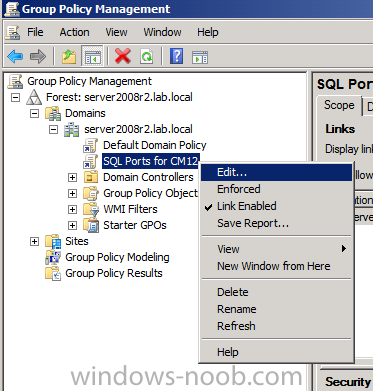
Select Computer Configuration, Policies, Windows Settings, Security Settings, Windows Firewall with Advanced Security and select Inbound Rules, choose New Rule and follow the wizard for opening up TCP port 1433 as per this guide on Technet. Once done, repeat the above for Port 4022.
Step 7. Install .NET 3.5.1 and WCF Activation
Note: Perform the following on the Configuration Manager 2012 servers (CAS and P01) as SMSadmin
In Server Manager select Features, Add Features, Select .NET Framework 3.5.1, also select WCF Activation and when prompted answer Add Required Role Services click next and next again
Verify the following IIS components are installed in addition to the ones preselected by the wizard.
Quote
Static Content
Default Document
Directory Browsing
HTTP Errors
HTTP RedirectionApplication Development
ASP.NET
.NET Extensibility
ASP
ISAPI Extensions
ISAPI Filters
Health and Diagnostics
HTTP logging
Logging tools
Request Monitor
Tracing
Security
Basic Authentication
Windows Authentication
URL Authorization
Request Filtering
IP and Domain Restrictions
Performance
Static Content Compression
Management Tools
IIS Management Console
IIS Management Scripts and Tools
Management Service
IIS 6 Management Compatibilty
IIS 6 Metabase Compatibility
IIS 6 WMI Compatibility
IIS 6 Scripting Tools
IIS 6 Management Console
answer yes to any additional prompts, then Click Next and Install and close when done.
Step 8. Download and install .NET 4
Note: Perform the following on the Configuration Manager 2012 servers (CAS and P01) as SMSadmin
Download .NET 4 from here (webinstall) or here (Standalone). Double click the file, After a while it will complete, Click Finish when done
restart when prompted
Tip: In some scenarios, such as when IIS is installed or reconfigured after the .NET Framework version 4.0 is installed, you must explicitly enable ASP.NET version 4.0. For example, on a 64-bit computer that runs the .NET Framework version 4.0.30319, run the following command:%windir%\Microsoft.NET\Framework64\v4.0.30319\aspnet_regiis.exe –i –enable
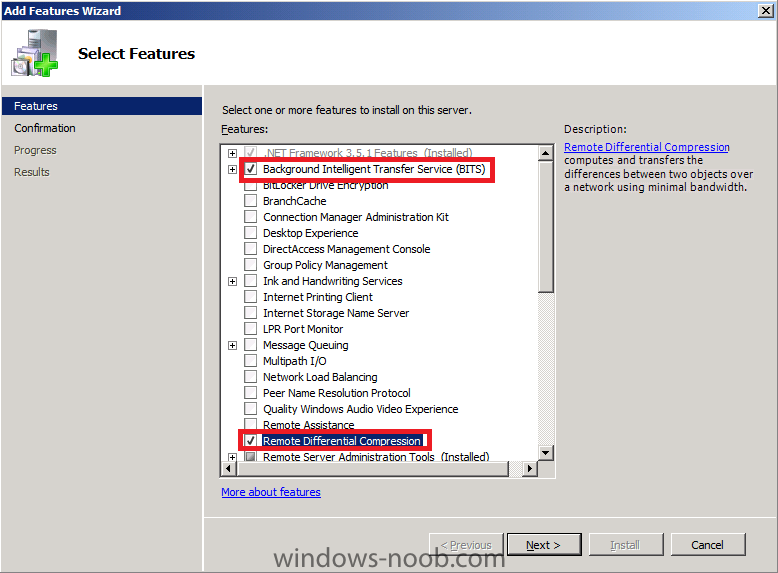
Step 9. Add BITS and Remote Differential Compression
Note: Perform the following on the Configuration Manager 2012 servers (CAS and P01) as SMSadmin
Finally, in Server Manager click on Add Features, place a selection mark in BITS and RDC.
Step 10. Download Microsoft SQL Server 2008 R2 SP1 CU6
Note: Perform the following on the Active Directory server AD1 as an Administrator
The supported versions of SQL Server 2008 and SQL Server 2008 R2 are listed here on Technet:- http://technet.micro…nfigSQLDBconfig
In this guide I will be installing SQL Server 2008 R2 SP1 CU6. The currently supported version for Configuration Manager 2012 is SQL Server 2008 R2 SP1 CU6.
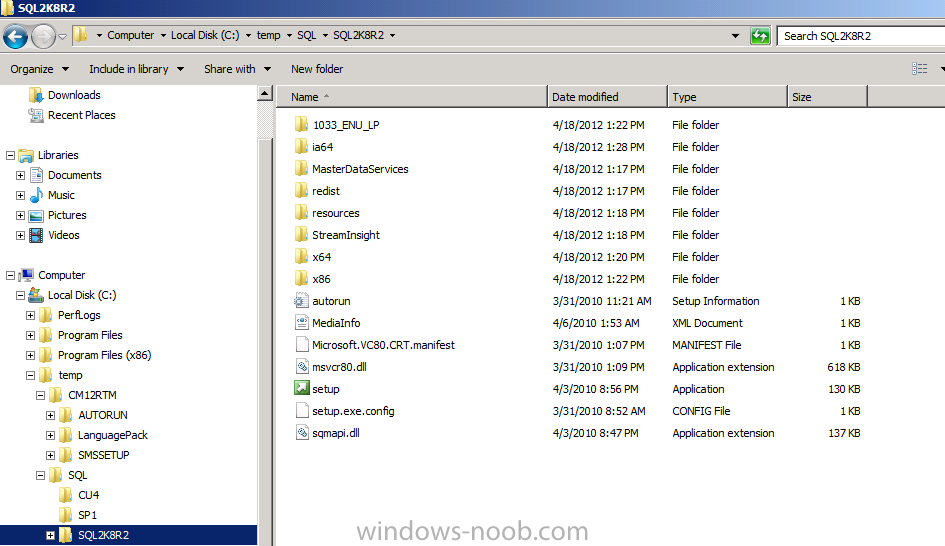
Download the following from Technet:- File Name: en_sql_server_2008_r2_standard_x86_x64_ia64_dvd_521546.iso (4177 MB)
Download Microsoft® SQL Server® 2008 R2 Service Pack 1
Download Cumulative update package 6 for SQL Server 2008 R2 Service Pack 1
Step 11. Install SQL Server 2008 R2
Note: Perform the following on the Configuration Manager 2012 servers (CAS and P01) as SMSadmin
Note: If you use SQL Server Standard, your server will only support 50k clients.
Database collation
The instance of SQL Server in use at each site must use the following collation: SQL_Latin1_General_CP1_CI_AS. (more info below)
SQL Server instance
You must use a dedicated instance of SQL Server for each site.
As we are setting up more than one server with SQL Server, we’ll copy the source files to our Active Directory server (AD1) temp folder (C: emp) or to a temp folder on both the CAS and P01 servers and run each install script from the directory where you copied those files, so if installing CU6 then run the script from the directory where the CU6 SQLServer2008R2-KB2679367-x64.exe file is present.
For SQL Collation note that you must use SQL_Latin1_General_CP1_CI_AS. If you want to change the collation or find out what the collation is set to on an already installed SQL Server please see the following post.
To Install SQL server you can follow this guide but please install SQL on D:\Program Files\Microsoft SQL Server and when running setup.exe right click and choose Run as Administrator, alternatively you can script the installation by using the scripts below. Test them first to make sure you have no typos.
SQL Server 2008 R2 RTM Setup:
This will install to D:\Program Files\Microsoft SQL Server if you don’t want to use that location you can change it by changing the /INSTANCEDIR below.
setup.exe /q /ACTION=Install /ERRORREPORTING="False" /FEATURES=SQLENGINE,RS,AS,IS,SSMS,TOOLS,BIDS,ADV_SSMS,CONN /INSTANCENAME=MSSQLSERVER /INSTANCEDIR="D:\Program Files\Microsoft SQL Server" /SQLSVCACCOUNT="NT AUTHORITY\System" /SQLSYSADMINACCOUNTS="BUILTIN\ADMINISTRATORS" /SQLSVCSTARTUPTYPE=Automatic /AGTSVCACCOUNT="NT AUTHORITY\SYSTEM" /AGTSVCSTARTUPTYPE=Automatic /RSSVCACCOUNT="NT AUTHORITY\System" /RSSVCSTARTUPTYPE=Automatic /ASSVCACCOUNT="NT AUTHORITY\System" /ASSVCSTARTUPTYPE=Disabled /ASSYSADMINACCOUNTS="BUILTIN\ADMINISTRATORS" /ISSVCACCOUNT="NT AUTHORITY\System" /ISSVCSTARTUPTYPE=Disabled /ASCOLLATION="Latin1_General_CI_AS" /SQLCOLLATION="SQL_Latin1_General_CP1_CI_AS" /TCPENABLED="1" /NPENABLED="1" /IAcceptSQLServerLicenseTerms
SQL Server 2008 R2 SP1 Setup:
SQLServer2008R2SP1-KB2528583-x64-ENU.exe /Action=Patch /IAcceptSQLServerLicenseTerms /AllInstances /Quiet
SQL Server 2008 R2 SP1 CU6 Setup:
SQLServer2008R2-KB2679367-x64.exe /Action=Patch /IAcceptSQLServerLicenseTerms /AllInstances /Quiet
Reboot when the above is complete.
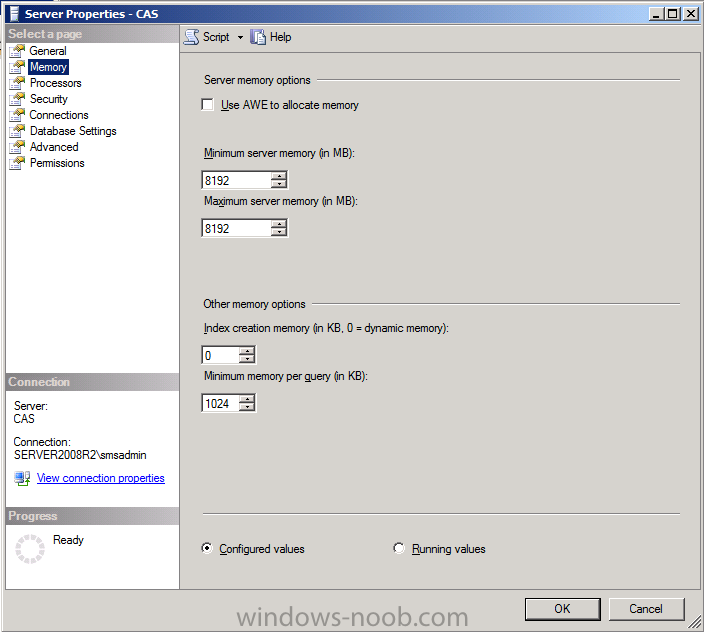
SQL Memory Configuration.
Depending on your memory configuration and server setup, you may also want to configure SQL memory limits as per the following guidance prior to installing ConfigMgr otherwise you’ll get warnings when you run the Server Readiness checks.
- Configuration Manager requires SQL Server to reserve a minimum of 8 gigabytes (GB) of memory for the central administration site and primary site and a minimum of 4 gigabytes (GB) for the secondary site. This memory is reserved by using the Minimum server memory setting under Server Memory Options and is configured by using SQL Server Management Studio. For more information about how to set a fixed amount of memory, see here.
- If your SQL Server is configured for unlimited memory usage, you should configure SQL Server memory to have a maximum limit.
Based on the above recommendations i’ve configured the SQL Server memory for CAS as follows:
SQL Server security
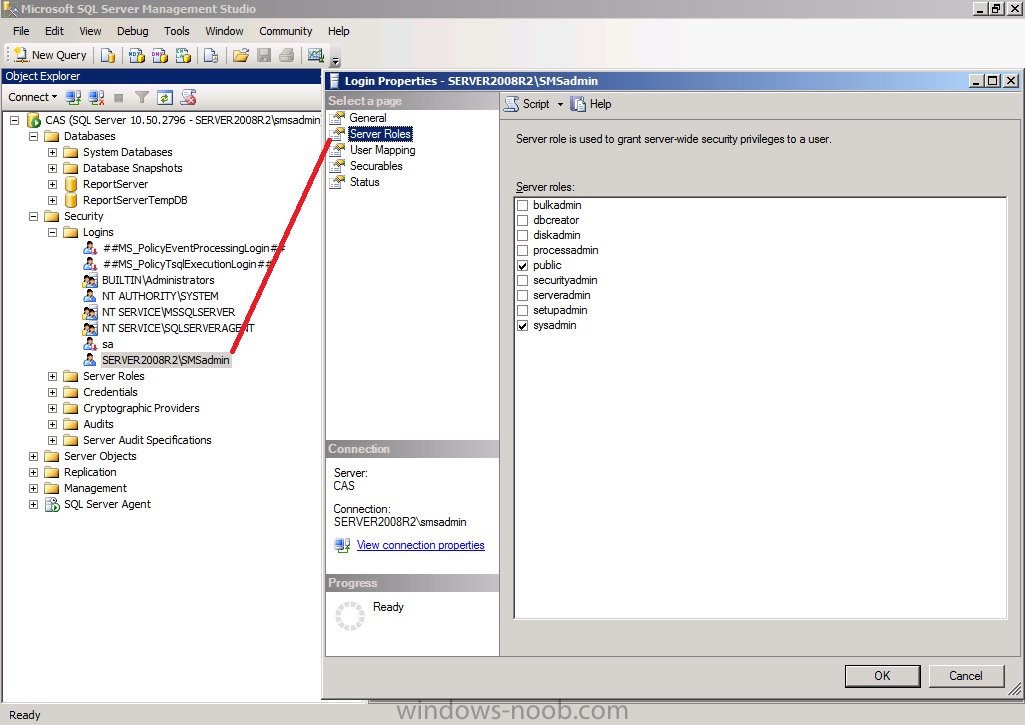
You will also want to think about what security to grant your users, in my Lab I grant the Server2008r2\Smsadmin the sysadmin role by adding the user to the SQL server security Logins (do this as a local or domain administrator in SQL Server Enterprise).
Step 12. Install Configuration Manager 2012 on CAS.
Note: Perform the following on the CAS server as SMSadmin
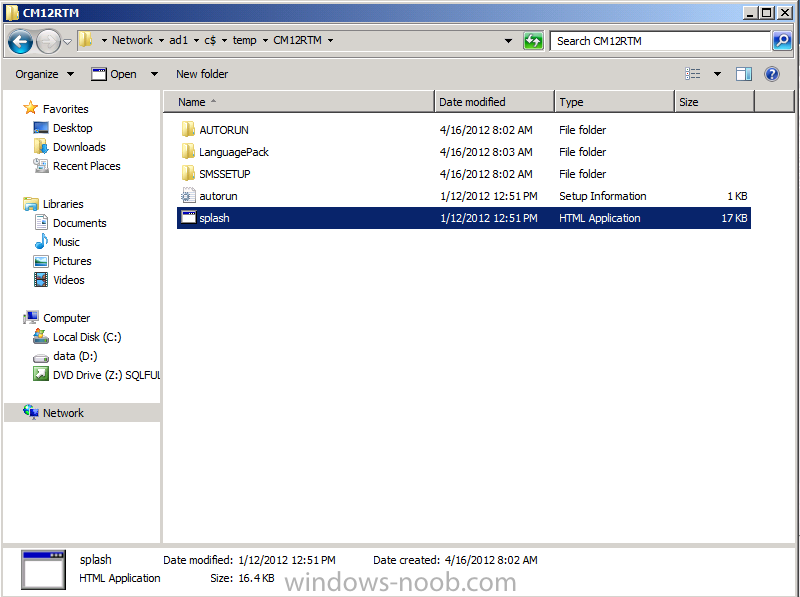
In windows Explorer, browse to the Active Directory domain controller (AD1) and locate the temp folder where you extracted CM12. Copy the temp folder and all it’s contents to C:\ on your CAS server.
Browse to C: emp\CM12RTM on your CAS server, and double click on Setup, the System Center 2012 Configuration Manager Setup screen appears, note the various options available to you.
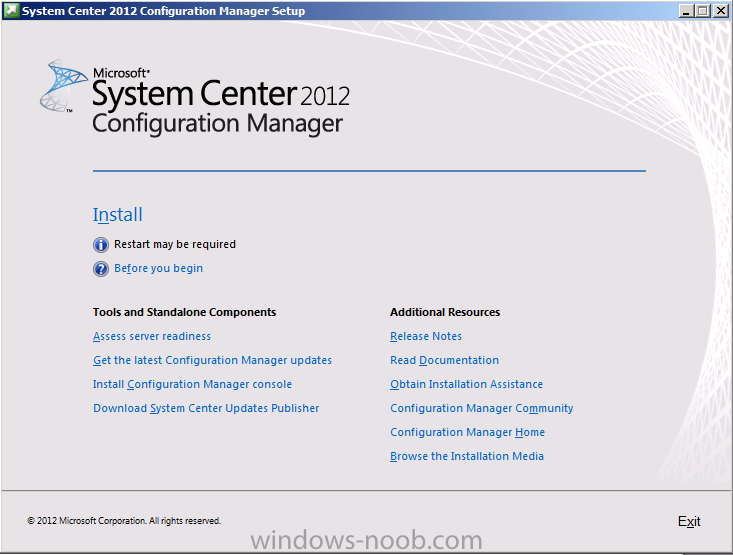
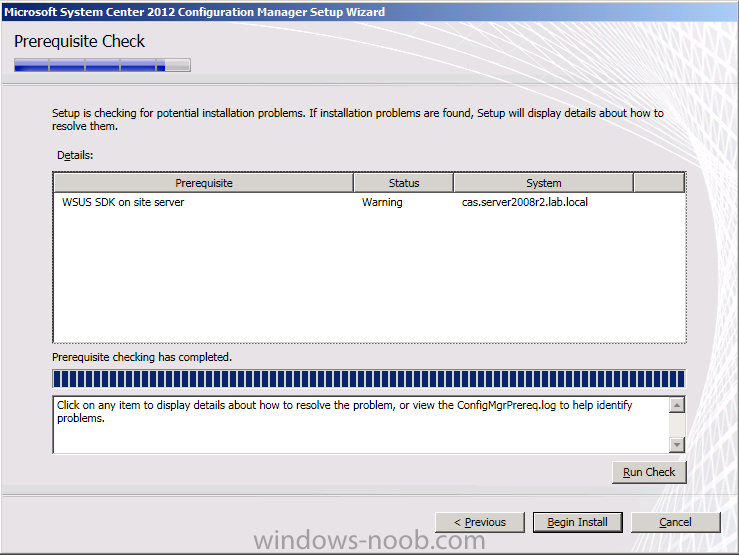
Click on the Assess Server Readiness link and answer yes when prompted. This allows you to do a quick check to see that you havn’t forget anything important or that you are not running some unsupported setup. Provided that you’ve followed my advice above, you should see something similar to below, warnings are in Yellow and you can click on them for more info.
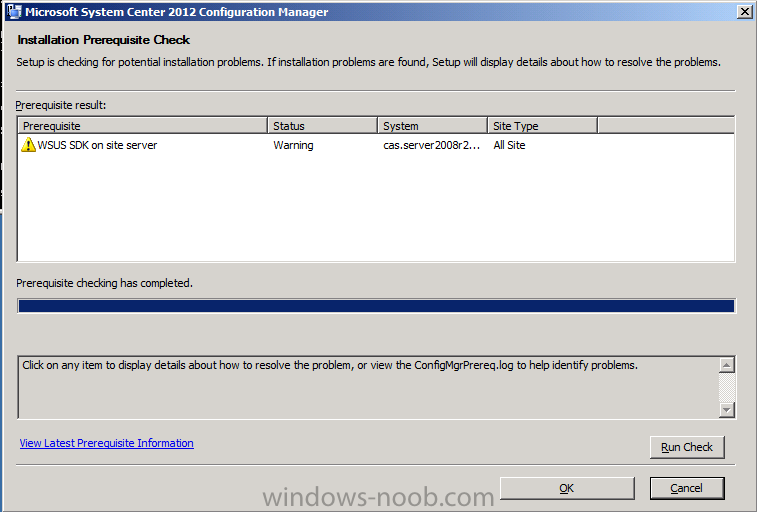
we will be installing WSUS later in the series so we can ignore this warning. Click ok to close the Server Readiness Check.
Tip: The ConfigMgrPrereq.log file will provide more details about the checks performed etc, you can find this in the root of c:\, open the file in CMTrace for best viewing results.
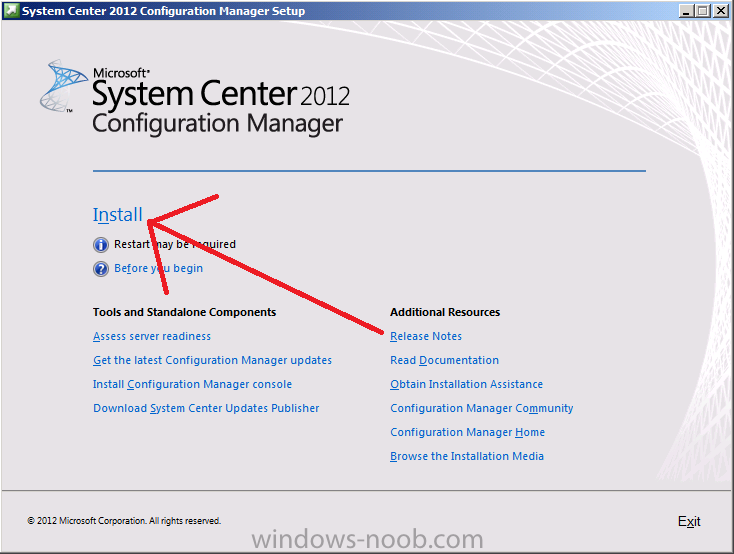
After you have read the release notes, click on Install to start the installation process.
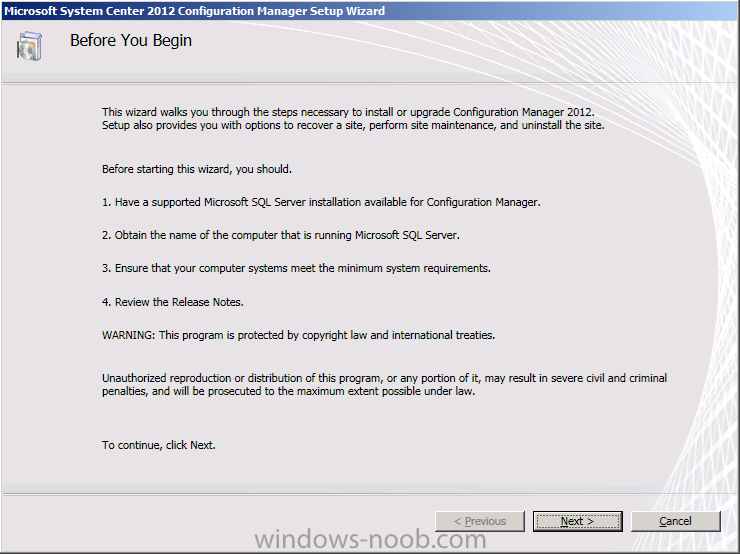
The Before you Begin screen is displayed, read it and click Next to continue
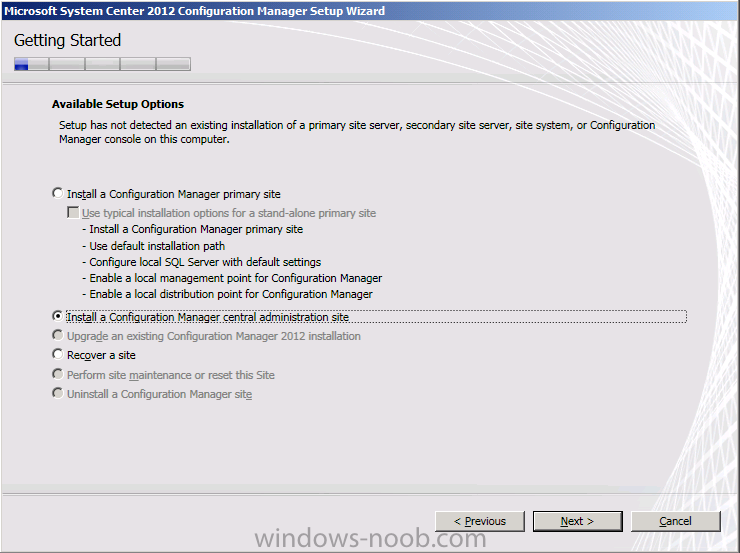
we are installing a Central Administration Site so select that option and click next
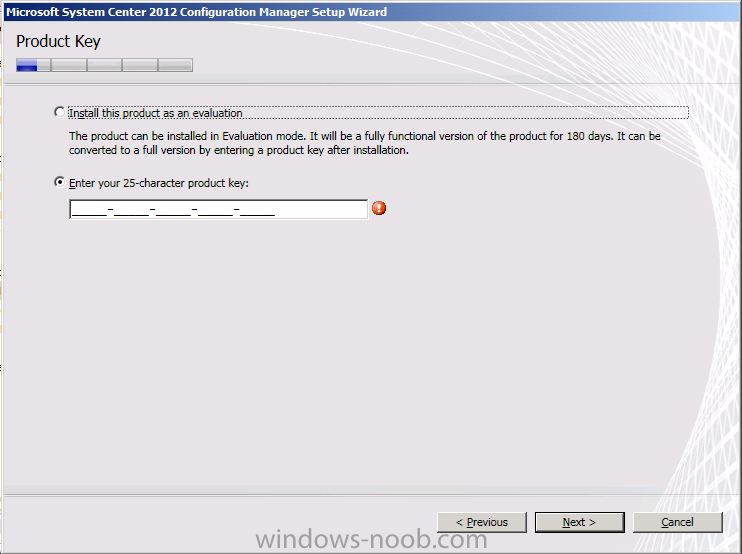
next enter your Product key and click next or if you just want to evaluate the software select the first option
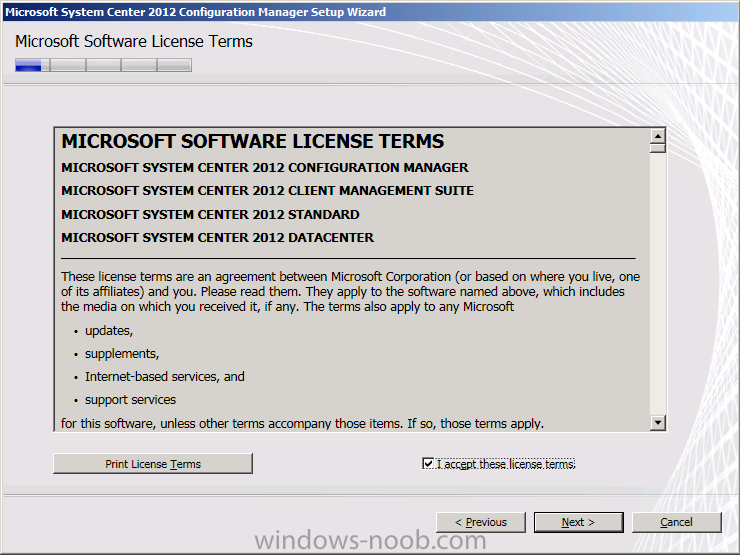
and accept the License terms to continue
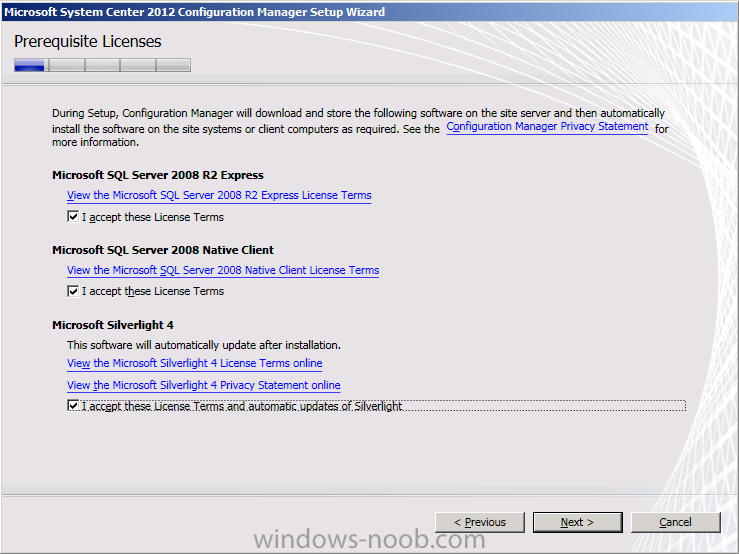
next up are the SQL Server R2 Express and Microsoft Silverlight license terms, select them to continue..
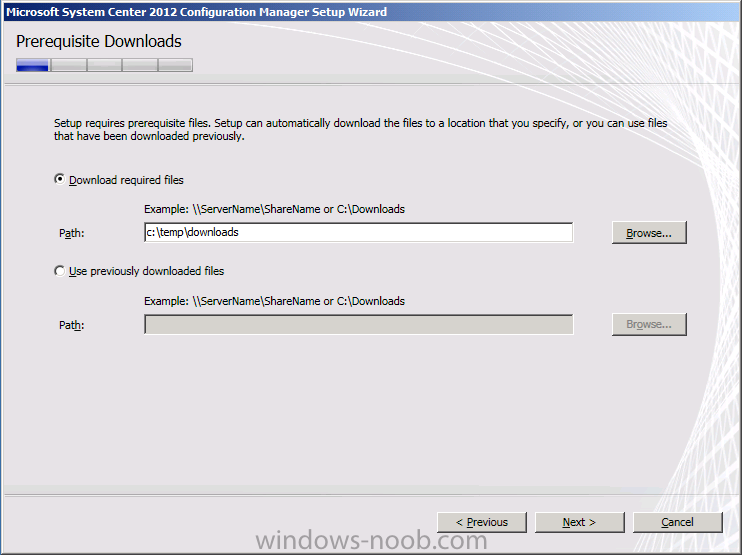
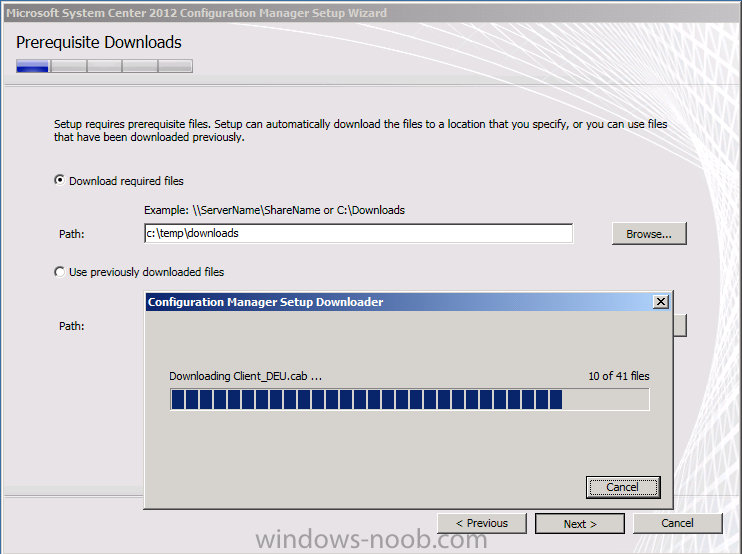
Select the file location for the Configuration Manager prerequisite downloads (internet connection required) or point to previously downloaded files. Note that you need to create this folder prior to clicking next.
Tip:If you don’t have internet on your Configuration Manager server then you can download the required updates on another computer by doing like so:-
- Open a command prompt with administrative permissions
- Navigate to .\Configuration Manager 2012 Install source\smssetup\bin\X64
- Run SetupDL.exe target dir (in my example SetupDL.exe C: emp\downloads)
click Next and the downloading begins,
and then you can select the Language that you want the Configuration Manager Server console and reports to appear in
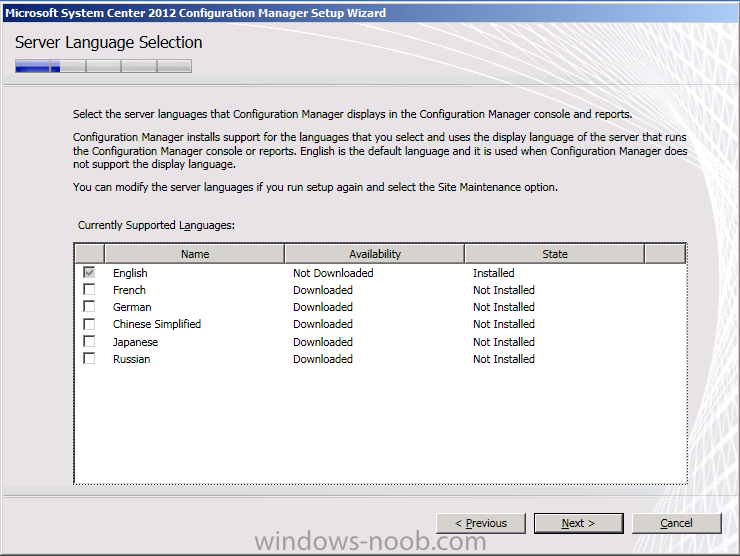
and then the Client Languages that you wish to support

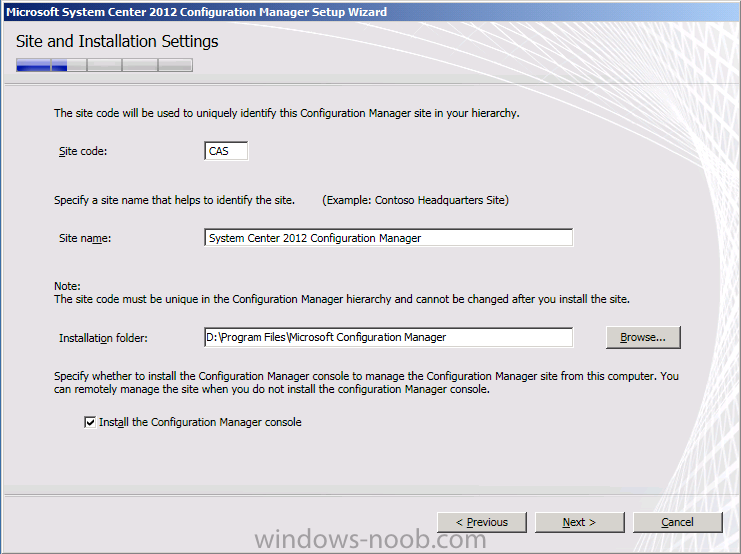
fill in your desired Site Code and name, and install it to D:\, make sure you are happy with the choices as you can’t change them later…
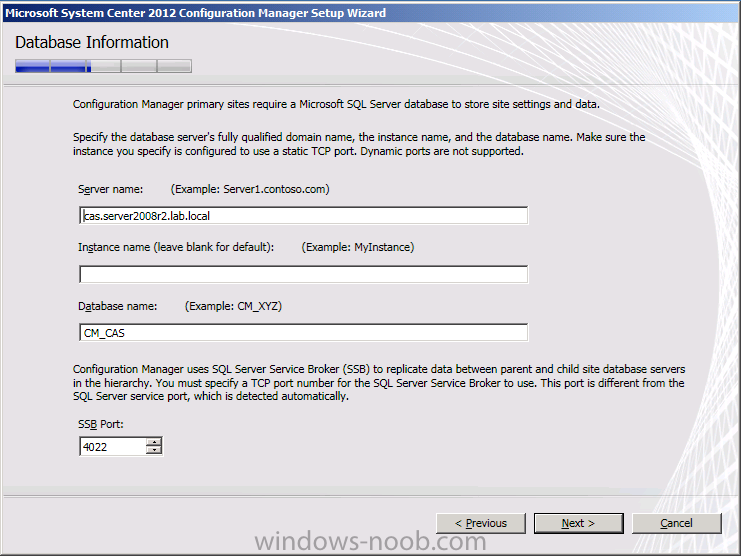
next you have the Database Information screen, verify everything is ok,
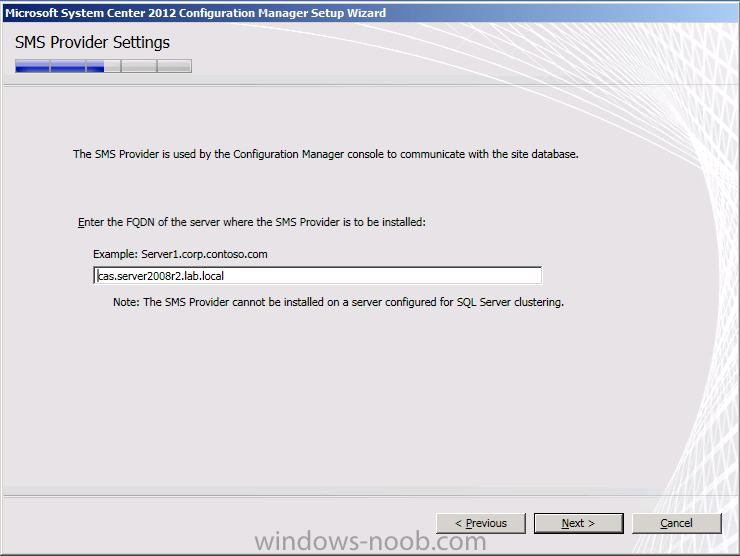
and where do you want to install the SMS Provider, select the default and continue
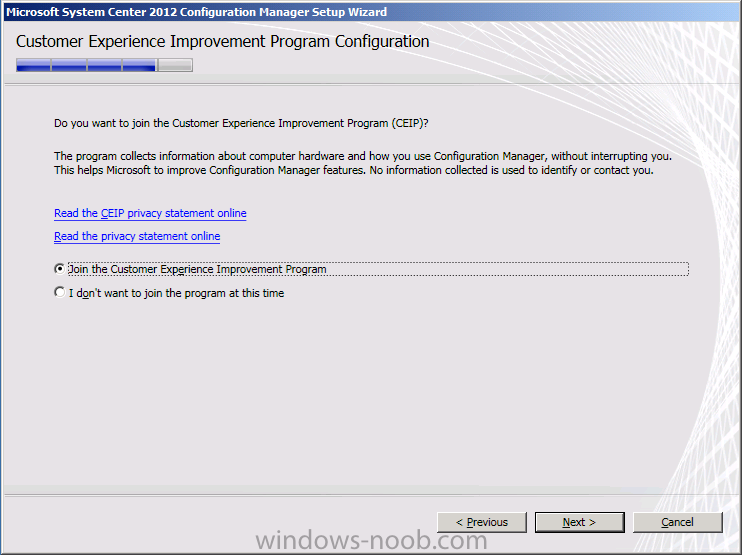
if you are interested in CEIP join it, if not, don’t. It helps Microsoft to improve their products via feedback.
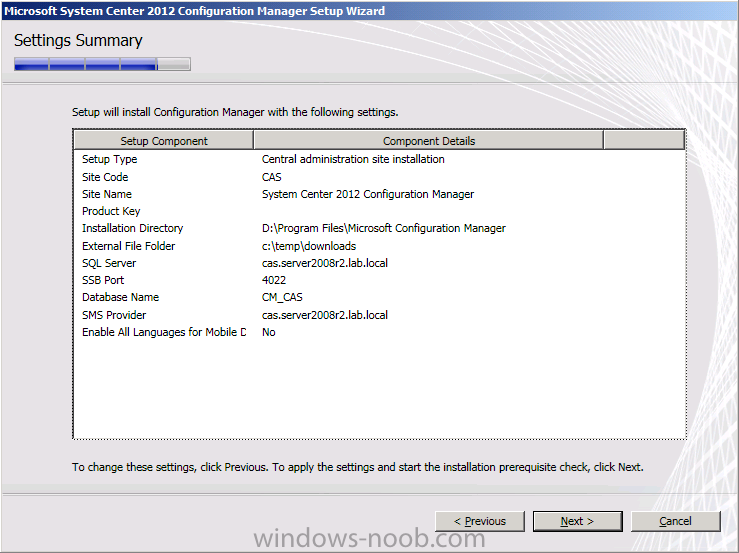
review the Summary
click next and the Prerequisite check runs, we did this already so all should be good, click Begin Install to start installing
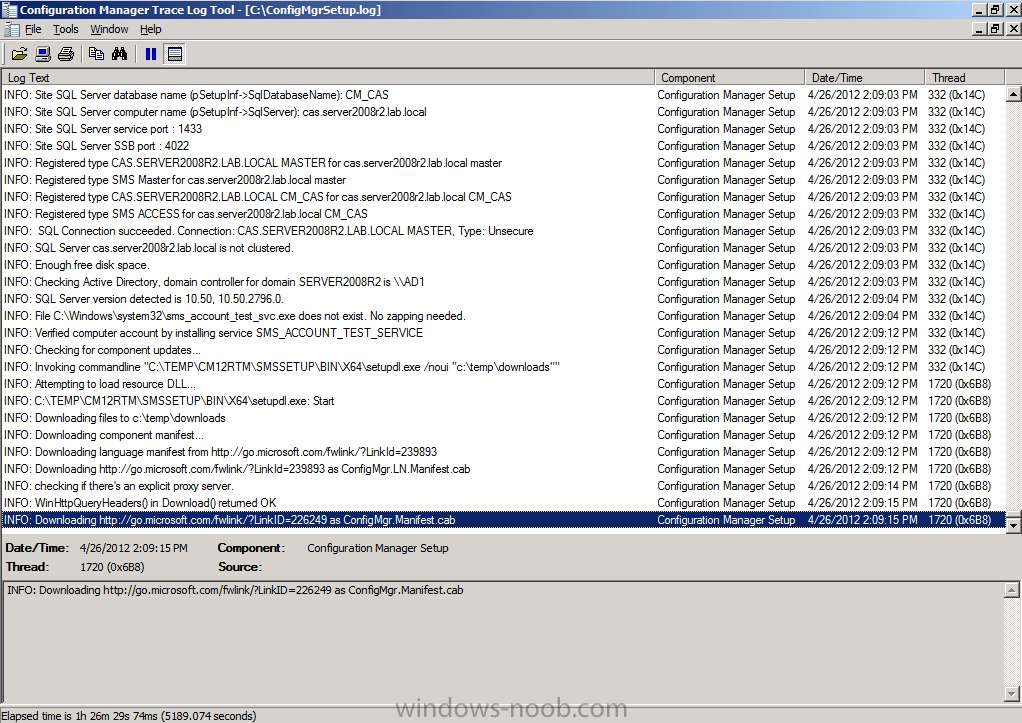
TIP: now is a very good time to look at the C:\ConfigMgrSetup.log with CMtrace, watch it for any errors (in Red)
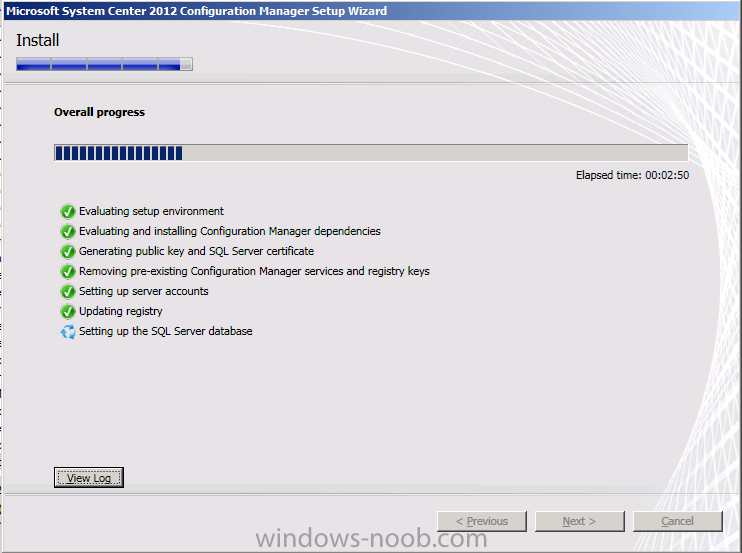
The installation of System Center 2012 Configuration Manager begins nd you can review the overall progress
after a long install (approximately 45 minutes to one hour or so depending on the speed of your hardware) you should see the installer finish, verify all progress is listed in Green (scroll up and down) and if all is ok click on Close.
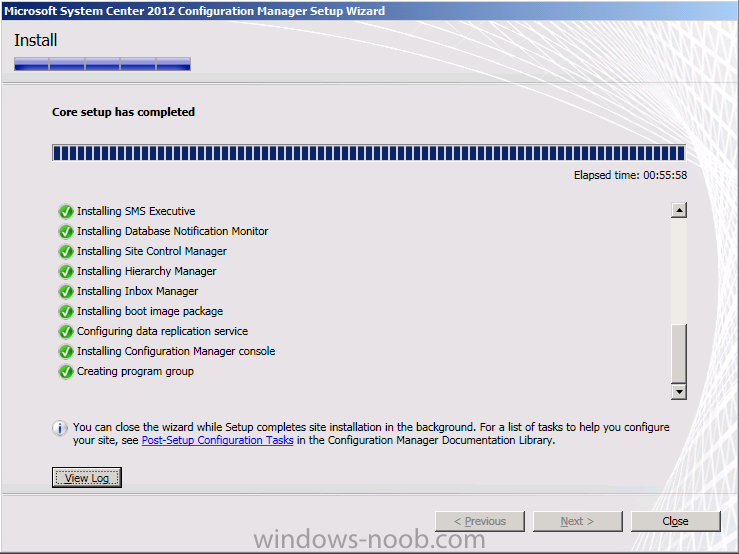
reboot the Configuration Manager server and then login again as SMSadmin, start the Configmgr console,
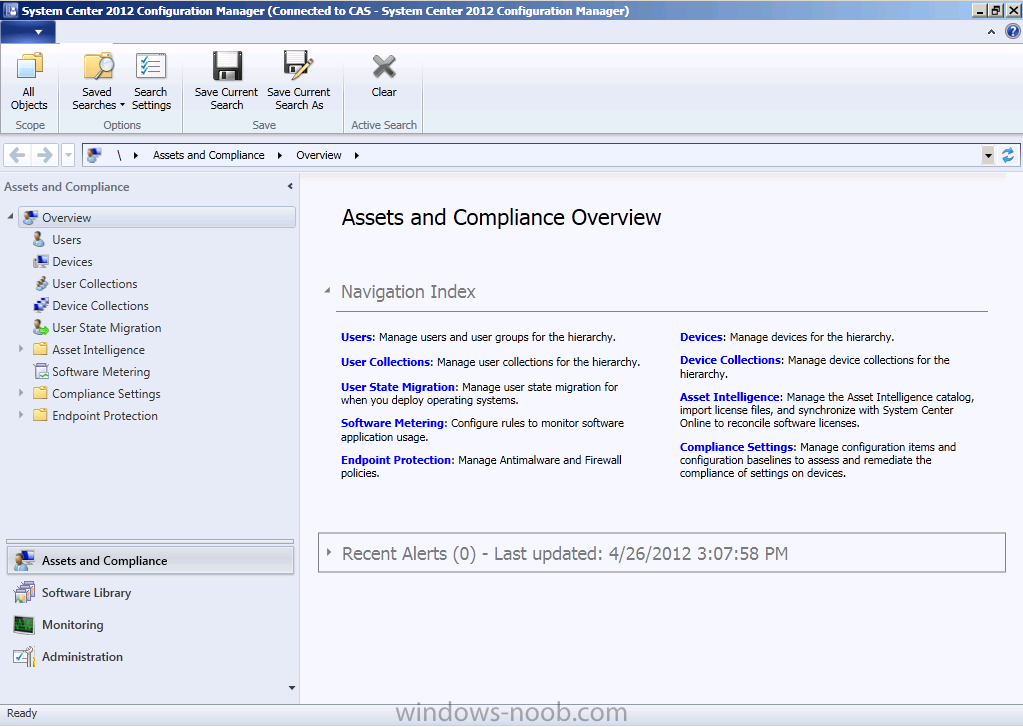
navigate to Monitoring and Site Heirarchy in the console
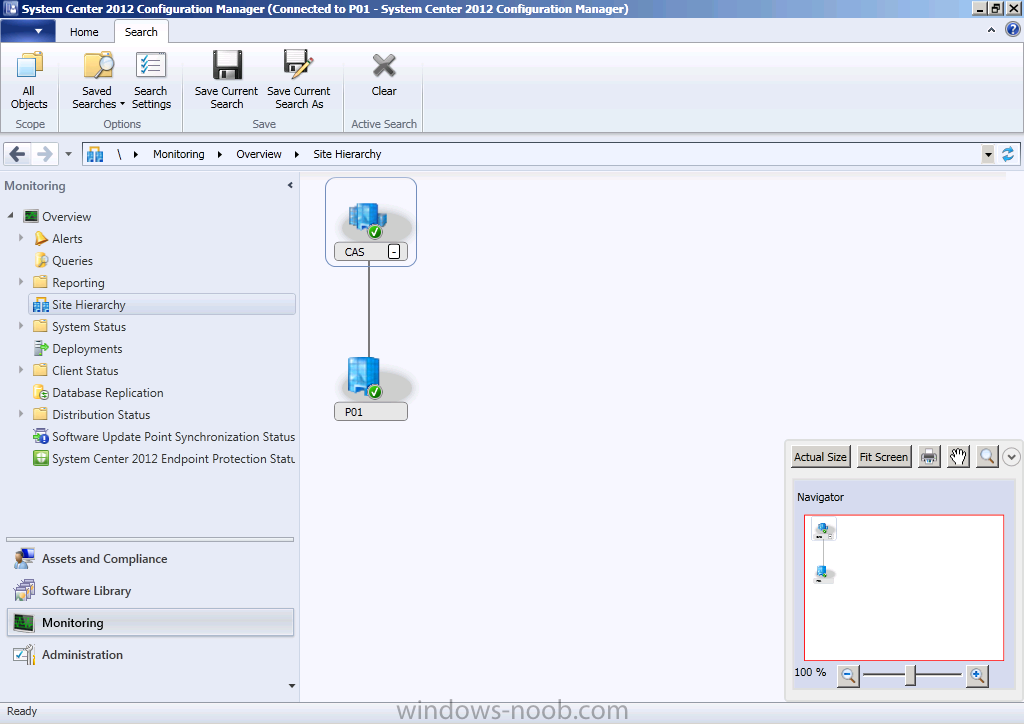
congratulations, you now have a System Center 2012 Configuration Manager 2012 heirarchy !. In the next part we’ll start configuring it.
The original post is here on windows-noob.com.
