
Introduction
This is Part 6 in a new series of guides about getting started with Windows 365. This series of guides will help you to learn all about Windows 365 in a clear and insightful way. This series is co-written by Niall & Paul, both of whom are Enterprise Mobility MVP’s with broad experience in the area of modern management. At the time of writing, Paul is a 6 times Enterprise Mobility MVP based in the UK and Niall is a 12 times Enterprise Mobility MVP based in Sweden. In this series we aim to cover everything we learn about Windows 365 and share it with you to help you to deploy it safely and securely within your own organization. In Part 1 we introduced you to Windows 365, selecting the right edition with the level of management that you need, choosing the plan that suits your users needs at a cost you can afford, or modifying the configuration to make it more suited to your individual needs, purchasing licenses and saving money for your organization via the Windows Hybrid Benefit. In Part 2 you learned how to provision an Azure Ad joined Cloud PC and take a look at the different network options available when provisioning an Azure Ad joined Cloud PC. In Part 3 you learned about the steps needed to successfully provision a Hybrid Azure Ad Joined Cloud PC. In Part 4 you saw the many different ways you can connect to your Cloud PC from many device be it Android, Mac, Windows, Linux or iPhone and you learned that not all connection options have the same abilities. In Part 5 we covered the management capabilities of your Cloud PCs and explained the different options available depending on which version (Business versus Enterprise) that you purchase. In this part we’ll take a look at the built in configurable backup technology in Windows 365 which is known as Point-in-time restore, this is a great ability to restore your Cloud PC’s to an earlier time before a problem such as a Ransomware incident occurred.
Below you can find all parts in this series:
- Getting started with Windows 365 – Part 1. Introduction
- Getting started with Windows 365 – Part 2. Provisioning an Azure Ad Joined Cloud PC
- Getting started with Windows 365 – Part 3. Provisioning a Hybrid Azure Ad Joined Cloud PC
- Getting started with Windows 365 – Part 4. Connecting to your Cloud PC
- Getting started with Windows 365 – Part 5. Managing your Cloud PC
- Getting started with Windows 365 – Part 6. Point in time restore <- you are here
- Getting started with Windows 365 – Part 7. Patching your Cloud PCs with Windows Autopatch
- Getting started with Windows 365 – Part 8. Windows 365 boot
- Getting started with Windows 365 – Part 9. Windows 365 switch
- Getting started with Windows 365 – Part 10. Windows 365 offline
In this part we’ll cover the following:
- Introduction to Point in time restore
- Configuring restore point settings
- Restoring a single Cloud PC
- Restoring multiple Cloud PCs at the same time (bulk)
- End user initiated restore
- Recommended reading
- Summary
Introduction to Point in time restore
Point in time restore for Windows 365 is explained as follows according to Microsoft:
Point-in-time-restore lets an administrator restore a Cloud PC to the exact state it was at an earlier point in time. Admins can also give users permission to restore their own Cloud PCs.
However, based on our testing this is not entirely correct as the type of restore points (or snapshots) are similar in concept to hyper-V’s production checkpoints. Why does that matter ? Well in hyper-v, production checkpoints capture the current state of the operating system, not the running apps at the time that the snapshot was taken. If you use hyper-v virtual machines then you’ll love using standard checkpoints as they capture everything you are doing at the time, including running apps, settings, operating system state. Everything.
With Point-in-time restore, you’ll get a restore point of a Cloud PC to the exact state it was in at the time the backup was made, however it won’t capture the state of any apps that were running at the time the backup was made, the operating system will essentially be in a ‘just booted’ state with no apps running and that becomes immediately obvious when you restore a point-in-time restore..
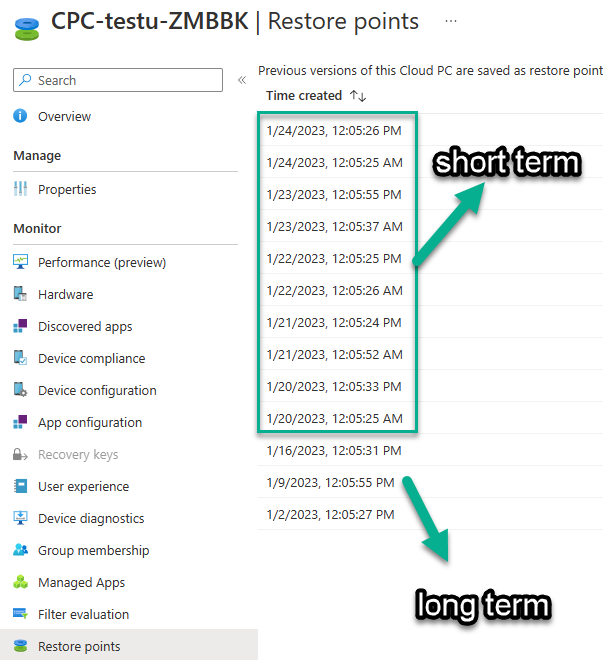
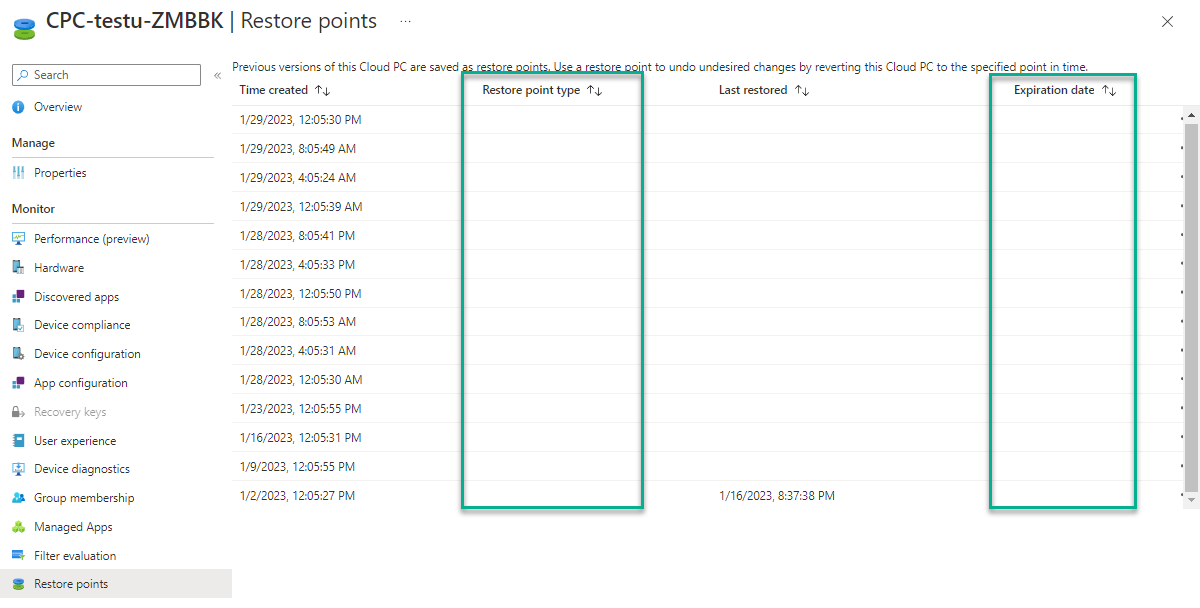
Point-in-time restore has 2 different types of restore points, long term and short term. Long term restore points are saved every 7 days and there are a maximum of 4 long term restore points. Short term restore points are saved based on the user settings interval, so can be every 4, 6, 12, 16 or 24 hours. Each Cloud PC will have up to 10 short term restore points saved at intervals defined in user settings configured by the admin and a further (up to) 4 long term restore points making a total of 14 possible restore points.
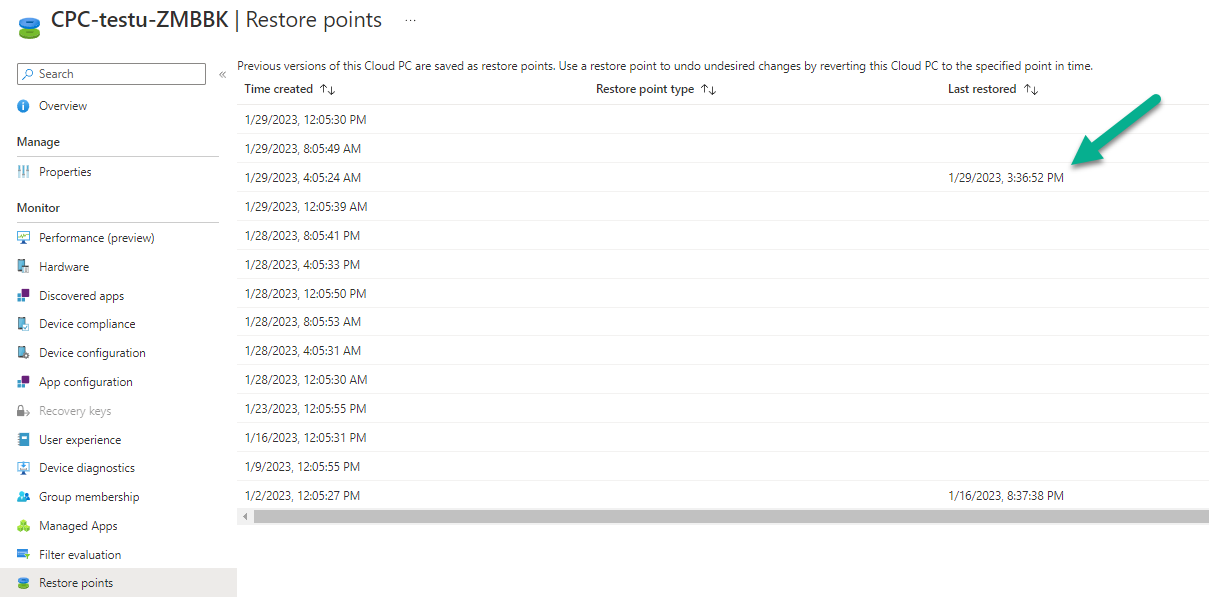
In the screenshot below of a Cloud PC in Microsoft Intune you can see 3 long term restore points (every 7 days) and 10 short term restore points (configured for the default setting of every 12 hours).
So now that we know there are different types of restore-points let’s take a look at how to configure them.
Configuring restore point settings
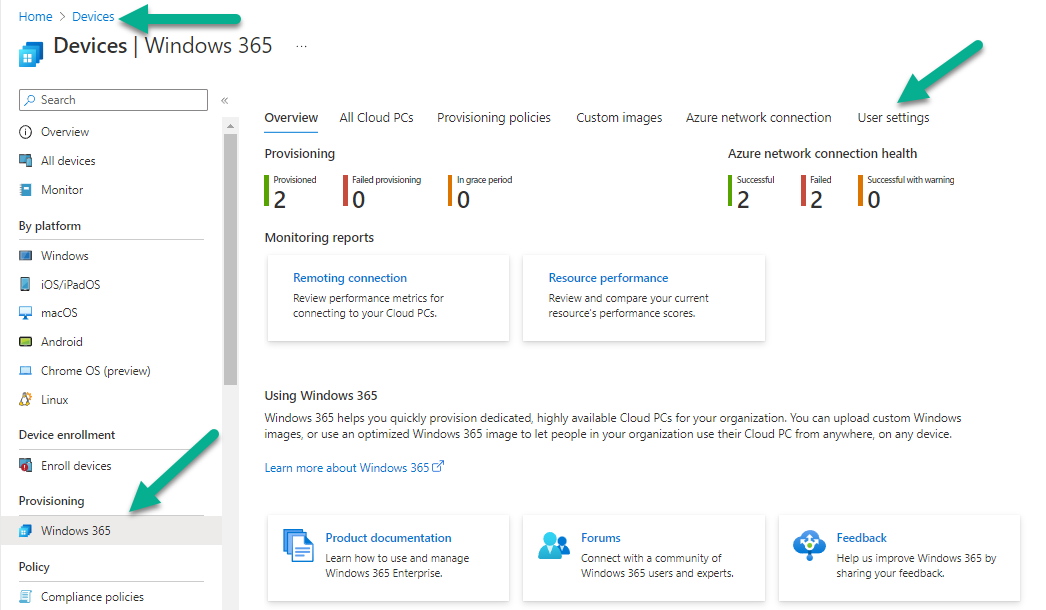
In Microsoft Intune, navigate to Devices, Windows 365 and click on the User Settings tab.
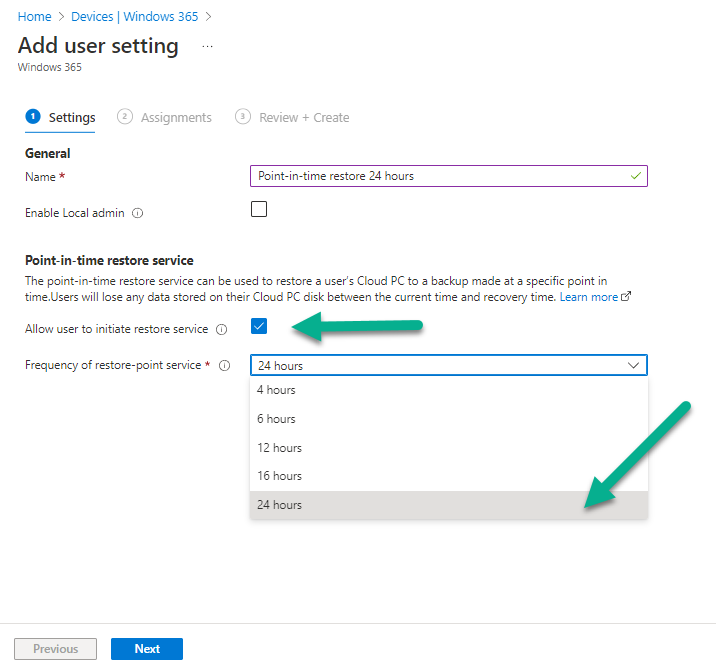
Click on Add + and give your User Settings policy a suitable name, keep in mind that if you have multiple policies targeting the same users that there is no way to currently enforce one over the other. In this example we’ll configure the restore points every 24 hours (the default setting is every 12 hours), which means one restore point every day. You can also configure whether the user is allowed to restore their own Cloud PC via the Windows 365 portal and you can additionally configure Local Admin Settings.
Click Next and then add one or more groups with Users that you wish to target with these settings.
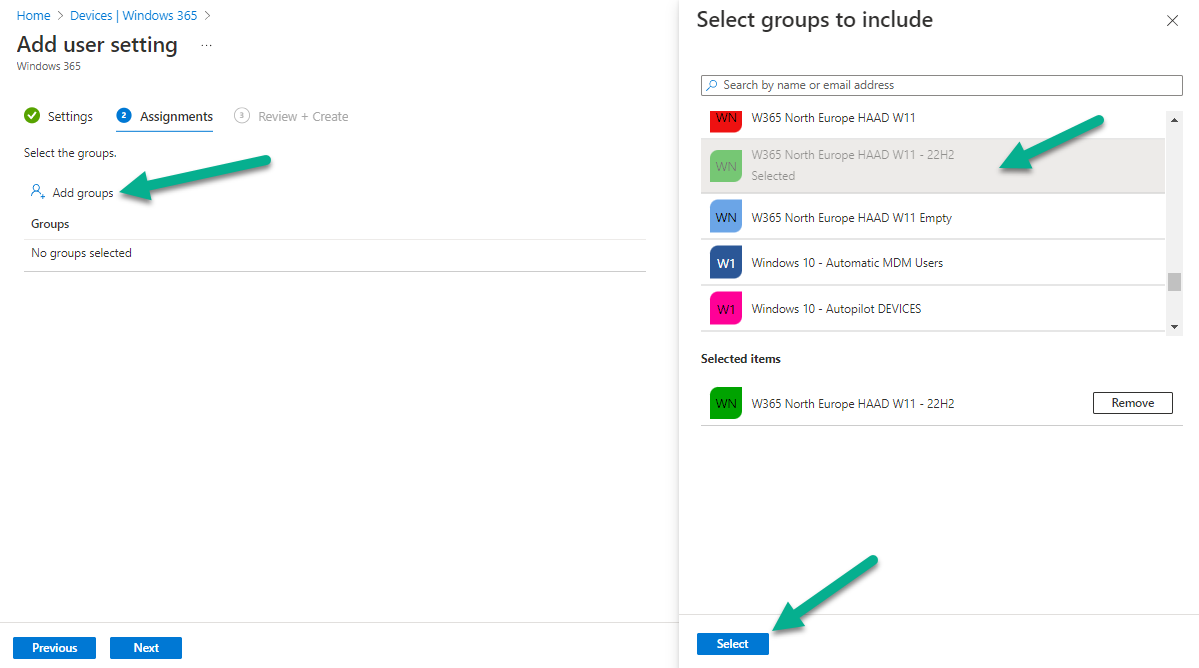
When ready, click Select, then click Create.
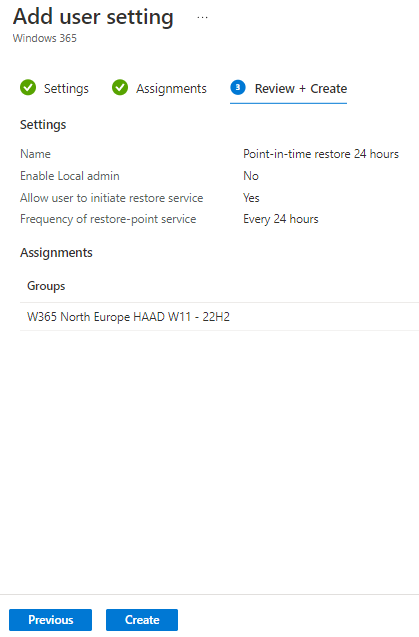
Once done, any users in the Groups added will be able to restore their own restore points and their restore points will be taken every 24 hours.
Restoring a single Cloud PC
To restore a single Cloud PC simply locate it in the Endpoint Manager console selecting Devices and then clicking on Windows 365, next select All Cloud PC’s and select the Cloud PC you wish to restore. Notice that there is a node on the left called Restore Points. You can access the same ability via the Restore option at the top of the screen and the last previous Restore action will listed in the summary.
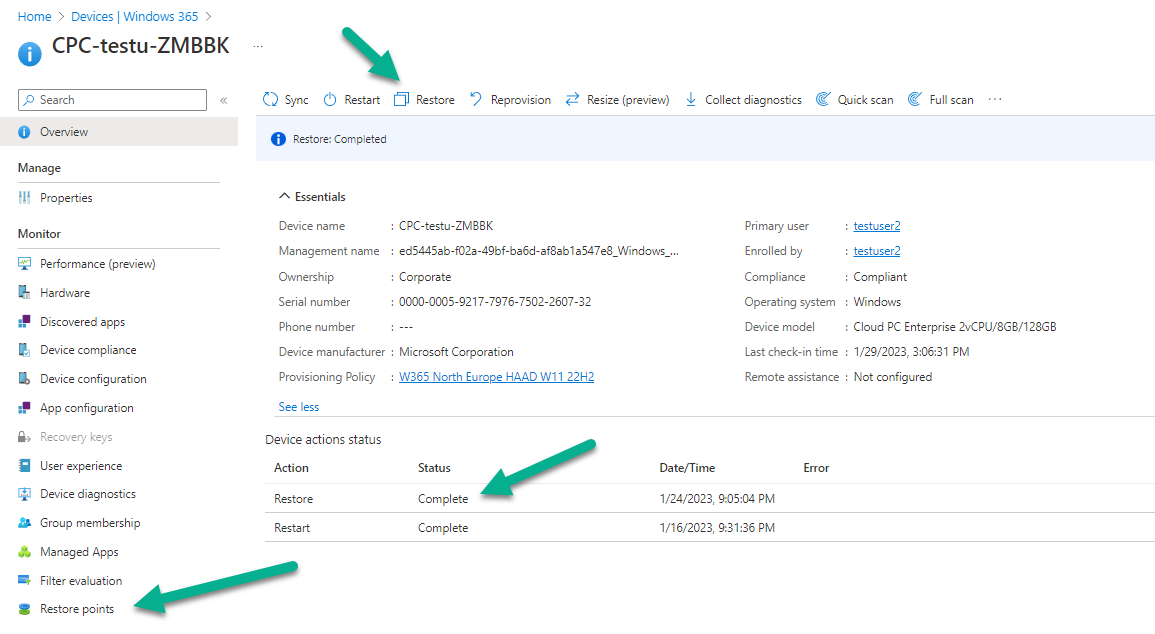
Click on Restore Points in the left pane. This will bring up a new window showing all restore points that have been taken for the Cloud PC.
In our testing, the Restore Point type and Expiration date columns never populated with any information. We have informed Microsoft PG about this, however, the Last restored column does populate after a restore is completed.
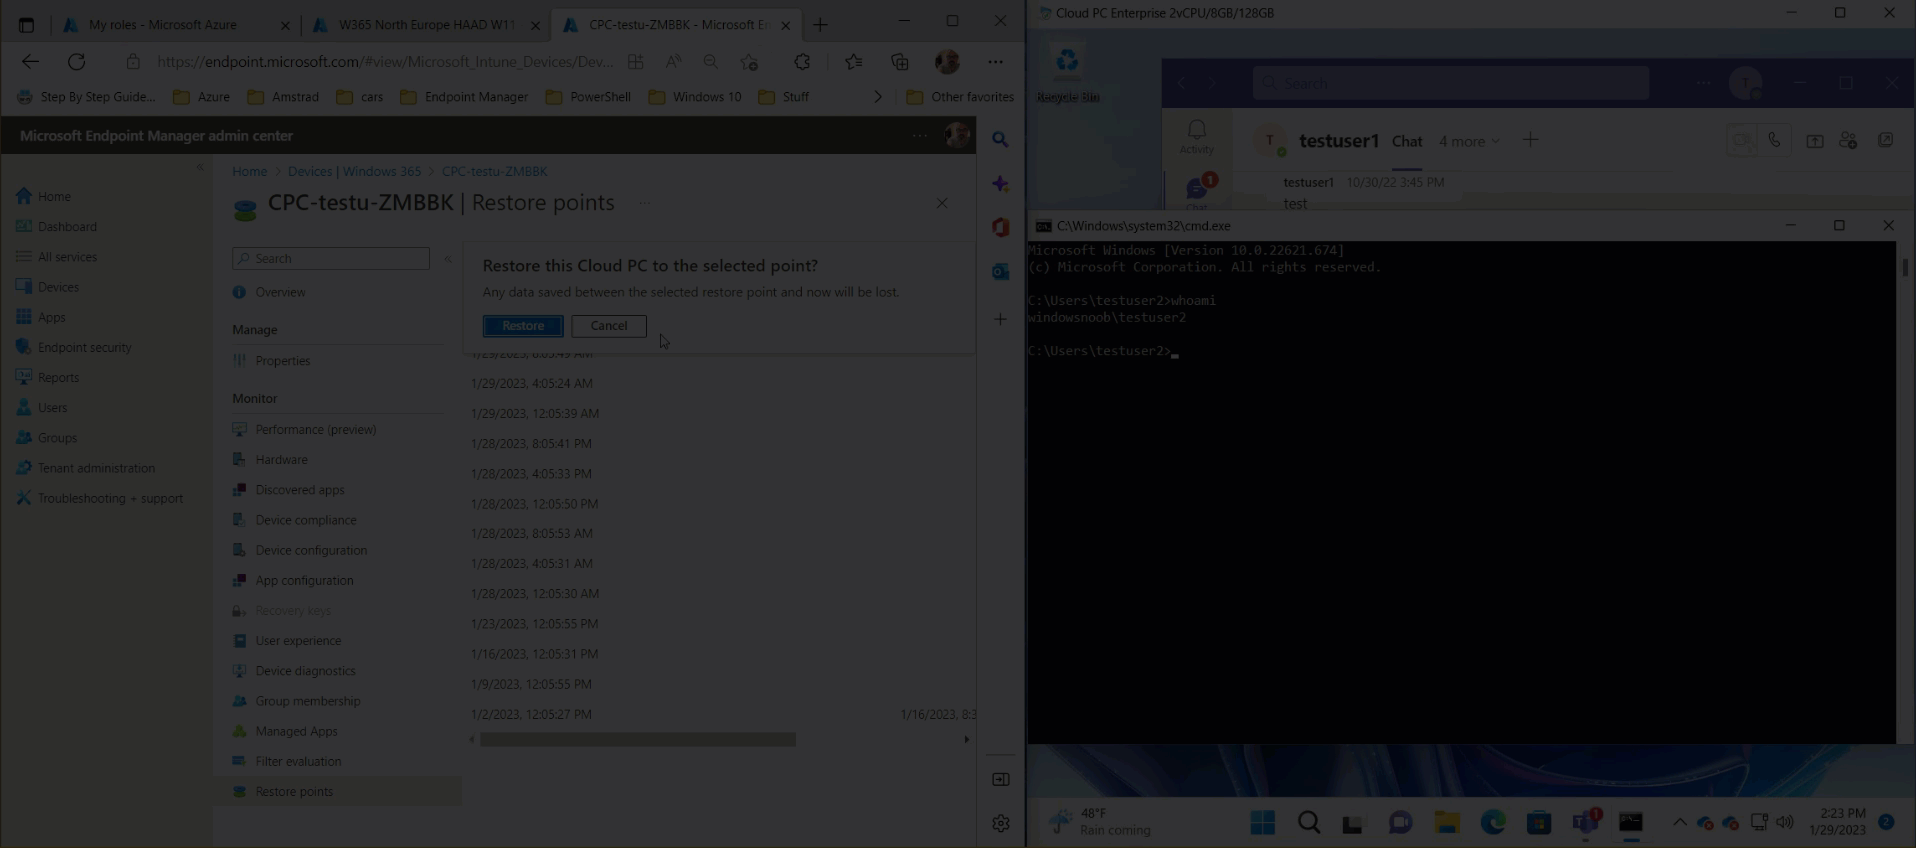
Note: Be careful when restoring a Cloud PC as no indication/message or information will be sent to the user logged on that their Cloud PC is about to be restored. They will simply see the computer shutting down all of a sudden and after that it will be inaccessible for a time.
Keeping in mind that Cloud PC’s that are domain joined may have rolling passwords/secrets that change causing you to lose the ability to logon to the domain if you restore a Cloud PC from too far back. So let’s pick a fairly recent date in the above list and right click, you’ll get the option to Restore this version. Continuing the process will give you one last chance to cancel, and if you select restore it will start the restore process which can typically take about 30 seconds.
You can see an edited (shortened) video of that process below:
After the restore is complete, you can refresh the Intune console and the Last restored column should now indicate the latest restore.
The end user may see the following in their Windows 365 app, indicating that there is an error connecting to their Cloud PC.
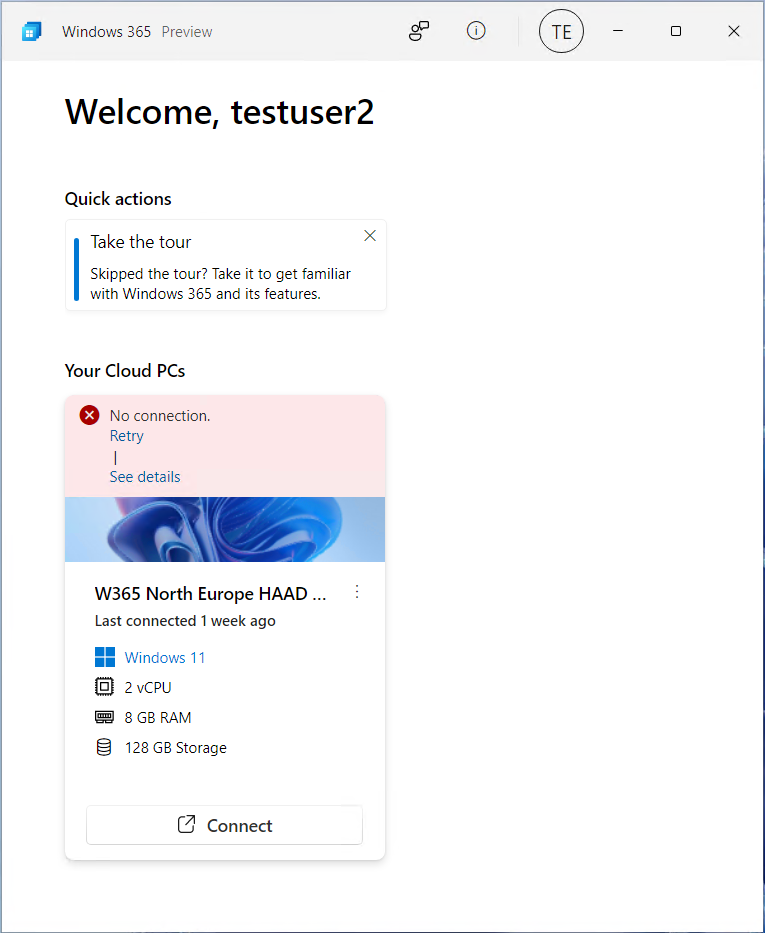
Clicking on details may give you some information like the following.
Your session was disconnected. If this keeps happening ask your admin or tech support for help.
Error Code: 0x3000046Error Message: Gateway does not have resource to assign to the connectionTimestamp: 2023-01-29T14:53:02.671ZActivity ID: 1d435b62-b3d7-465c-85fa-84ed545b0000
Waiting a minute or so and clicking on retry should be enough to reconnect.
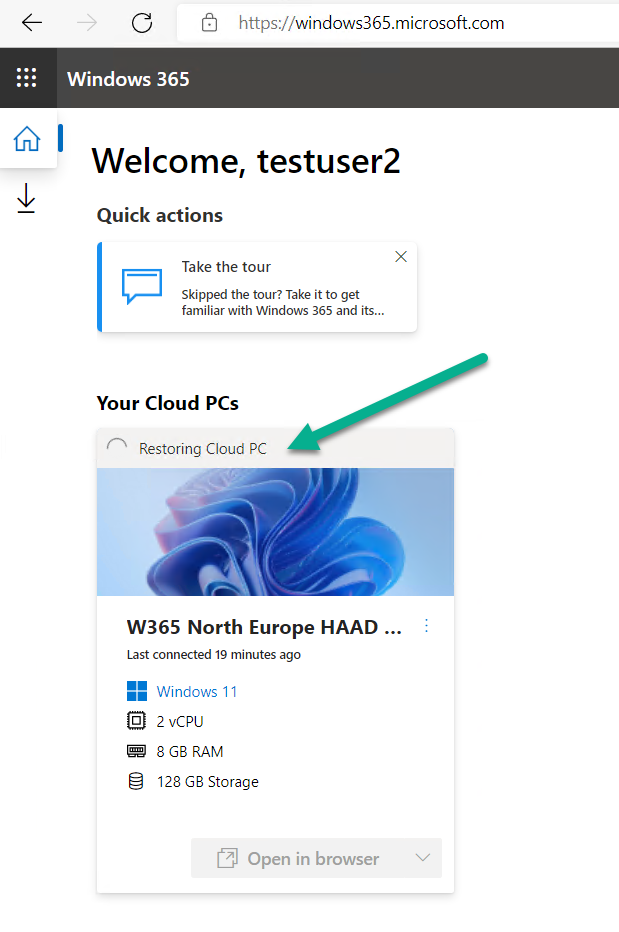
If the end user accesses the Cloud PC using the Windows 365 portal, then they’ll be correctly informed that the Cloud PC is in the following state: Restoring Cloud PC
Restoring multiple Cloud PCs at the same time (bulk)
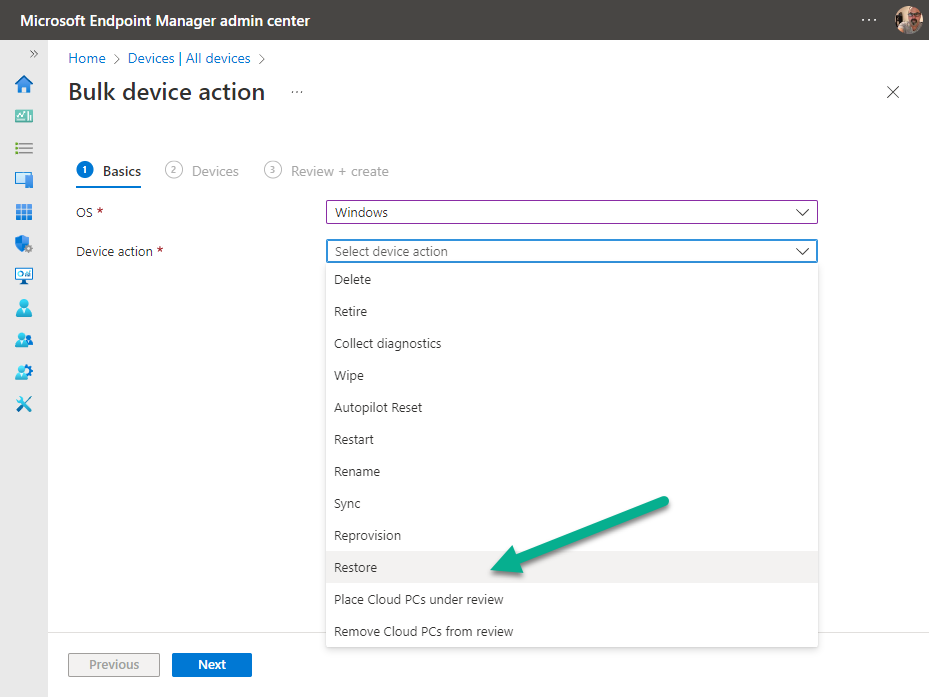
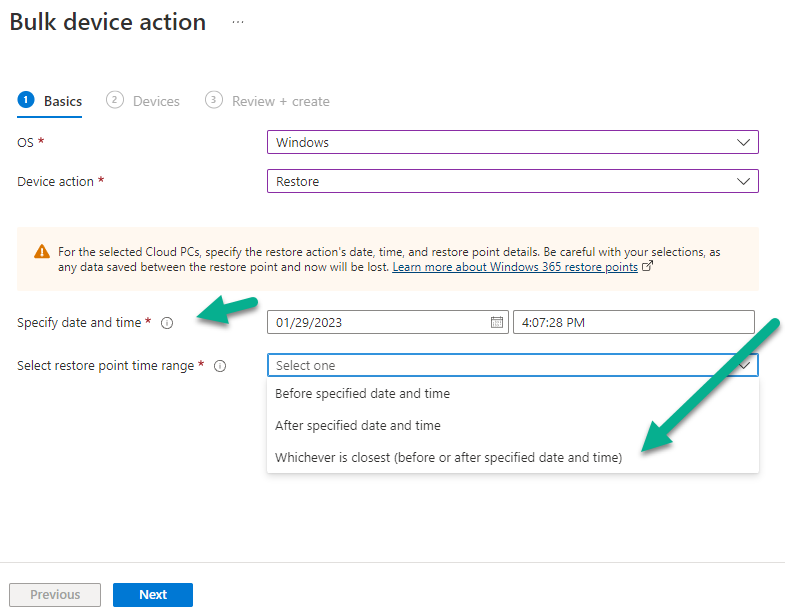
When an admin needs to restore multiple Cloud PC’s at the same time (up to 100 at a time) then Bulk PC actions are to the rescue. Let’s take a look at that process. In Microsoft Intune, select Devices, and next select All devices. In the top field you’ll see Bulk Device Actions.

Click on it and it’ll bring up the Bulk Device Actions menu. Select Windows as the OS and then select Restore from the options available.
Next, select the date and time and the time range from the available options.
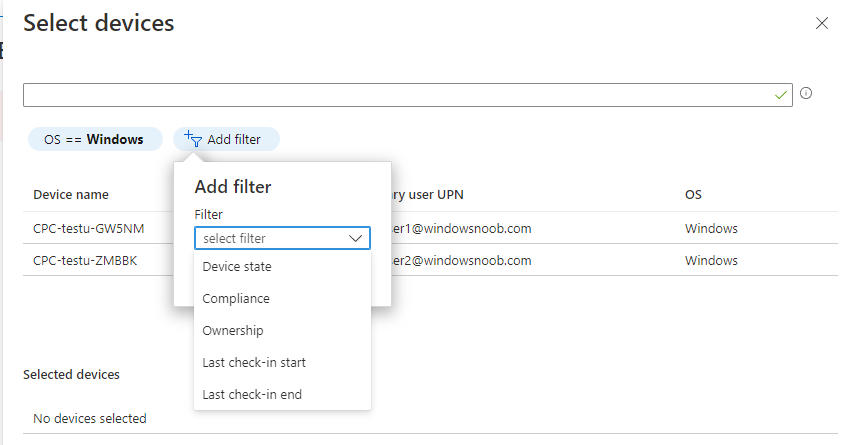
Next, select which devices to include (up to 100), you can use filters to assist with this
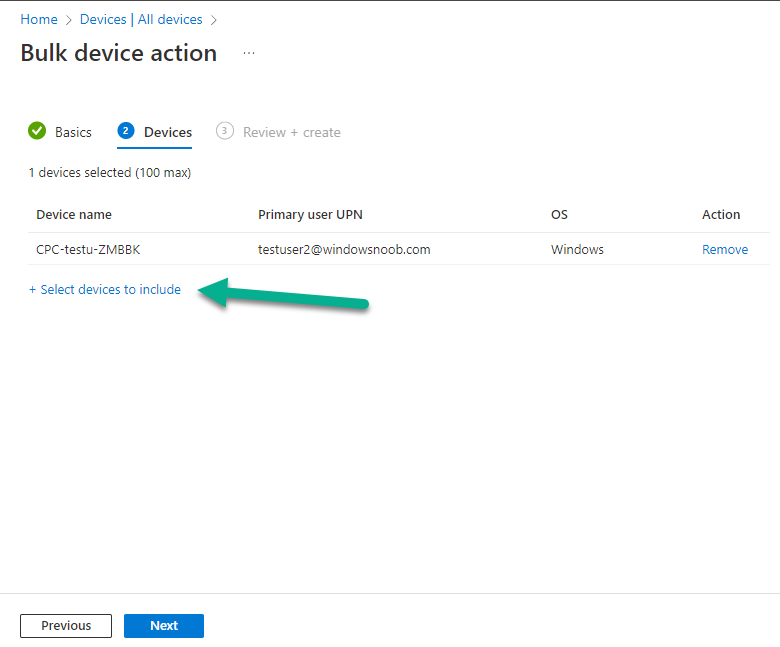
or you can simply add Cloud PC’s individually by selecting them and adding them to the list
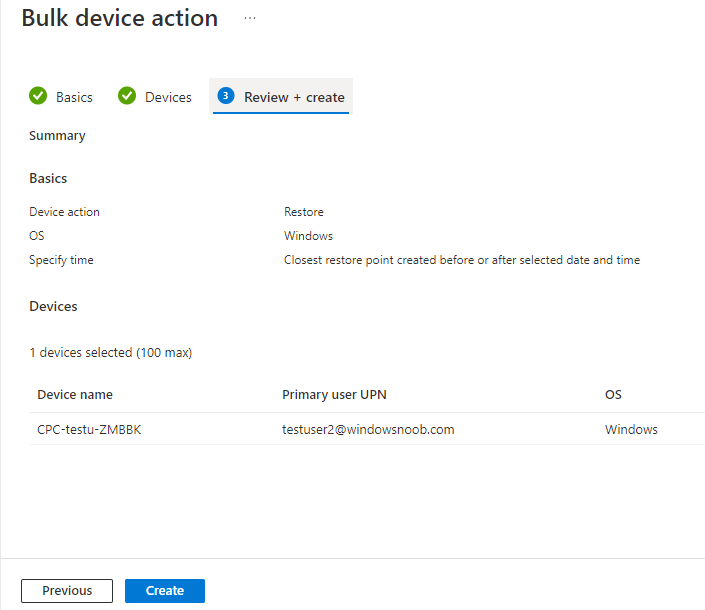
Once done, review the summary before clicking on Create to start the Bulk Action.
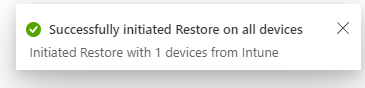
You should then be notified of the success or failure of the action in the Intune console.
End user initiated restore
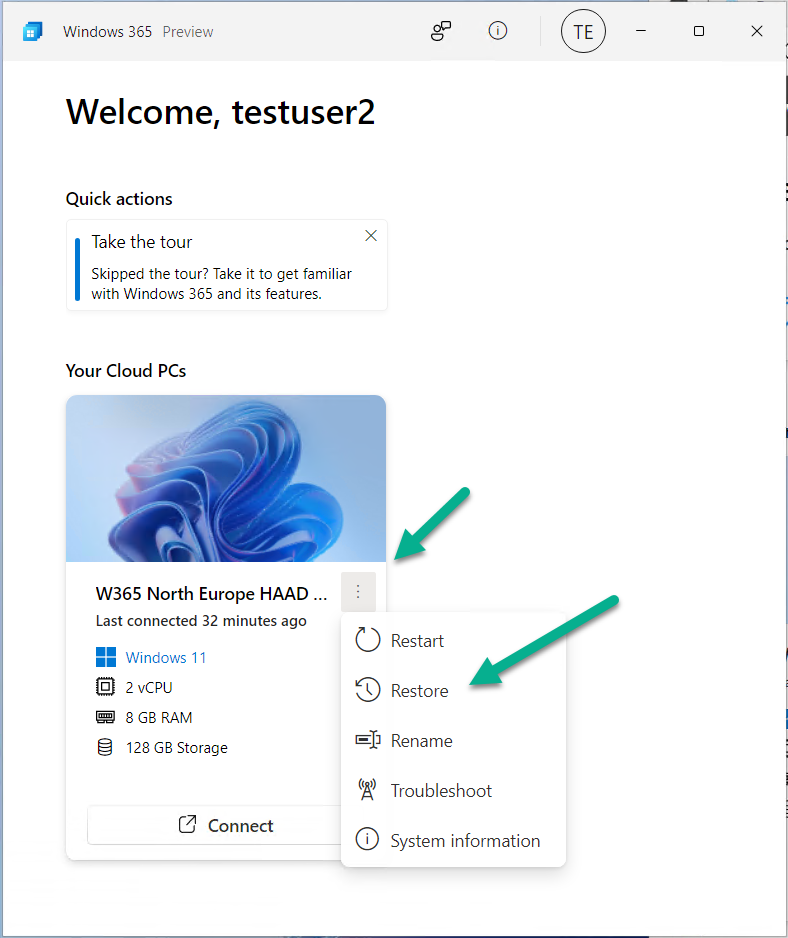
Now that you have seen how an admin can restore one or many Cloud PC’s, what about the end user’s view of things? The end user can restore their Cloud PC either using the Windows 365 app settings or via the Windows 365 portal.
In the Windows 365 app, the user can simply click on the 3 dots to gain access to user-initiated actions.
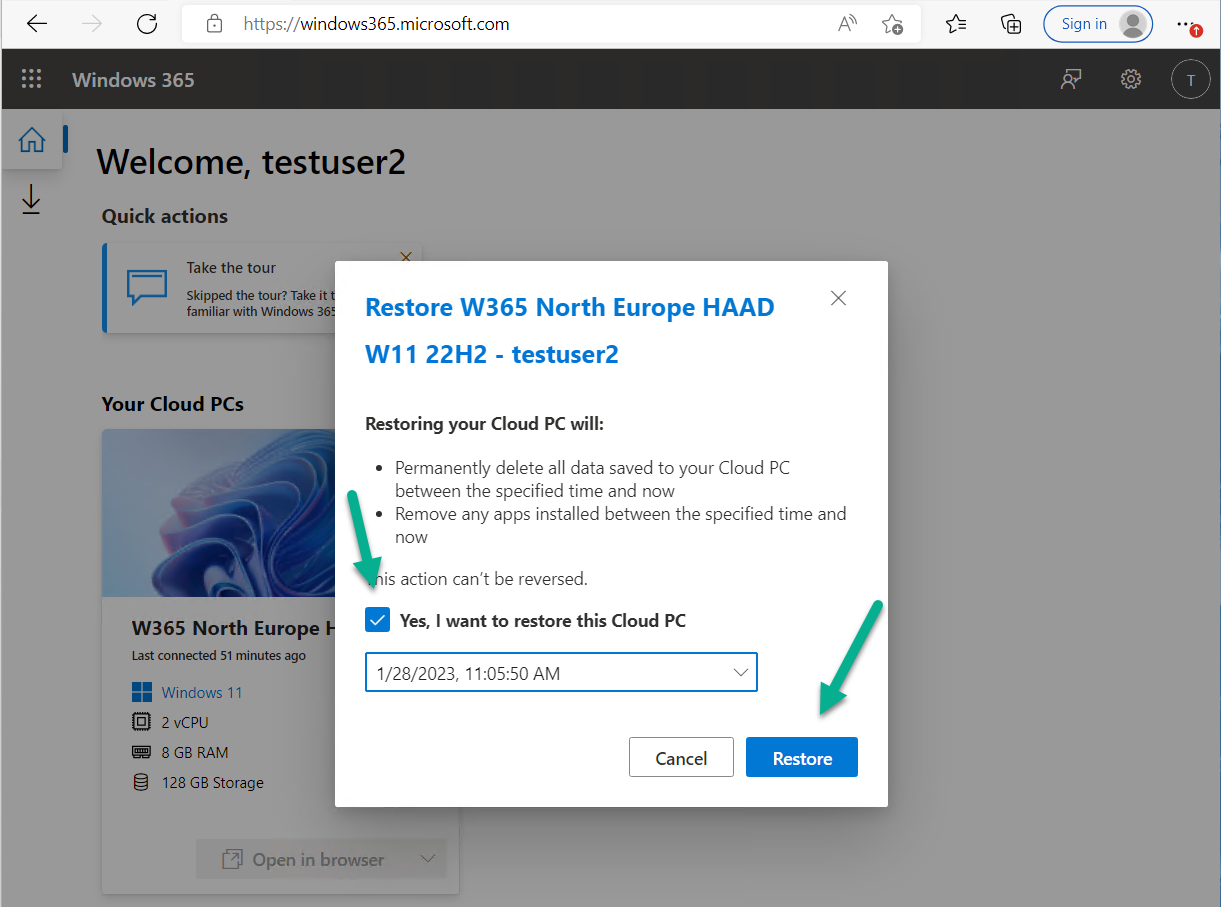
After selecting restore, the following window will popup informing the user about what is about to happen if they continue and asking them to confirm the action.
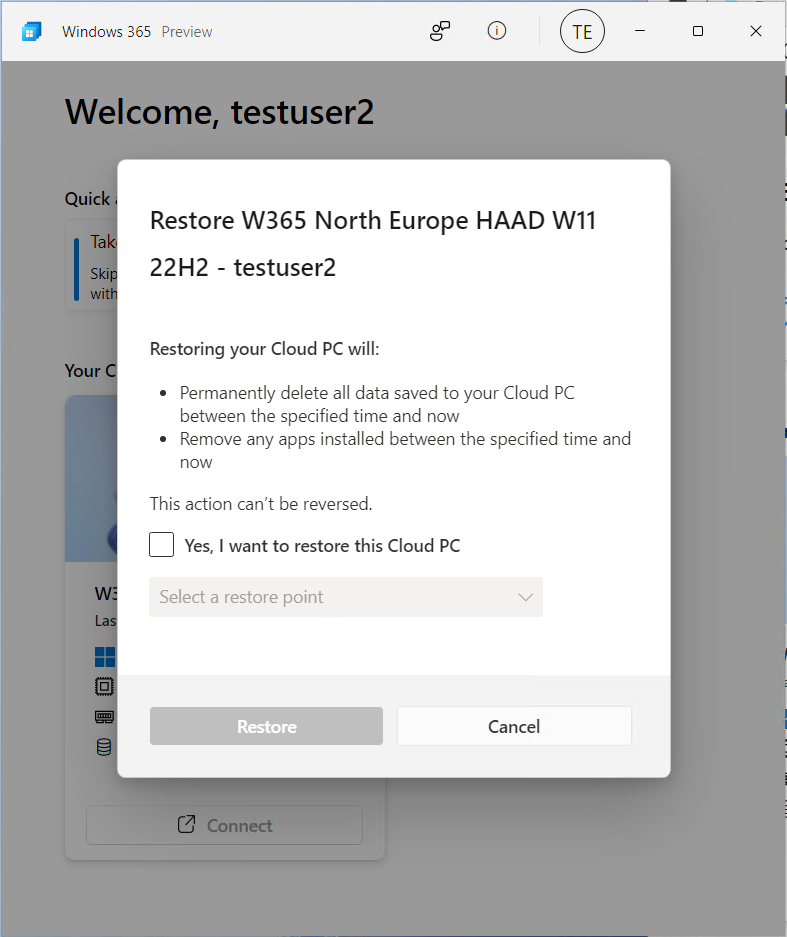
After confirming, they can select a restore point
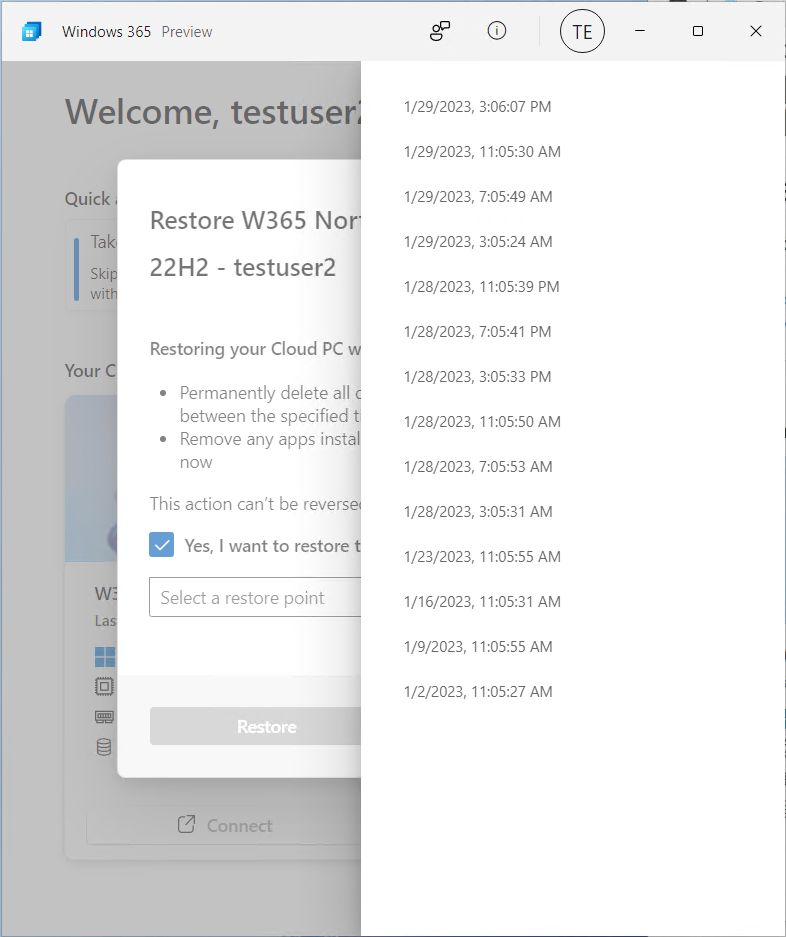
before finally clicking on Restore to complete the action.
Similarly to the app, in the Windows 365 portal the end user will see their available Cloud PC’s and options available based on what was configured by the admin. Clicking on the 3 dots to Manage this Cloud PC
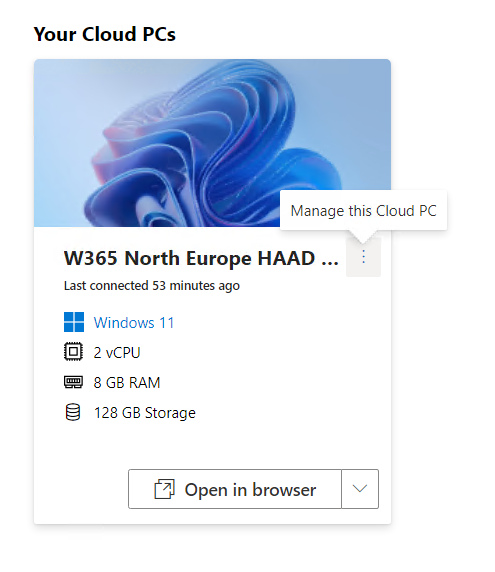
brings up the same experience as with the Windows 365 app above.
Recommended reading
- Differences between Production and Standard checkpoints in hyper-v – https://learn.microsoft.com/en-us/windows-server/virtualization/hyper-v/manage/choose-between-standard-or-production-checkpoints-in-hyper-v
- Point-in-time restore for Windows 365 Enterprise – Overview of restoring a Cloud PC to a previous state with Windows 365 Enterprise | Microsoft Learn
- Windows 365 app – https://www.windows-noob.com/forums/topic/23113-introducing-the-windows-365-app/
- Known issues for Windows 365 Enterprise – Known issues for Windows 365 Enterprise | Microsoft Learn
Summary
Windows Cloud PC’s are more manageable than ever, but sometimes things can and do go wrong. As an admin having the ability to restore one or more Cloud PC’s to a previous point-in-time is great, we only wish that we could get more options such as the ability to customize the type of restore point to include say running apps. We’ve sent the feedback to Microsoft. It would also be nice if the Status of a restore revealed if it was the end-user that initiated it versus the Admin.
