
Introduction
This is part 7 in a series of guides about cloud attach in Microsoft Endpoint Manager, with the aim of getting you up and running with all things cloud attach. This part will focus on enabling the compliance policies workload. This series is co-written by Niall & Paul, both of whom are Enterprise Mobility MVP’s with broad experience in the area of modern management. Paul is 4 times Enterprise Mobility MVP based in the UK and Niall is 10 times Enterprise Mobility MVP based in Sweden.
In part 1 we configured Azure AD connect to sync accounts from the on premise infrastructure to the cloud. In part 2, we prepared Azure resources for the Cloud Management Gateway, in part 3 we created the cloud management gateway and verified that everything was running smoothly. In part 4 we enabled co-management. With co-management, you retain your existing processes for using Configuration Manager to manage PCs in your organization and you gain the additional advantage of being able to transfer workloads to the cloud via Endpoint Manager (Intune). In part 5 we enabled the compliance policies workload and reviewed how that affected a co-managed computer. In this part we will enable conditional access and see how that can be used to deny access to company resources. In part 6 we configured conditional access and used it to deny access to company resources unless the device was encrypted with BitLocker. In this part we’ll show you that a device doesn’t need to be hybrid Azure Ad joined in order to become co-managed and we’ll show you one way to add an Azure AD joined device to co-management via a LOB (line of business) app.
Microsoft recommends joining devices to Azure AD. Internet-based devices can use Azure AD modern authentication with Configuration Manager. It also enables both device and user scenarios whether the device is on the internet or connected to the internal network.
- Cloud attach – Endpoint Managers silver lining – part 1 Configuring Azure AD connect
- Cloud attach – Endpoint Managers silver lining – part 2 Prepare for a Cloud Management Gateway
- Cloud attach – Endpoint Managers silver lining – part 3 Creating a Cloud Management Gateway
- Cloud attach – Endpoint Managers silver lining – part 4 Enabling co-management
- Cloud attach – Endpoint Managers silver lining – part 5 Enabling compliance policies workload
- Cloud attach – Endpoint Managers silver lining – part 6 Enabling conditional access
- Cloud attach – Endpoint Managers silver lining – part 7 Co-managing Azure AD devices
Step 1. Identify Azure ad joined devices
To determine if a device is hybrid azure ad joined or azure ad joined let’s take a look at the output of a command on two different computers, the following command will reveal this info.
dsregcmd /status
This reveals info containing lots of details, but we are mainly interested in the following properties of the device state.
- AzureADJoined
- DomainJoined
On the left we have our hybrid azure ad joined device which is joined to an on-premises domain as well as joined to Azure AD. On the right, the equivalent output is shown from an azure ad joined device, as you can see the device on the right is only joined to Azure AD and that device is the target of today’s blog post. We will show you how to co-manage this azure ad joined device and the steps needed to achieve that easily.

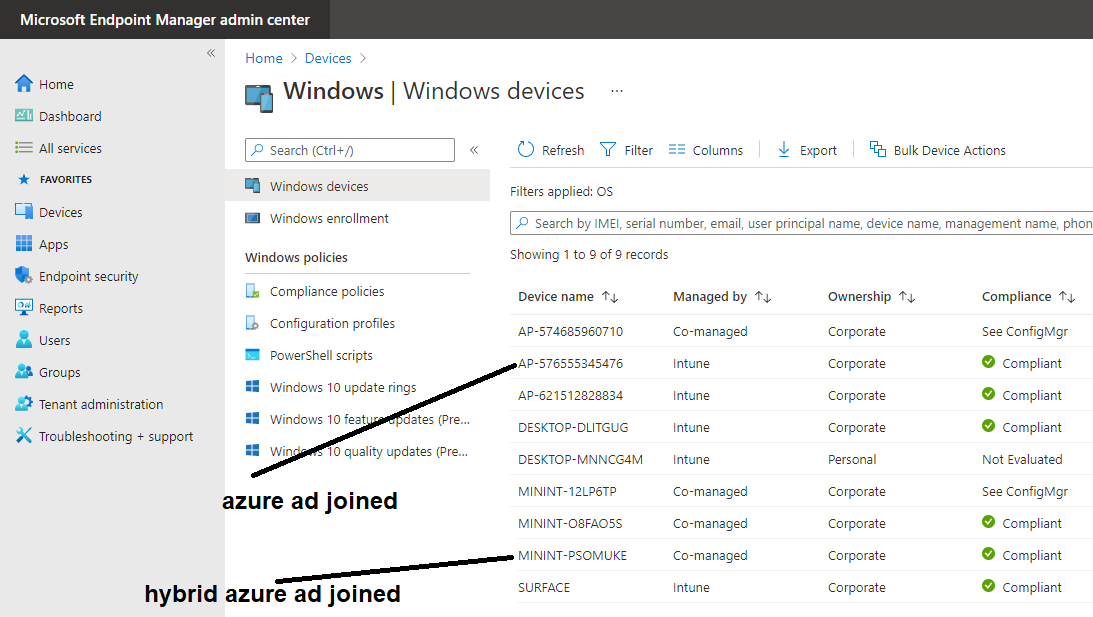
If we look in Microsoft Endpoint Manager we can see those two devices, note that the hybrid azure ad joined device is already co-managed while the Azure AD joined device is not but it is enrolled into Intune.
Step 2. Create an azure ad group
Create an assigned Azure ad group called Co-managed AzureAd devices. We will use this group to target assigned devices with:
- Certificates used for communication to the on-premises infrastructure (when situated in that network)
- LOB app to deploy the Configuration Manager client
Step 3. Add needed certificates
Note: The on-premises infrastructure used for this series uses PKI (HTTPS) communication, so the client will communicate with on-premises client facing roles using HTTPS when on the same network, when it’s not on the same network (or is on the internet), the CMG connection point does not need a client authentication certificate as the client uses Azure AD authentication. If we deploy the Trusted Root cert and Intermediate cert to our clients then when they roam into the on-premises network they’ll flip over to ‘currently intranet’ in the ConfigMgr client properties, and be able to download content from the local distribution point rather than from the CMG. If you don’t do this, they’ll stay as ‘currently internet’ and download content from the CMG even when located on the same network as the on-premises Configuration Manager site servers (such as MP, SUP, DP).
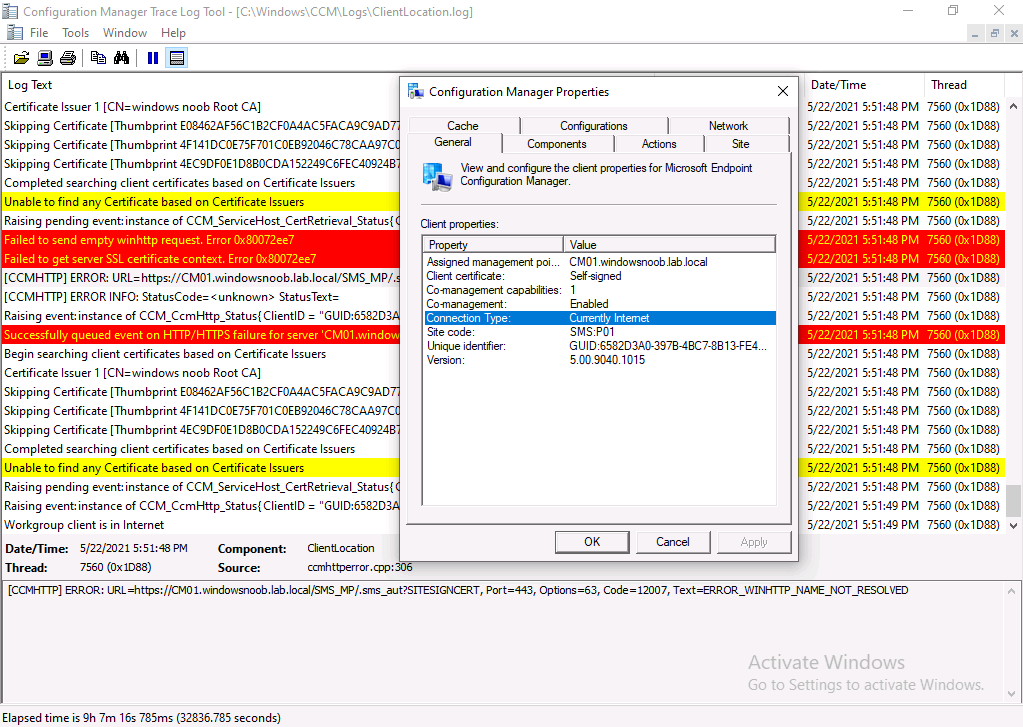
Below you can see how the client behaves when it is on the same network as your on-premises infrastructure when these certificates are not deployed to it. Note the errors in ClientLocation.log and how the Connection Type is set to Currently Internet.
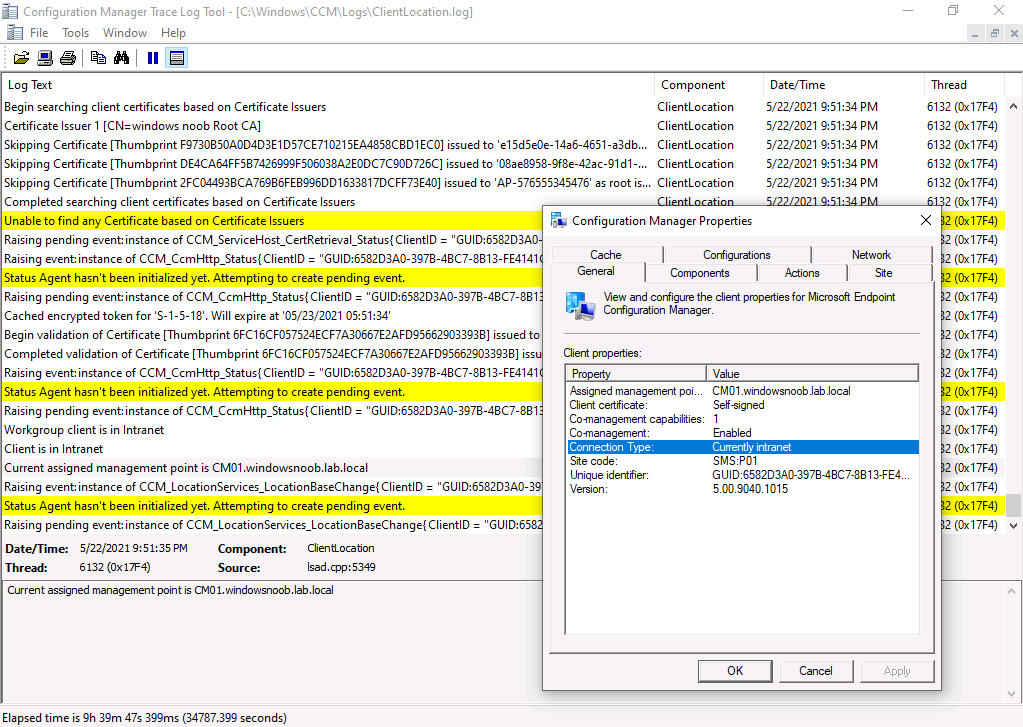
and below is the same client after having the Trusted Root Certificate and Intermediate Certificate installed. Note how the ClientLocation.log no longer complains about being able to talk to the local MP and the Connection Type is now set to Currently Intranet.
To resolve this (for communicating with client facing roles in the on-premises network), simply deploy the certificate used in your certificate chain within your infrastructure, we use a 2-tier chain so that means the following certs need to be deployed.
- Trusted Root Certificate
- Intermediate Certificate
To deploy the certs, you’ll need to export them first on a client computer that has the certificates in its’ certificate store.
Exporting certificates
To export the certificates you can do as follows. On a client computer that has the certificates installed, open CertLM.msc and select the Trusted Root Certification section, select Certificates and browse to your Trusted Root Certificate.
To continue reading the rest of this post click here.
