
Introduction
In an earlier post I showed you how you can enable Full Disk Encryption via a task sequence in Microsoft Endpoint Manager Configuration Manager version 1910.
The screenshots in that blog post were taken from virtual machines, and I noted that when I enabled FDE in WinPE (Pre-Provision BitLocker), it would fail on virtual machines. When I did the initial test I was using ADK 1709 in that lab, I have since updated it to ADK 1903 and I can confirm that the Pre-Provision Bitlocker step with the Use full disk encryption setting enabled, works, and dare I say it, the step is instant *unlike real hardware hdd’s).
In this blog post I want to show you how those BitLocker steps with Full Disk Encryption selected, work on real hardware, in this case a HP Prodesk 600 G3 SFF fitted with a 256GB hdd. This particular hdd is a traditional spinning hdd, I will update this blogpost with data from an SSD as soon as I get the chance. The versions used in my testing are shown below:
- Windows 10 Enterprise x64 – version 1909
- Windows ADK version 1903
- ConfigMgr 1910
I’ve placed pause steps before and after each of the BitLocker related steps and will issue various commands to ‘see’ the effect of those steps on real hardware.
Note: For an overview of BitLocker encryption types please see – https://docs.microsoft.com/en-us/windows/security/information-protection/bitlocker/bitlocker-device-encryption-overview-windows-10
In a nutshell:
- Used Space Only – quicker, less secure
- Full Disk Encryption – slower, more secure
In this post we’ll look in detail at how Full Disk Encryption functions within the two BitLocker specific steps, namely:
- Pre-Provision BitLocker
- Enable BitLocker
Note that the TPM has already been enabled in the UEFI firmware on this hardware.
Pre-Provision Bitlocker
The Pre-Provision Bitlocker step takes place in WinPE and normally allows you to save time during operating system deployment by encrypting only used space, so how does this step change behaviour when Use full disk encryption is selected.
The first thing you need to keep in mind is that enabling FDE will significantly increase OSD build times. Every step after this point will be slower when Use full disk encryption is selected. The second thing to understand is that enabling FDE in the Pre-provision BitLocker step will start the encryption at the start of the task sequence so that will mean the disk is getting protected from the beginning of it’s existence and that’s more secure. Lastly, in case you missed it, this step requires a physical TPM (when using FDE).
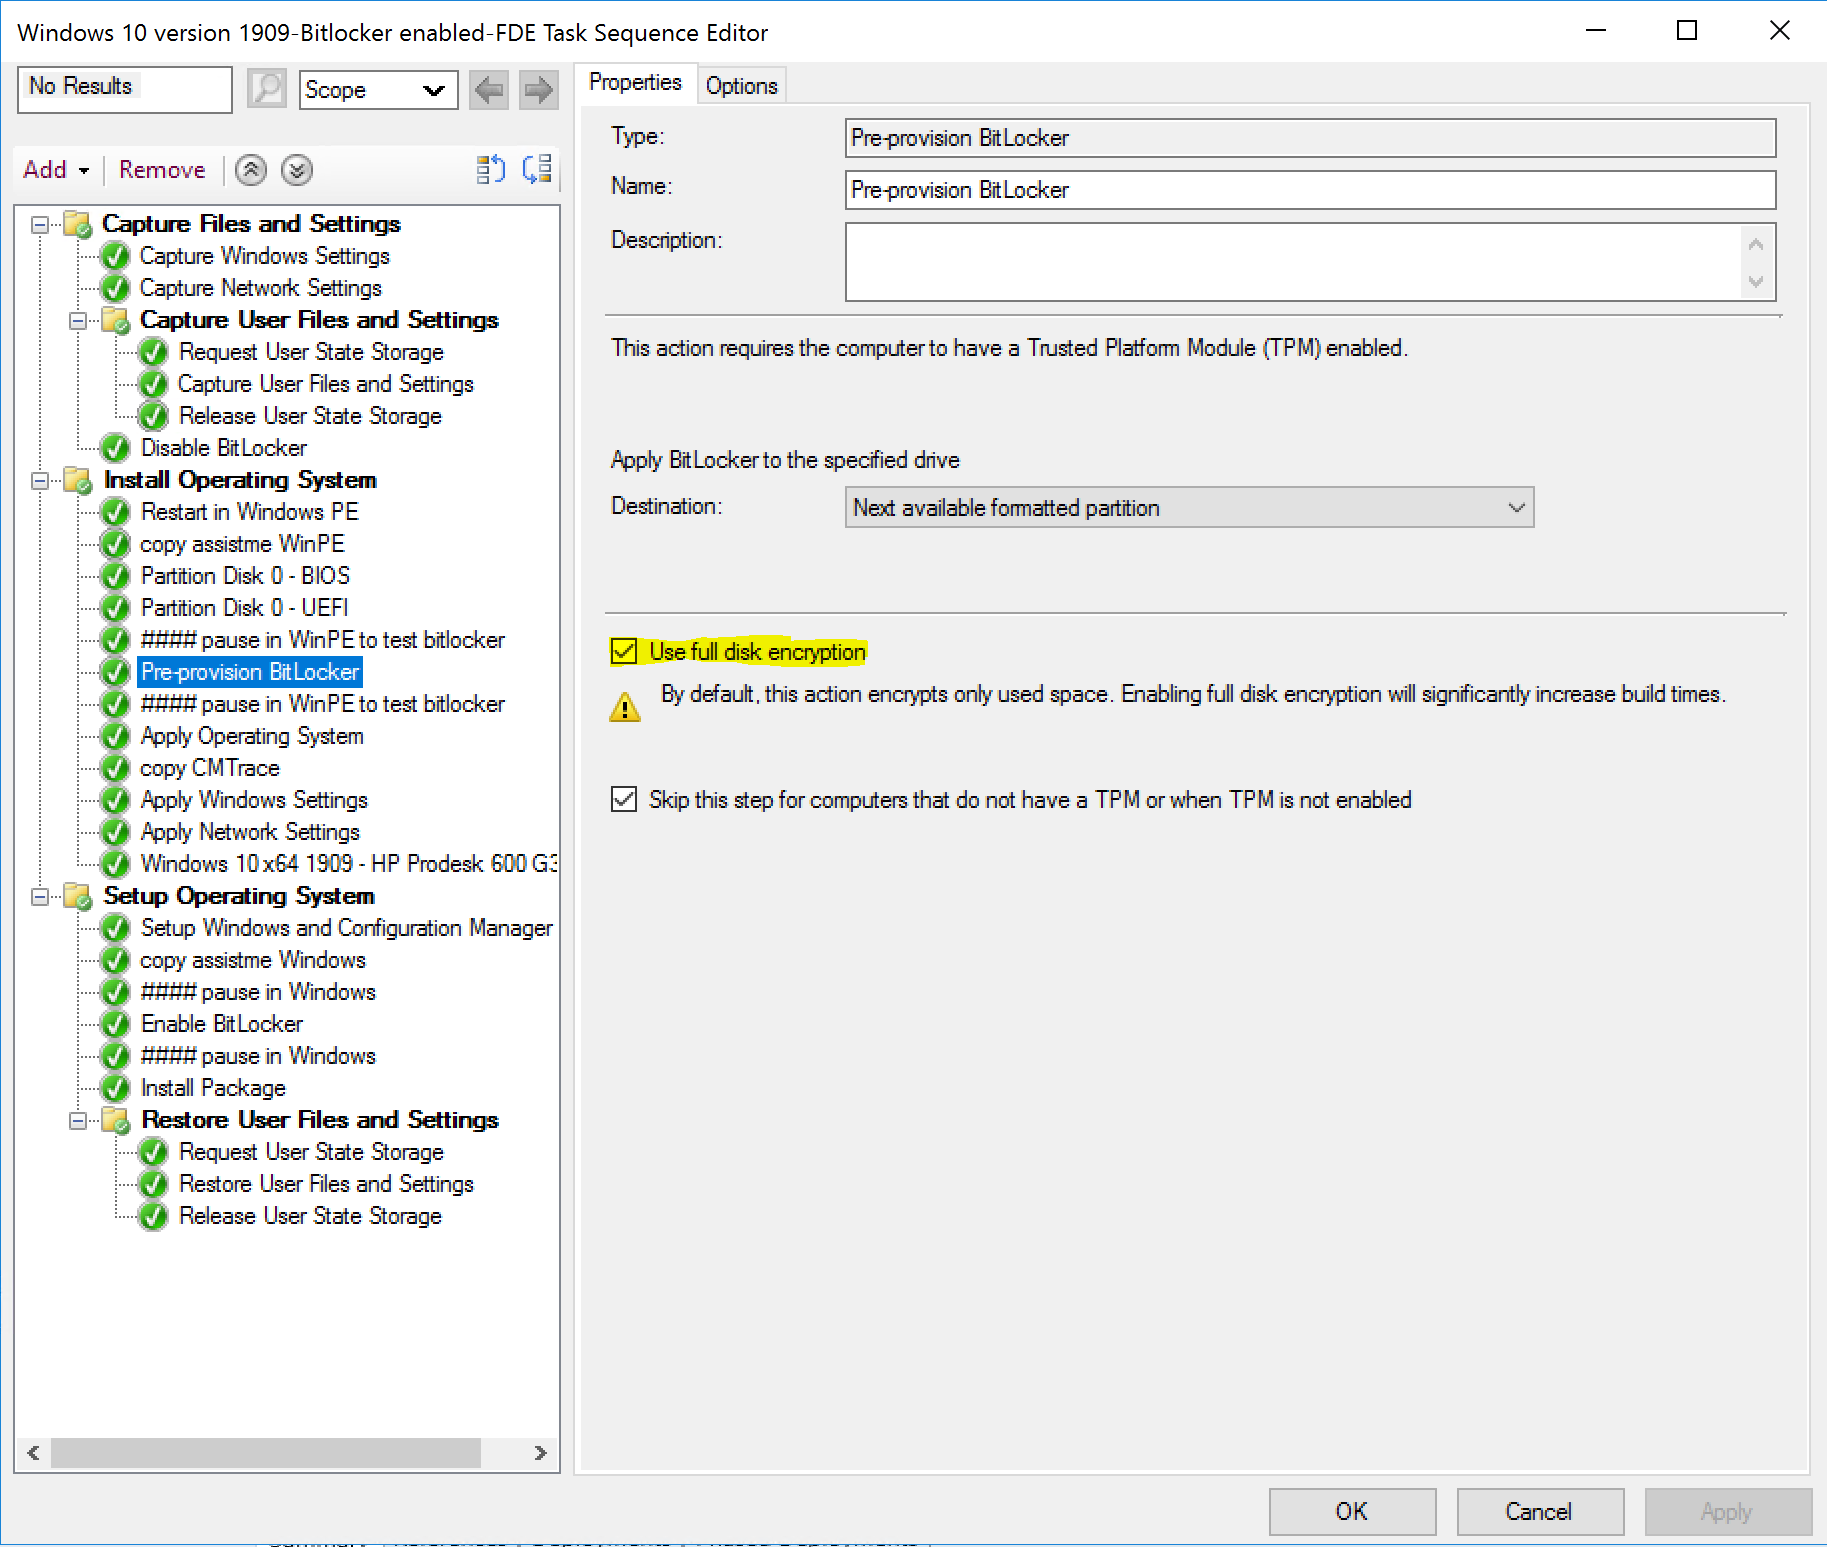 Now that you know what enabling that setting (highlighted in yellow above) will do, let’s see what the client is like before that step runs.
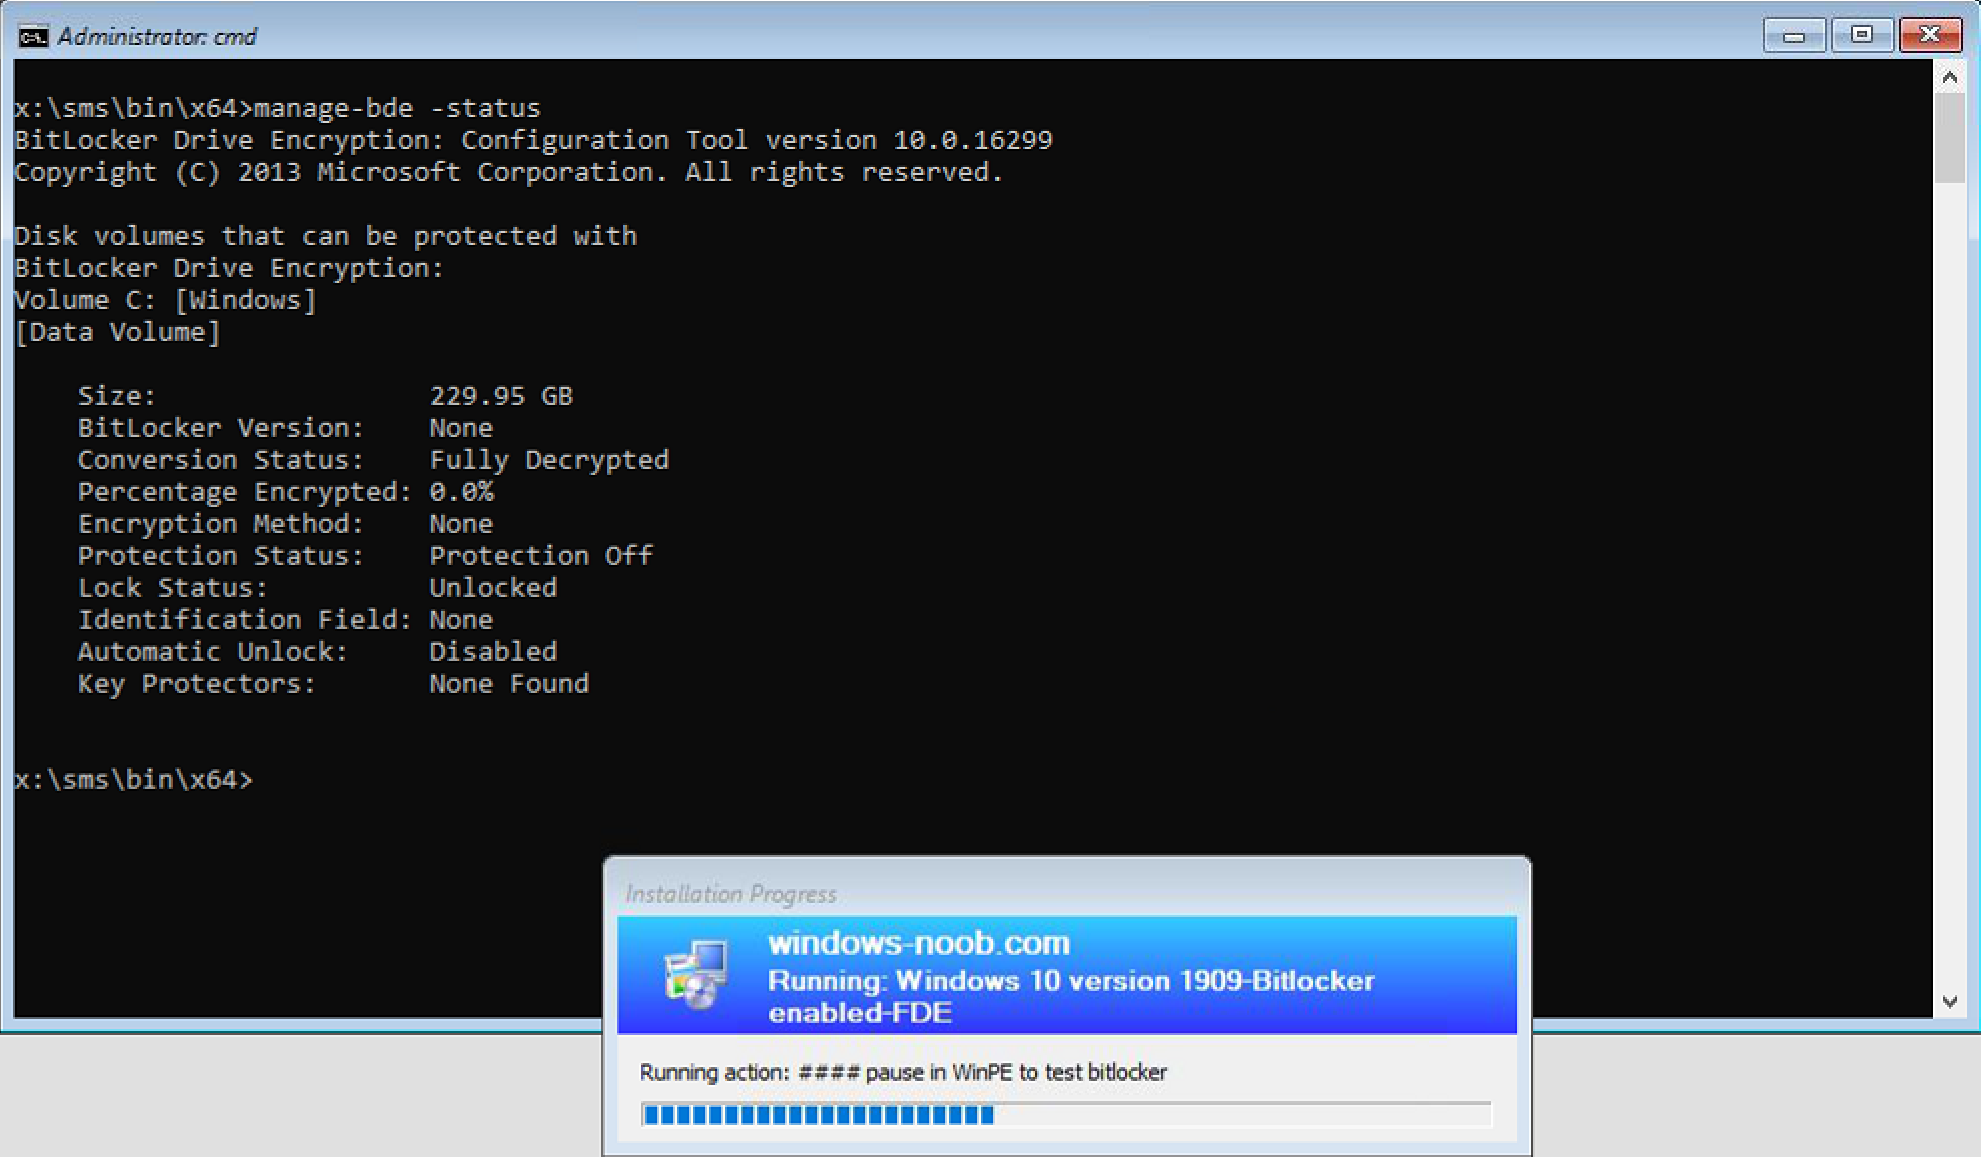
Now that we’ve paused the task sequence at this point, it’s good to note that the HDD has been formatted in the previous Partition Disk 0 – UEFI step and due to that, it is not encrypted in any way as the following command reveals.
manage-bde -status
Conversion Status: Fully Decrypted
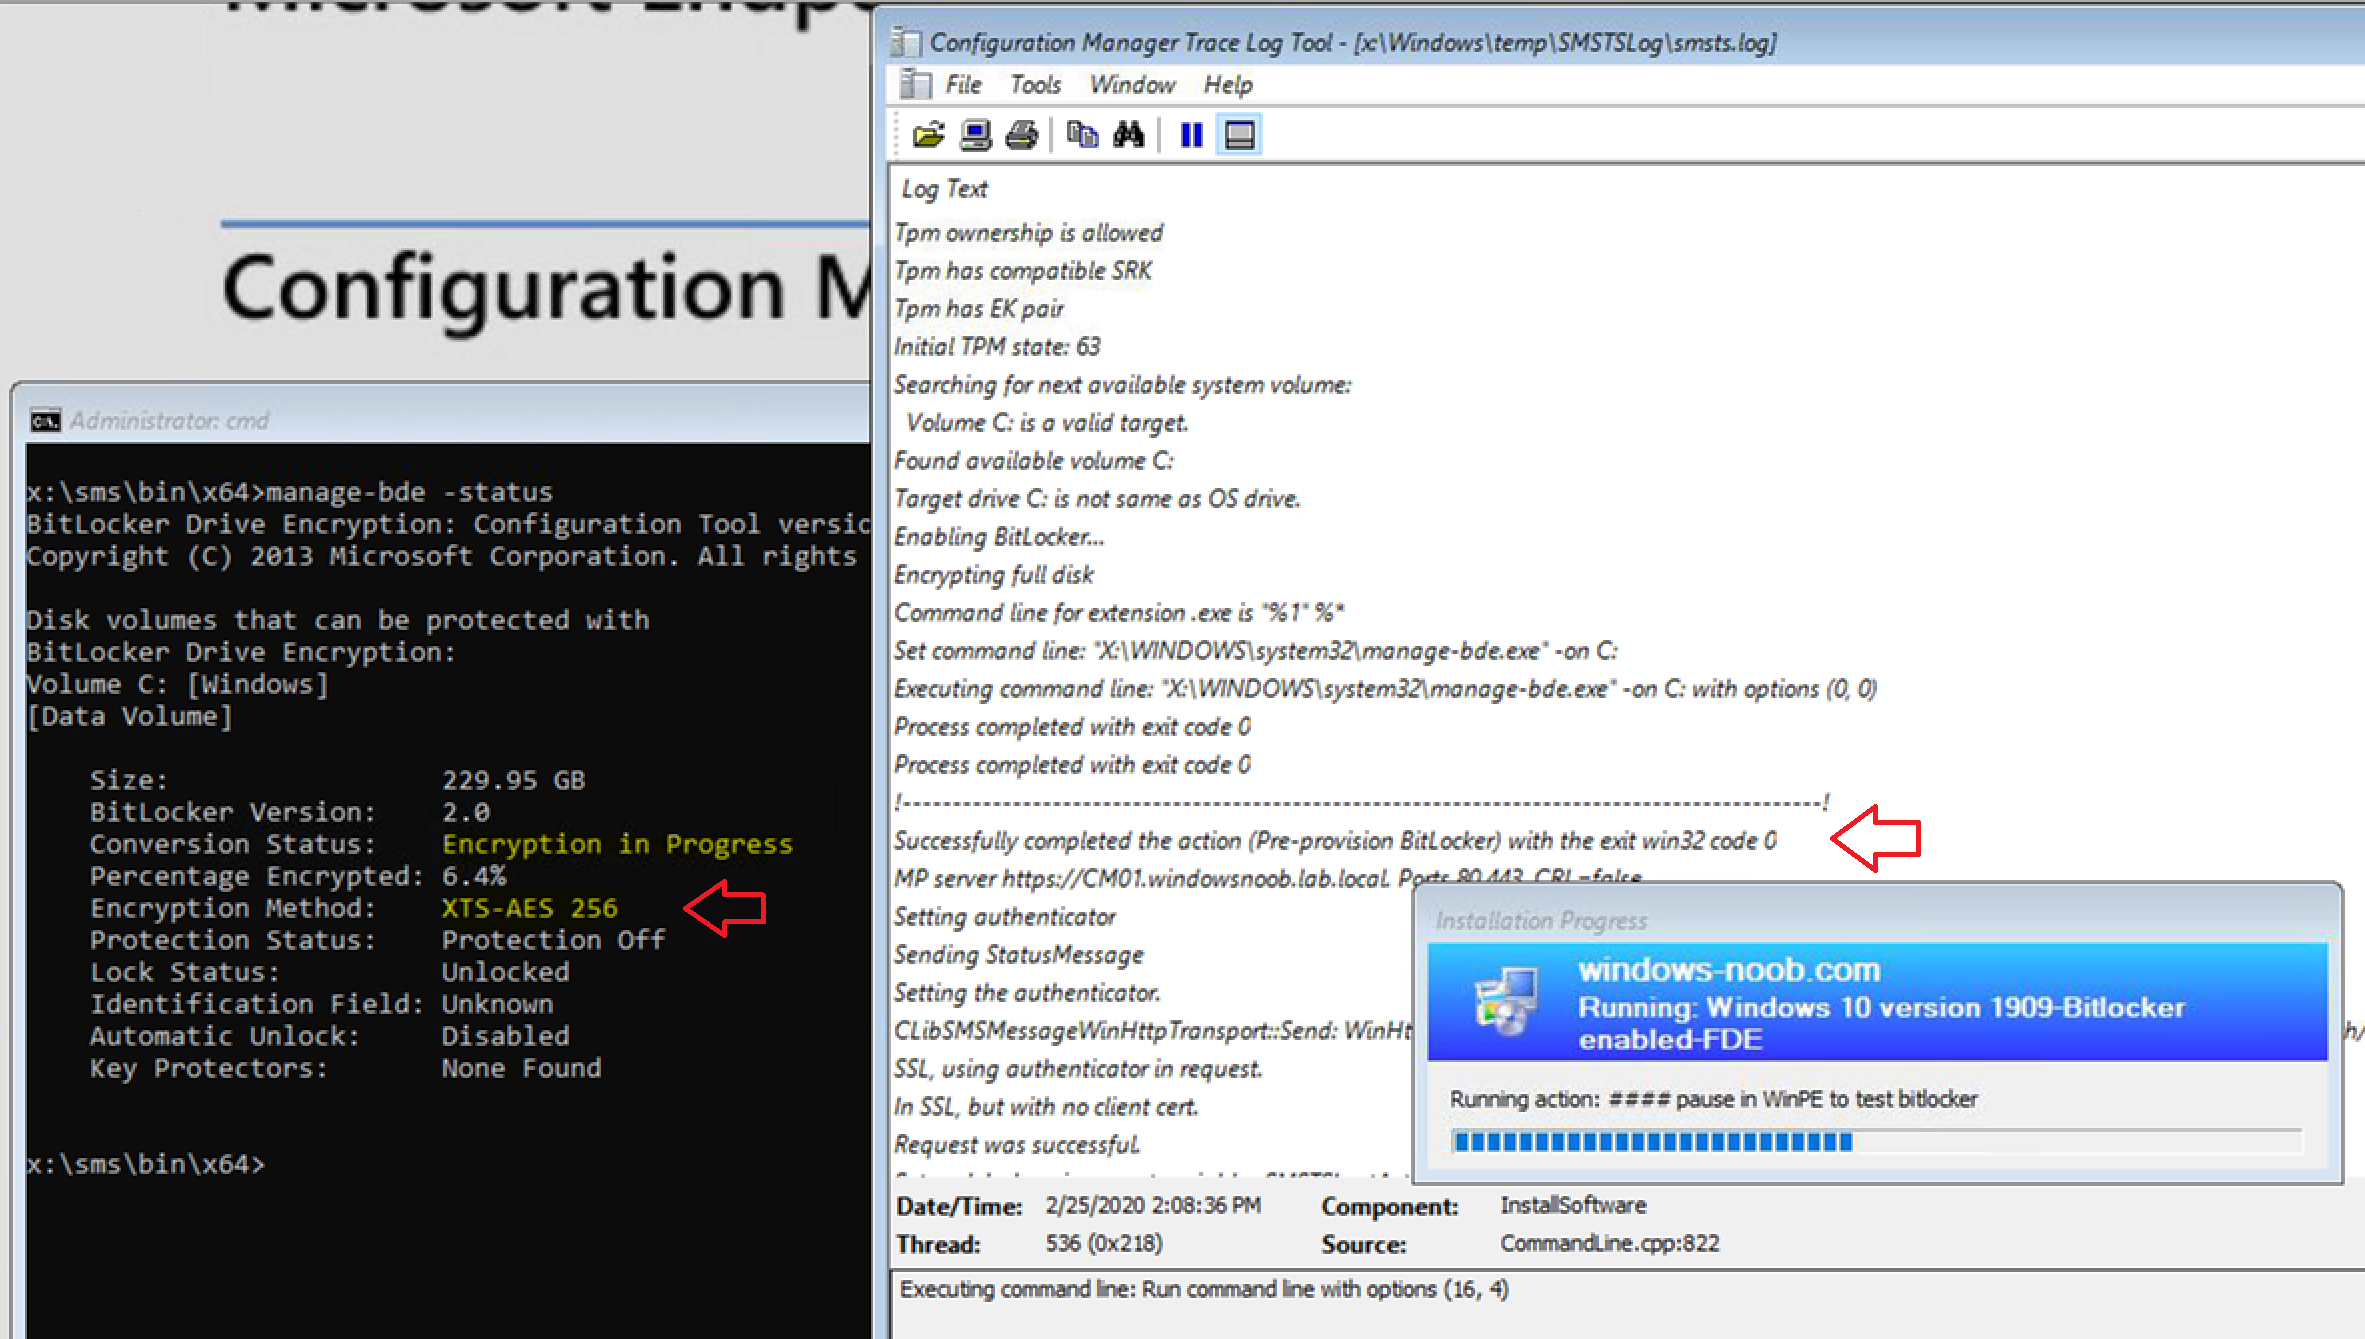
 After running the Pre-Provision BitLocker step we can see the following in smsts.log
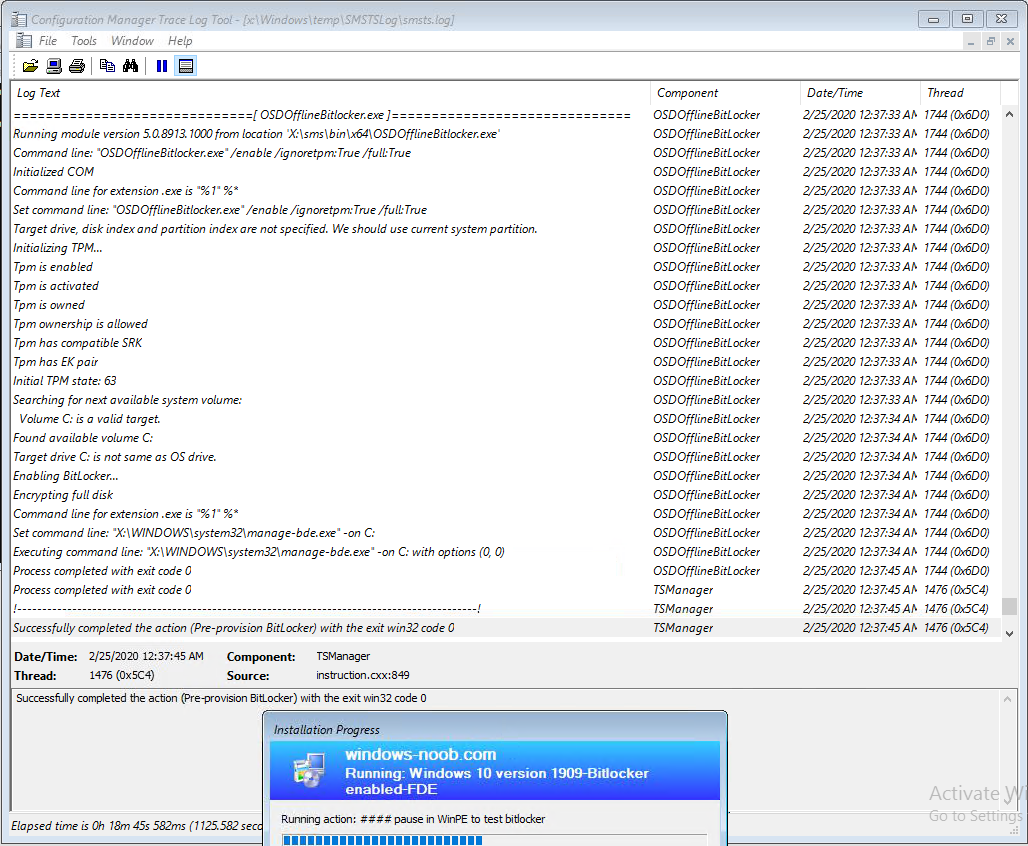 the interesting bits in relation to the TPM are shown below:
- Tpm is enabled
Tpm is activated
Tpm is owned
Tpm ownership is allowed
Tpm has compatible SRK
Tpm has EK pair
Initial TPM state: 63
For comparison’s sake, here’s a view of smsts.log on the same hardware after the TPM has been cleared in Windows using TPM.MSC as administrator.
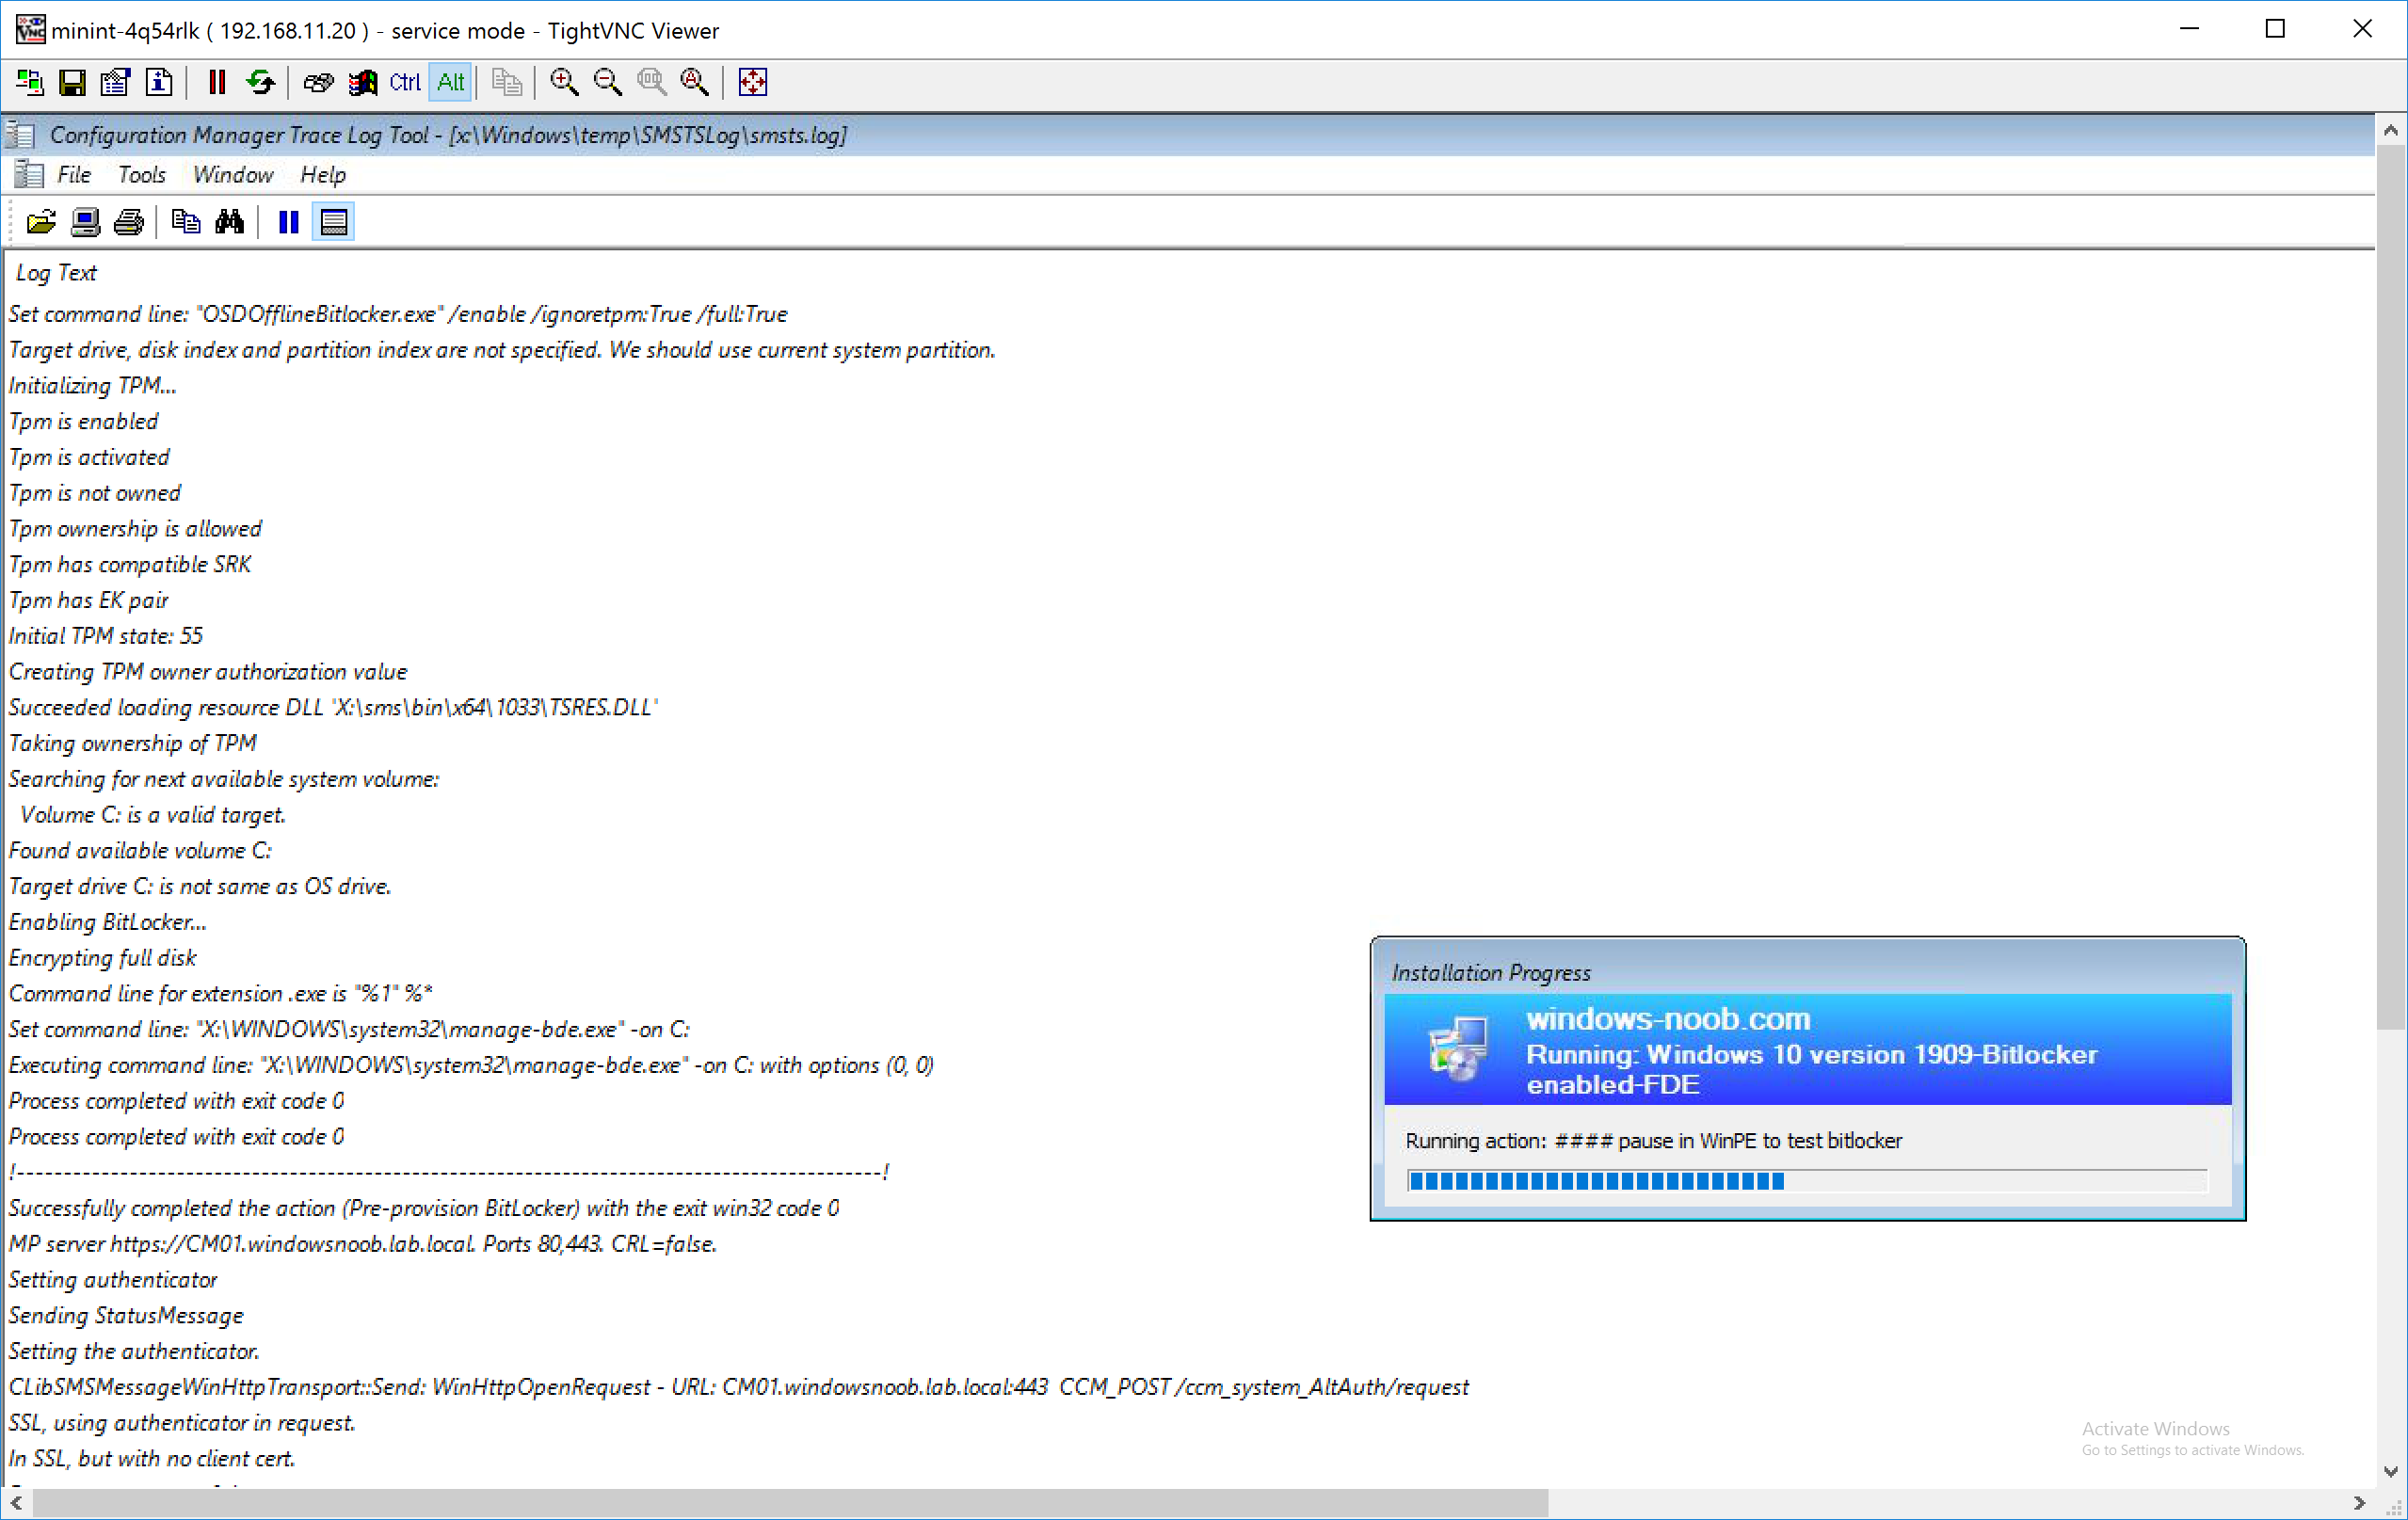
- Tpm is enabled
Tpm is activated
Tpm is not owned
Tpm ownership is allowed
Tpm has compatible SRK
Tpm has EK pair
Initial TPM state: 55
As you can see in that example, the TPM is not owned so ownership is instigated by the Pre-Provision BitLocker step:
- Taking ownership of TPM
Note: You can perform hardware actions such as clearing the TPM, via hardware vendor specific custom steps in your task sequence, or do them manually in the UEFI firmware, or via tpm.msc in Windows (as Administrator).
and further down in smsts.log it lists that it is Encrypting full disk.
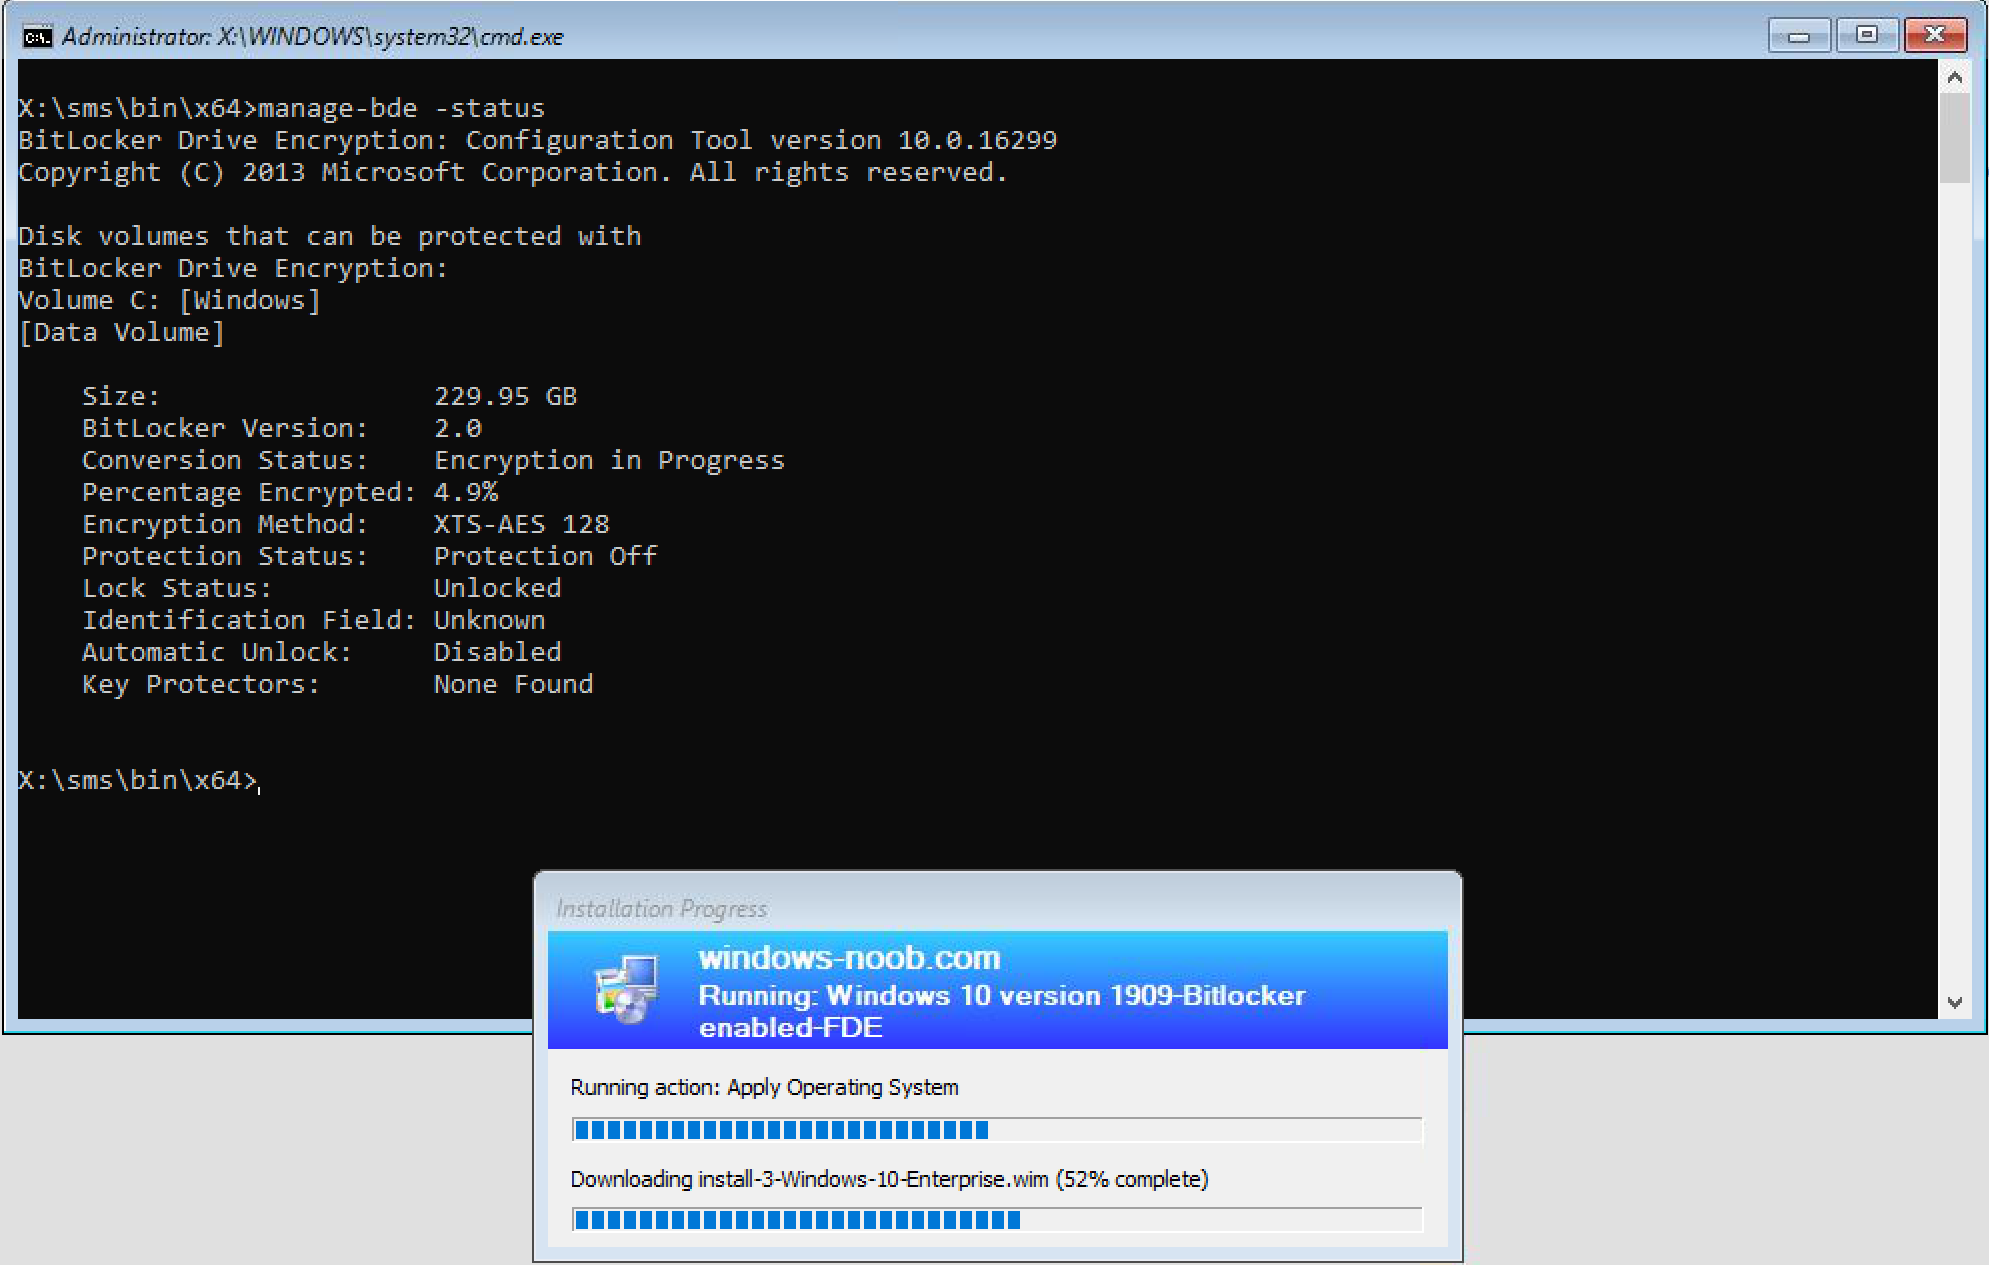
and, if we look at manage-bde -status it reveals the following, the drive is being encrypted !
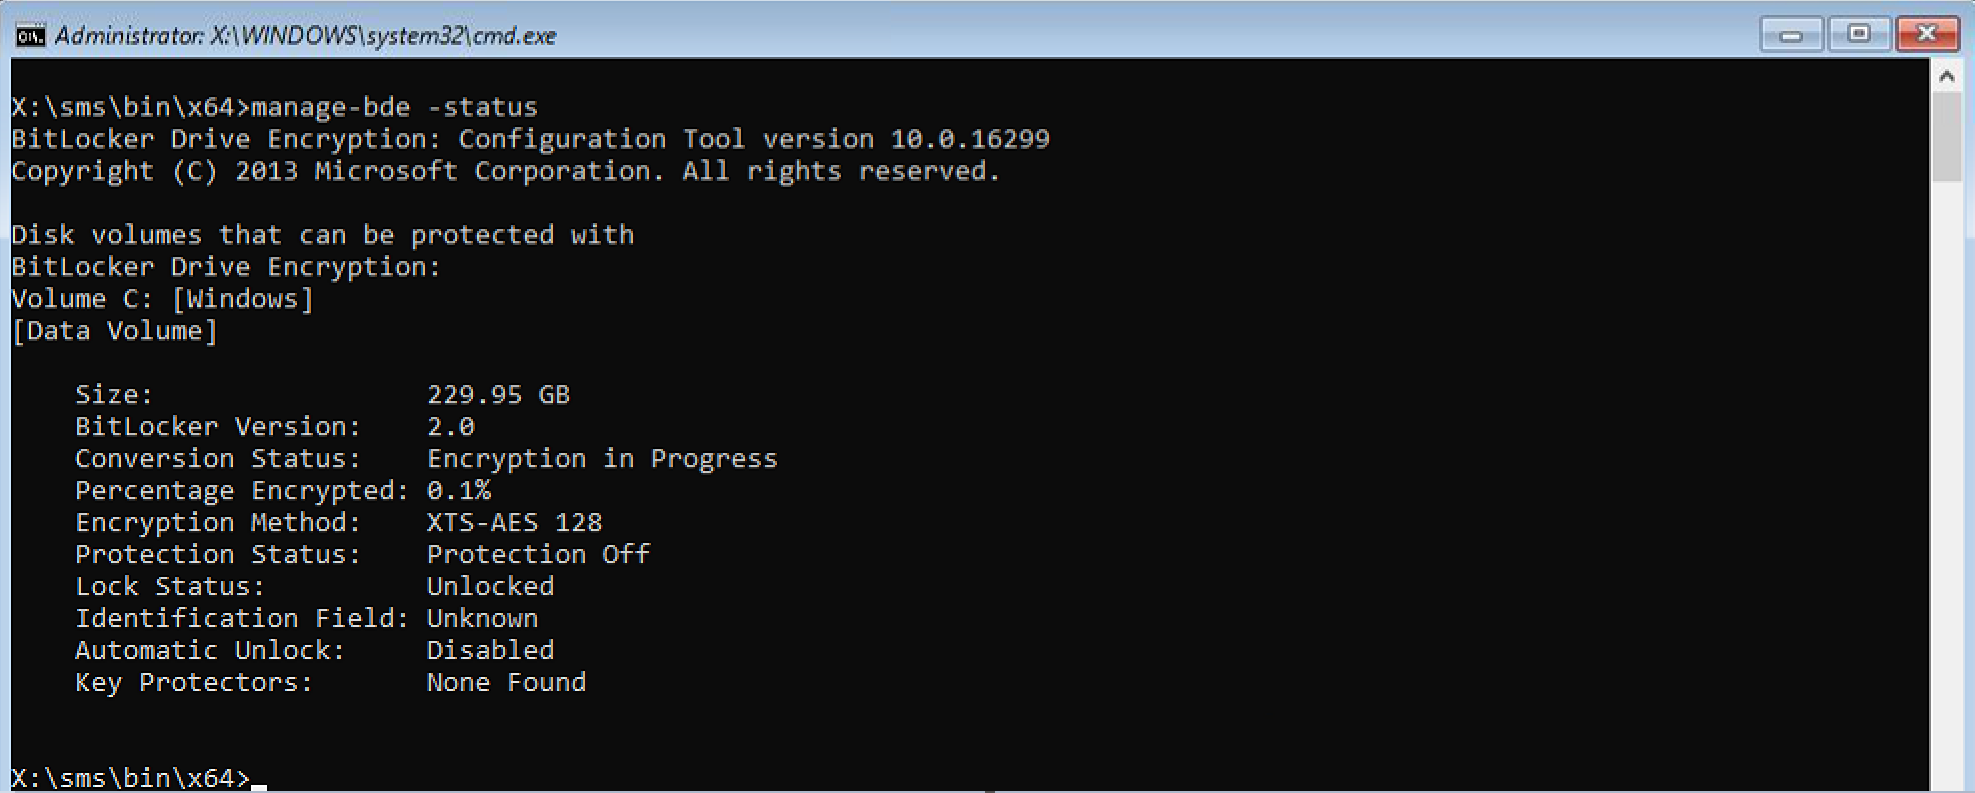 However, it’s using the default encryption algorithm, XTS-AES 128. In a later post I’ll show you how you can force our own encryption algorithm, but just to get you excited check this out (from another test).
 But back to the FDE test in progress…
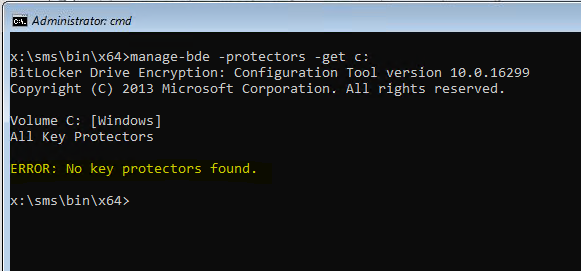
You will also note that there are no protectors at this point.
manage-bde -protectors -get c:
 After a couple of minutes you can see that it is indeed progressing…
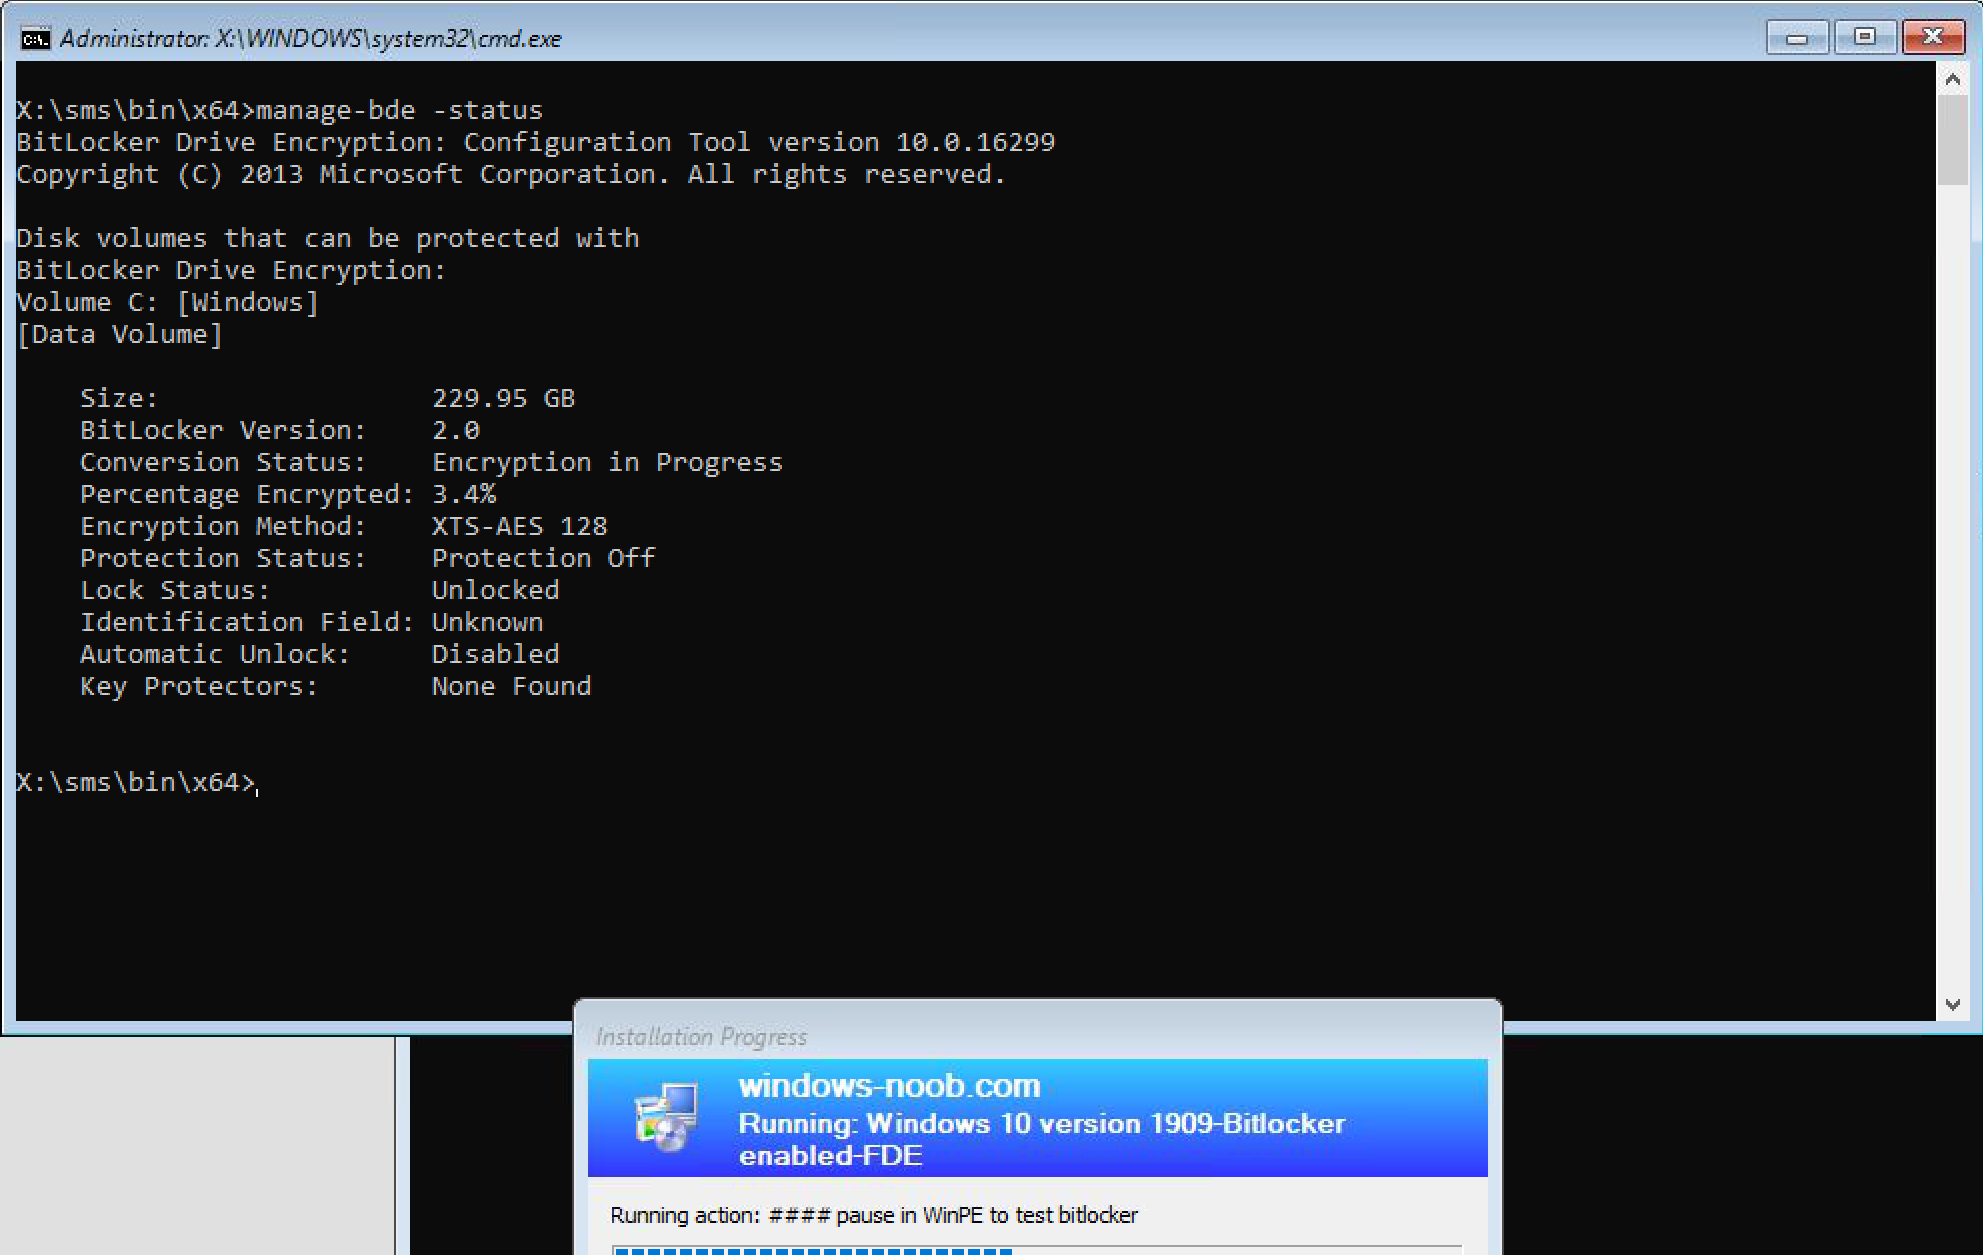 We could wait until all of the drive is encrypted at this point but lets let the task sequence continue by closing the current ‘pause task sequence’ step.
The Apply Operating System step begins (while the disk is being encrypted).
After this point the task sequence will reboot and start Windows setup, you’ll see the OEM hardware logo with Getting Ready.

After that is done, it will reboot again before installing the ConfigMgr client agent and eventually progress to the Enable BitLocker step. I say eventually because everything will be slower when you enable FDE on real hardware.
Enable BitLocker
In the Enable BitLocker step shown below, you’ll note that Use full disk encryption is selected, and that the protector TPM only is selected. In addition, we are not going to wait for encryption to complete.

On the computer itself, when the Enable BitLocker step actually runs, the disk is more than likely still encrypting from the Pre-Provision BitLocker step.
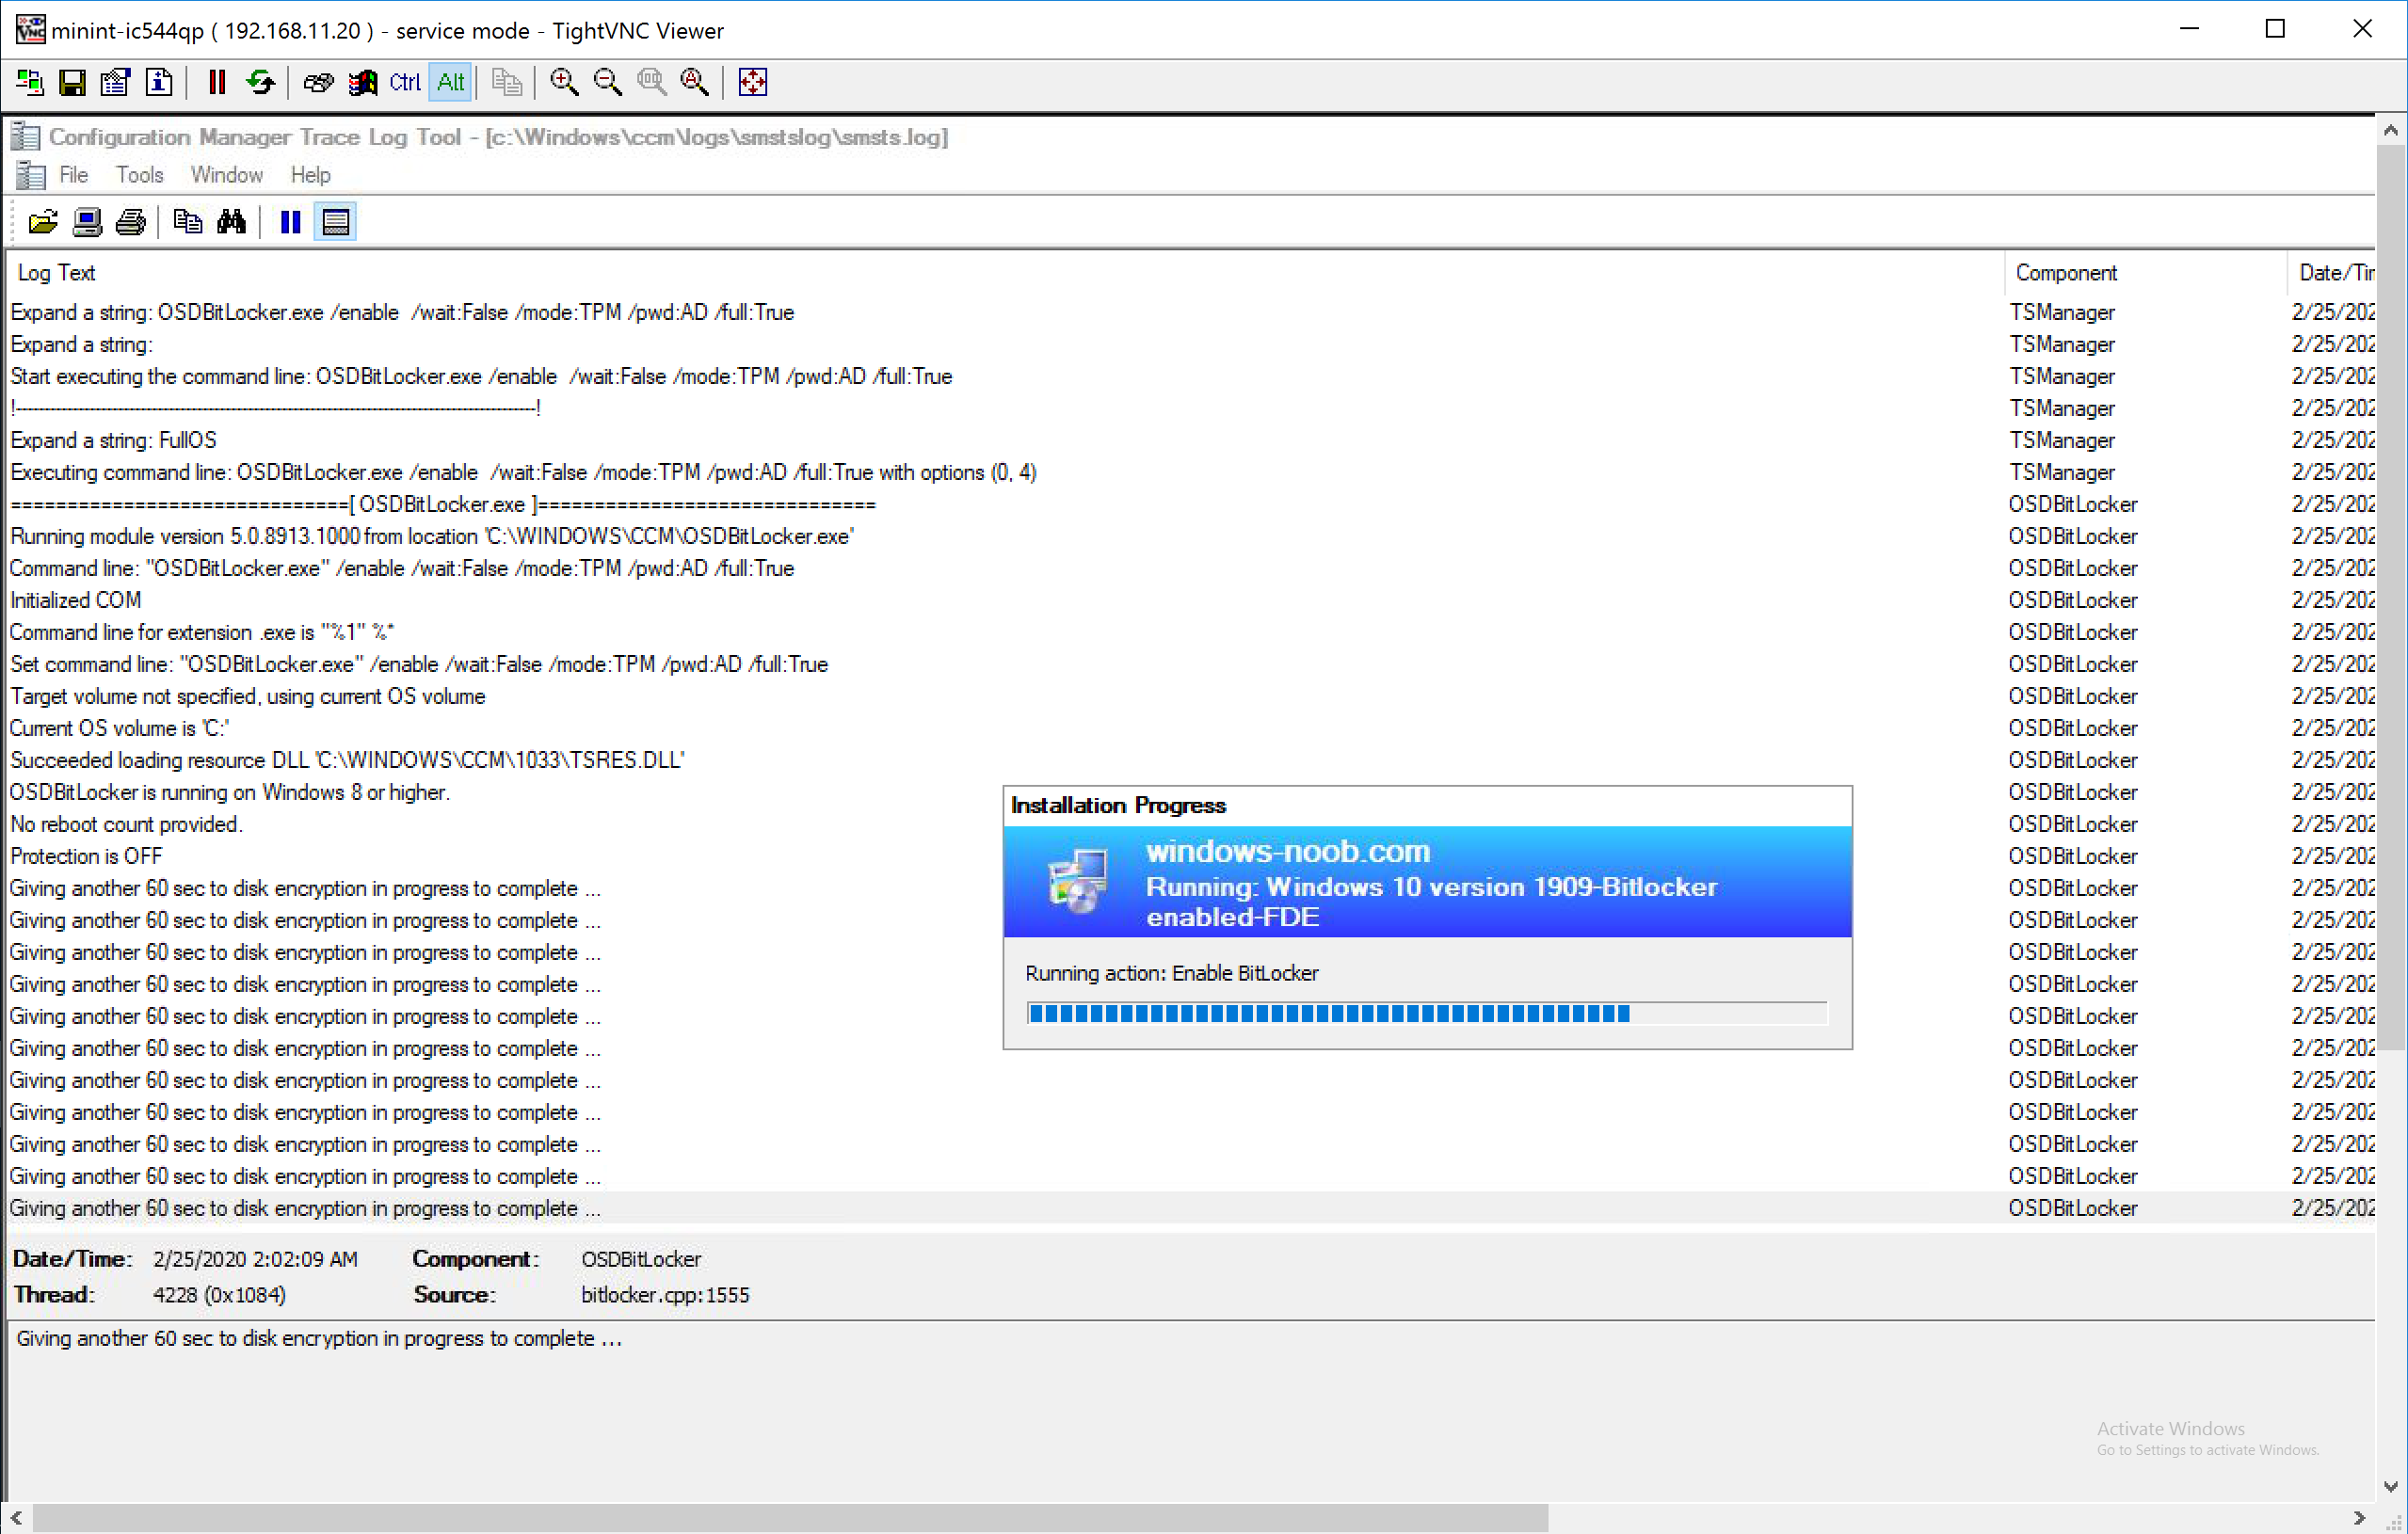
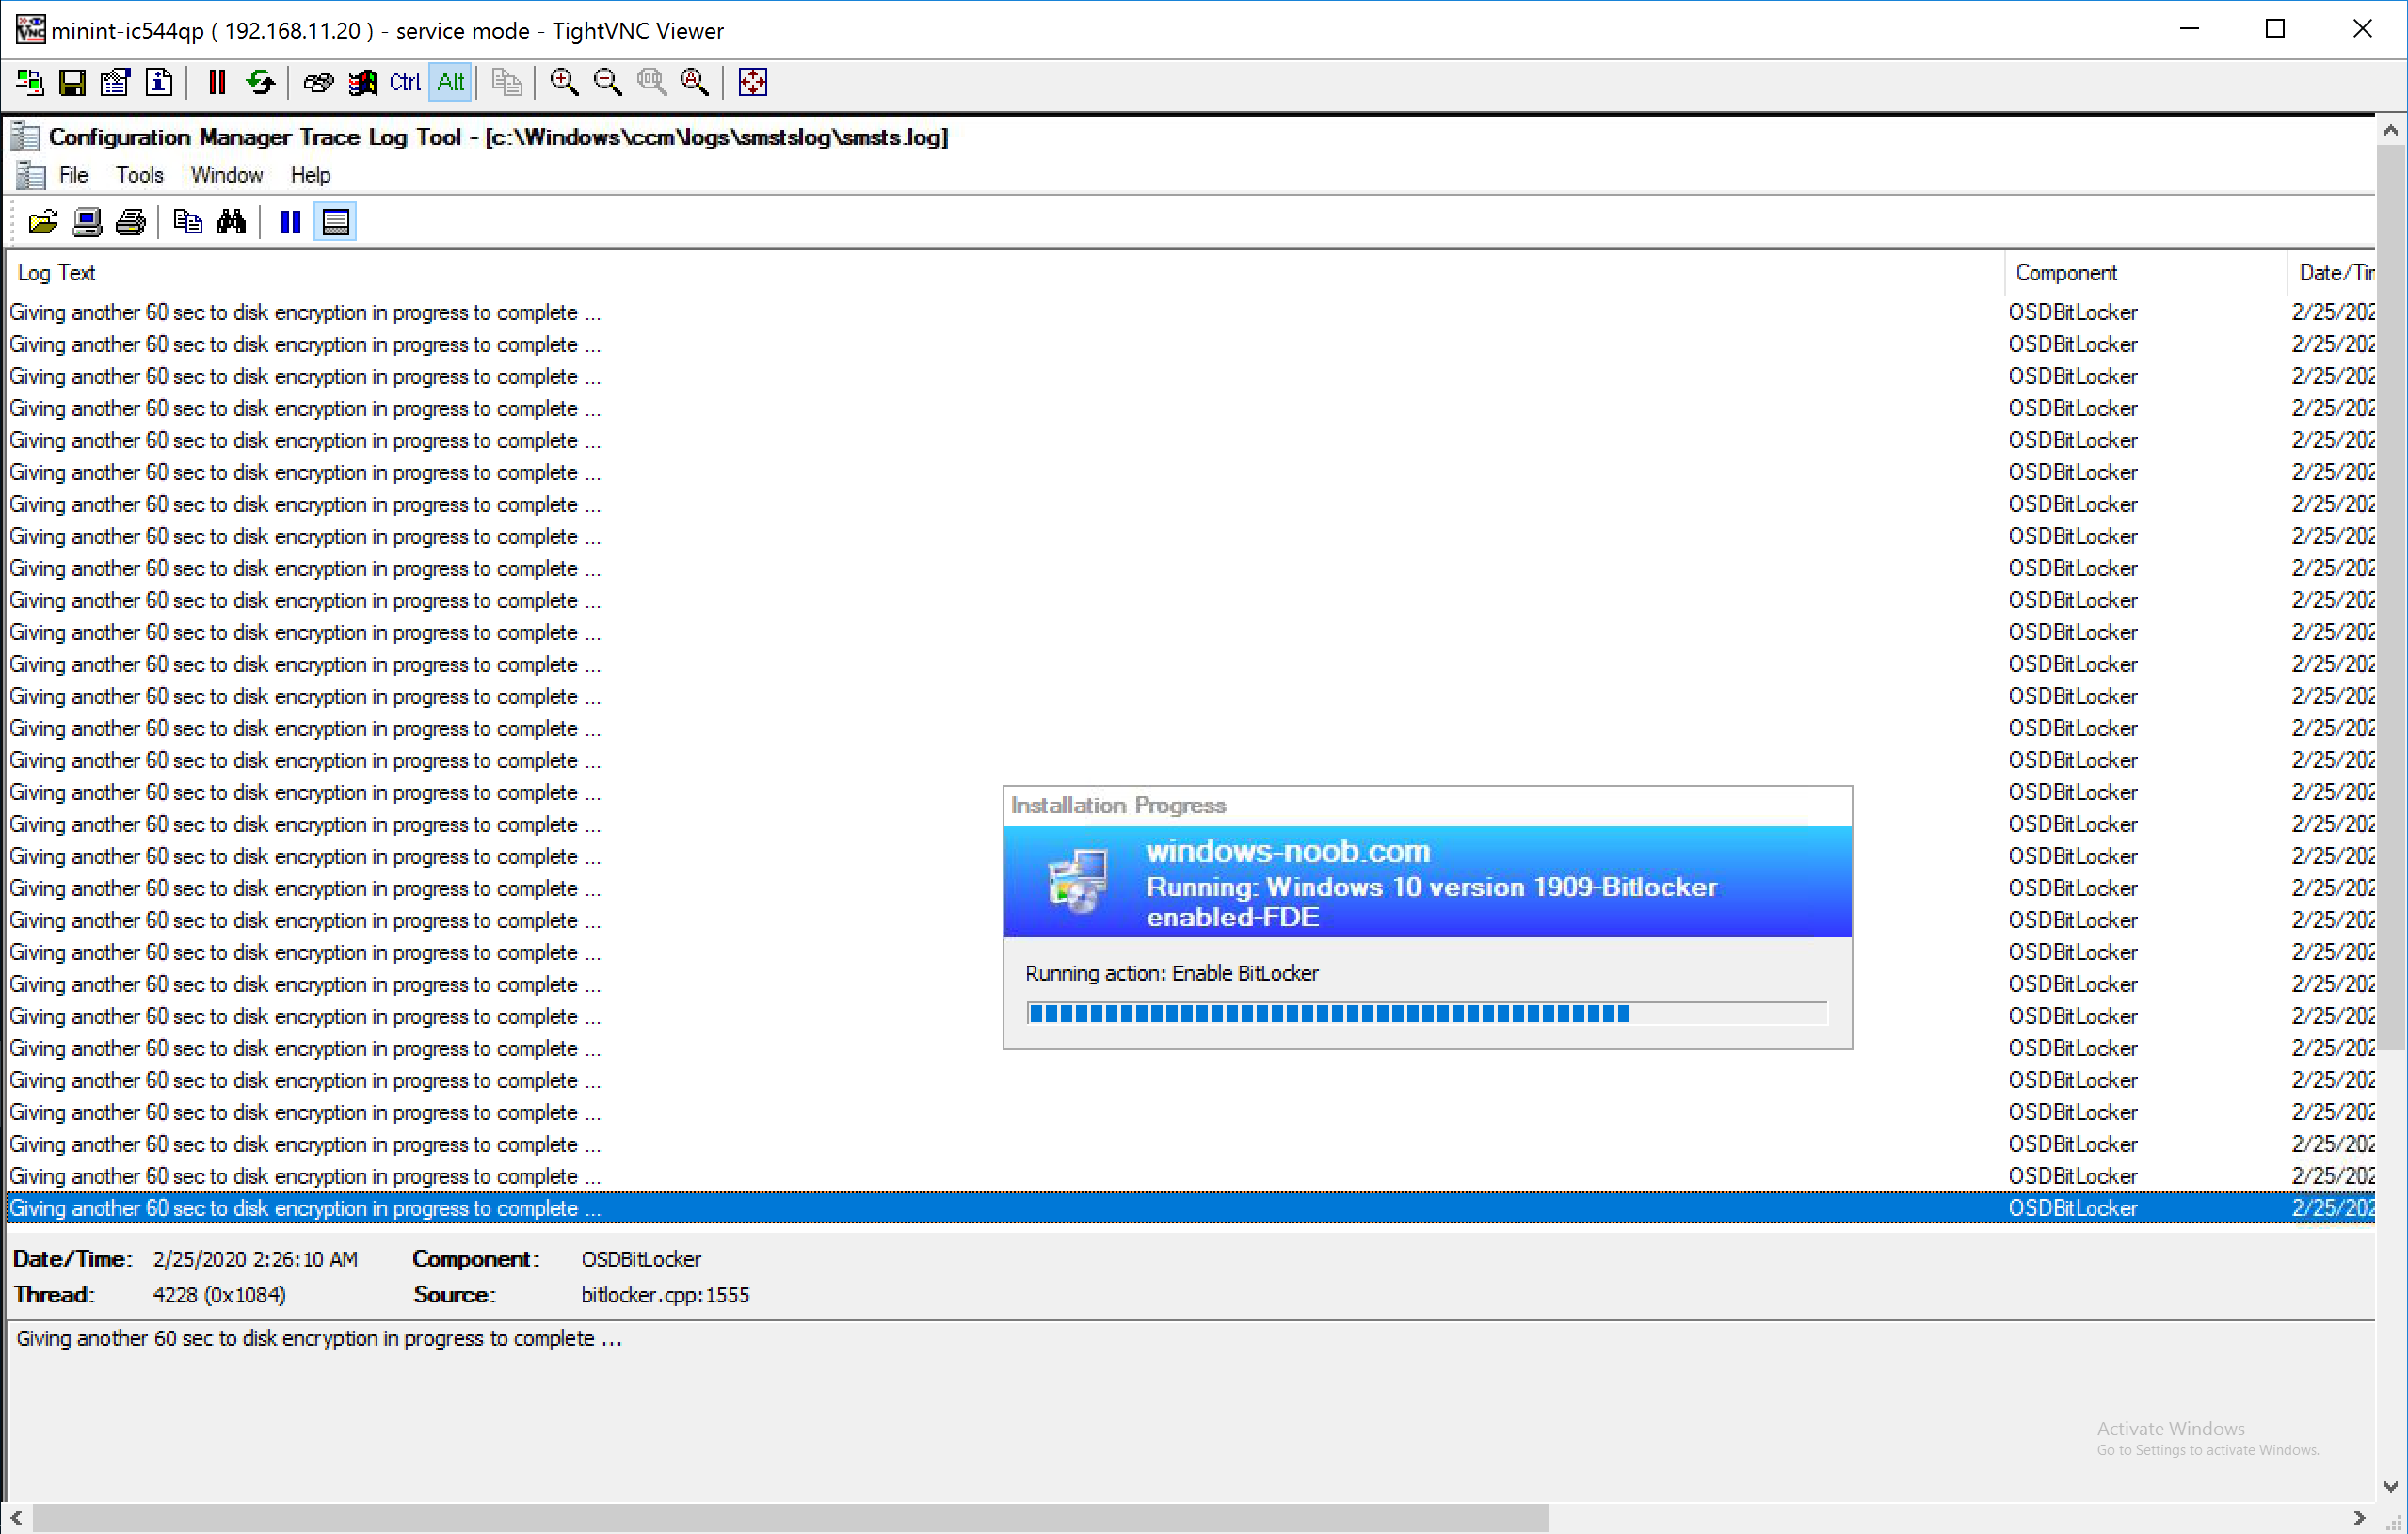
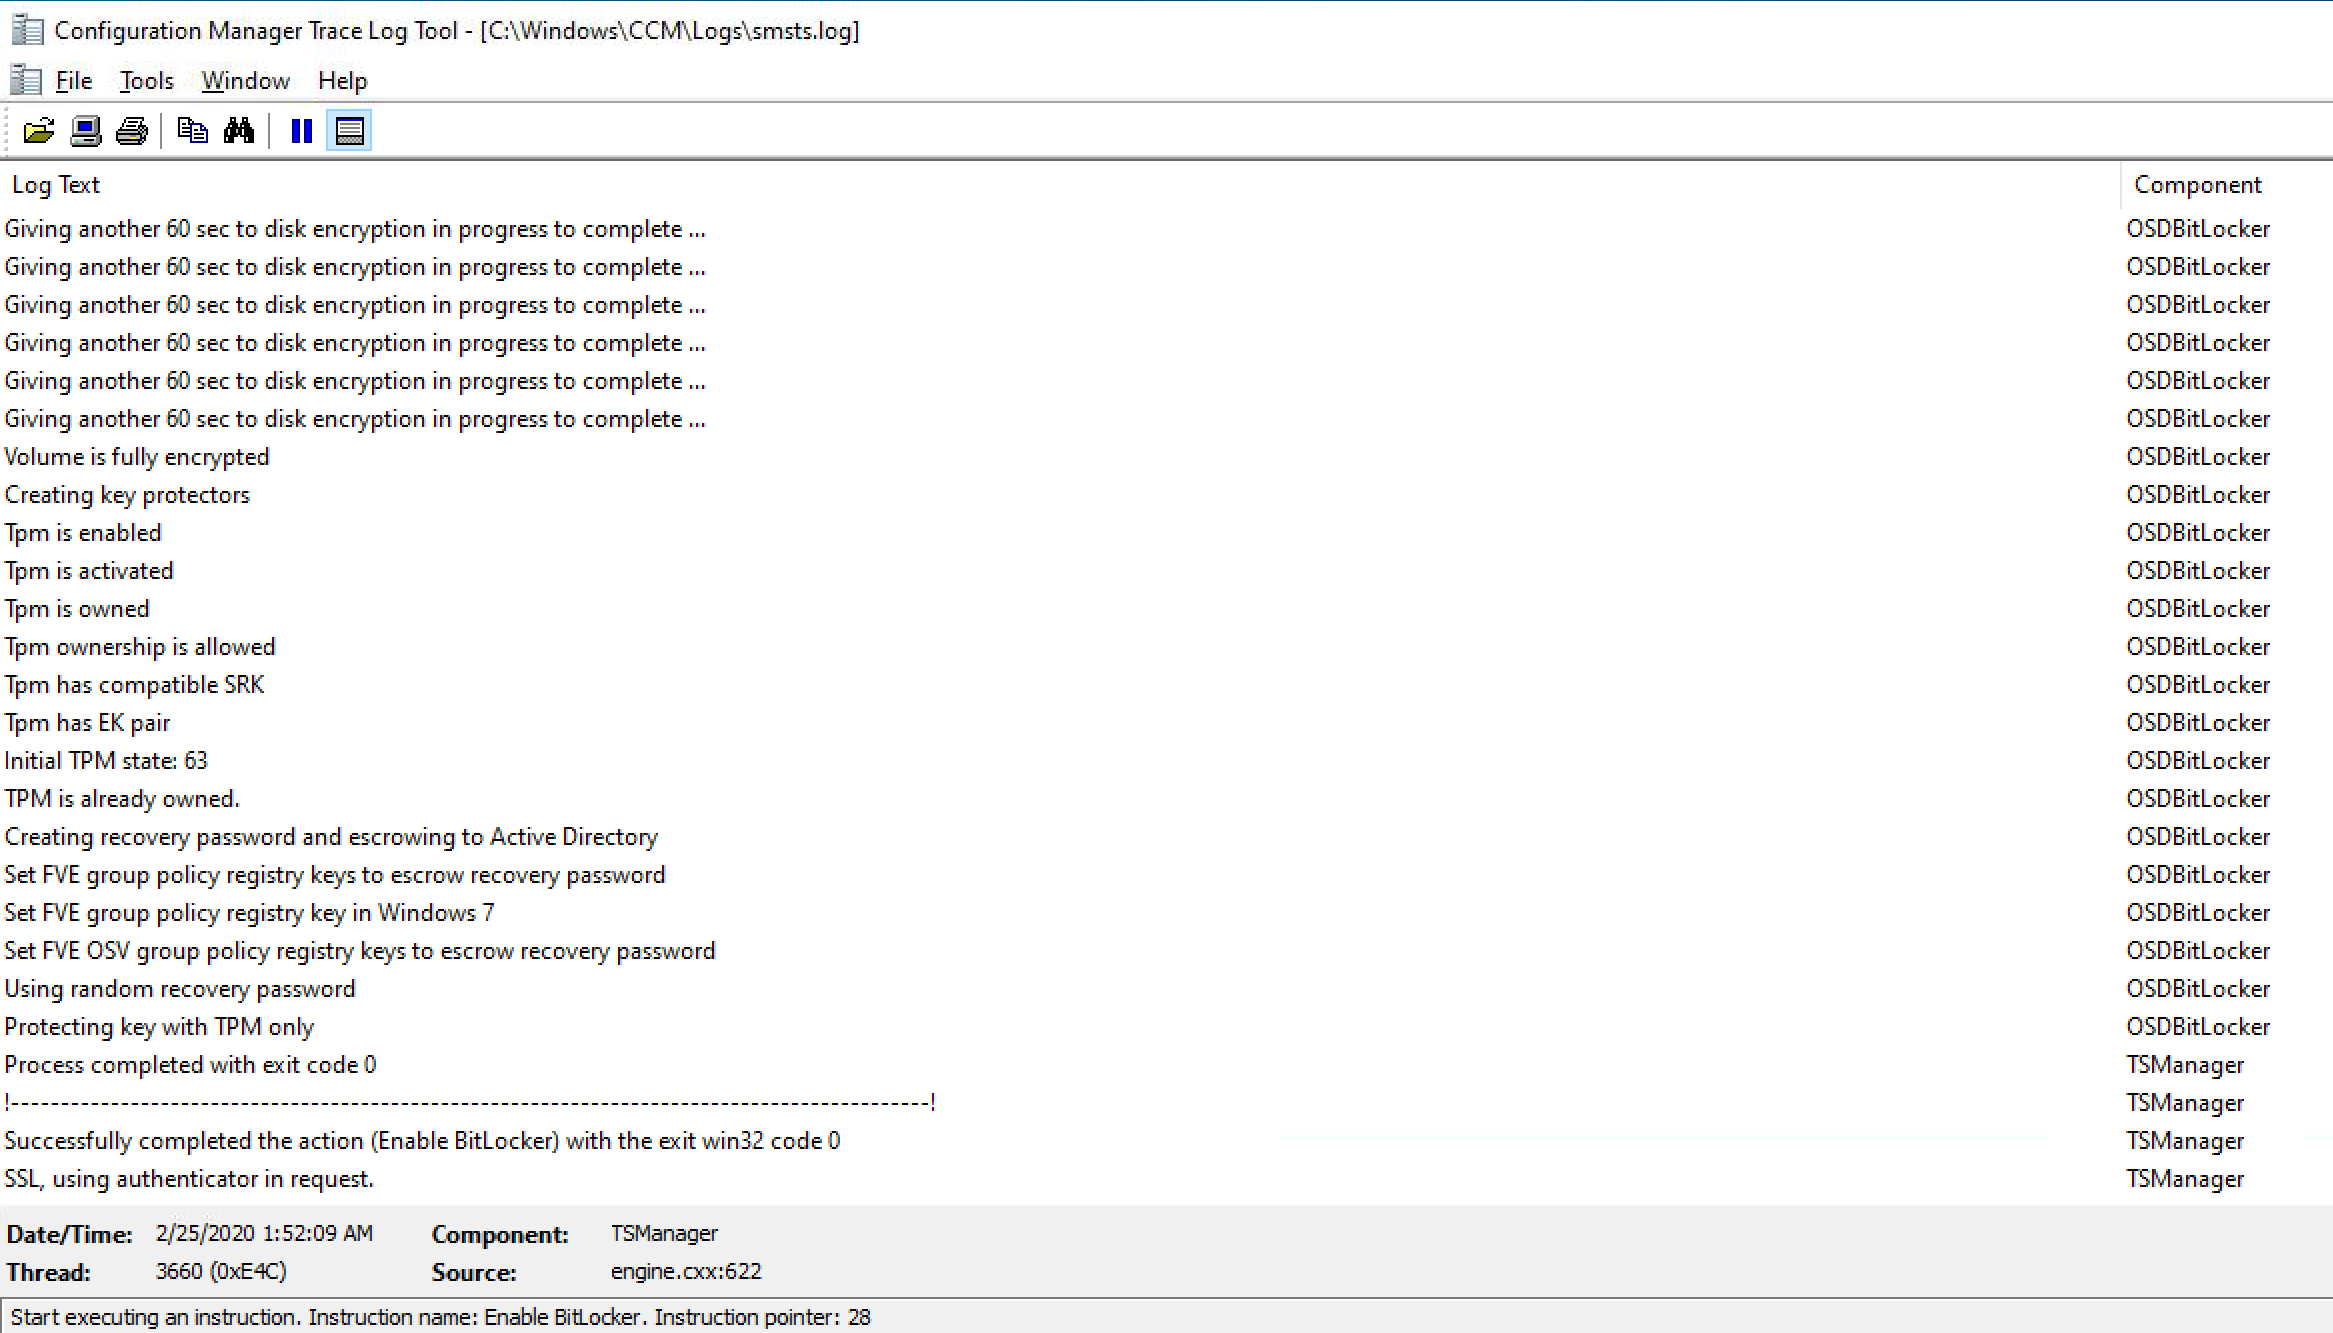
and if you look at smsts.log you’ll see details of the Enable BitLocker step, including ironically, that it’s ‘giving another 60 sec to disk encryption in progress to complete’.
I was in contact with Microsoft PG and they stated that the reason we see these ‘giving another 60 sec to disk encryption in progress to complete’ messages is because it WILL wait for the Pre-Provision BitLocker step to complete encryption (up to 200 minutes), and the ‘Wait for BitLocker to complete’ setting in the Enable BitLocker step will only wait if encryption was started in the Enable BitLocker step and not in the Pre-Provision Bitlocker step.
I’ve suggested that perhaps it needs to be re-worded to make this more clear.
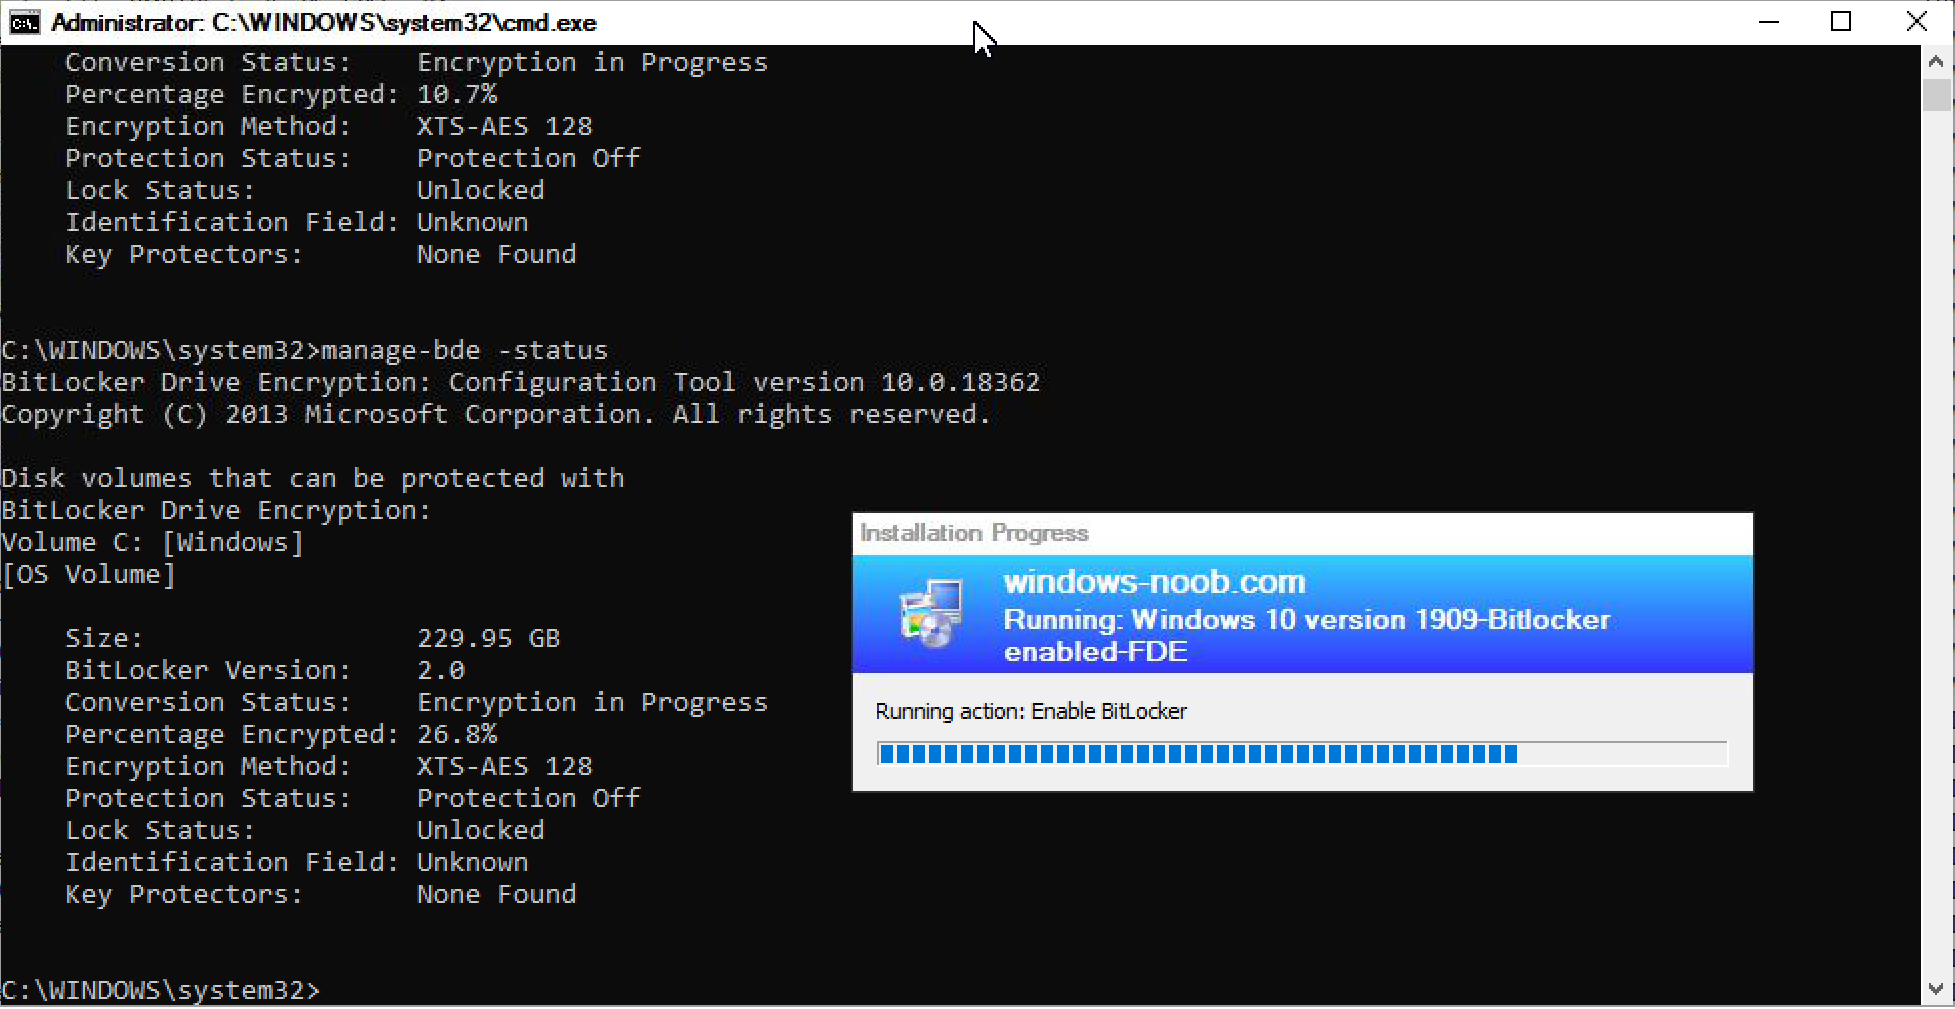
 so let’s take a look at manage-bde -status… we can see it is only 26 percent complete.
 after a lot more waiting…
 and finally after encryption is complete, the Enable Bitlocker step actually completes.
 The Enable BitLocker step took 52 minutes to complete!.
That’s quite a delay added by simply enabling Full Disk Encryption, and it’s especially odd as it ignored the fact that we de-selected ‘wait for Bitlocker encryption to complete’. This was tested on a traditional spinning disk (256GB), imagine if it was 1TB or more.
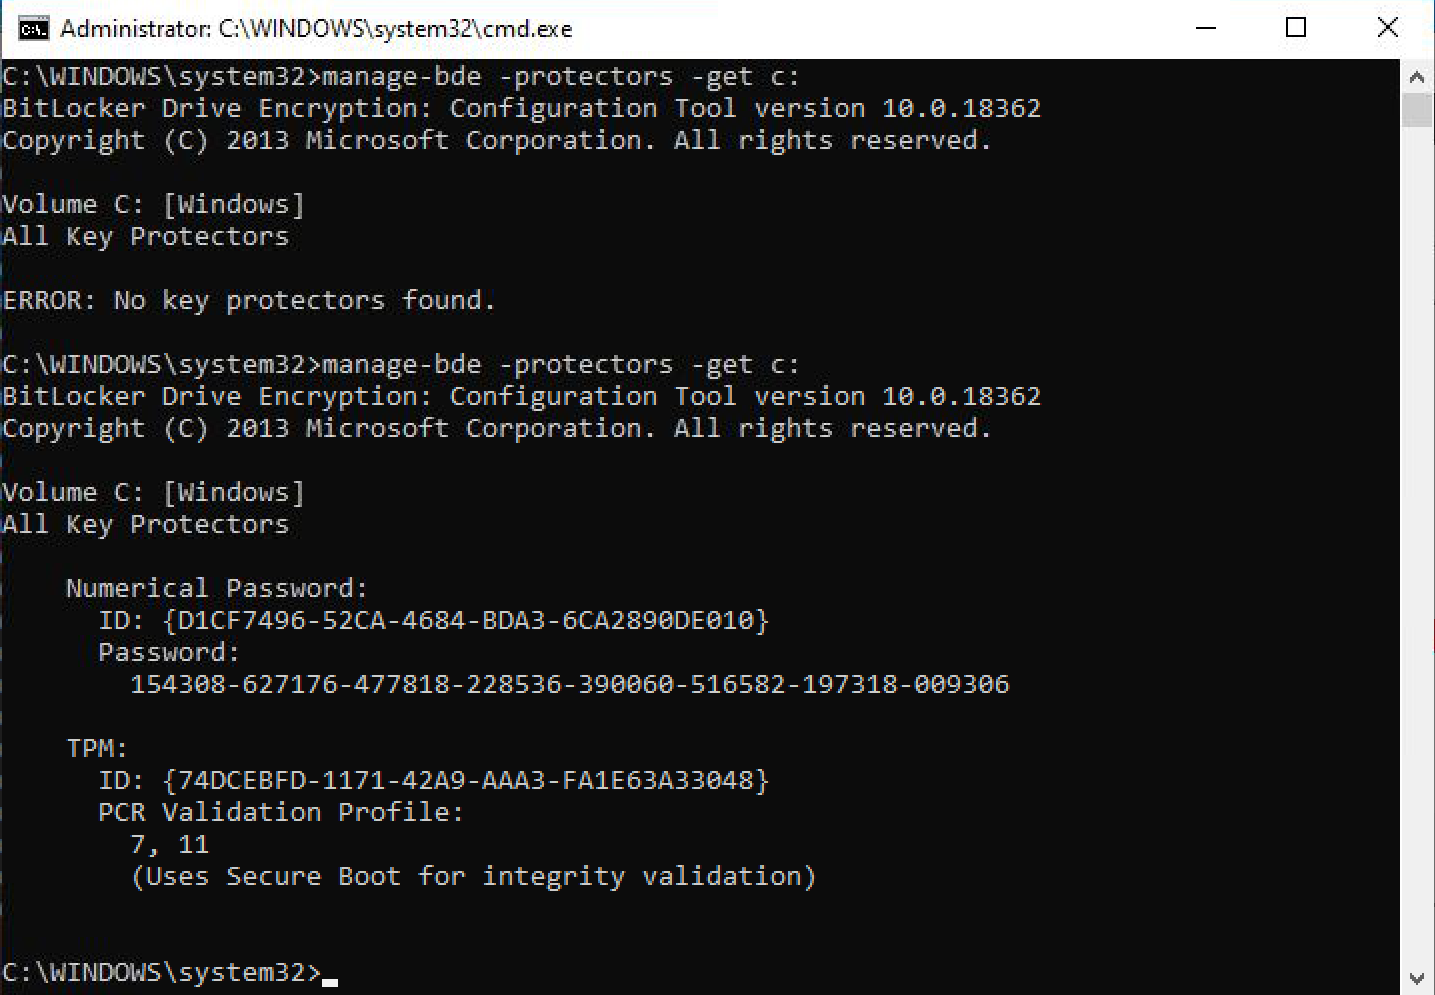
After Encryption is complete we can verify the protectors are now set in the TPM
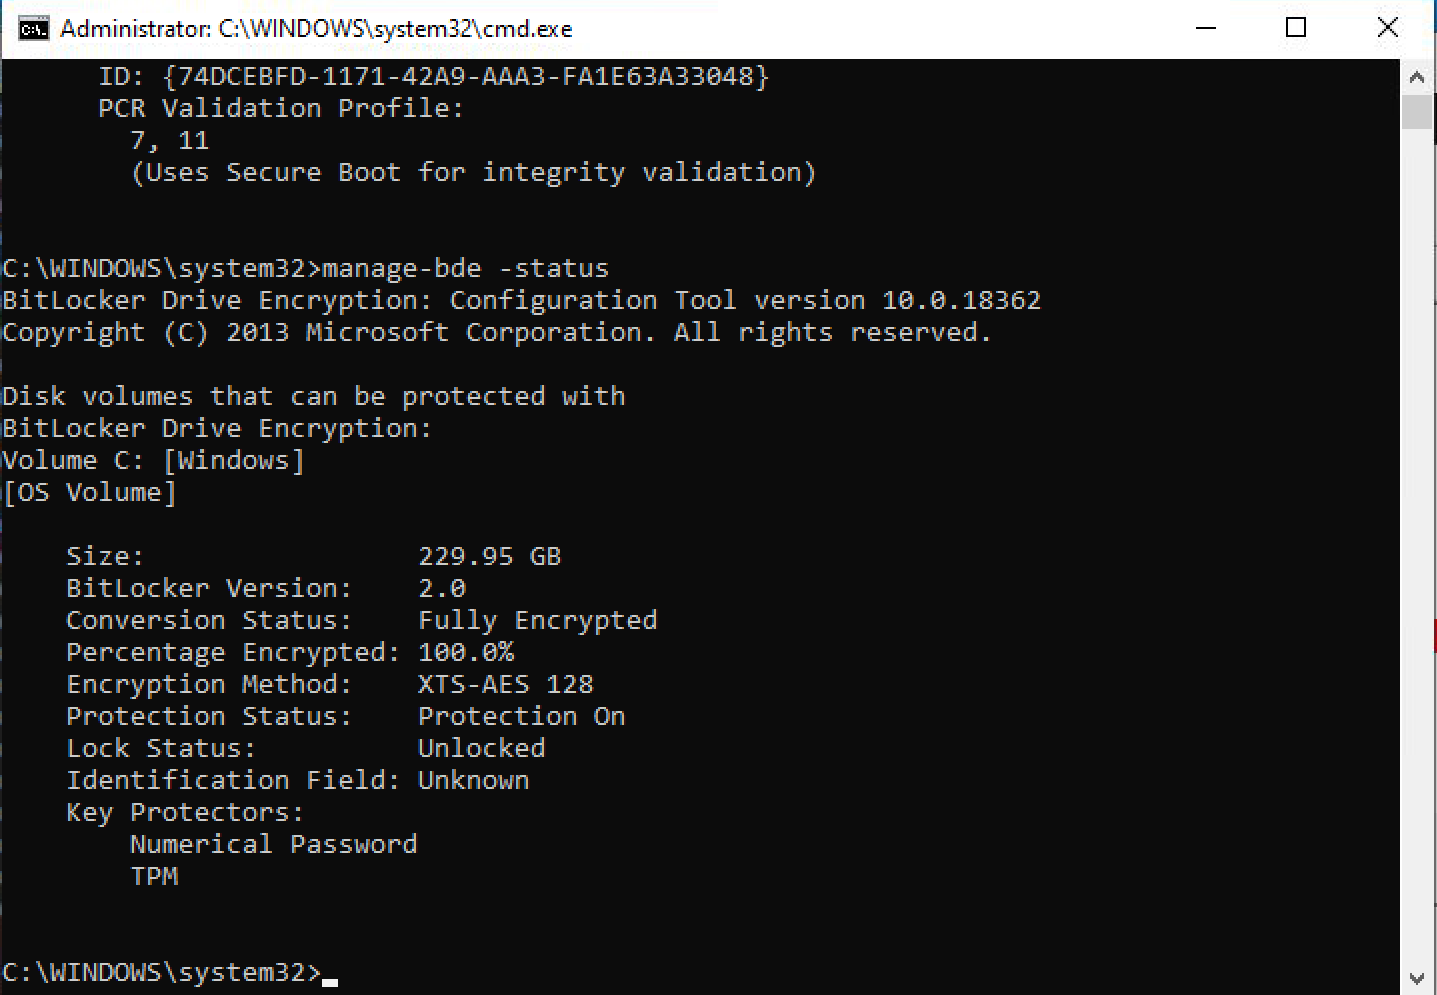
 and we can see that the disk is Fully Encrypted based on encryption status as shown below.
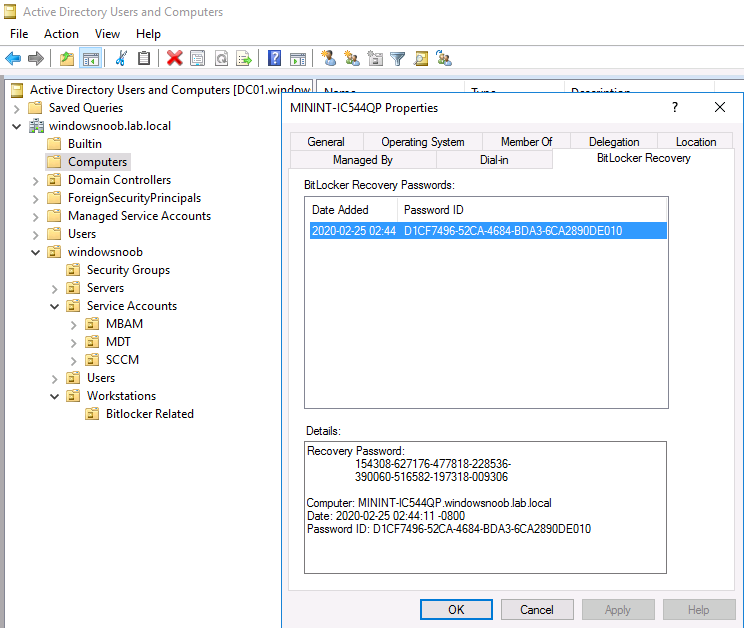
 In addition, the BitLocker recovery key is stored in Active Directory.
What about Bitlocker Management ?
The default built in Bitlocker related steps in an OSD task sequence in ConfigMgr version 1910 have no way of knowing if you are using the Bitlocker Management feature in ConfigMgr or not, so by default the recovery key and TPM ownership data will not be escrowed into ConfigMgr unless you target these computers with a Bitlocker Management policy after Windows is installed, then, the key (and associated data) will get escrowed. The other alternative is to create a custom Group within your task sequence to first install the MDOP agent, then set the registry settings needed for recovery key to escrow to the ConfigMgr database.
For more details about the new Bitlocker Management feature in ConfigMgr 1910 please see this blog post.
What about Bitlocker Compliance ?
If the default encryption algorithm (XTS-AES 128) as laid down by the Pre-Provision Bitlocker step doesn’t match a configured Bitlocker Management policy targeted to your computer then that computer will remain non-compliant.You can modify the task sequence to add registry keys so that it forces the algorithm to match your configured Bitlocker Management policy or leave it as is in the default task sequence steps and then decrypt it and re-encrypt matching the new algorithm or (not recommended) change your Bitlocker Management policy to match XTS-AES 128.
And that’s it for this blog post, I hope it gave you a deeper insight into how Full Disk Encryption via a task sequence works on real hardware.
cheers
niall

Pingback: Enabling Full Disk Encryption in Microsoft Endpoint Configuration Manager 1910 in a task sequence | just another windows noob ?
Hi Nial,
thanks for your useful posts regarding Bitlocker managament.
I’m running into and issue that I don’t know where is the problem.
I can get my testinf latptop encrypted using the Task Sequence without problems, but if I enable on “Enable Bitlocker” Step TPM+PIN, then it crashes …
Do you have succesfully tested TPM+PIN ? during a TS ?
Thanks in advance
hi Carlo,
task sequences are working fine for me, what errors are you seeing when you enable that step ?
cheers
Niall.
Hi Niall,
thanks for your quick reply.
Finally I’ve got this working … but Now I have a diferent issue … I put the laptop on the collection where Bitlocker is applying the policy and the computer key is not screwed … and I’m not able to manage it from the portal …
Put it into a collection with a MBAM policy should be enough ?
Thanks a lot
so what did you do to get it working, maybe someone else will have the same issue,
i assume you mean the recovery key and associated data is not getting escrowed into ConfigMgr’s database ? if so yes it needs to be targetted by bitlocker management policy that matches the settings you’ve deployed it with
Yes indeed, is not escrowed into SCCM database
This is the BitlockerManagementHandler.log
… Installed MBAM product version 2.5.1147.0 BitlockerManagementHandler 3/13/2020 1:04:00 PM 8592 (0x2190)
Desired MBAM product version 2.5.1147.0 BitlockerManagementHandler 3/13/2020 1:04:00 PM 8592 (0x2190)
Processing group policy BMSClientConfigureCheckIntervalPolicy, enforce mode is OFF BitlockerManagementHandler 3/13/2020 1:04:00 PM 8592 (0x2190)
Found current management point, hq-sccm-pro01.idiadagroup.com (version 8913) BitlockerManagementHandler 3/13/2020 1:04:00 PM 8592 (0x2190)
Bitlocker Management rule BitLockerManagementSettings_BMSClientConfigureCheckIntervalPolicy is compliant BitlockerManagementHandler 3/13/2020 1:04:00 PM 8592 (0x2190)
Processing BitLockerManagement Rule ‘BitLockerManagementSettings_BMSOSDEncryptionPolicy’. Enforcement is OFF BitlockerManagementHandler 3/13/2020 1:04:00 PM 8592 (0x2190)
Installed MBAM product version 2.5.1147.0 BitlockerManagementHandler 3/13/2020 1:04:00 PM 8592 (0x2190)
Desired MBAM product version 2.5.1147.0 BitlockerManagementHandler 3/13/2020 1:04:00 PM 8592 (0x2190)
Processing group policy BMSOSDEncryptionPolicy, enforce mode is OFF BitlockerManagementHandler 3/13/2020 1:04:00 PM 8592 (0x2190)
Bitlocker Management rule BitLockerManagementSettings_BMSOSDEncryptionPolicy is compliant BitlockerManagementHandler 3/13/2020 1:04:00 PM 8592 (0x2190)