
Introduction
You are most likely familiar with the Microsoft Surface Pro 6 and the recently released version of Windows 10 version 1903 (May 2019 Update). Now you can automate the installation of Surface Pro 6 using PowerShell and MDT.

This script has been written to allow you to automate the deployment Windows 10 version 1903 (May 2019 Update) using the latest available software including:
- Windows 10 x64 (version 1903)
- Microsoft Deployment Toolkit (MDT) build 8456
- Latest available 2019 drivers for the Surface Pro 6 for Windows 10 version 1903
- Windows 10 ADK (version 1903)
- Windows Server 2019
Note: This is fully automated, and as this does install a Windows Deployment Services server role hosting a boot image, you should modify the script accordingly and test it thoroughly in a lab first.
This script is tailored for one thing only, deploying Windows 10 x64 version 1903 to the Microsoft Surface Pro 6 with all drivers loaded and MDT pre-configured. Download it and customize it to suit your needs for other hardware if you wish because what it does is pretty cool.
This script performs the following actions:-
- Downloads and then Installs Windows ADK 10 (version 1903) if you have not done so already
- Downloads and then Installs MDT, if you have not done so already
- Downloads all required drivers for Microsoft Surface Pro6 if you have not done so already
- Imports the Windows 10 x64 (version 1903) operating system into MDT
- Imports the Microsoft Surface Pro drivers into MDT
- Creates Selection Profiles for Surface Pro 6 and WinPE x64
- Creates a Deploy Windows 10 X64 version 1903 task sequence
- Edits the Deploy Windows 10 X64 version 1903 task sequence and adds an inject drivers step for Microsoft Surface Pro 6
- Sets a WMI query for hardware detection for the Surface Pro 6 on the corresponding driver step
- Injects the Microsoft Surface Pro 6 network drivers into the LiteTouchPE_x64.wim
- Creates custom CustomSettings.ini and BootStrap.ini files
- Disables the X86 boot wim (as it is not needed for Surface Pro 6)
- Changes the Selection Profile for the X64 boot wim to use the WinPE x64 selection profile
- Installs the Windows Deployment Service role
- Configures the WDS role and adds the previously created LiteTouchPE_x64.wim
- Starts the WDS service so that you can PXE boot (UEFI network boot).
All you have to do is provide a domain joined server (MDT01), then download the script below, modify some variables, then place certain files in the right place such as the Windows 10 x64 Enterprise (version 1903) media. Please ensure you have a working DHCP scope on your Active Directory domain controller, then PXE boot a Microsoft Surface Pro and sit back and enjoy the show.
Step 1. Download the script
Note: You must be a logged on member of windows-noob.com to download the script.
The PowerShell script will do all the hard work for you, download it, unzip it and place it on the server that is designated to be the MDT server.
Step 2. Configure the variables in the script
Once you have downloaded and extracted the script, you need to configure certain variables interspersed throughout the script. I’ll highlight the ones you need to edit.
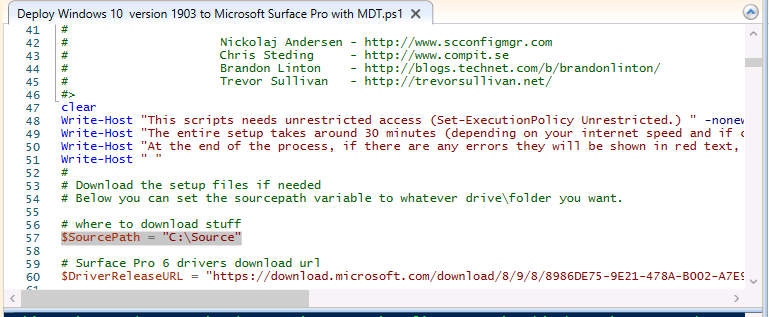
The most important of them is the $SourcePath variable (line 57) as this decides where to get the content from and where to store it. This variable should point to a valid drive letter, the folder name will be created if it does not exist.
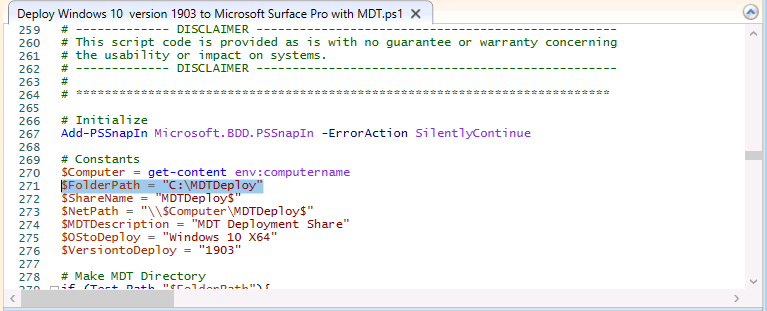
The $FolderPath variable (line 271) specifies the MDT Deployment share root folder for example C:\MDTDeploy.
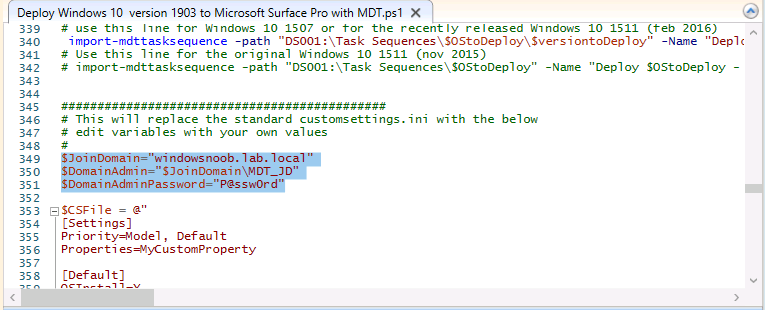
There are other variables to configure, for joining the Domain (lines 349-351)
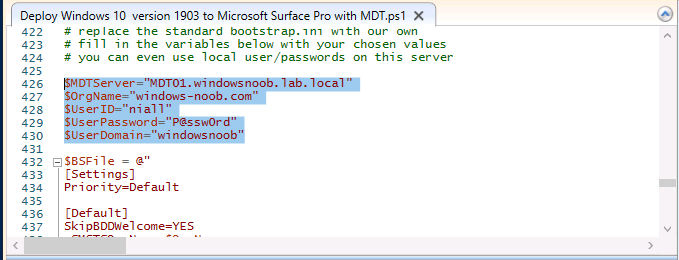
and then you need to configure how you actually connect to the MDT server from WinPE (lines 426-430)
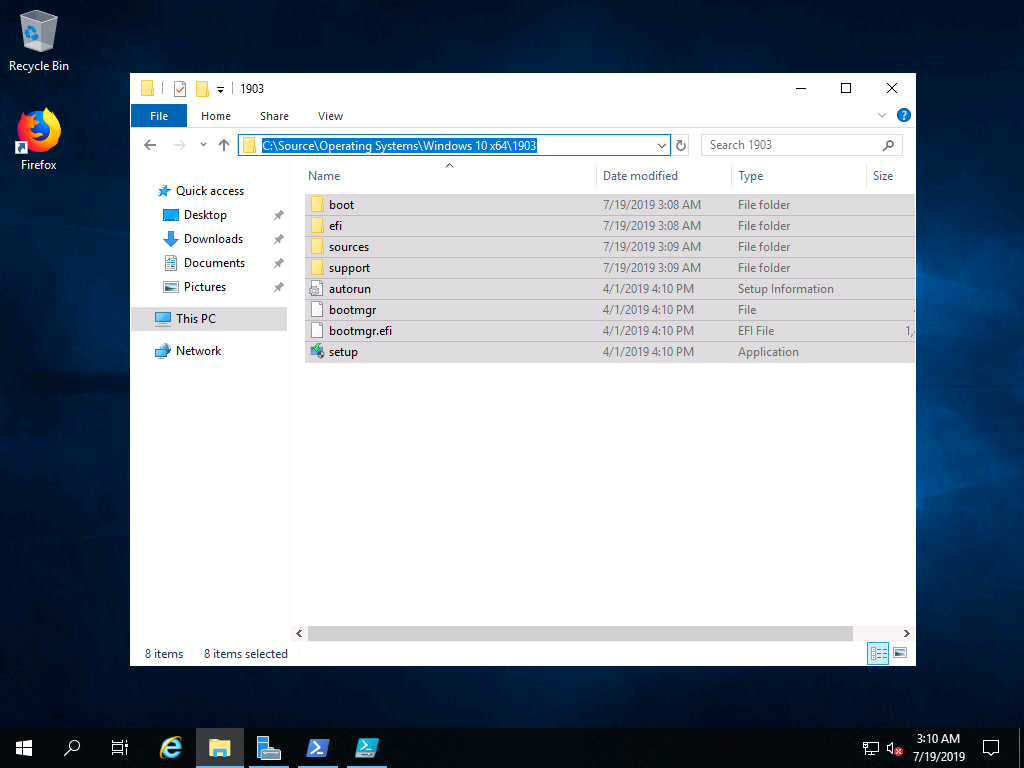
Step 3. Copy the Windows 10 x64 (version 1903) operating system files
Mount a Microsoft Windows 10 x64 Enterprise (version 1903) ISO and copy the contents to $SourcePath\Operating Systems\Windows 10 x64\1903 as shown below.
Step 4. Optionally copy MDT, ADK 10, Surface Pro drivers
This is an optional step. If you’ve already downloaded the above files then place them in the source folder, otherwise the script will automatically download them for you.
Note: You do not have to do this as the script will download the content for you if it’s not found.
To read the rest of this post please visit windows-noob.com here.
