
This series is comprised of different parts, listed below.
- Part 1 – Introduction and server setup
- Part 2 – Install and do initial configuration on the Standalone Offline Root CA
- Part 3 – Prepare the HTTP Web server for CDP and AIA Publication
- Part 4 – Post configuration on the Standalone Offline Root CA
- Part 5 – Installing the Enterprise Issuing CA
- Part 6 – Perform post installation tasks on the Issuing CA
- Part 7 – Install and configure the OCSP Responder role service
- Part 8 – Configure AutoEnroll and Verify PKI health (this part)
In part 1 of this series, you configured your LAB for a 2 tier PKI hierarchy running on Windows Server 2016. You used PowerShell to create some virtual machines, and then installed Windows Server 2016, Windows 10 Enterprise version 1803 and optionally Smoothwall 3.1 before configuring the IP address scheme and Computer Names on the virtual machines. Finally you configured ADDS on DC01 so that you have a working Domain Controller for the rest of this LAB. In part 2 you installed and did the initial configuration on the Standalone Offline Root CA. In part 3 you prepared the HTTP Web Server for CDP and AIA Publication and you created a DNS record for the publicly available web server.
In part 4 you performed post configuration on the Standalone Offline Root CA to set certificate revocation list (CRL) period registry settings using CertUtil, and then enabled object access Auditing and finally, you configured three locations for the Authority Information Access (AIA) and four locations for the Certificate revocation list Distribution Point (CDP), again using CertUtil. In part 5 you joined the IssuingCA computer to the windowsnoob domain before creating a new CAPolicy.inf file which was customized for the Issuing CA role. Next, you published the Root CA Certificate and CRL (both to Active Directory and the HTTP web server) and you installed the Enterprise Issuing CA before submitting a request to the StandAlone Offline Root CA. Next you installed the Issuing CA Certificate using the response files from the StandAlone Offline Root CA on the removable media.
In part 6, you performed post installation and configuration of the IssuingCA server by configuring Certificate Revocation and CA Certificate Validity Periods, you then enabled auditing on the CA server, and configured the AIA and CDP. In part 7 you installed and configured the OCSP responder role service on the web server. Now you will configure Auto Enrollment and Verify PKI health.
Step 1.Configure a GPO for Auto Enrollment
Logon to to the Domain Controller (DC01) as windowsnoob\Administrator. Click Start, click Run, and then type gpmc.msc and press enter. Expand Forest, expand Domains, expand windowsnoob.lab.local, and then expand Group Policy Objects. Right click Default Domain Policy, then click Edit. Under Computer Configuration, expand Policies, expand Windows Settings, expand Security Settings, and then expand Public Key Policies. Select Certificate Services Client – Auto-Enrollment, right click and choose Properties. Change it from Not Configured to Enabled and enable the following 2 options.
- Renew expired certificates, update pending certificates, and remove revoked certificates
- Update certificate that use certificate templates
As shown here.
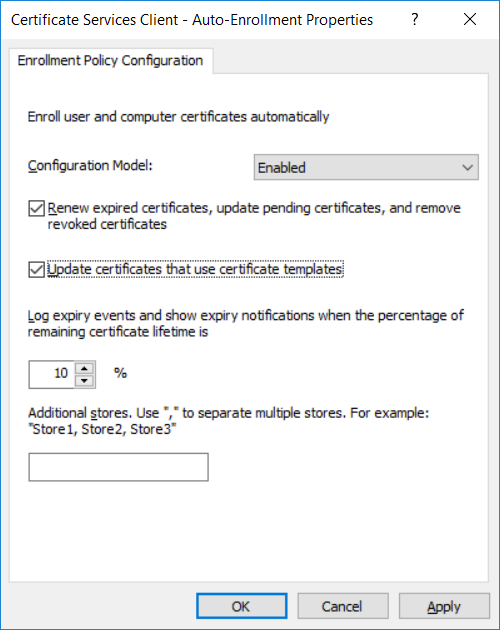
Click Apply when done, and close the Group Policy Management Editor and then close the Group Policy Management Console.
Step 2. Configure AutoEnrollment for Workstation Authentication on the Issuing CA
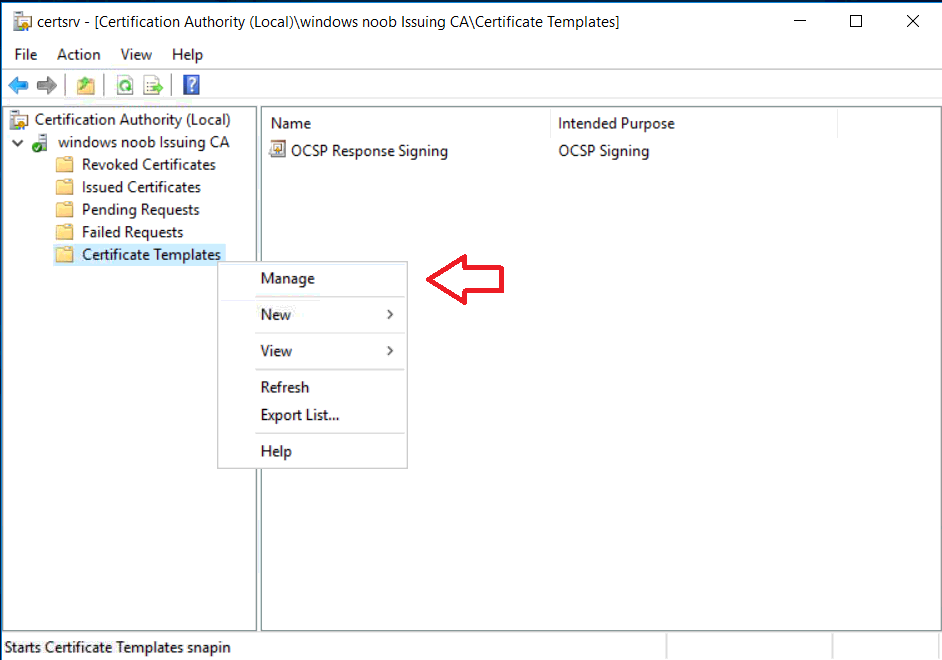
Ensure that you are logged on as windowsnoob\EntAdmin on the Issuing CA server (IssuingCA), start the Certification Authority console by entering certsrv.msc, ensure that windowsnoob Issuing CA is expanded. Right-click on Certificate Templates, then select Manage.
In the Certificate Templates that appear, select Workstation Authentication.
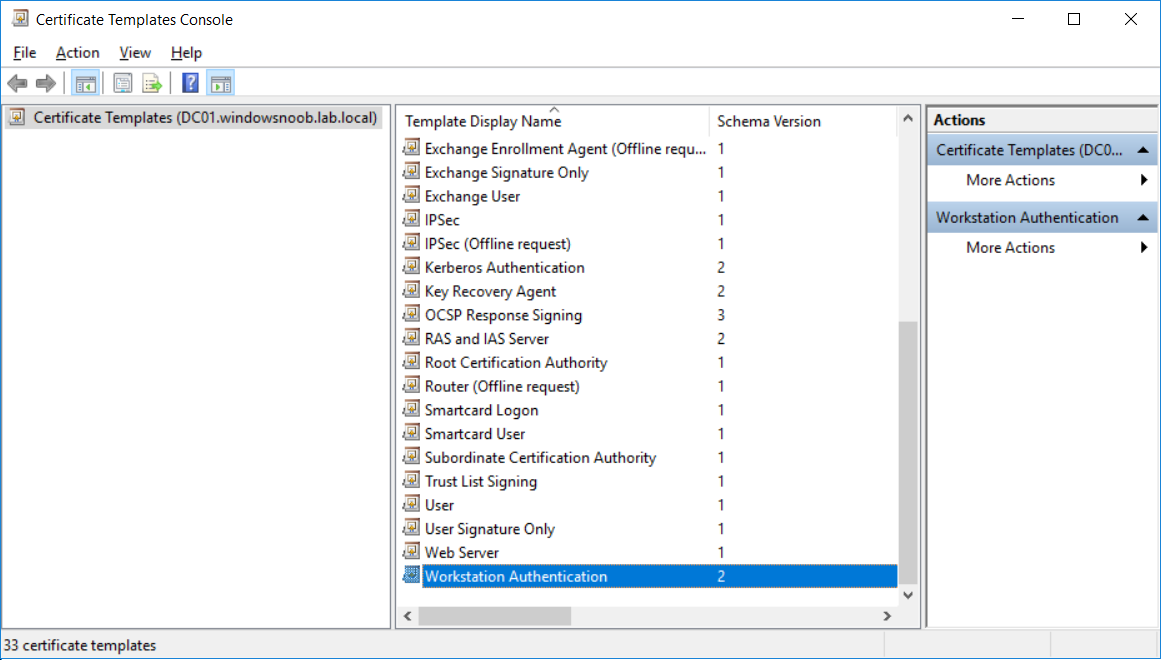
Right click it, and select Properties, click on the Security tab, select Domain Computers and ensure that AutoEnroll is selected, click Apply.
You can read the rest of this part here on windows-noob.com.
