
Introduction
Remotely accessing computers allows you to control those computers from your own desktop with (or in some cases without) the other users consent. System Center 2012 Configuration Manager offers three methods from within the console to remotely control other computers with the client agent installed.
- Remote Control
- Remote Assistance
- Remote Desktop client
In the above list, only Remote Control is specific to Configuration Manager (i.e. it’s a tool provided by Configuration Manager). Both Remote Assistance and Remote Desktop Client are Windows technologies.
Workgroup based computers pose their own challenges as they lack many of the security benefits of Domain membership and as a result lack access to resources. Before we can do anything with our workgroup clients (including remote control) we need our Configuration Manager client software installed but before we do that we have to prepare our clients for this installation by preparing them. As workgroup clients are not joined to a domain they will need some help to communicate with the Configuration Manager management point as they will not be able to retrieve these values from Active Directory and they may have no (or limited) access to DNS.
There are a number of limitations to supporting workgroup computers:
- Workgroup clients cannot locate management points from Active Directory Domain Services, and instead must use DNS, WINS, or another management point.
- Global roaming is not supported, because clients cannot query Active Directory Domain Services for site information
- Active Directory discovery methods cannot discover computers in workgroups.
- You cannot deploy software to users of workgroup computers.
- You cannot use the client push installation method to install the client on workgroup computers.
- Workgroup clients cannot use Kerberos for authentication and so might require manual approval.
- A workgroup client cannot be configured as a distribution point. System Center 2012 Configuration Manager requires that distribution point computers be members of a domain.
Note: In the steps below I am assuming all client computers are WorkGroup joined with no access to DNS. If you have access to a fully functioning DNS then go ahead and start at Step 3. In addition, I assume that you have installed the Remote Assistance features on your server and client computers.
Step 1. Create and then edit the LMHosts file
Perform the following on a workgroup computer as Administrator
Note: If you have access to working DNS then your client can use DNS to resolve the Configuration Manager server management point. However if you have no access to DNS then you can use the hosts file as in step 2. This step is optional as it helps client installation with auto site assignment if DNS is not accessible
As our workgroup computers need to locate and communicate with the Configuration Manager server, we will create a text file on the client and this file will contain the information we need to find our Configuration Manager server. The LMHOSTS (LAN Manager Hosts) file is used to enable Netbios Name Resolution under Windows when other methods, such as WINS, fail.
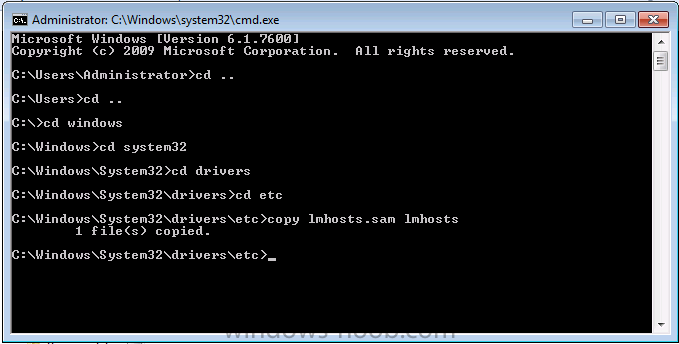
We will create this new file called lmhosts on the client by copying a built in sample lmhosts file. This sample file is located in C:\Windows\System32\Drivers\Etc\. Open a command prompt on the workgroup computer and issue the following commands
cd windows\system32\drivers\etc
copy lmhosts.sam lmhosts
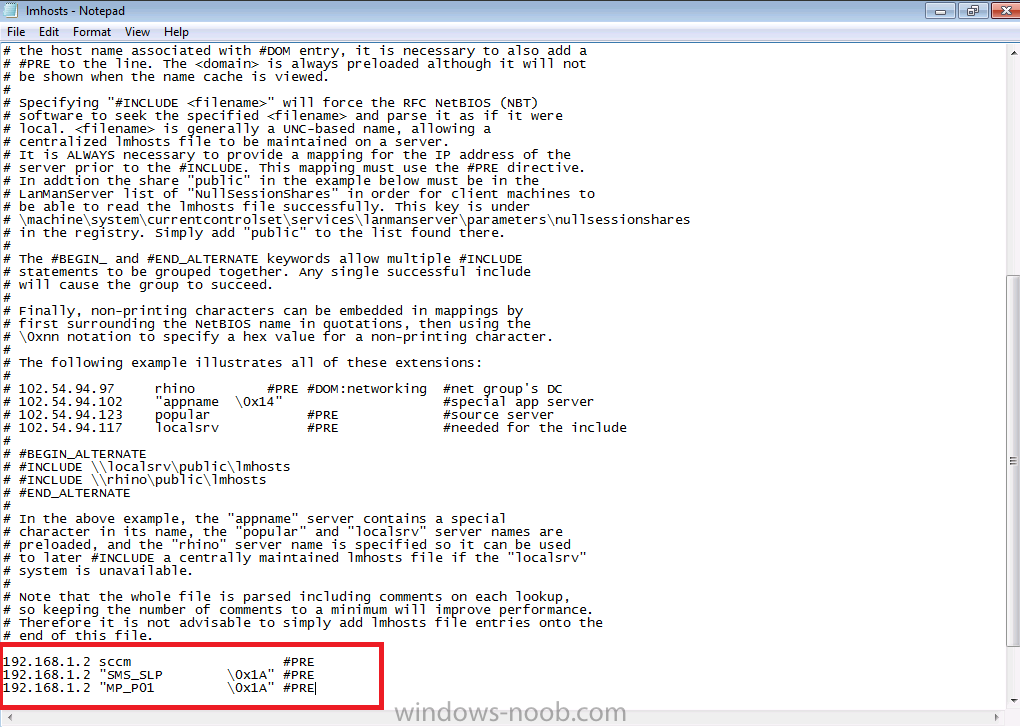
Open the newly created lmhosts file in notepad and add the following information,
XX.XX.XX.XX YYYY #PRE
XX.XX.XX.XX “SMS_SLP \0x1A” #PRE
XX.XX.XX.XX “MP_ZZZ \0x1A” #PRE
where XX.XX.XX.XX is the IP address of your Configuration Manager server, YYYY is the hostname of your Configuration Manager server and ZZZ is the site code.
In the example below the ip address 192.168.1.2 is the ip address of my Configuration Manager 2012 SP1 standalone primary server, you should enter the ip address of your Configuration Manager Primary server. In the example below SCCM is the hostname of my standalone primary. You should enter the hostname of your server instead. In the example below P01 is the site code of my Configuration Manager Primary server, use the site code of your Configuration Manager Primary server instead.
Save the file when you are finished adding the required info. After editing the lmhosts file it will look something like this:
Quote
192.168.1.2 SCCM #PRE
192.168.1.2 “SMS_SLP \0x1A” #PRE
192.168.1.2 “MP_P01 \0x1A” #PRE
Note: The NetBIOS naming convention allows for 16 characters in a NetBIOS name. Microsoft, however, limits NetBIOS names to 15 characters and uses the 16th character as a NetBIOS suffix. The “\0x1a” is a NetBIOS suffix and there must be exactly 15 characters between the the first quote and the backslash.
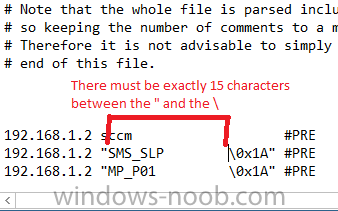
if you have an incorrect number of spaces between the ” and / in your lmhosts file then the file may be parsed incorrectly,
below is an example of too many spaces

below is an example of not enough spacing
and below is an example with the correct spacing

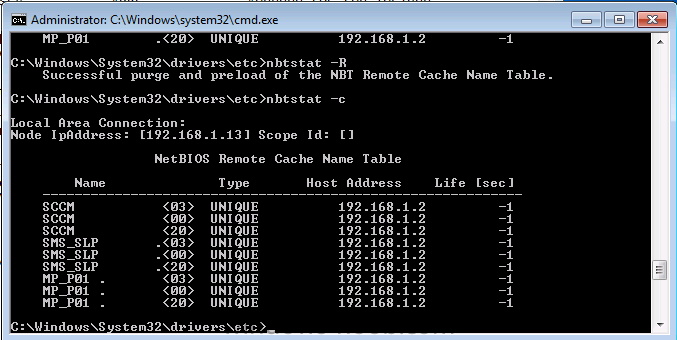
At system start up, the name cache on a client computer is preloaded with entries from the LMHOSTS file, defined as preloaded by a special keyword, the #PRE keyword. You can force these entries into the name cache by rebooting the computer or by using a command line tool called nbtstat as follows.
nbtstat -R
- nbtstat -R clears the name cache of any previous entries and then preloads the entries in the Lmhosts file (purge and preload)
- nbtstat -c lists NBT’s cache of remote machine names and their ip addresses
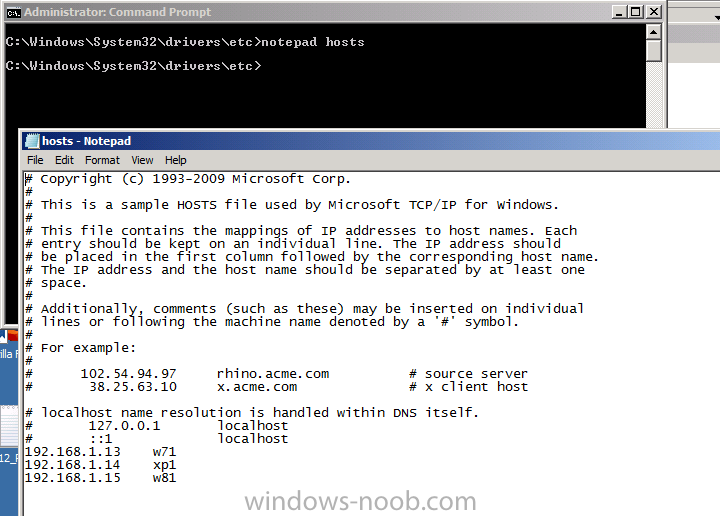
Step 2. Edit the hosts file
Perform the following on a workgroup computer as Administrator
Open the hosts file located in C:\Windows\System32\driver\etc using notepad and add the ip address and fully qualified domain name of you Configuration Manager 2012 server like in the example below
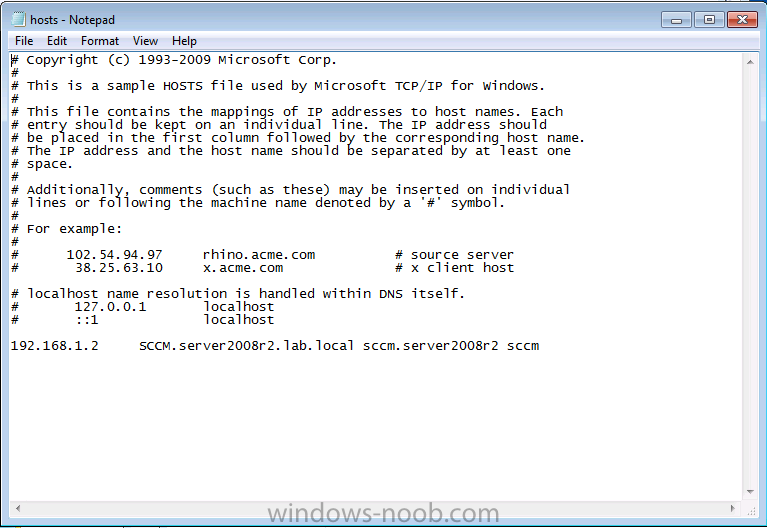
save the file.
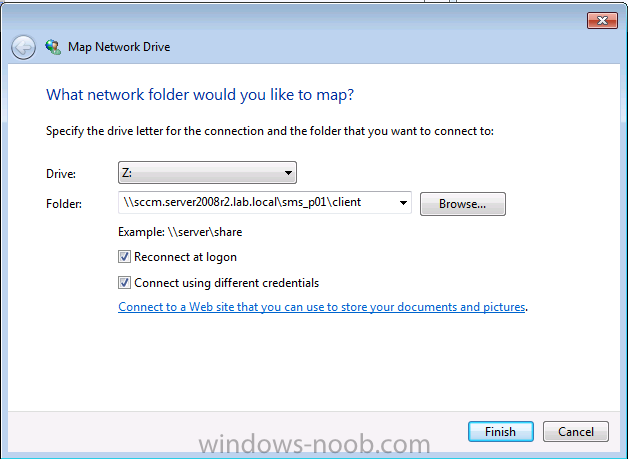
Step 3. Install the Configuration Manager client
Perform the following on a workgroup computer as Administrator
Installation of the Configuration Manager client requires the following
- local administrative permissions on the workgroup computers
- The Network Access Account must be configured to to access resources in the System Center 2012 Configuration Manager site server domain.
Installation of the client on workgroup computers is usually done manually and that’s how we will do it here.
On the client computer, log on as a local administrator, map a drive to \\XX.XX.XX.XX\SMS_YYY\Client, where XX.XX.XX.XX is the ip address of your management point and YYY is the site code.
change to the drive letter you mapped (eg: Z:\) and issue the following command in a command line (assuming Z:\ is your mapped network drive)
CCMSetup.exe SMSMP=sccm.server2008r2.lab.local/logon SMSSITECODE=P01 /source:z:
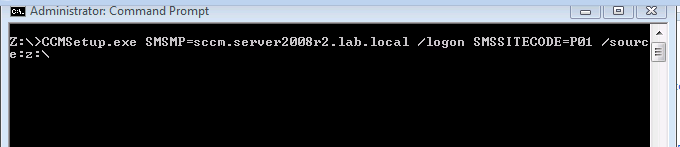
the switches above are explained below
- SMSMP Specifies an initial management point for the Configuration Manager client to use.
- /logon This CCMSetup property specifies that the installation should stop if an existing System Center 2012 Configuration Manager or Configuration Manager 2007 client is found on the computer.
- SMSSITECODE=P01 This explicitly tells the client which Site code to use, if you set to AUTO then you must make sure that the boundary is properly configured for Workgroup computers (cannot be set to use AD Site for example).
- /source: tells the client where to download the client files from
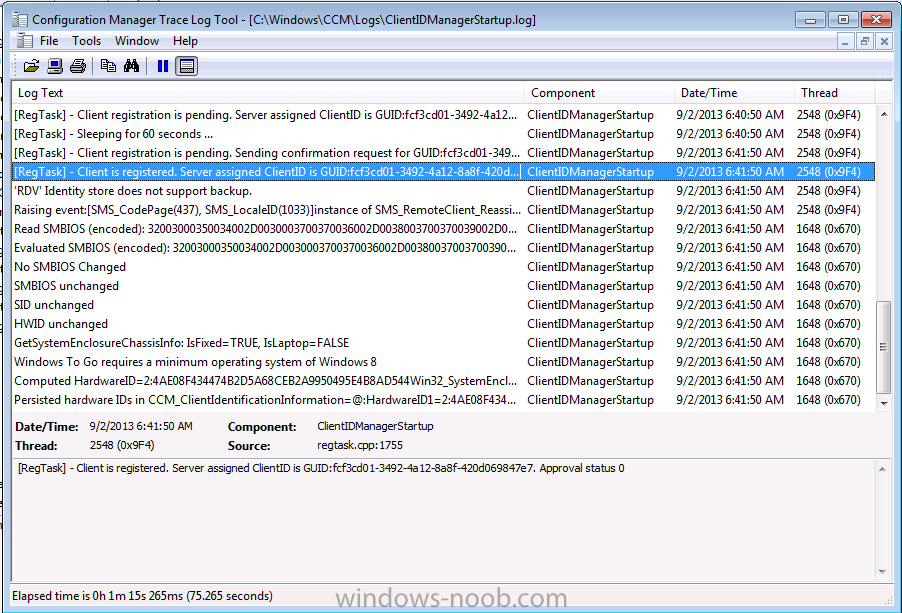
at this point you can monitor the progress of the client installation in CMTrace using the following log file C:\Windows\CCMSetup\logs\ccmsetup.log
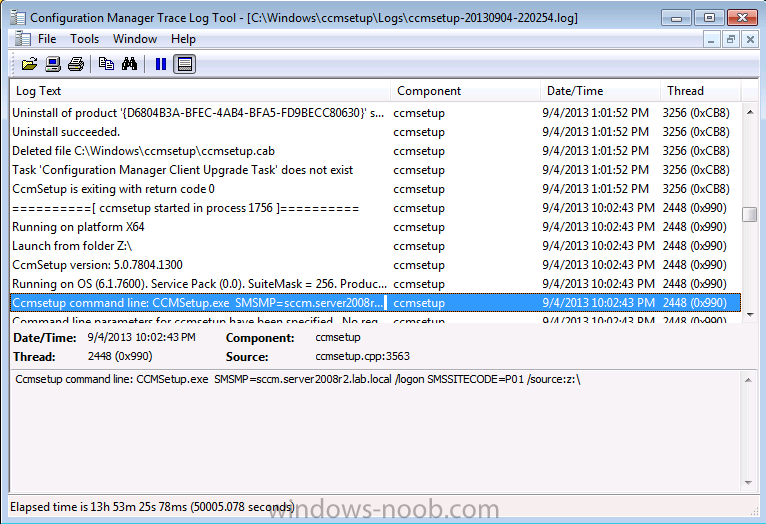
once ccmsetup is finished, you should see the following in cmsetup.log
Quote
CCMSetup is exiting with return code 0
You should also monitor ClientLocation.log,LocationServices.log in C:\Windows\CCM\Logs\ to see how things are progressing with your workgroup client and review ClientIDManagerStartup.log to check the status of Client registration with your management point.
Step 4. Approve the Configuration Manager client
Perform the following in the Configuration Manager console as SMSadmin
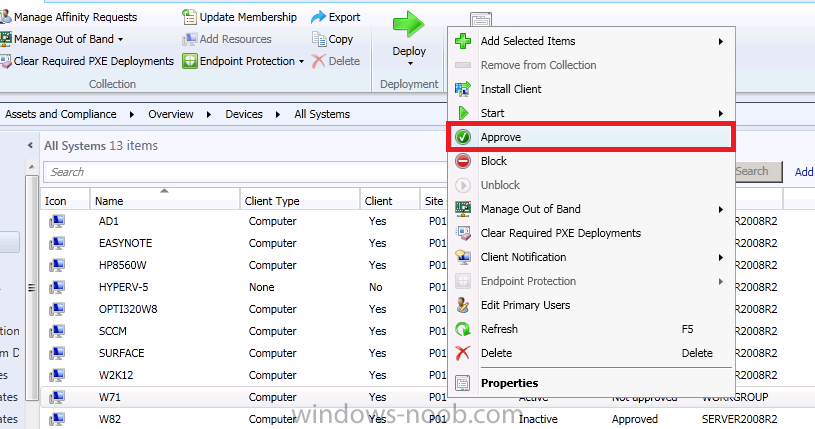
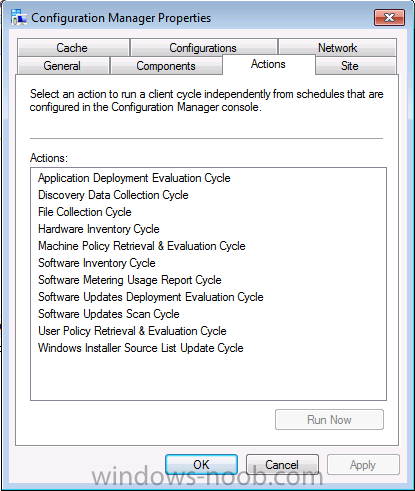
At this point the client will be installed but more than likely not working, if you open the Configuration Manager client in Windows control panel and check the actions tab most likely there will be two actions listed.
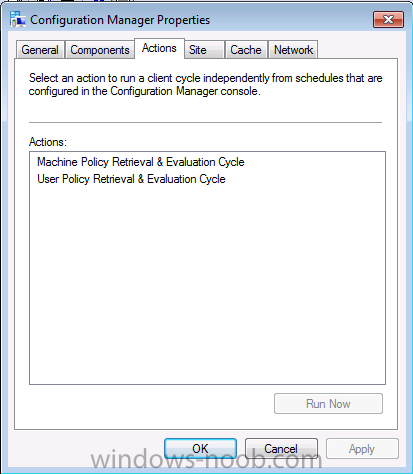
This is a symptom of a client that’s either not registered with the site (we saw that it was registered above), or that it is not approved. Approval relies on AD authentication which naturally you won’t get with a workgroup machine. In the Configuration Manager console locate your workgroup client and verify its status, it should say ‘Not Approved‘ (you may have to add the Approved column to your console view as in the screenshot below).
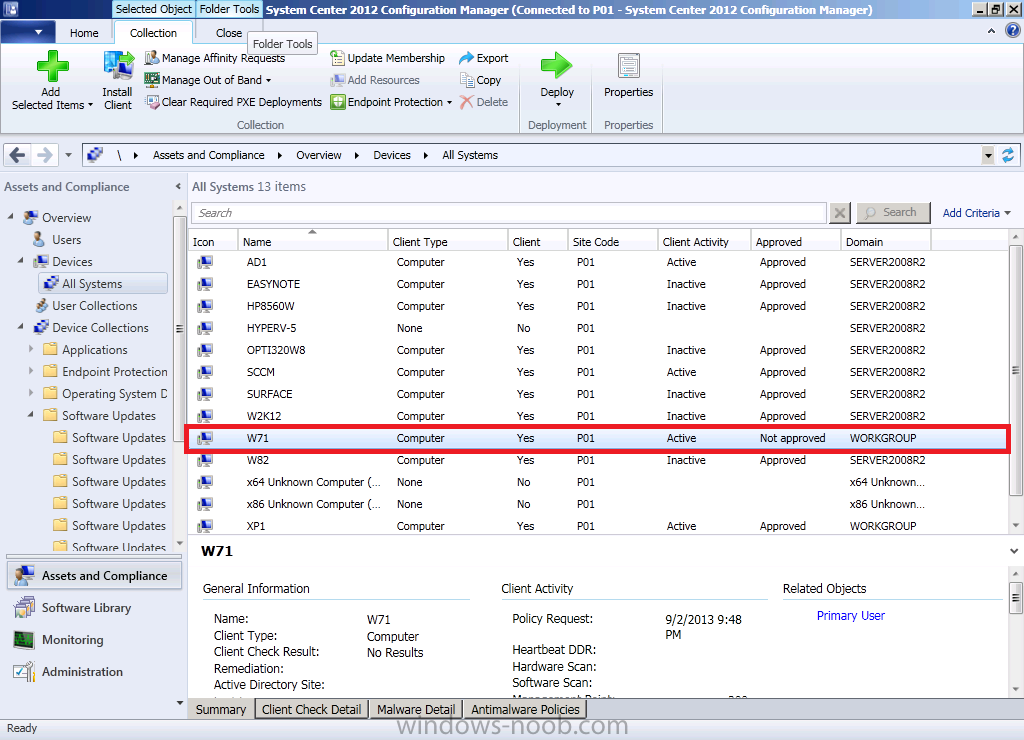
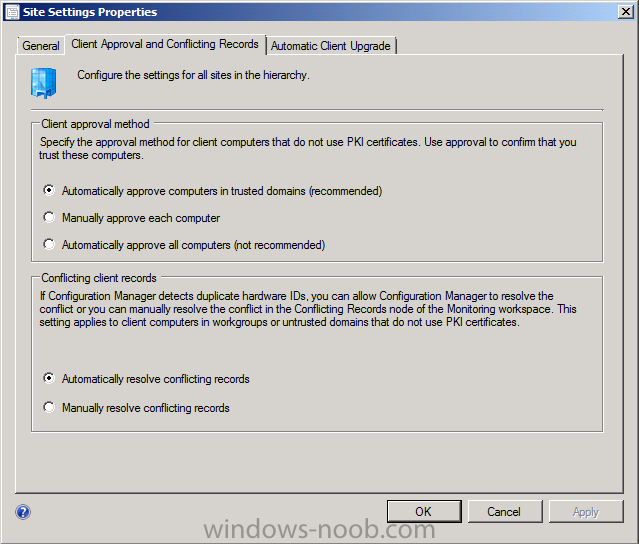
This is because the default site setting for client approval in Configuration Manager is to automatically approve clients in trusted domains and as a workgroup client is not in a trusted domain you would have to approve it manually or change the site setting to “automatically approve all clients” (not recommended).
As a Configuration Manager client is pretty much useless without policy we will manually approve the workgroup client. Right click on the client, and click Approve. Answer Yes when prompted.
After approval, the client should receive policy correctly and all actions will become available. Not only that, but it should now be ready for the next stage.
Step 5. Create a Remote Tools Operator
Perform the following in the Configuration Manager console as SMSadmin
Now we will add a previously created Domain user called RemoteUser1 as a Configuration Manager console remote tools operator with permission to do Remote tools actions in the console, we are doing this using Role Based Access Control (RBAC) which is a pretty cool feature in Configuration Manager 2012.
In the Configuration Manager console, click on Administration, Security, Administrative Users and then click on Add User or Group.
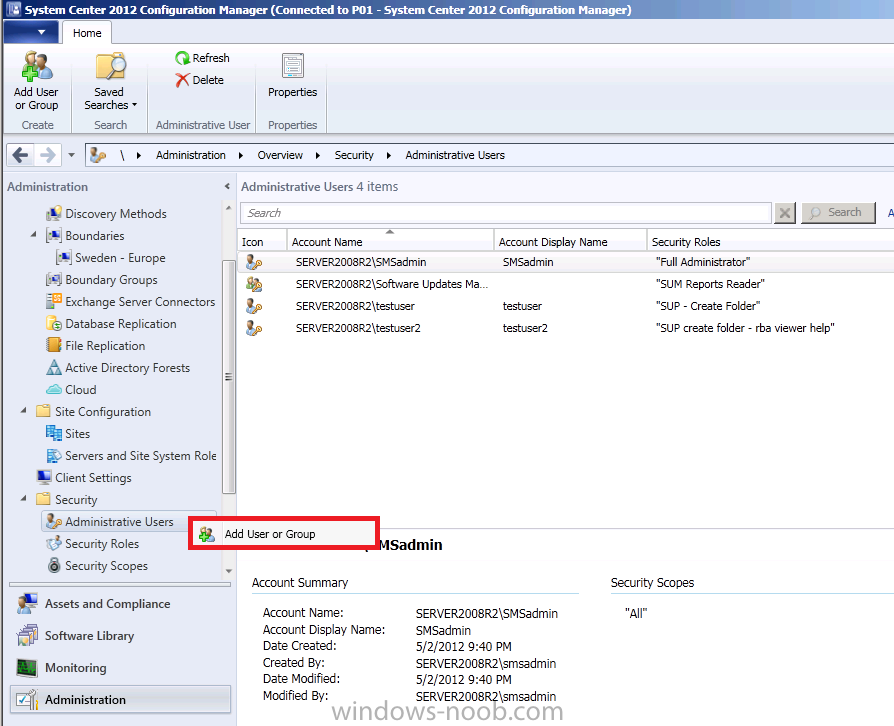
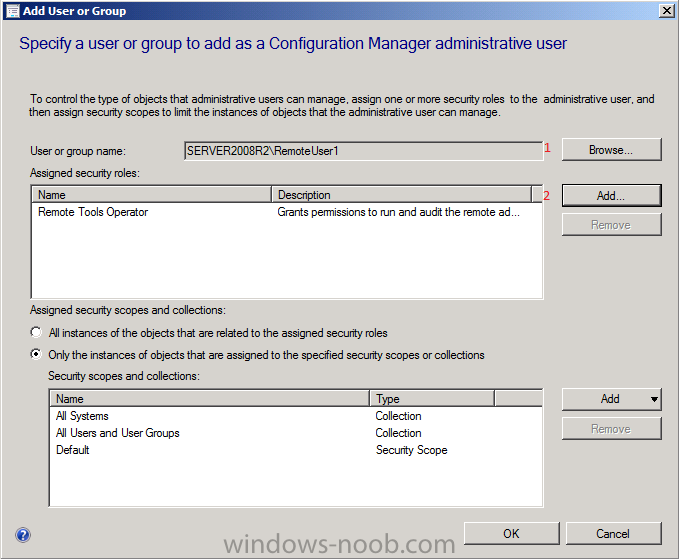
next click on Browse and select our domain user (RemoteUser1) then click ok, next click on Add to add the assigned security roles, select Remote Tools Operator.
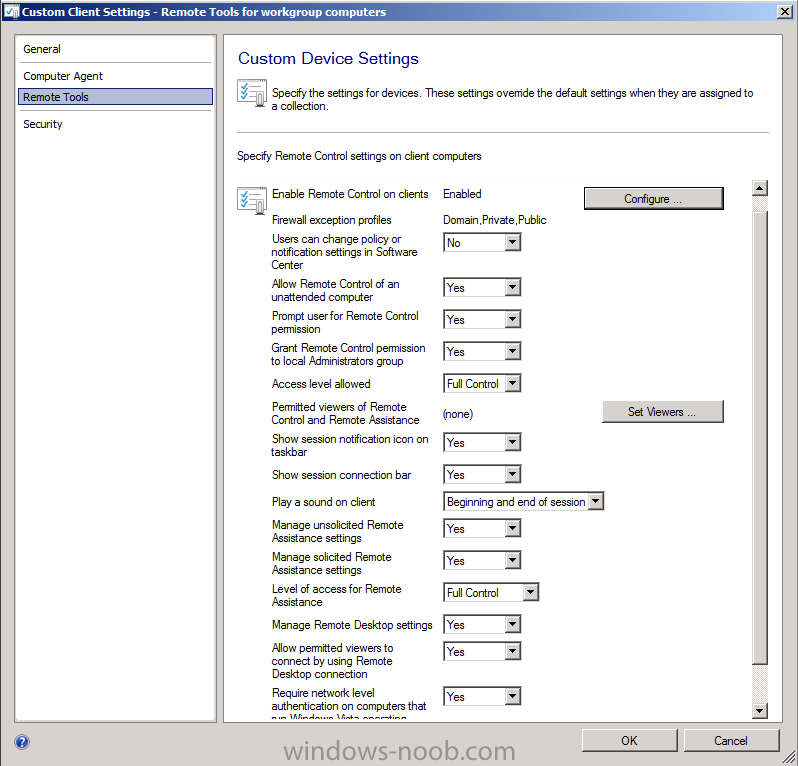
Step 6. Create custom client settings with remote tools enabled
Perform the following in the Configuration Manager console as SMSadmin
In the Administration node of the console, create new custom client device settings with Remote Tools enabled, give the client settings a suitable name like Custom Client Settings – Remote Tools for WorkGroup computers, in the example client settings below I’ve enabled pretty much every option available in the remote tools agent. In addition, I’ve added the computer agent and for Organization Name entered Custom Client Settings – Remote Tools.
Tip: To get a step by step guide for creating custom client device settings and targeting them to a collection see this post.
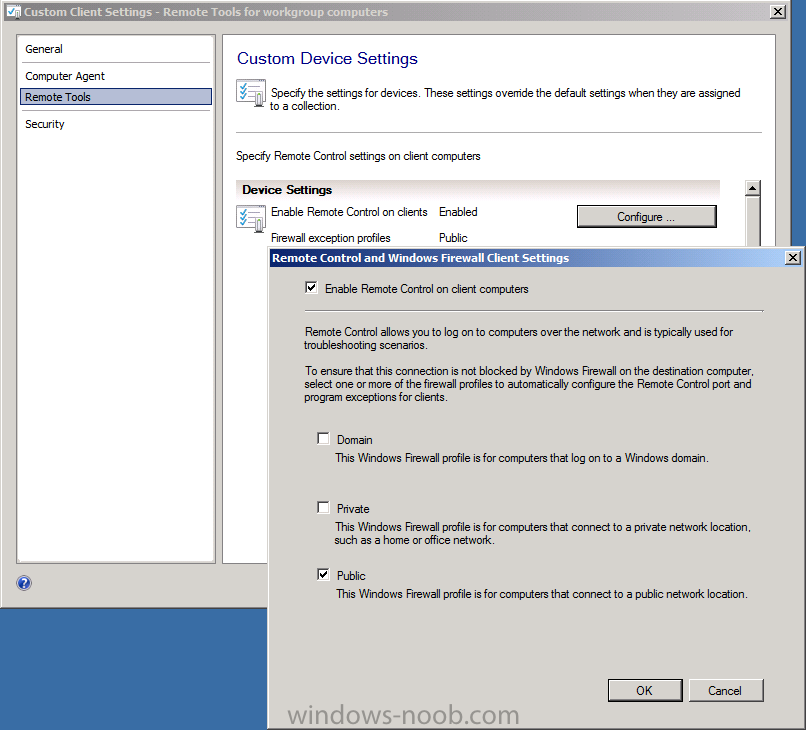
click on Configure and set the Public profile as enabled, click ok
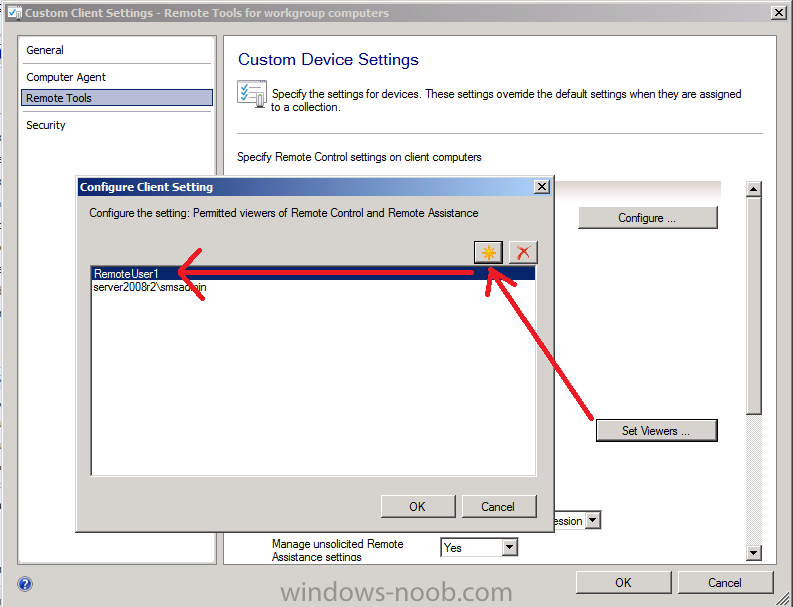
click on Set Viewers and add a local user with a password that matches a domain user that has access to the Console. In other words if you have a domain user called domain\RemoteUser1 and you want them to do the remote tools actions in the console, then you should also create a local user called RemoteUser1 on all your workgroup clients that you want to remotely control, this user must have the same password as the domain user.
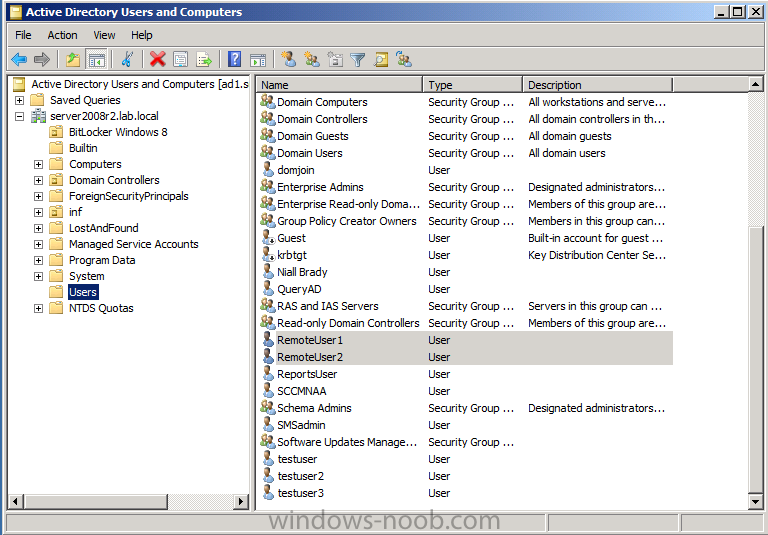
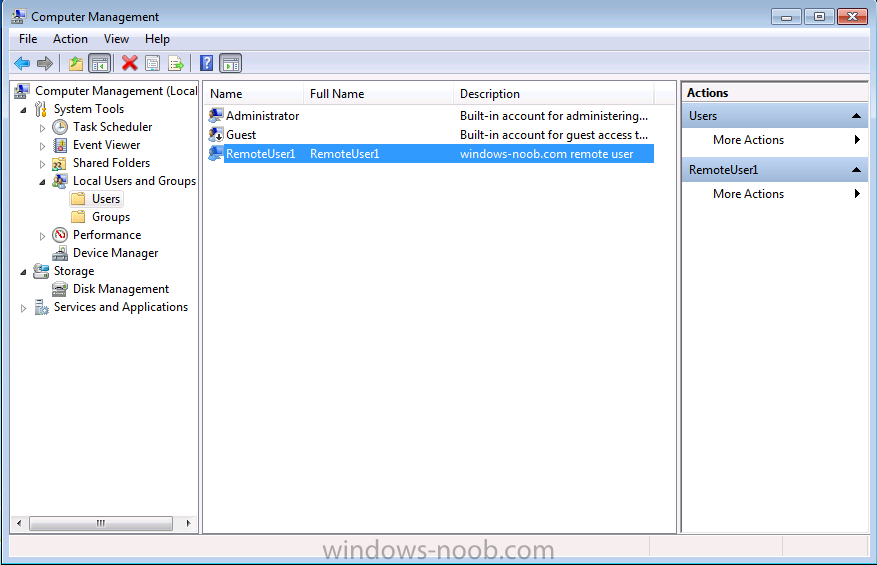
Below is a screenshot of Users and computers in Active Directory, note our RemoteUser1 is listed (this is a Domain User).
and below is our RemoteUser1 added as a local user on our WorkGroup client, this user has the same password as the same name domain user.
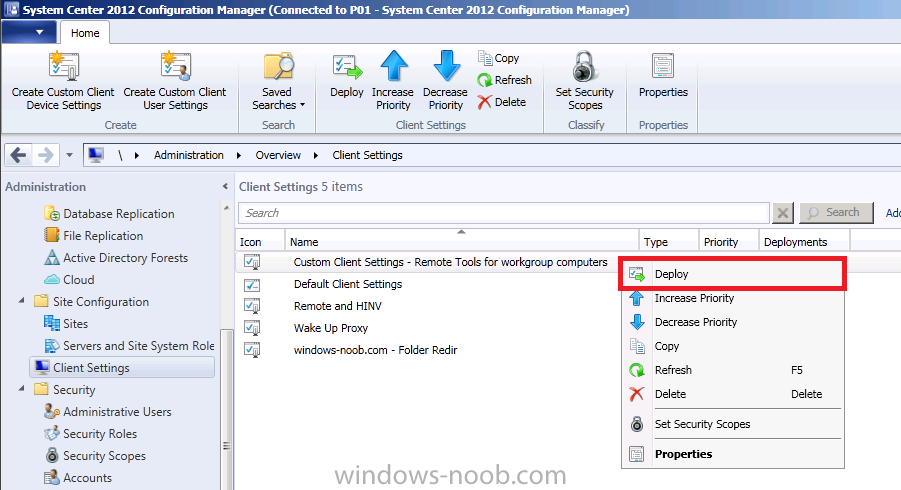
Step 7. Deploy custom client settings to a collection
Perform the following in the Configuration Manager console as SMSadmin
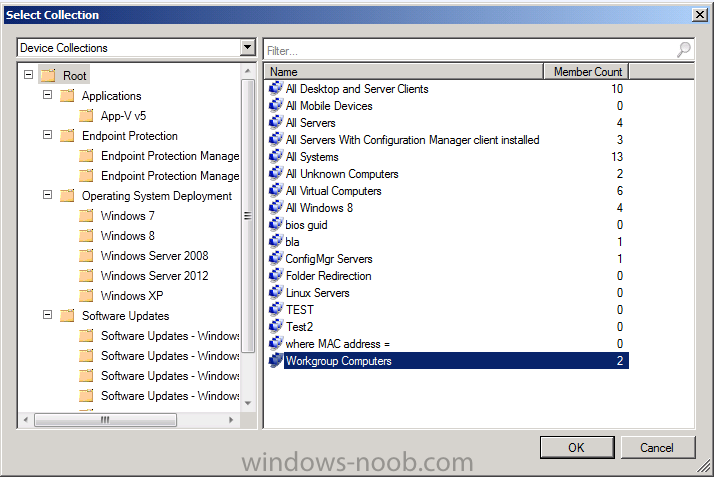
Now we are ready to deploy our custom client device settings to a collection containing our workgroup computers, right click the client settings and choose Deploy
and select a Device collection containing our Workgroup computers
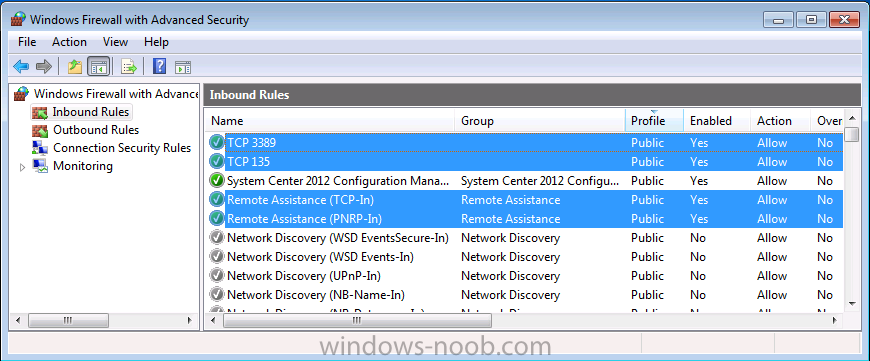
Step 8. Add Firewall exceptions
Perform the following on a workgroup computer as Administrator
Even though we enabled Remote Control, Remote Assistance and Remote Desktop via client settings only one of the three gets added to the firewall exceptions, (Remote Control) as a result you need to open your firewall on the workgroup computers for Remote Assistance and Remote Desktop Client.
Here are the settings you need to allow as inbound exceptions for both Remote Assistance and Remote Desktop Client
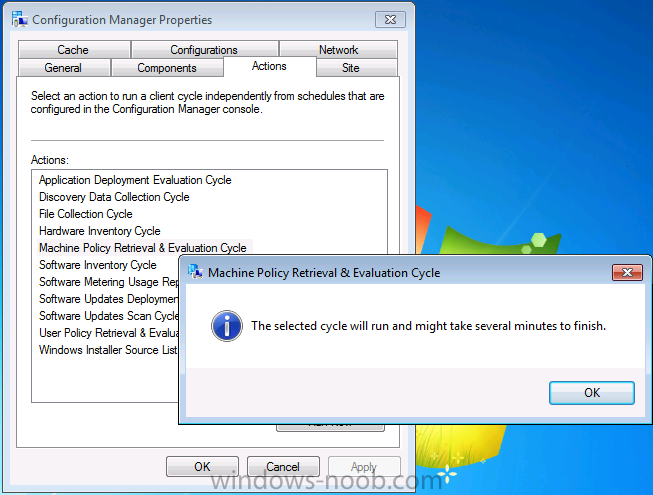
Step 9. Update Machine Policy
Perform the following on a workgroup computer as Administrator
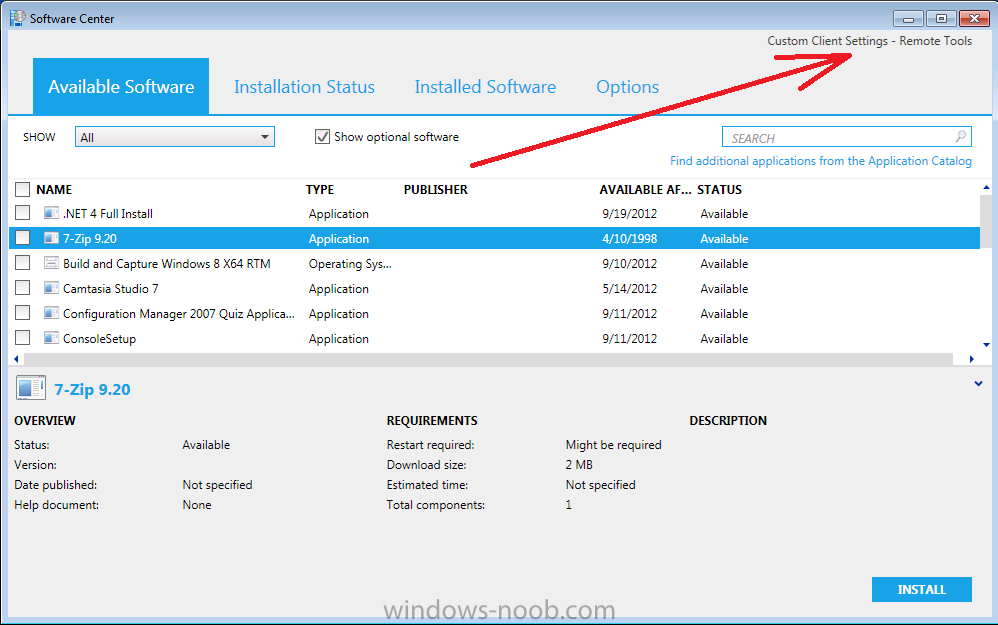
On a workgroup computer that is in our targeted collection, start up the Configuration Manager client, click on the actions tab and initiate a Machine Policy retrieval. alternatively do nothing and wait until the policy is automatically updated.
and after a few minutes you can start Software Center to verify that the correct Custom Client device Settings are applied by reviewing the Organization name in the top right corner.
Step 10. Edit hosts on the computer hosting the Configuration Manager console
Perform the following on the computer running the Configuration Manager console as Administrator
In an administrative command prompt, open the hosts file (located in C:\Windows\System32\Drivers\Etc) on the computer hosting the configuration Manager console and add the ip address and hostnames of your workgroup computers, save the file when done. This will allow us to connect via Remote Assistance and Remote Desktop Client via the console.
Step 11. Start the Configuration Manager console as RemoteUser1
Perform the following on the computer running the Configuration Manager console as RemoteUser1
On a computer that has the Console installed,logon as domain user RemoteUser1, note how the console appears to be ‘slimmed down’. This is RBAC in action. Browse to our Workgroup Computers collection.

Right click on a workgroup computer and choose Start, and select one of the three Remote access tools available which are
- Remote control
- Remote Assistance
- Remote Desktop client

The sessions are described below
Step 12. Do a Remote Control session
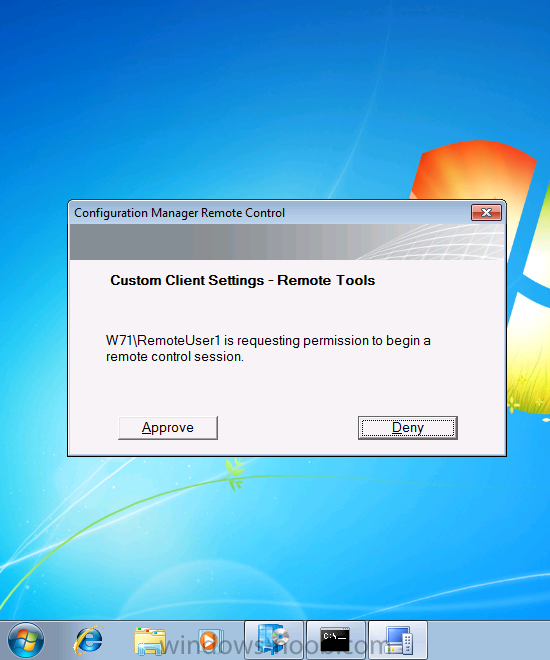
Right click on a workgroup computer, select Start, then Remote Control, when you select it you might be informed that the identity of the remote computer cannot be verified, answer yes to connect anyway.

the client will be prompted to accept (depending on your choices in the Custom Client Settings) choose Approve on the client
the session is now active with a nice Green bar on the top of the target screen to denote the connection, below you can see how it appears on the computer that initiated the connection vhe console
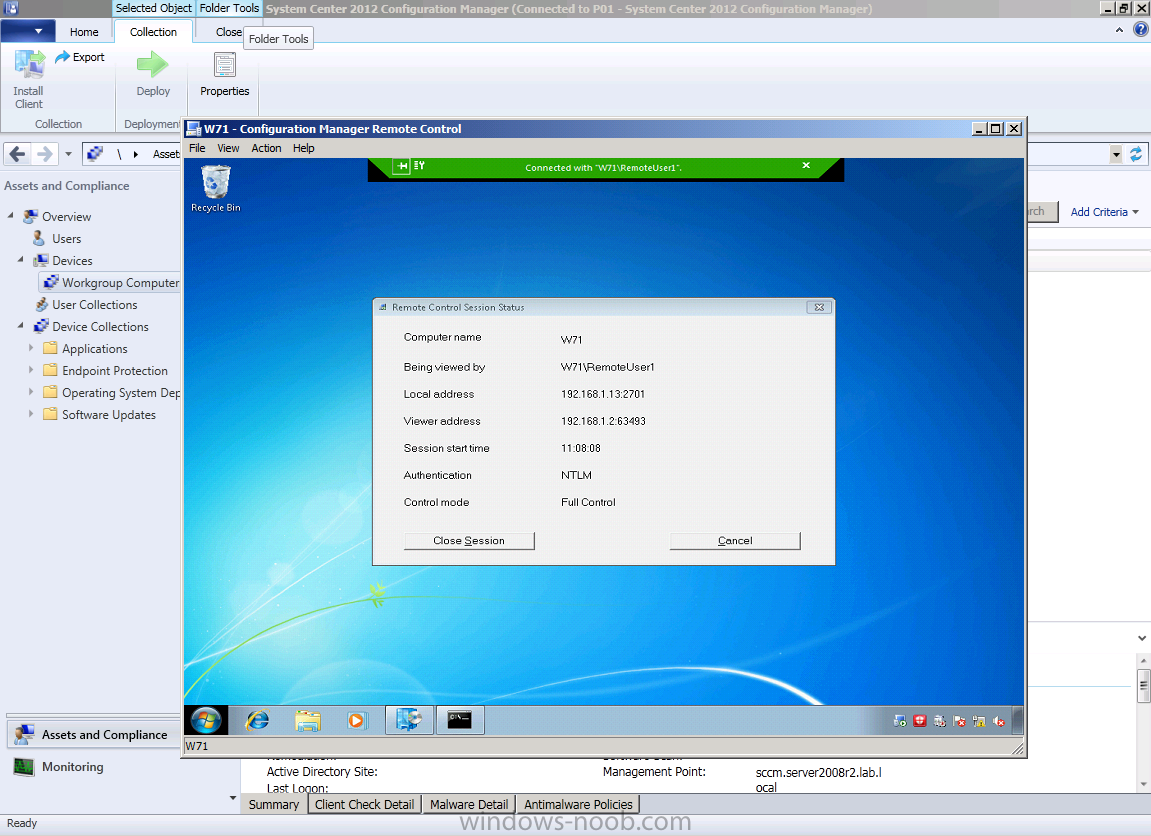
via the Action menu you can send ctrl alt del to the client (great function) or indeed stop the end user from interrupting your work by locking the remote keyboard and mouse

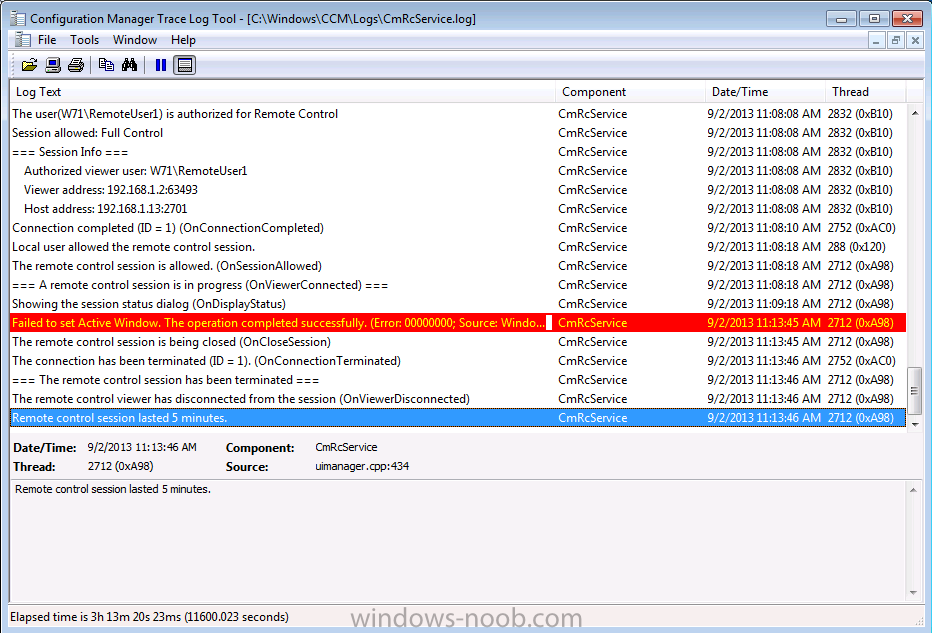
If you want details about the remote control session you can review the CmRcService.log which records information for the remote control service (found in C:\Windows\CCM\Logs).
Step 13. Do a Remote Assistance session
Right click on a workgroup client computer and choose start, then choose Remote Assistance, on the client computer you are connecting to the end user will be prompted to accept the connection (if not then you probably havn’t followed all the advice above, double check your firewall settings on the client).
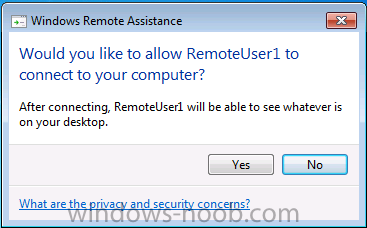
if they click accept you’ll see this in the console,
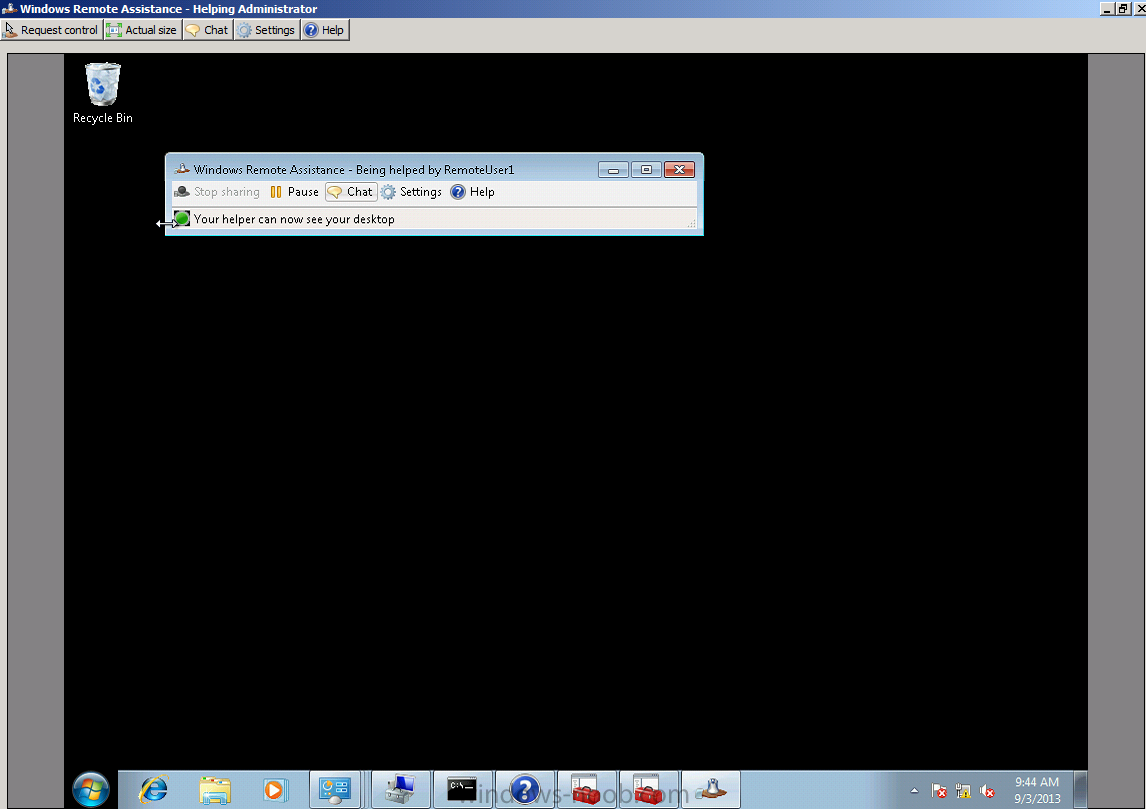
you can then use the options available to request control or have a chat
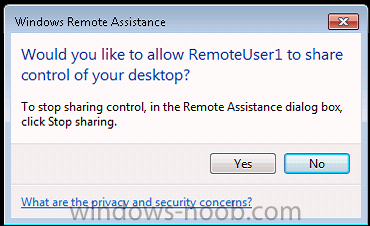
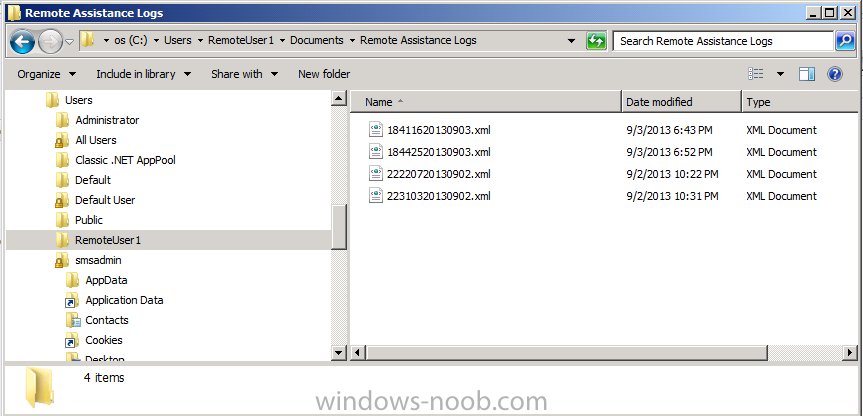
if the user agrees then you are in control ! The log files for Remote Assistance are stored in both the client and the server as described below
- On the server: C:\Users\[UserName]\Documents\Remote Assistance Logs with username the name of the user running the CM12 console.
- On the client: C:\Users\[UserName]\Documents\Remote Assistance Logs with username the name of the user accepting the Remote Assistance.
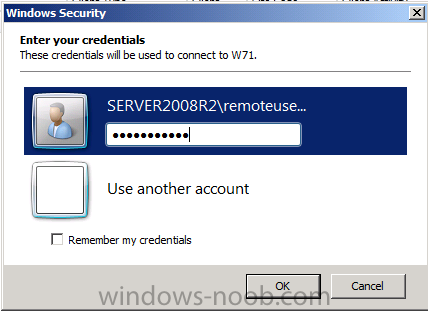
Step 14. Do a Remote Desktop Client session
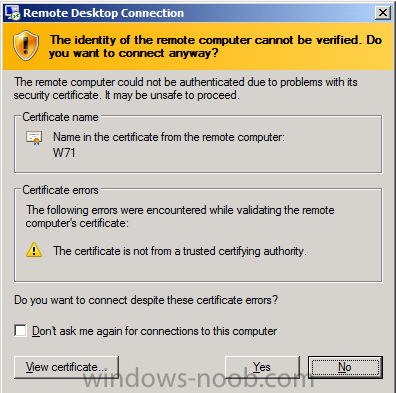
Right click on a workgroup client computer and choose start, then choose Remote Assistance, you’ll get prompted for Credentials (note that the domain user is listed, don’t worry about that, it’ll use the Local user to connect…)
answer yes to the Identity prompt
and yes to the logon message
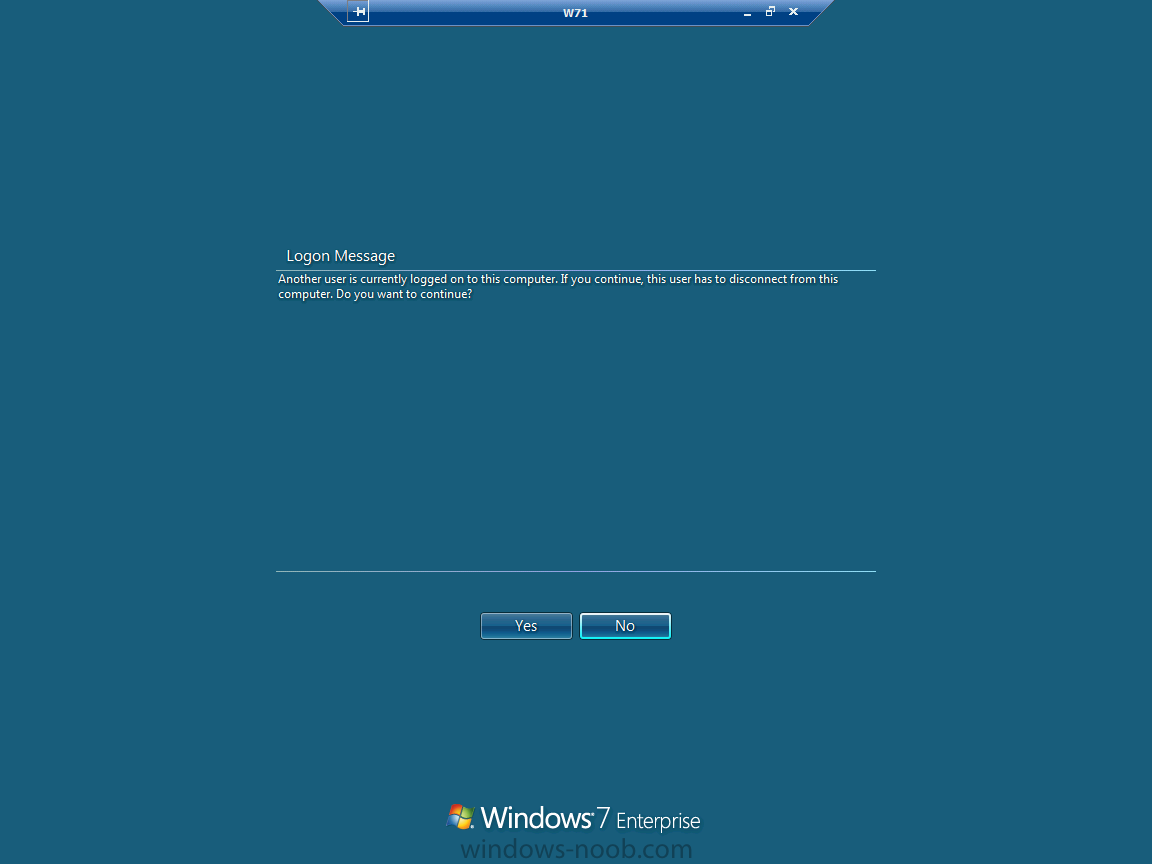
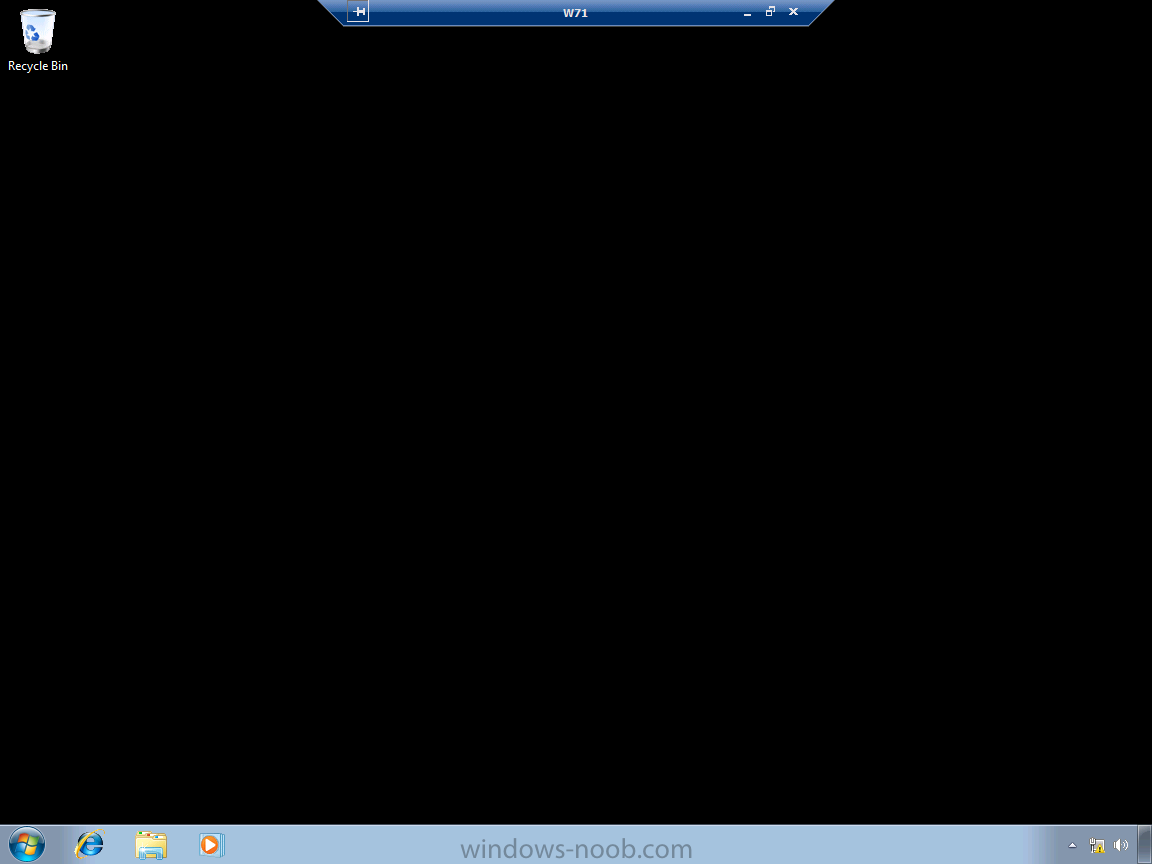
and you are in
Troubleshooting
If you have any client installation failures verify that you can ping the Configuration Manager servers ip address (assuming that the server allows you to ping it), does the ip address resolve to the correct ip of the Configuration Manager server ?
if not perhaps you need to double check your lmhosts file and/or hosts. If you make a change to the lmhosts file you’ll need to repopulate the cache as described above (nbtstat -R or reboot the computer for the same effect).
If you are having issues with Remote Control verify the following
- that the workgroup computer is in a collection that is targeted with the Custom device client settings for remote control
- that it has received that policy (check software center to verify or use policy spy RSOPv2)
- check the firewall settings on the client are enabled for the Public firewall profile for Remote control
- verify you’ve created a local user matching the name/password of the domain user you are running the console as
Related Reading
- LMHOSTS File Information and Predefined Keywords – http://support.micro…kb/102725/en-us
- Technical Reference for Ports Used in Configuration Manager – http://technet.micro…y/hh427328.aspx
- Determine the Site System Roles for Client Deployment in Configuration Manager – http://technet.micro…MK_Determine_MP
- Using LMHOSTS File to Find Computers and Services – http://www.microsoft…h.mspx?mfr=true
- Configuring SMS to Work on Workgroup Computers and Computers in Other Domains (LMHOSTS) – http://blogs.msdn.co…ns-lmhosts.aspx
- HOWTO: Assign SMS Advanced Client to the Isolated Secondary Site – http://support.micro…kb/555853/en-us
- How to install Clients on Workgroup computers – http://technet.micro…ClientWorkgroup
- NetBIOS Suffixes (16th Character of the NetBIOS Name) – http://support.micro…kb/163409/en-us
- Managing System Center Configuration Manager clients in a workgroup – http://blogs.technet…-workgroup.aspx
- Configuring Remote Control in Configuration Manager – http://technet.micro…y/gg682148.aspx
Summary
System Center 2012 Configuration Manager makes life easier for the admin as they can easily manage and remote control computers in the enterprise. Many enterprises still have workgroup clients however and while those workgroup clients do pose setup challenges, it’s still possible to use Remote Tools with Workgroup clients.
until next time !
cheers
niall.
