
In Part 1 of this series we created our new LAB, we got the System Center 2012 Configuration Manager ISO and extracted it, then copied it to our Active Directory server. We then created the System Management container in AD, delegated permissions to the container, extended the Schema for Configuration Manager. We then opened TCP ports 1433 and 4022 for SQL replication between sites, installed some prerequisites like .NET Framework 4.0, added some features and then downloaded and installed SQL Server 2008 R2 SP1 CU6. We then configured SQL Server using SQL Server Management Studio for security and memory configurations prior to running the Configuration Manager 2012 setup to assess server readiness. Finally we installed a central administration site (CAS). In Part 2 we setup our Primary server with SQL Server 2008 R2 SP1 CU6. We then installed Configuration Manager 2012 on our primary server (P01) and verified that it was replicating to our central administration site (CAS) server. Then we configured Discovery methods for our Hierarchy and then configure Boundaries and Boundary Groups.
In Part 3 we configured Discovery methods and configured boundaries and created a boundary group, we then configured them for Automatic Site Assignment and Content Location. In Part 4 we added the Application Catalog roles to our Hierarchy. We then configured Custom Client Device Settings and then deployed those settings to the All Systems collection on site P01. After that we created Custom Client User Settings and deployed them to the All Users collection in order to allow users to define their own User and Device affinity settings. In Part 5 we installed the WSUS server role (it is required for the Software Update Point role). We then installed the Software Update Point role on our CAS and Primary servers and we configured the SUP to support ConfigMgr Client Agent deployment which is a recommended Best Practice method of deploying the Configuration Manager Client Agent.
In Part 6 we prepared our server for the Endpoint Protection Point role, and installed that role before configuring custom client device settings and custom antimalware policies. We then deployed those custom client device settings and custom antimalware policies to our newly created Endpoint Protection collections. In Part 7 we added operating system deployment ability to our hierarchy by adding Windows 7 X64. We used the Build and Capture process to capture a WIM image which we can later deploy to targeted computers using network boot (PXE). PXE boot requires specific settings on our distribution points and the boot images used to deliver the operating system WIM images were therefore also enabled for PXE support.
In Part 8 we added Applications to our Software Library and configured the requirements in the Deployment Type to add new abilities to the application delivery process. We monitored the approval process of our applications and saw how requirements can influence whether an application is installed or not and we noted the difference between deploying to Users versus Devices. Now we will take a look at how Automatic Deployment Rules can be used to automate the deployment of windows updates on Patch Tuesday using a recurring schedule to patch your infrastructure using Software Updates.
In Part 9 we created some folders and collections using a PowerShell script to make targeting of Windows Updates easier, we then performed a full synchronization of our Software Update Point before creating an Automatic Deployment Rule (ADR) for Windows 7 monthly updates for Patch Tuesday. In Part 10 we monitored our previously created ADR and monitored the downloading and deployment of those updates both to the distribution points and finally to our Windows 7 client computers. We reviewed the process in fine detail in order to understand the sequence of events when an ADR is run on a schedule.
In Part 11 we upgraded our Hierarchy to System Center 2012 Configuration Manager Service Pack 1. In Part 12 we used the new Build and Capture process in Configuration Manager 2012 Service Pack 1, to capture a master image of Windows 8 Enterprise with the .NET 3.5 feature pre-installed, in addition we did most of it using Powershell cmdlet’s which are now part of Configuration Manager, now we will deploy that captured image.
Tip: This is a long post, give yourself plenty of time to go through it all, it’s worth it.
Introduction
Having a captured image (master image with FAT applications such as Microsoft Office 2013, this image would typically be captured with as many Windows updates that are available at that time) is essential for this part of the series. We use that captured image to save time in Deploying new computers with Windows 8, the end result is quicker deployments (less time waiting for Office to install, less time waiting for Windows updates to install), and a predictable, automated, professional, Enterprise ready experience for end users as they will have a clean Start screen with only the ‘approved’ applications for your organization present.
Step 1. Design your Windows 8 Start Screen [Optional]
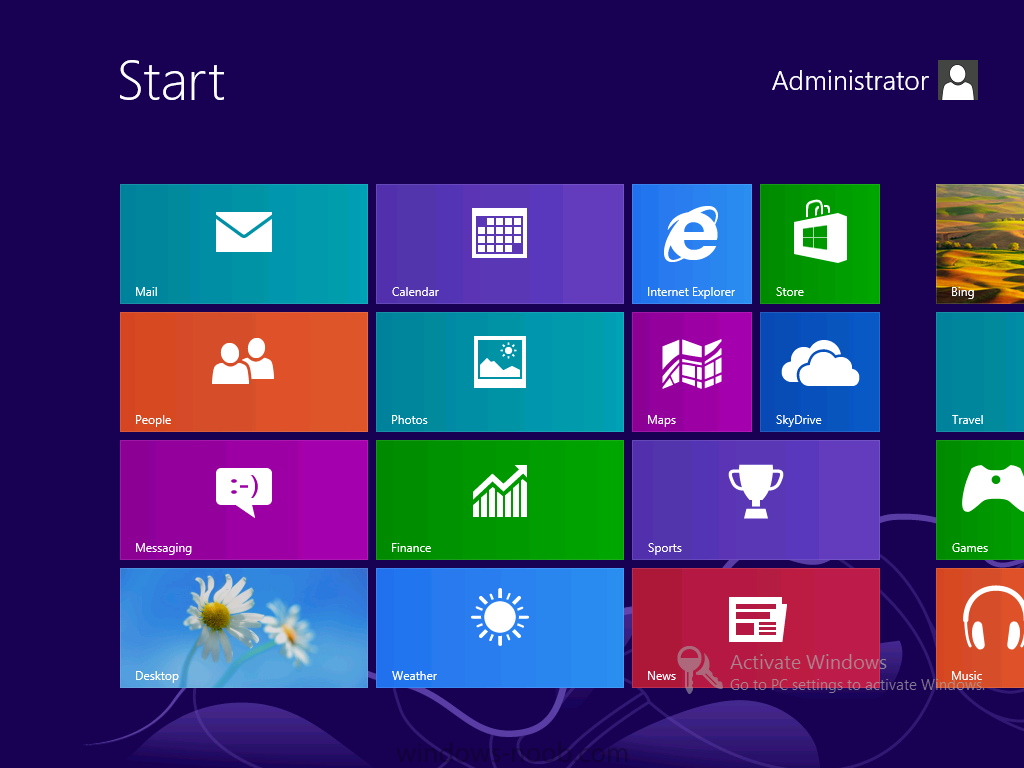
Perform the following on the W81 virtual machine as Administrator
At the end of Part 12, we were left with a newly installed virtual machine with Windows 8 Enterprise joined to a workgroup, this installation had some windows updates installed, some applications and of course .NET 3.5 installed, we can still use that virtual machine to create a special file used later in our deploy process, however this involves some manual steps.
Login to our Build and Capture machine (W81) as administrator,
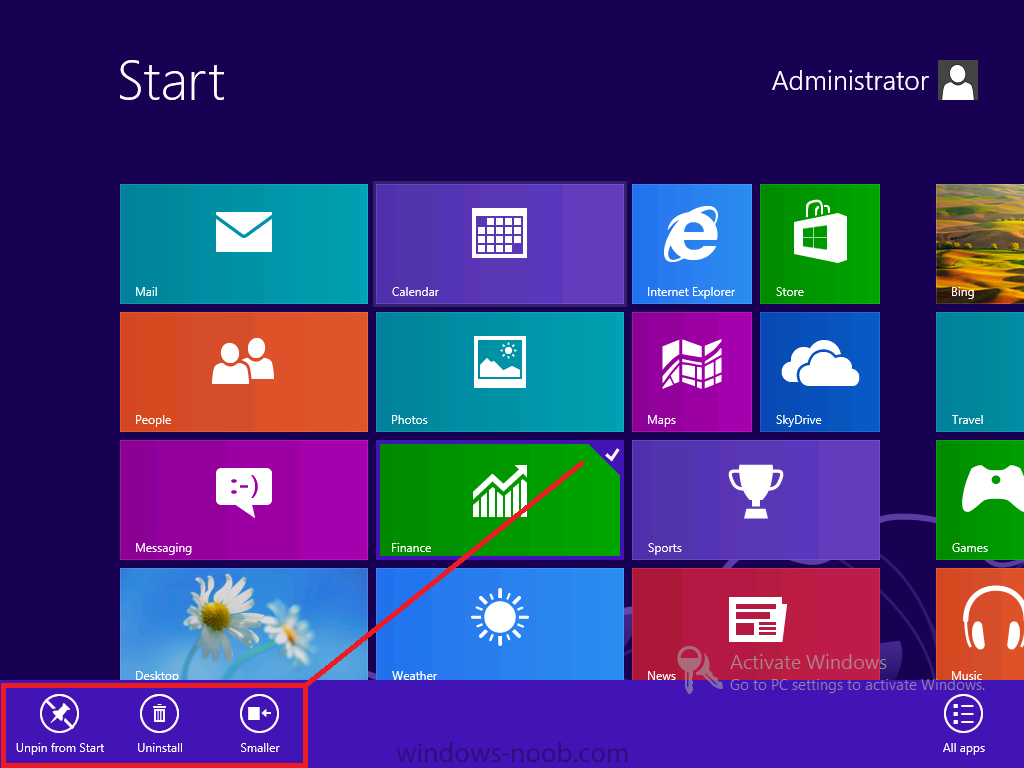
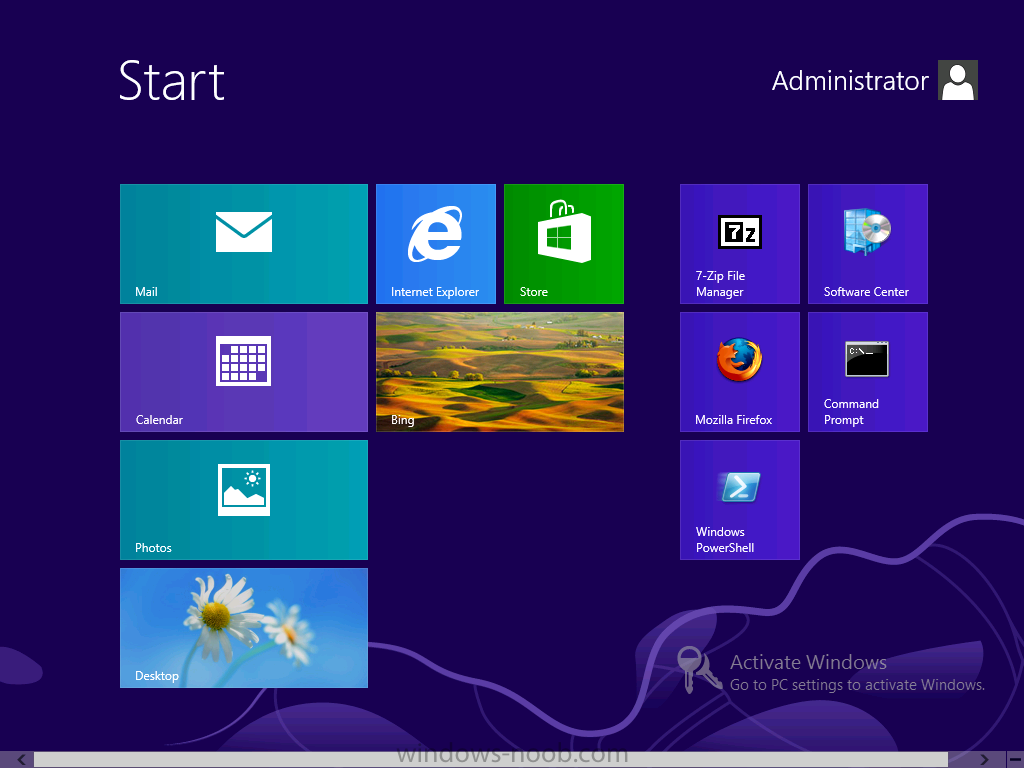
using your preferences, remove tiles that you don’t want to appear in your corporate image by right clicking and choosing the appropriate action, for example you can remove games by choosing Unpin from start to remove it from the Start Screen or Uninstall to uninstall it altogether.
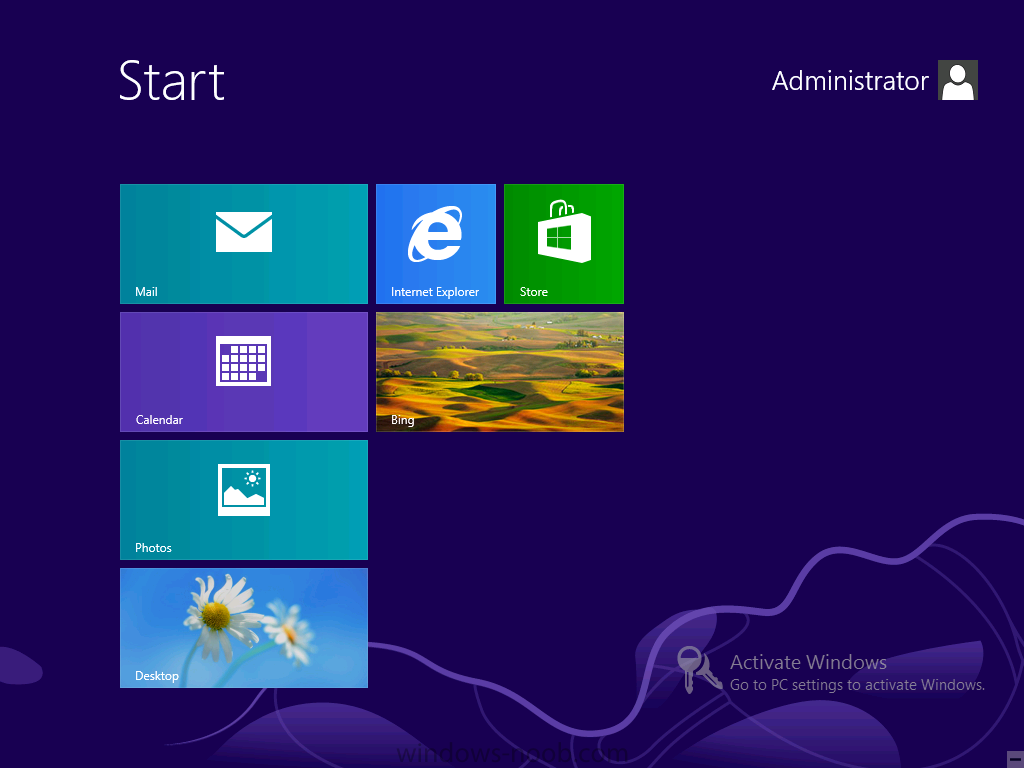
Once you’ve unpinned (or uninstalled) some applications, your start screen will look something like this
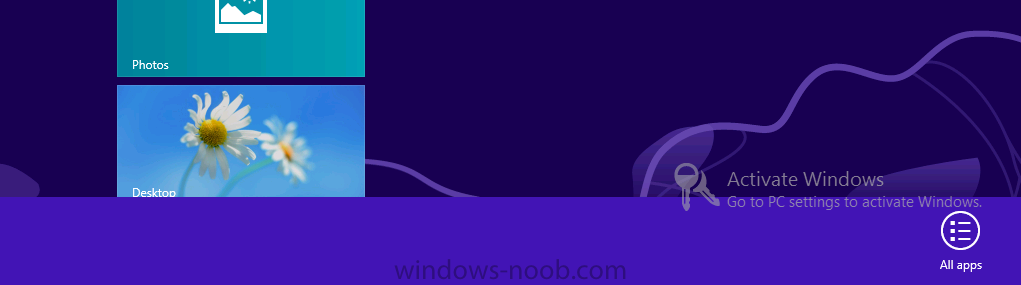
Now you want to add your Enterprise apps, if they don’t appear as tiles already, choose right click and select All Apps
all your apps appear, select the ones you want to appear by right clicking the tile and choose Pin to start
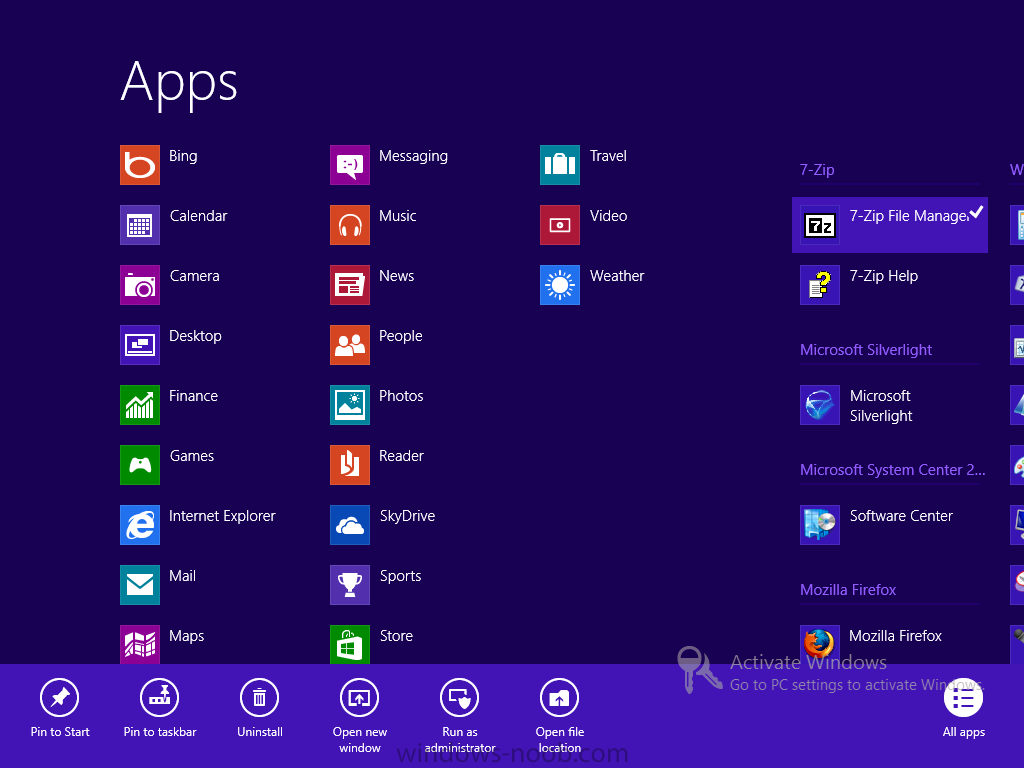
keep on doing this until you’ve added the apps you want in your start screen
Next we need to sysprep this image in order to generate the AppsFolderLayout.bin file that we need for the deploy task sequence, open a command prompt and browse to C:\Windows\System32\Sysprep and run sysprep.exe, choose Enter System Out-Of-Box Experience (OOBE), enable Generalize like in the screenshot and select Shutdown.
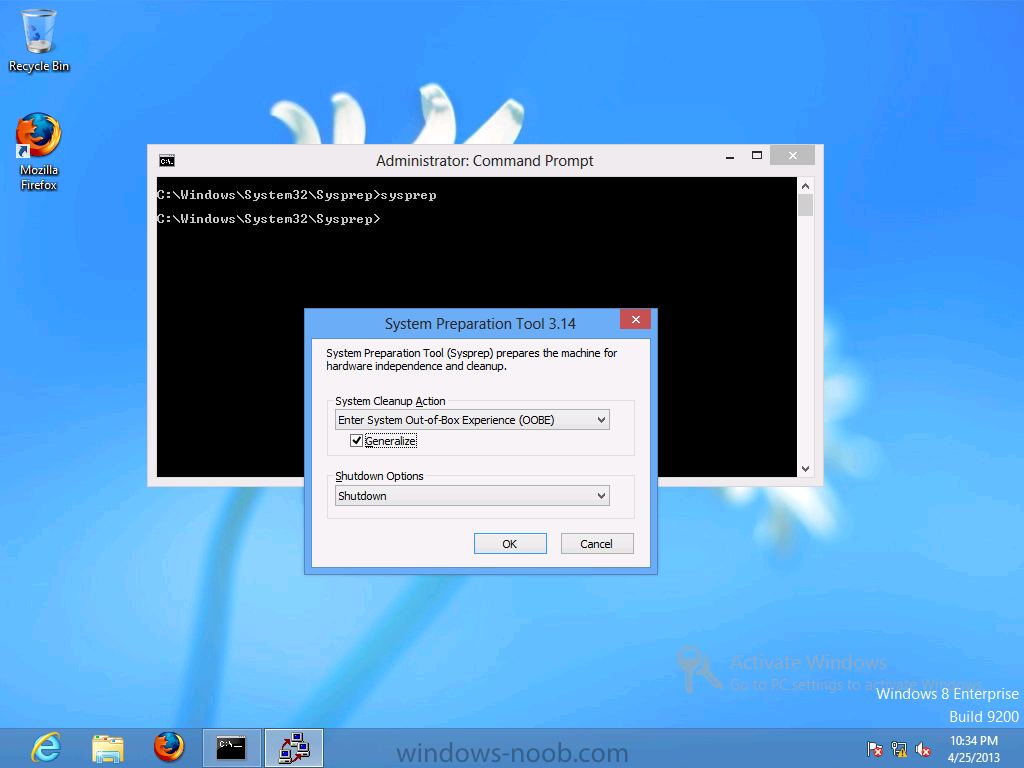
once sysprep has run it will power off the computer.
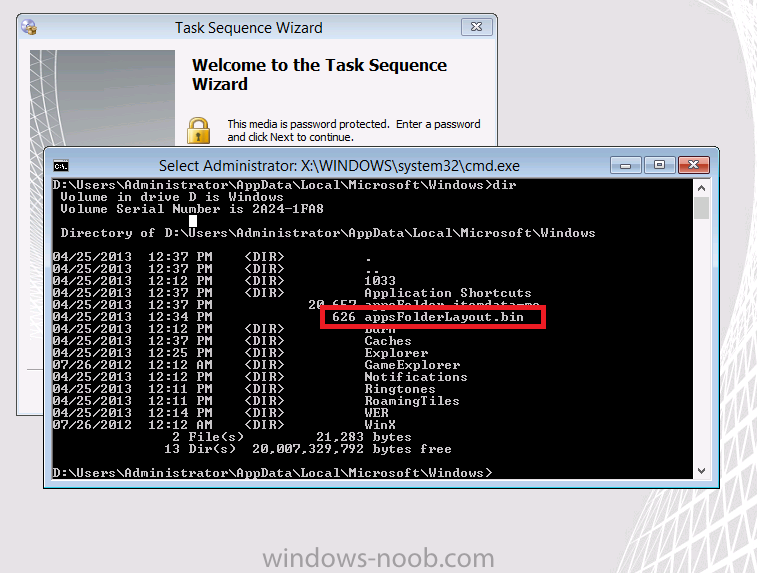
Next we will PXE boot this virtual machine to the PXE password prompt, we do this as we are not interested in reinstalling or recapturing this image, in fact we only want one file from the computer, this file will get overwritten (and be removed) if we let the computer boot into sysprep (with the Generalize option), so booting to the network (PXE) will allow us to get to the file. PXE boot the computer and when the PXE password prompt appears press F8 to open a command prompt, then browse to the drive letter that holds windows (probably D:\) and to the following path:-
D:\Users\Administrator\Appdata\Local\Microsoft\Windows
in there you should see a file called appsFolderLayout.bin
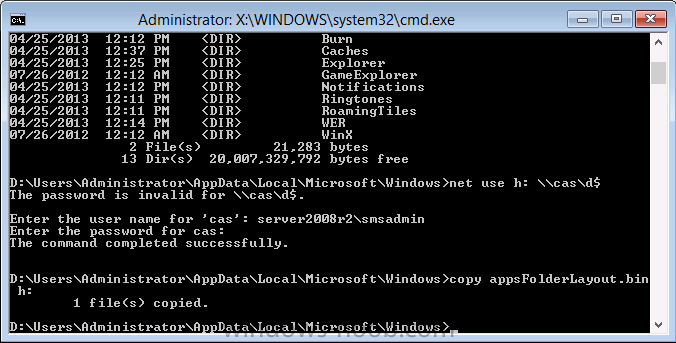
copy that file somewhere safe like to a network share or USB key, I use the command below to connect to my CAS server’s default D:\ drive admin share
net use h: \\cas\d$
it may prompt for credentials, enter credentials that have the adequate permissions and then copy the file to the share
Step 2. Create the AppsFolderLayout package and distribute it
Perform the following on the CAS server as SMSadmin
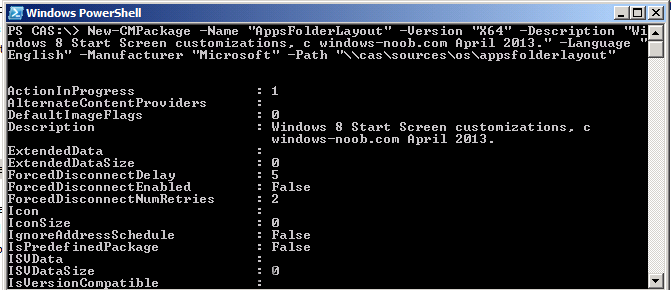
Once you have a copy of the AppsFolderLayout.bin file from Step 1, create a new folder in your OS sources called appsfolderlayout and copy the appsfolderlayout.bin file to that folder. We will create a new package in powershell pointing to that source eg: \\cas\sources\os\appsfolderlayout
New-CMPackage –Name "AppsFolderLayout" –Version "X64" –Description "Windows 8 Start Screen customizations, © windows-noob.com April 2013." –Language "English" –Manufacturer "Microsoft" –Path "\\cas\sources\os\appsfolderlayout"
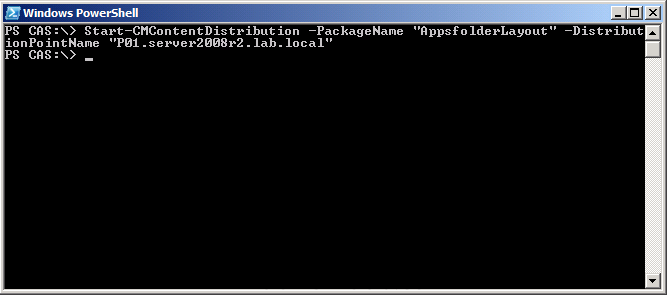
Ok now that we’ve created the package using PowerShell, the next job is to distribute it to our distribution point P01, so issue the following command
Start-CMContentDistribution –PackageName "AppsfolderLayout" –DistributionPointName "P01.server2008r2.lab.local"
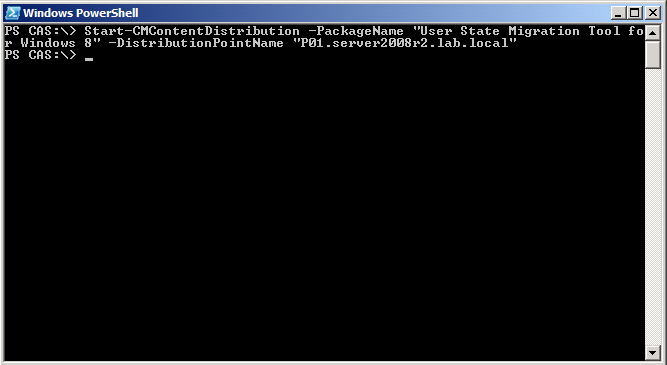
Step 3. Distribute the User State Migration Tool for Windows 8 package
Perform the following on the CAS server as SMSadmin
Tip: When you upgraded to Service Pack 1, part of the installation used the Windows ADK source files to create a User State Migration Tool package called User State Migration Tool for Windows 8. That mouthful could be easily abbreviated to USMT 5, but either way, the package (which is added as part of the upgrade) is not distributed to any distribution points and that means any task sequence that references it will fail.
To resolve this we need to distribute our package by right clicking and choose Distribute Content and continuing through the wizard, or be cool and do it with powershell.
The PowerShell cmdlet (Start-CMContentDistribution) is as follows, replace the DistributionPointName with your own distribution point FQDN.
Start-CMContentDistribution -PackageName "User State Migration Tool for Windows 8" –DistributionPointName "P01.server2008r2.lab.local"
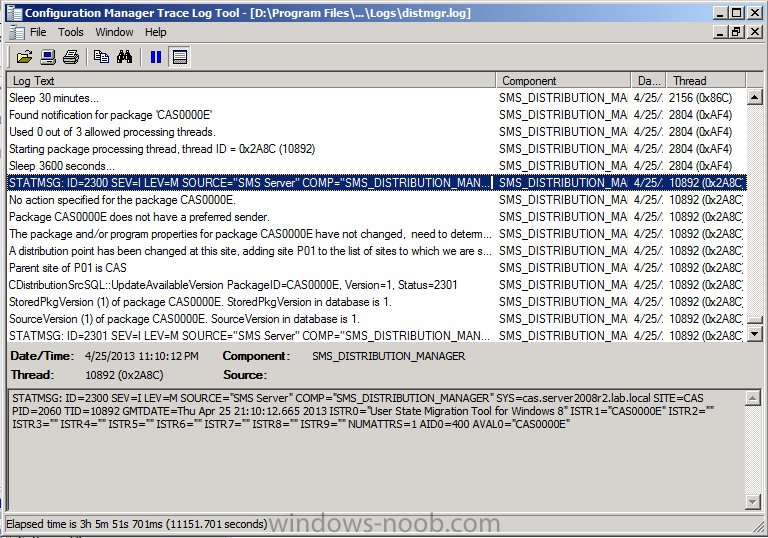
you can once again monitor the distribution using CMTrace by opening the distmgr.log
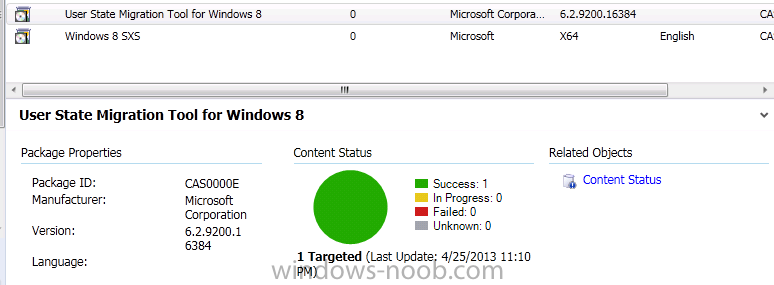
and verify in the console if you are a traditionalist
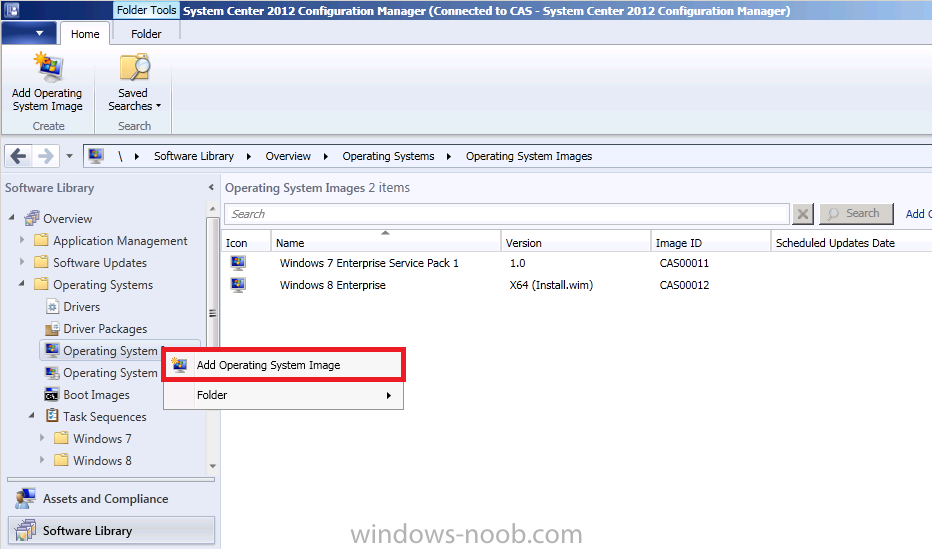
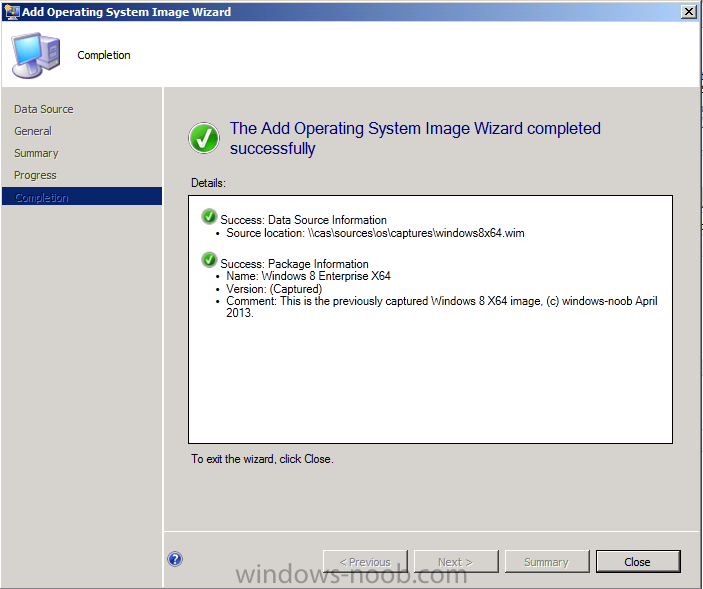
Step 4. Add the previously captured Operating System Image
Perform the following on the CAS server as SMSadmin
In the previous guide we captured our Windows 8 master image and now we need to add that captured image to Configuration Manager and then distribute it to the distribution points.
Note: There are hundreds of PowerShell CMDlets which help us automate every day tasks in Configuration Manager, and the Add an Operating System Image step has a CMDlet for that too, called New-CMOperatingSystemImage. However, it’s not working correctly at present (it creates the image but you will not be able to distribute the image after creation) therefore until further notice, please add the operating system image manually in the console. The Powershell cmdlet is listed below for your reference, but I repeat it is not working at present (you will get the following error when you try to distribute the image via powershell “Warning there is no object that can distribute content”) therefore please add the Operating System image manually.
continue through that wizard, I mark the version info as (Captured) to make things clearer later on…
Tip: Here is the corresponding way of doing it using PowerShell *remember, this cmdlet doesn’t work at present*. Issue the following command New-CMOperatingSystemImage as shown below:-
New-CMOperatingSystemImage -Name "Windows 8 Enterprise X64" -Path "\\cas\sources\os\captures\windows8x64.wim" -Version "(Captured)"
Step 5. Distribute the Operating System Image
Perform the following on the CAS server as SMSadmin
After you’ve added the operating system image, we want to distribute the image, we’ll do that with the Start-CMContentDistribution powershell cmdlet.
Start-CMContentDistribution –OperatingSystemImageName "Windows 8 Enterprise X64" –DistributionPointName "P01.server2008r2.lab.local"
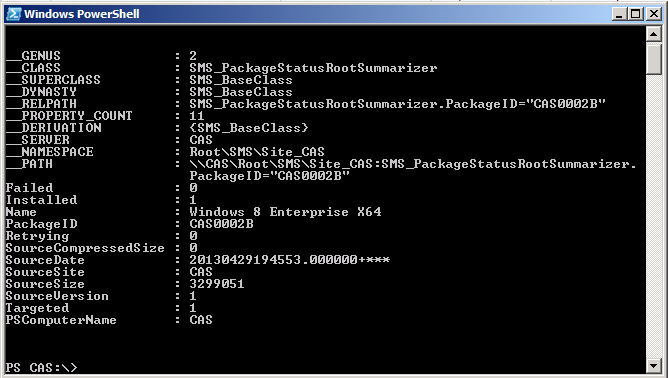
review the distribution of the image to your distribution point via distmgr.log or via the Configuration Manager console or via PowerShell using the following command, replace the PackageID listed below with the ImageID in your Configuration Manager console or
Get-WmiObject –NameSpace Root\SMS\Site_CAS –Class SMS_PackageStatusRootSummarizer –Filter "PackageID='CAS0002b'"
Check for Installed=1 and Targeted=1 in the output, this means that the package is distributed successfully.
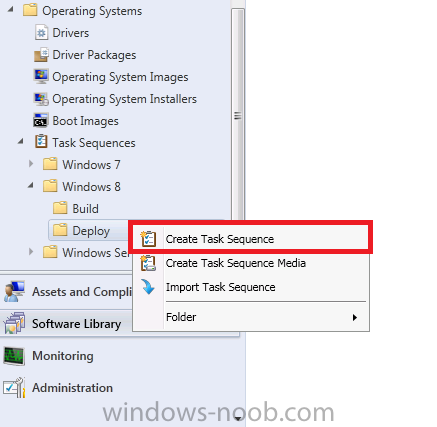
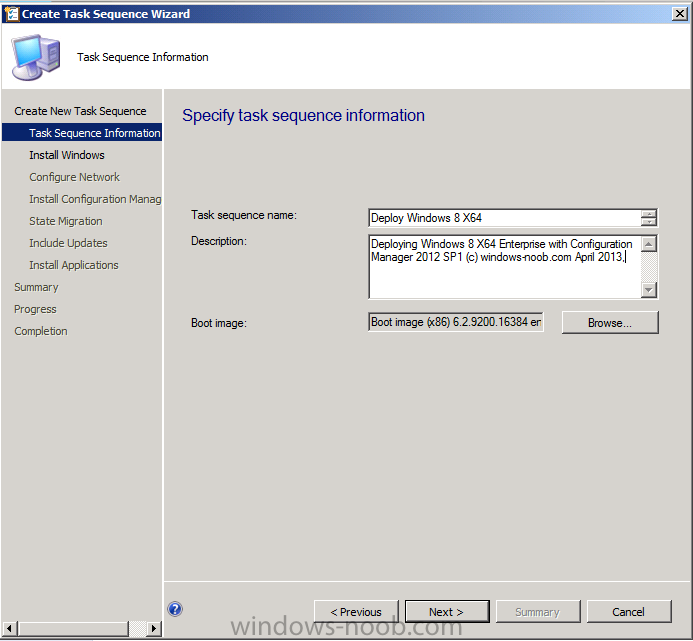
Step 6. Create the Deploy Windows 8 Task Sequence
Perform the following on the CAS server as SMSadmin
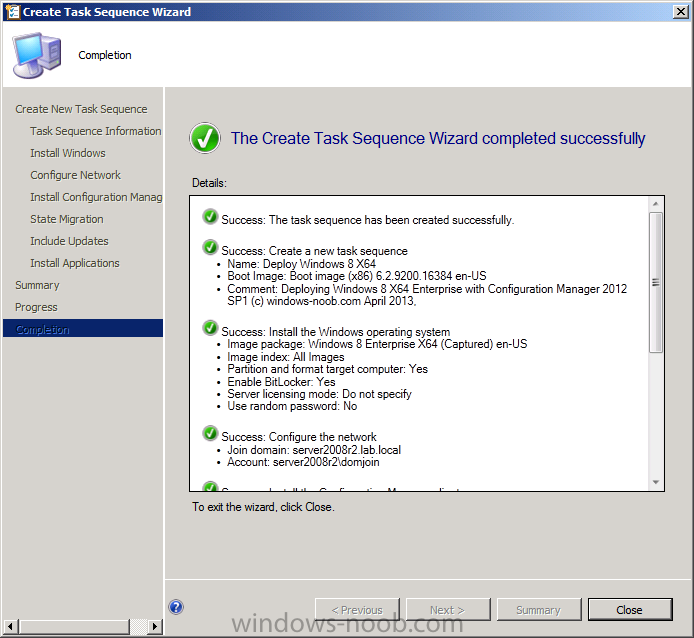
Now it’s time to create a Deploy Task Sequence, this task sequence will be used to deploy our previously captured image. This task sequence can be as flexible, simple or complex as you want (here is an example of a complex Deploy Windows 8 task sequence using MDT 2012 Update 1 integrated with Configuration Manager).
In the Operating System node, select Task Sequences, expand our Windows 8 folder and select the Deploy folder, right click and choose Create Task Sequence.
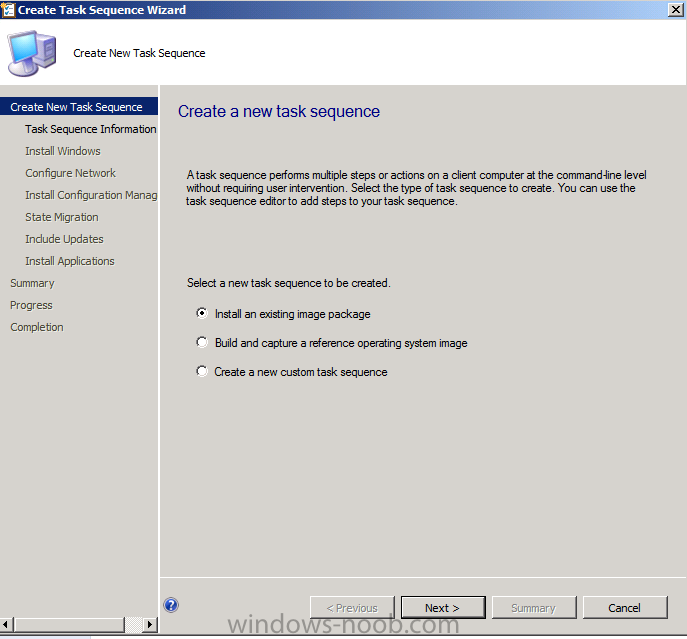
choose Install an Existing image package
give the task sequence a suitable name and description, choose the X86 boot image
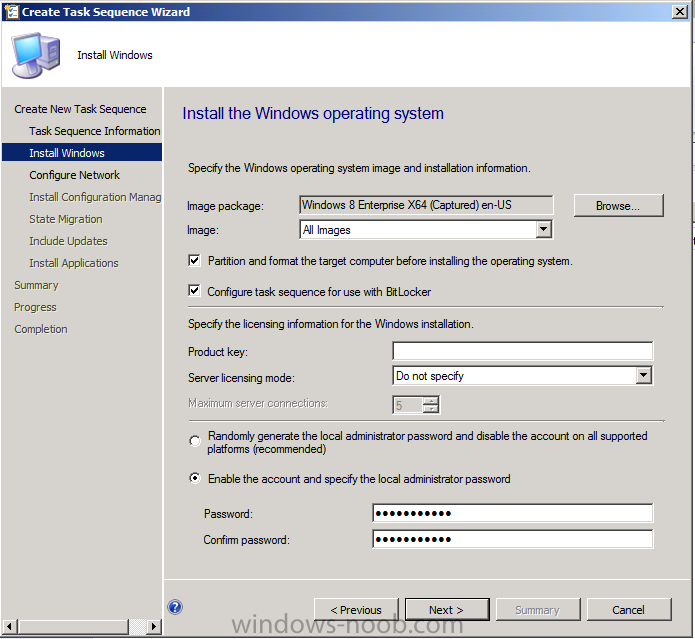
for the Install Windows step, browse to our captured image,
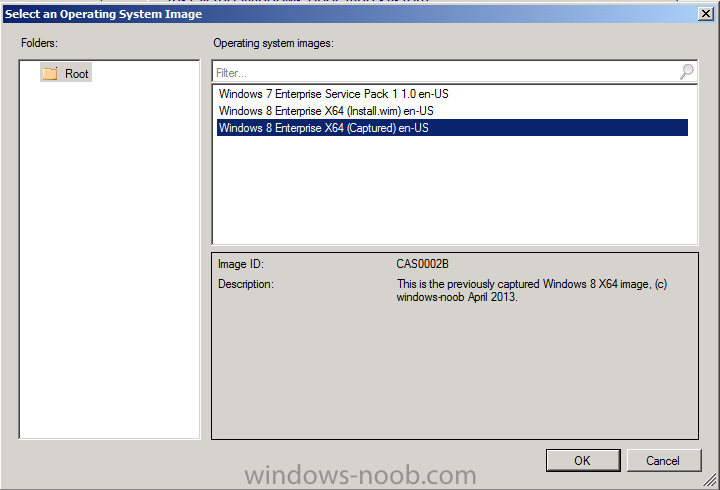
you’ll see the Captured wim clearly if you gave it an appropriate name earlier…enter an Administrator password if you want, and select any additional options such as BitLocker
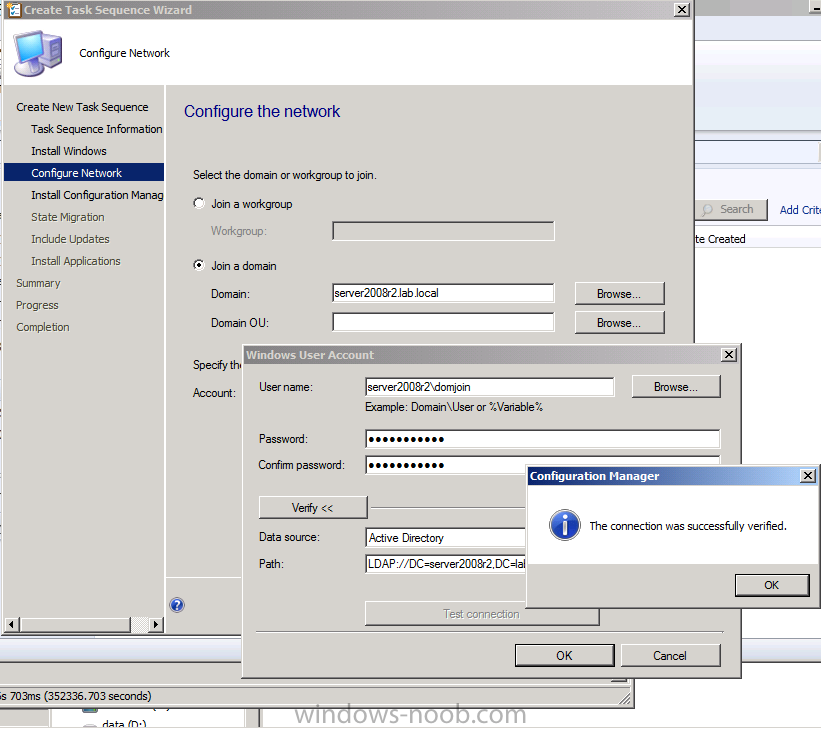
for the Configure Network step, select join a domain and enter the domain join user account credentials, make sure to Verify the credentials as shown in the screenshot below
continue with the wizard through to completion (next next next, add any additional applications if you wish)
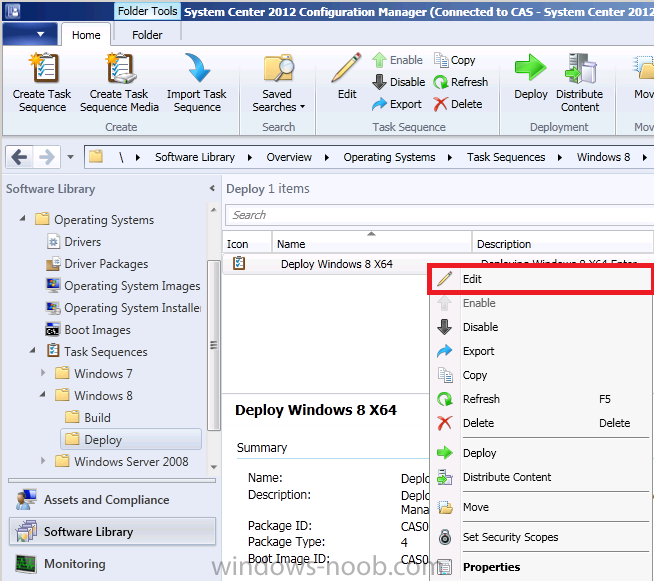
Step 7. Edit the Task Sequence
Perform the following on the CAS server as SMSadmin
In the Configuration Manager console, right click on the Deploy Windows 8 task sequence and choose edit
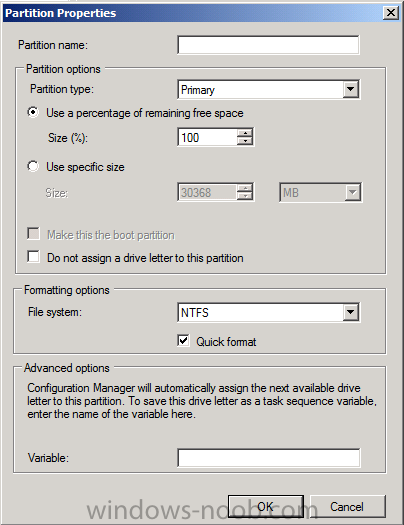
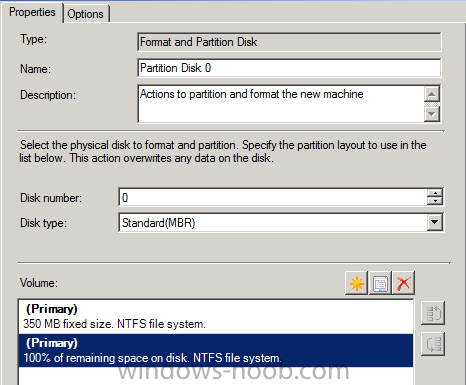
Locate the Partition Disk 0 step, if the primary partition (for the Operating System) is set to a fixed size as in the screenshot below then you’ll need to change it (otherwise the task sequence will fail on any computer that has a disc smaller than 29GB in size)
Here’s the step before the change
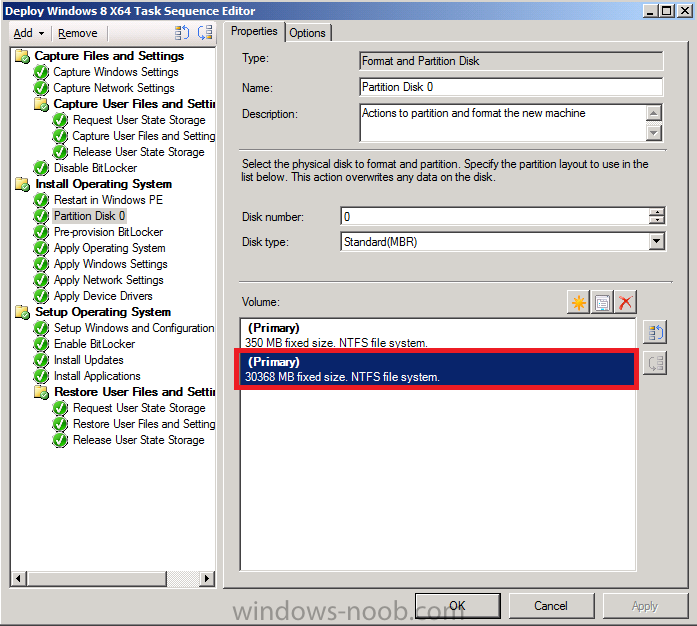
change it to Use a percentage of remaining free space instead (100%)
so that the Format and Partition Disk step now looks like this
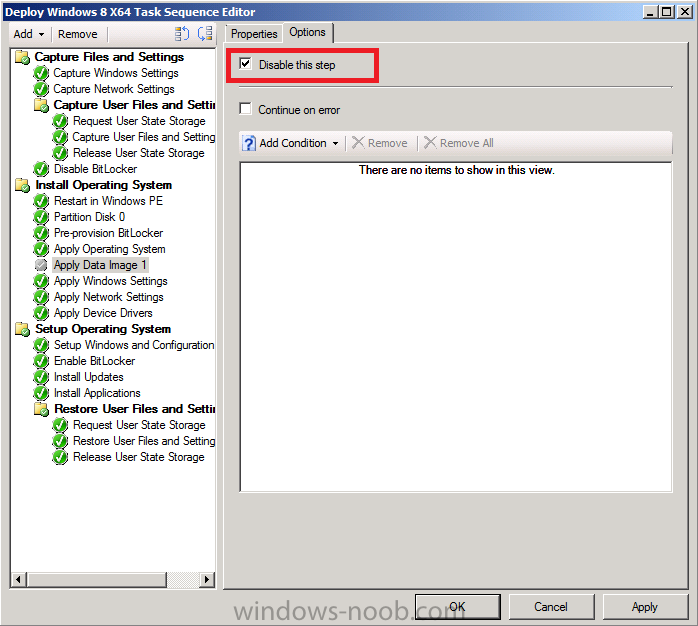
Once done apply your changes and then locate the Apply data image step and disable it in the options tab (it is not needed for our purposes)
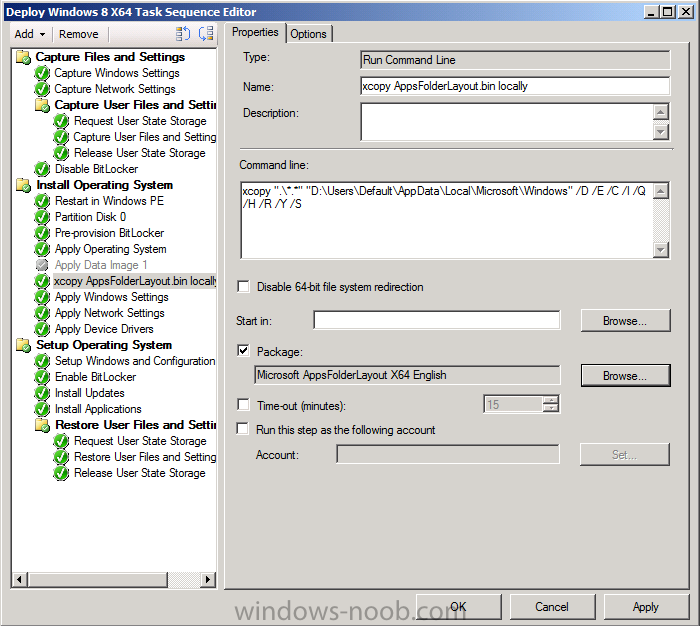
create a new Run Command Line step after the Apply Operating System image step, rename it to xcopy AppsFolderLayout.bin locally
in the run command line step use the following xcopy command to copy our previously saved appsfolderlyout.bin file to the default users profile, this will force our start screen changes on all users that login to this computer
xcopy ".\*.*" "D:\Users\Default\AppData\Local\Microsoft\Windows" /D /E /C /I /Q /H /R /Y /S
beneath this, select our previously created AppsFolderLayout package as shown in the screenshot below
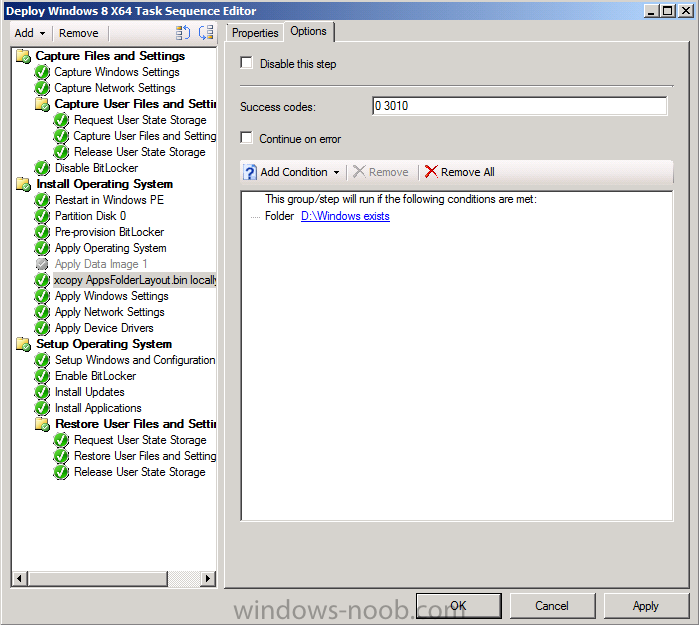
change the options on this step to only run if D:\Windows exists as per the screenshot below
copy the entire step, and then replace all references to D:\ to C:\ in that copied step both on the run command line and options tab (we could use variables to do this in one step by using a checkdriveletter.wsf script but that is beyond the scope of this post)
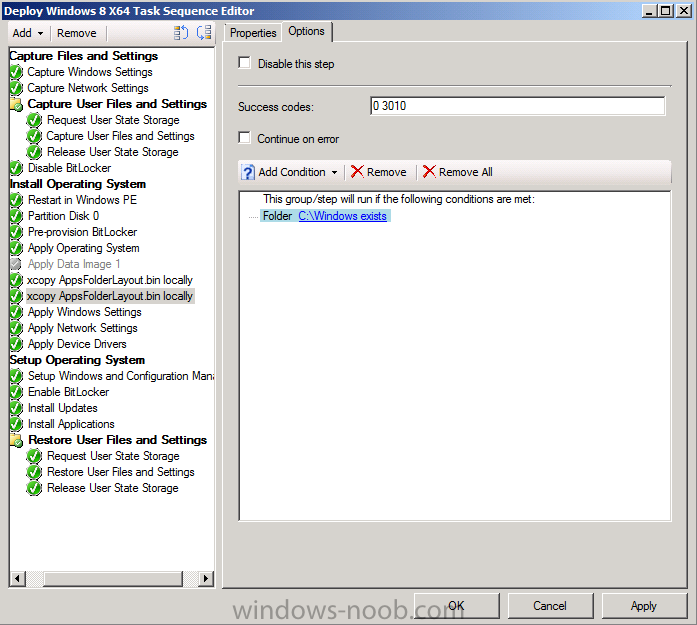
Basically what the above two steps do is verify which drive (C: or D: has Windows on it, and copies the appsfolderlayout.bin file to the respective drive letter default users profile
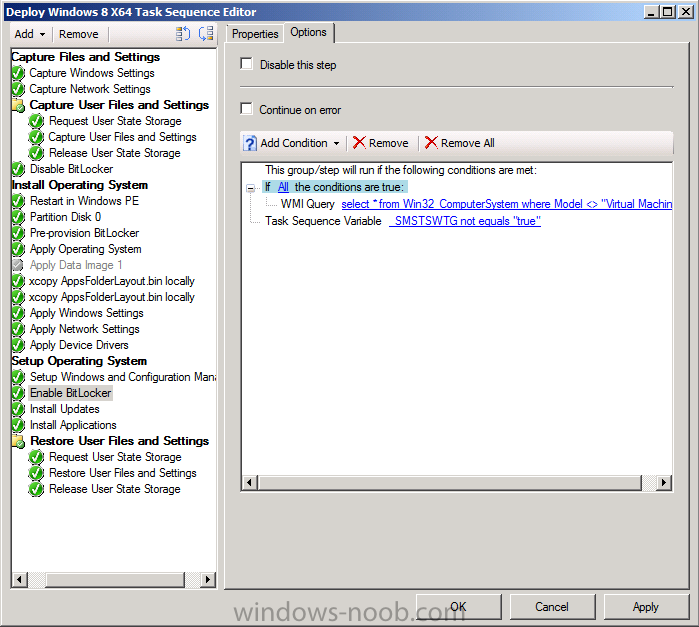
Next edit the built in Enable BitLocker step and add the following wmi query for root\cimv2 so that it won’t run on Virtual Machines otherwise the task sequence will bomb out on hyperV virtual machines…
select * from Win32_ComputerSystem where Model <> "Virtual Machine"
Tip: if you want to Add drivers for different hardware based on WMI queries then see Step 2 in the following guide.
Step 8. Deploy the Task Sequence
Perform the following on the CAS server as SMSadmin
Next we want to deploy our Deploy Windows 8 X64 task sequence to our Deploy Windows 8 collection (if you have not yet created that collection do so now, it should be a device collection with no members).
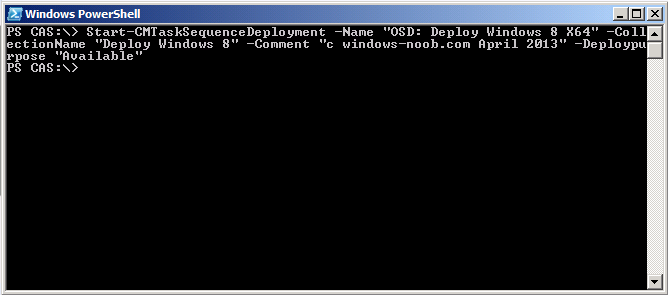
We will use the following PowerShell CMDLet: Start-CMTaskSequenceDeployment
Start-CMTaskSequenceDeployment –Name "Deploy Windows 8 X64" –CollectionName "Deploy Windows 8" –Comment "© windows-noob.com April 2013" –Deploypurpose "Available"
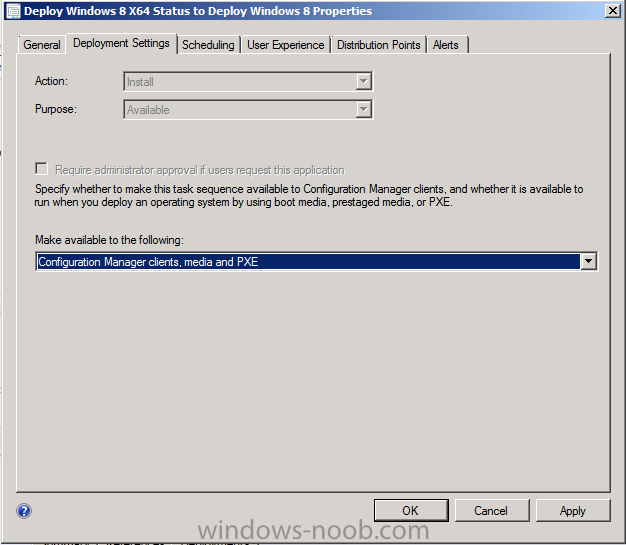
Next, manually edit the deployment so that it points to Media and PXE clients as per the screenshot below (this is necessary otherwise you won’t see the deployment via PXE boot)
or use the modified cmdlet in Cumulative Update 1 which does allow for that switch
Start-CMTaskSequenceDeployment –TaskSequencePackageId "CAS0002F" –CollectionName "Deploy Windows 8" –Comment "© windows-noob.com April 2013" –Deploypurpose "Available" –MakeAvailableTo "ClientsMediaAndPXE"
Next, add some computers to the Deploy Windows 8 collection using Queries or Direct Membership either manually or using PowerShell via the following cmdlet (Note: SP1 CU1 or later)
Import-CMComputerInformation –ComputerName = "W82" –MacAddress= "00:11:22:33:44:55" –CollectionName= "Deploy Windows 8"
Step 9. Deploy Windows 8 to a computer via PXE
Perform the following on a new computer
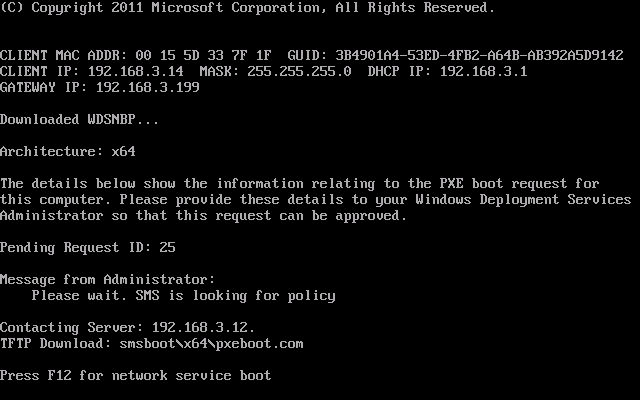
Now everything is in place to allow us to start Deploying Windows 8, so PXE boot a new computer press F12 when prompted
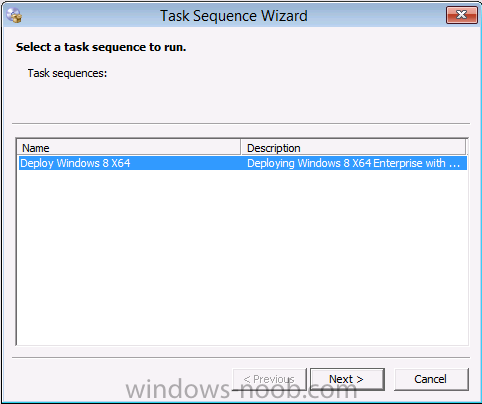
and select the Deploy Windows 8 X64 task sequence
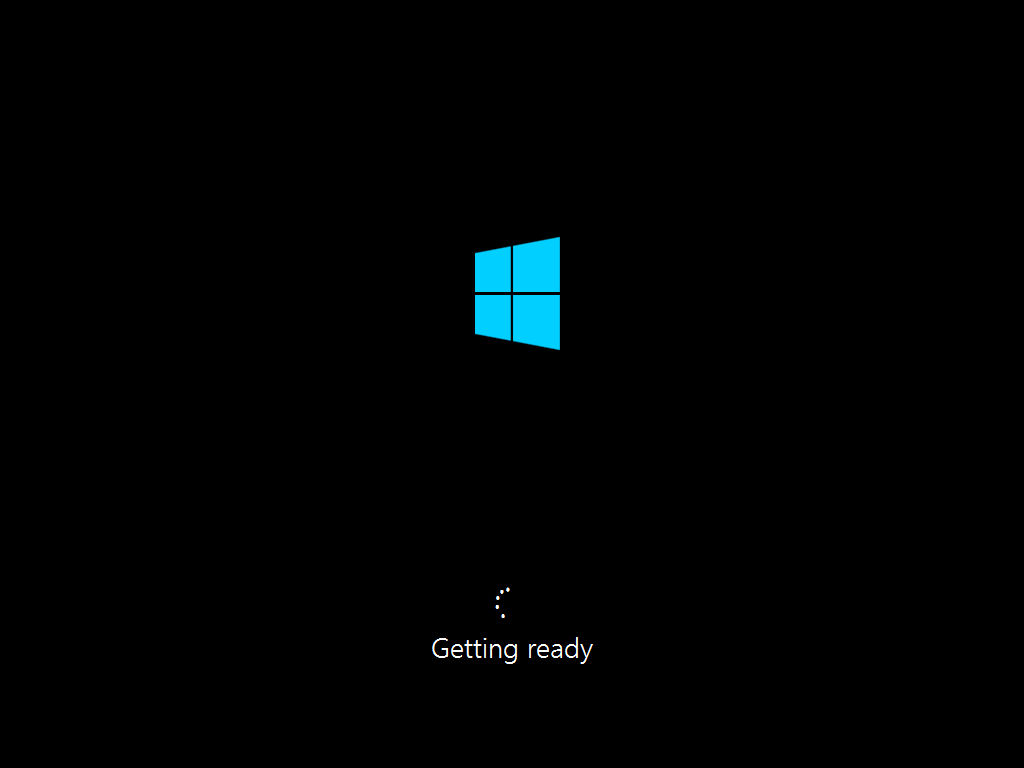
off it goes… it will download and then apply the previously captured Windows 8 Operating System

and Windows gets ready
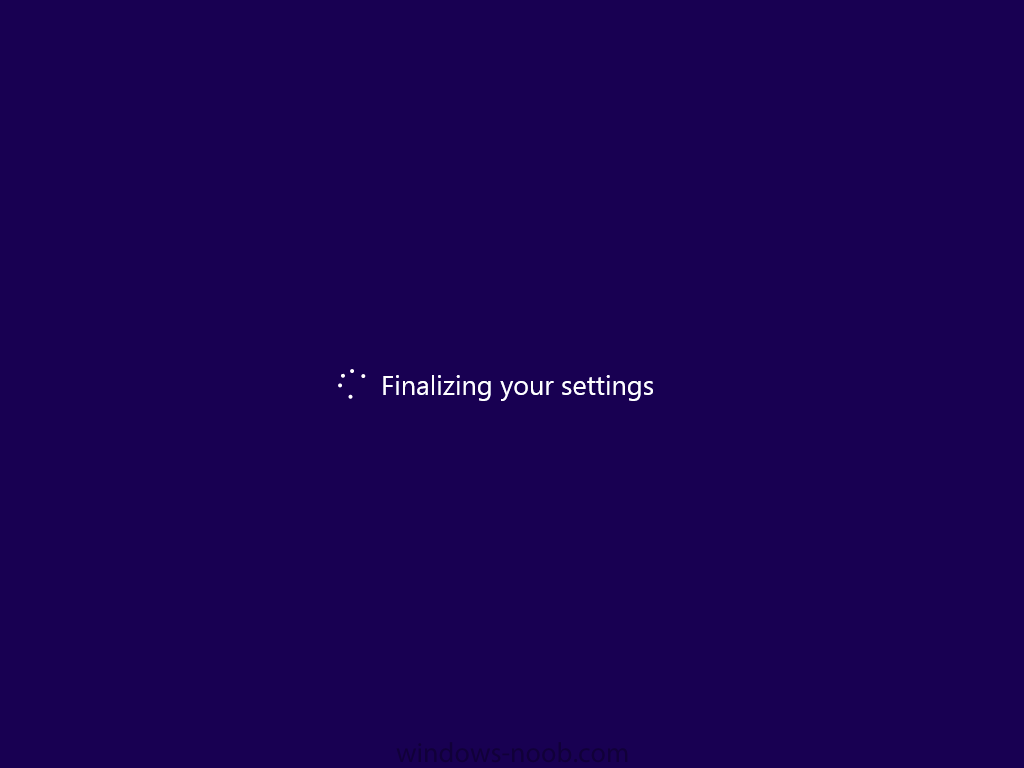
before finalizing settings
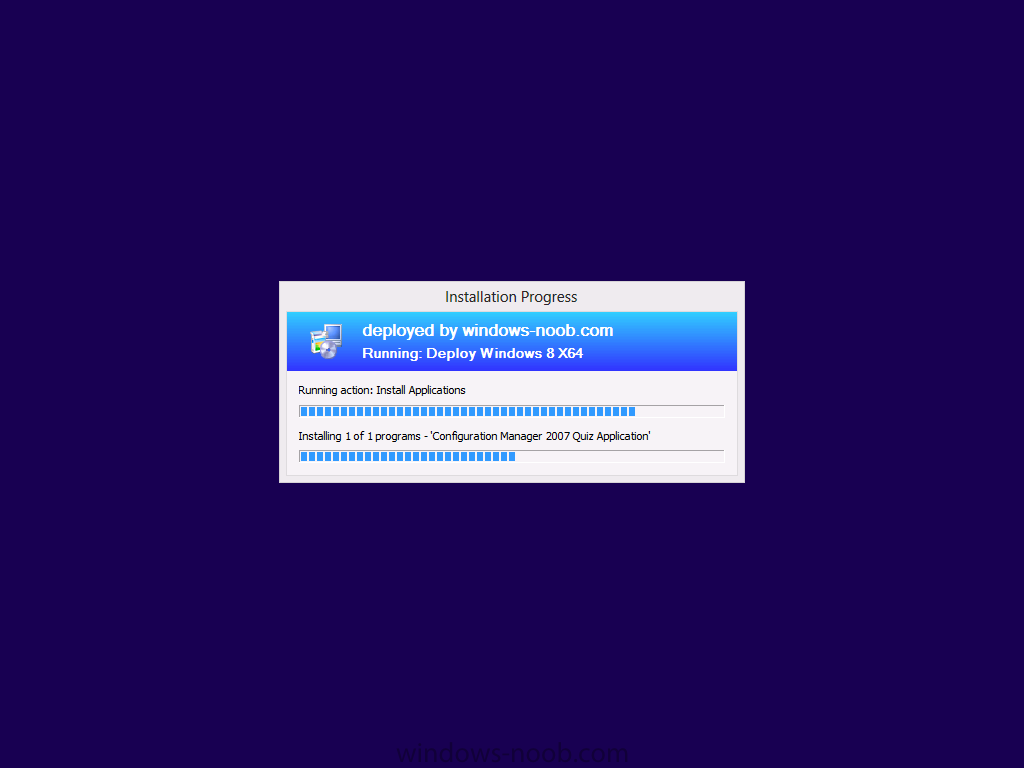
After that it will Install Updates (if any are targeted towards that collection) and Install your Applications
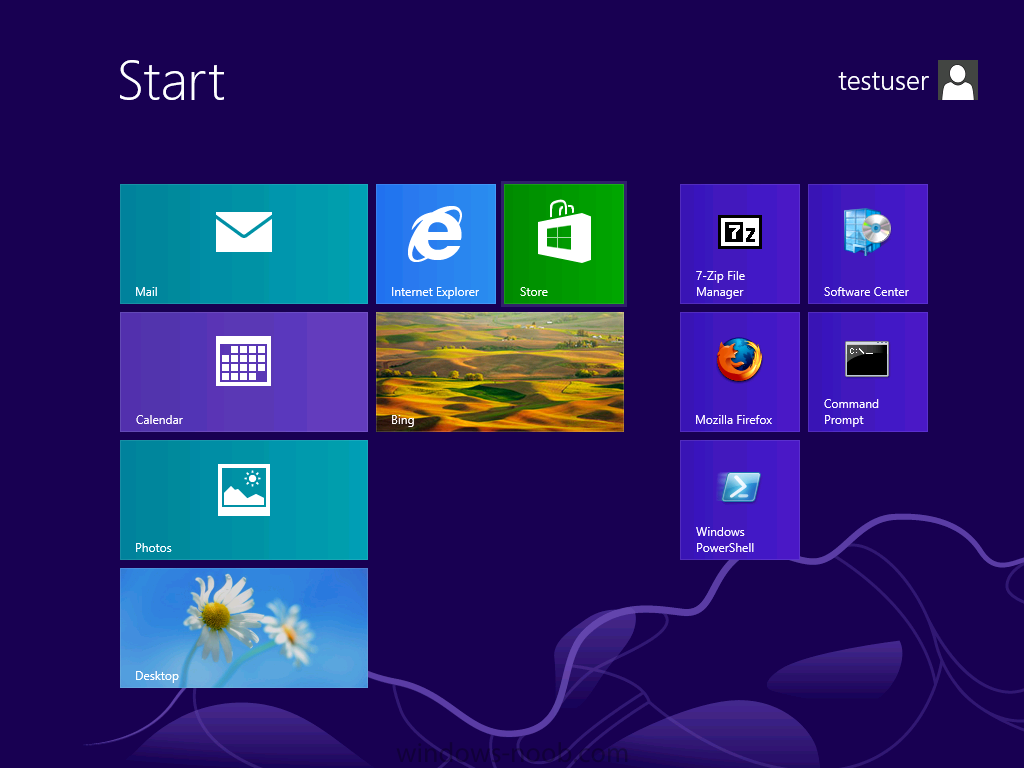
and the process is complete, login as a testuser and you will see the Start screen customizations which you did in Step 1. have been applied correctly, cool huh ?
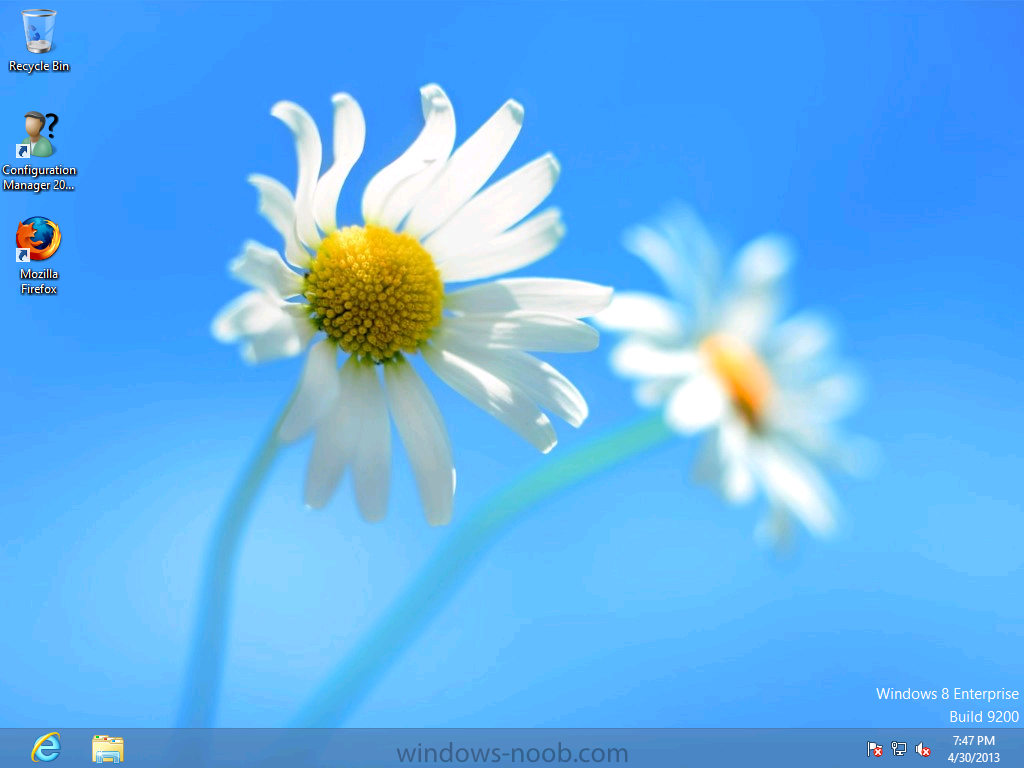
and any applications you installed in the Deploy Windows 8 X64 task sequence will also be installed
That’s it ! until next time, adios !
cheers, niall.
Summary
In this part of the series, you’ve learned how to customize the Windows 8 start screen to suit your organizations needs on a previously captured image, you’ve learned the steps required to successfully deploy that customized image and finally you’ve done most of the work using PowerShell Cmdlets (where available). Congratulations !
Recommended Reading:
- How to customize the start screen – http://technet.micro…y/jj134269.aspx
- How can I disable the “While we are getting things ready” animation for All users in Windows 8 – http://www.niallbrad…s-in-windows-8/
- Configuration Manager SP1 Cmdlet Reference – http://technet.micro…y/jj821831.aspx
- New-CMOperatingSystemImage – http://technet.micro…y/jj850128.aspx
- New-CMPackage – http://technet.micro…y/jj821986.aspx
- Start-CMContentDistribution – http://technet.micro…y/jj850100.aspx
- Start-CMTaskSequenceDeployment – http://technet.micro…y/jj870935.aspx
- Import-CMComputerInformation – http://technet.micro…y/jj821991.aspx

I have tried so many times to use the AppsFolderLayout method but if I do it, it takes over 2-3mins to login for the 1rst time (only) for every different user!
If I get rid of the AppsFolderLayout file, the login is under a minute.
Have you ever seen this?
thanks!
I would imagine that what you are seeing is normal, it’s copying the ‘changes’ to the default user profile to the New profile and this happens only once,