
In Part 1 of this series we got our AD and SCCM servers ready, and then we installed System Center 2012 Configuration Manager as a standalone Primary site. In Part 2 we configured the SCCM server further by adding some Windows Server roles necessary for the following Configuration Manager 2012 functionality, Software Update Point (SUP) and Operating System Deployment. In Part 3 we configured the server further by Enabling Discovery methods and creating Boundary’s and Boundary Groups. In Part 4 we configured Client Settings, Added roles and Distributed the Configmgr Client to our Computers within the LAB, then in Part 5 we enabled the Endpoint Protection Role and configured Endpoint Protection settings and targeted a collection called All Windows 7 Computers with these settings and policies.
In Part 6 we configured our SUP further to Deploy software updates to our All Windows 7 Computers and Build Windows 7 X64 collections. In Part 7 we used the Build and Capture process to create our Base Windows 7 X64 wim image. In Part 8 we created a USMT 4 package to migrate the users data using hardlinking and then we imported the captured image into ConfigMgr and created a Deploy Windows 7 X64 task sequence. We created a Deploy Windows 7 X64 Collection and set some User Device Affinity collection variables.
In Part 9 we created an Application, and created a deployment type for that application to only install if the Primary User
was True for that device (User Device Affinity), we then copied our
Task Sequence (duplicated it), deployed the new Task Sequence, added a
computer to the new collection and then PXE booted the computer to the
Deployment Menu. In Part 10
we monitored the Deployment process in a lot of detail to how UDA sent
state messages and we verified that our application installed on the
users Primary Device, in addition we modified our collection variables,
and added a prestart command to our boot image to prompt for the
SMSTSUdaUsers. In Part 11 we setup the Reporting Services Point Role and verified that reporting was working.
Now we will use a new feature in ConfigMgr which allows us to Patch operating system WIM images using Offline Servicing. This means that you can apply Windows Updates by using Component-Based Servicing (CBS) to update the your previously captured WIM images.
The Offline Servicing feature is applicable for Component Based Servicing (CBS) updates and for the following operating systems:
- Microsoft Windows Vista SP2 and later
- Microsoft Windows Server 2008 SP2 and later
- Microsoft Windows 7 RTM
- Microsoft Windows 2008 R2
DISM is used to inject the updates – Deployment Image Servicing and Management (DISM)
Note: At the launch of ConfigMgr 2012 Beta 2 Microsoft Windows 7 SP1 and
Windows Server 2008 R2 SP1 are not supported. They will be supported
with Configuration Manager 2012 RTM.
Step 1. Review our current Captured WIM file.
Perform the following on your SCCM 2012 server as SMSadmin.
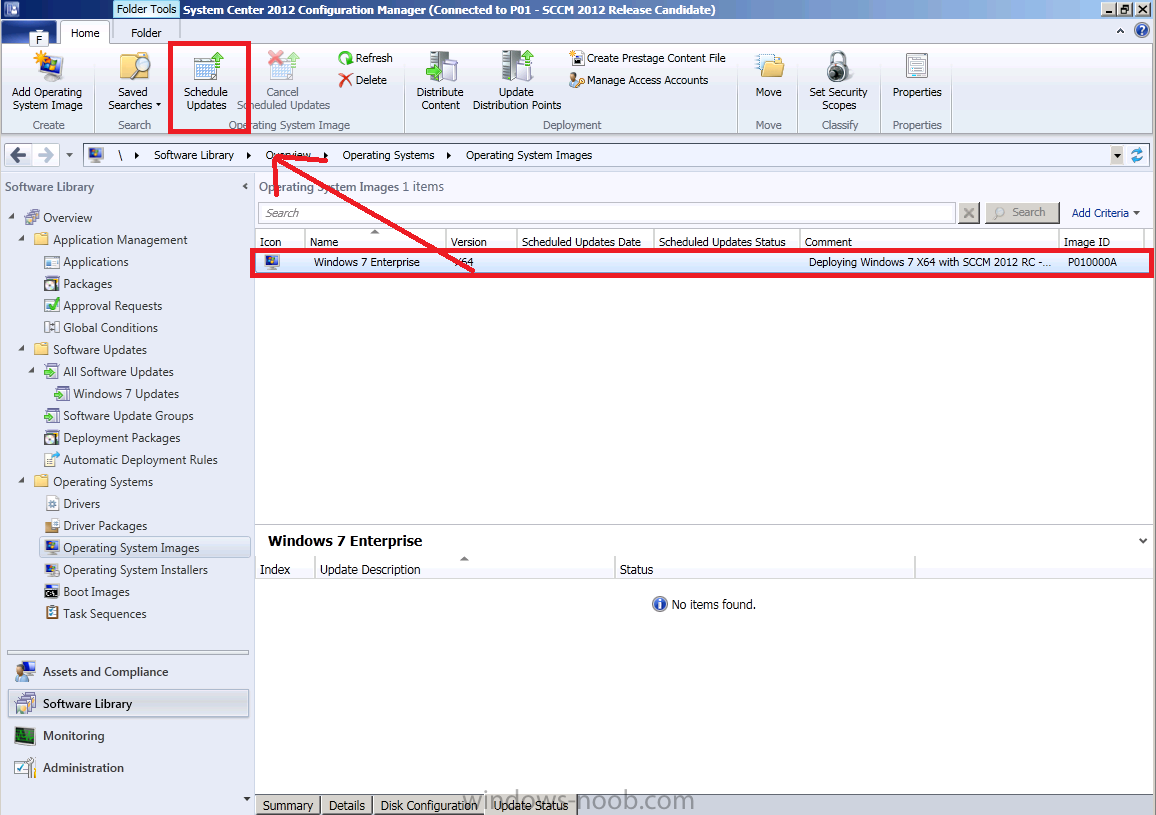
In the ConfigMgr console, expand the Software Library and then expand Operating Systems, select Operating System Images. This will contain our previously captured Windows 7 X64 WIM image. Select our Windows 7 X64 WIM image and note the four tabs which appear.
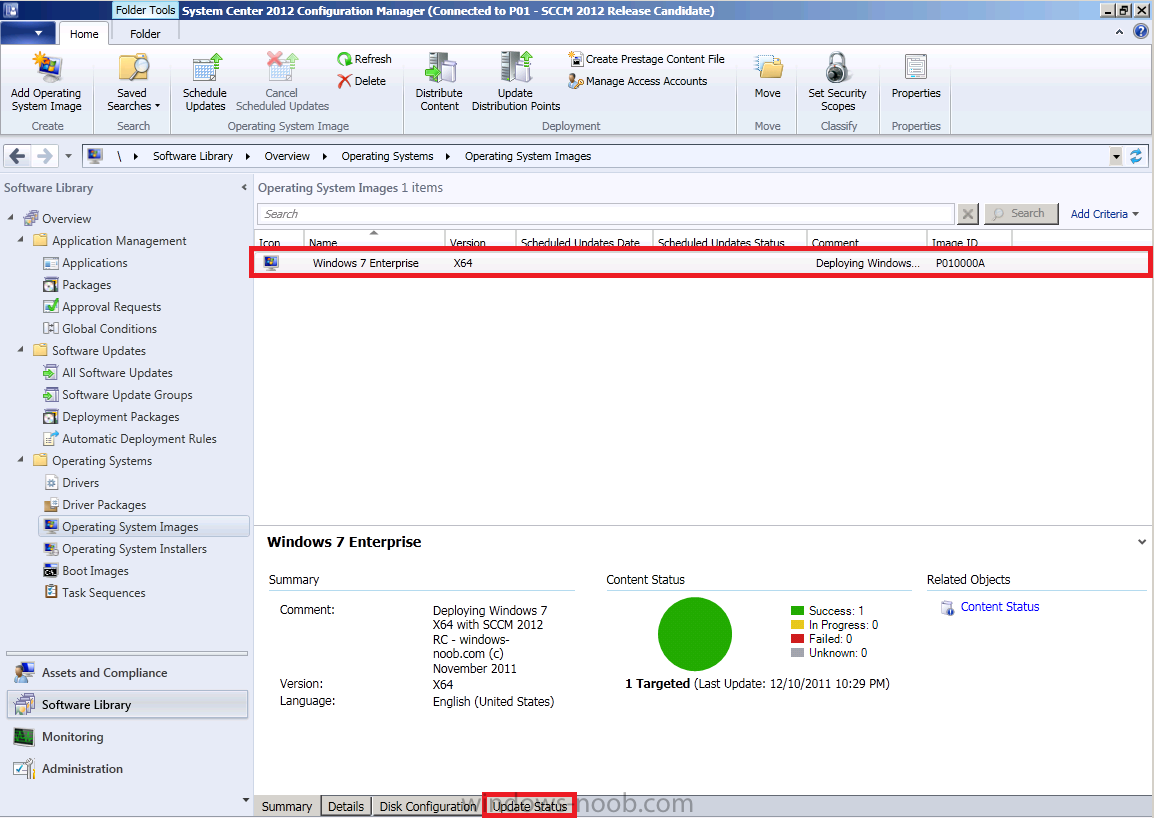
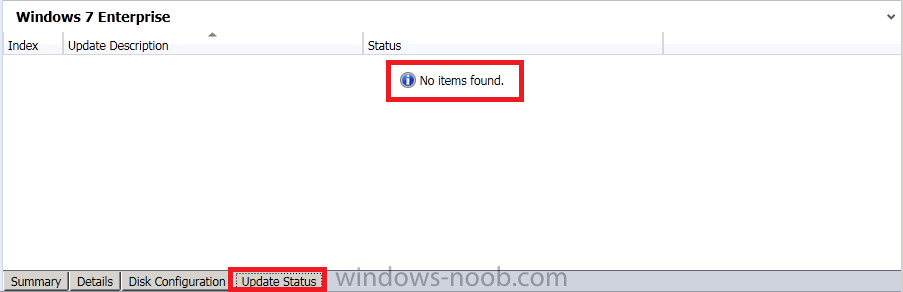
Click on the Update Status tab. This tab
will list any updates that have been added to our image via Offline
Servicing, we haven’t completed any Offline Servicing on our WIM image
yet so for this reason it will appear empty.
Note: Even though our
Captured image has updates installed in it already, unfortunately the
Update Status tab will not list udpates that are in the captured image
unless those updates that have been added via Offline Servicing after the WIM image was added to ConfigMgr.
Step 2. Perform a Software Update Point Synchronization
Perform the following on your SCCM 2012 server as SMSadmin.
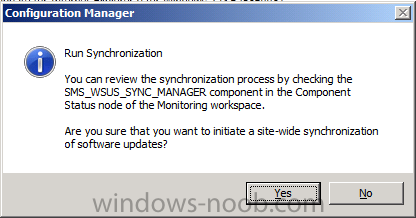
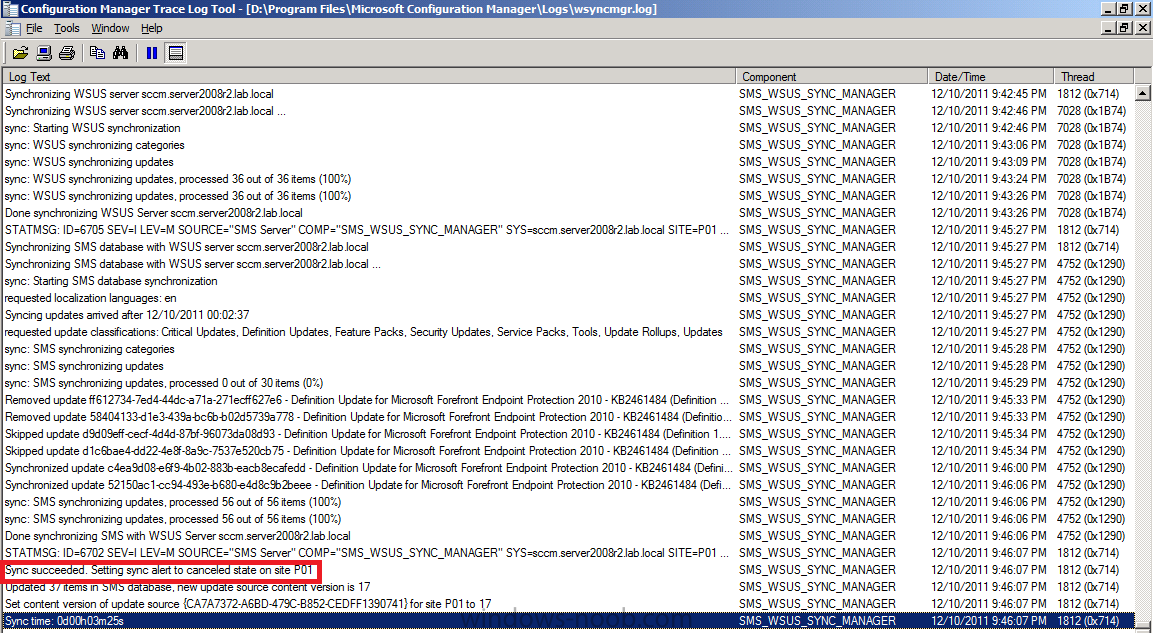
Before we perform Offline Servicing, we want to make sure we have the latest updates Synced. In Software Updates, All Software Updates. In the Ribbon, click on Synchronize Software Updates.
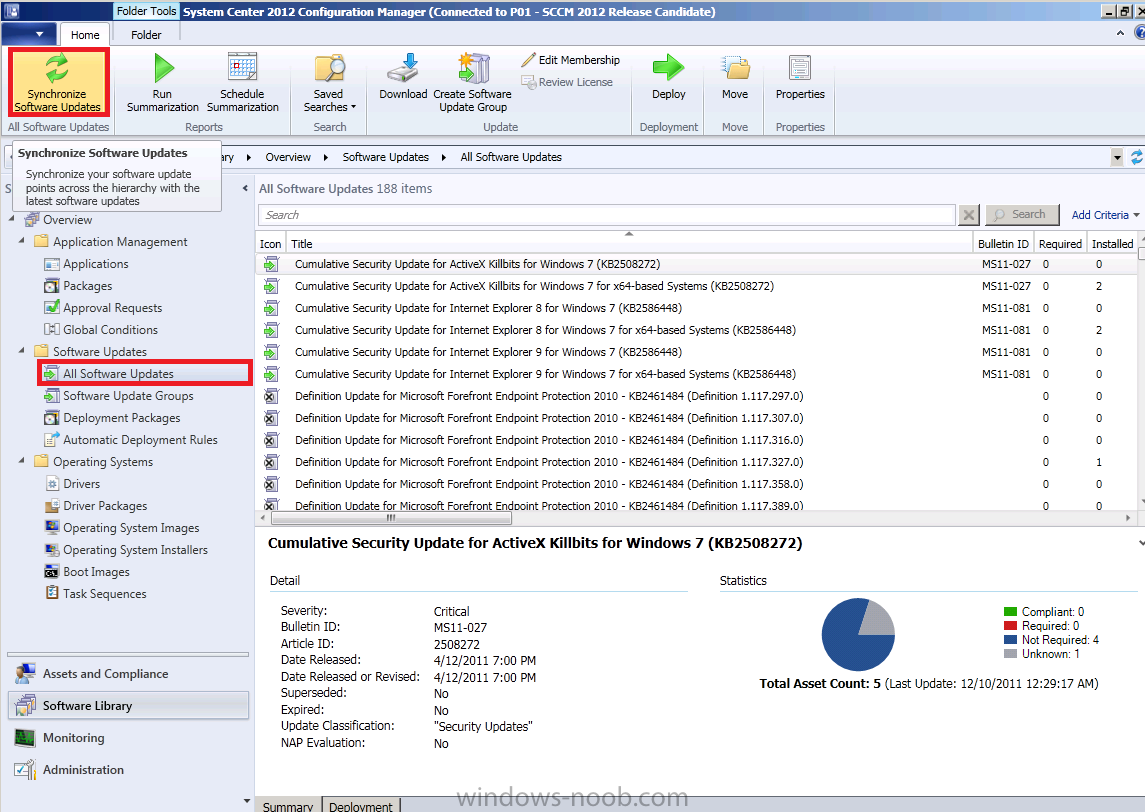
answer Yes to the Sync request
while it’s syncing, using CMTrace, monitor the WsyncMgr.log file found in D:\Program Files\Microsoft Configuration Manager\Logs, look for the Sync Suceeded line to be sure it’s finished. If you have synced recently it will be quick.
Step 3. Start Offline Servicing
Perform the following on your SCCM 2012 server as SMSadmin.
Select our Captured Windows 7 X64 image and click on Schedule Updates in the ribbon
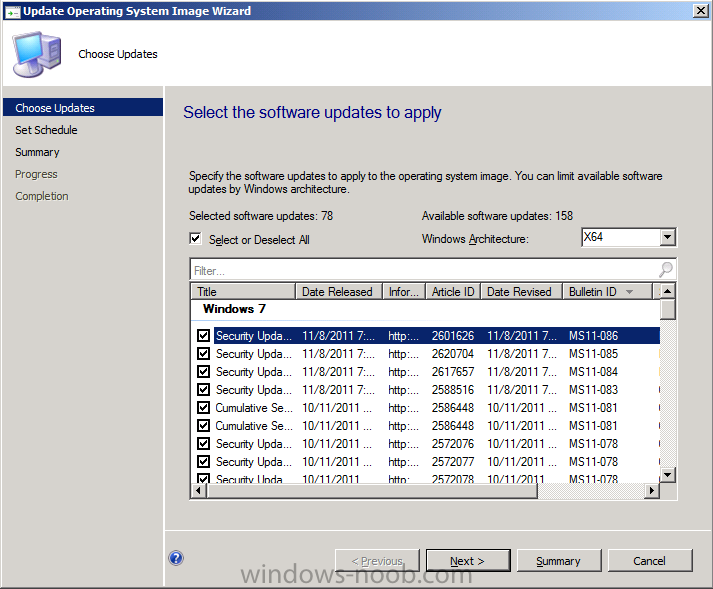
The Update Operating System Image Wizard
appears, note that it automatically selects the architecture of your
image (X64) and you can list all the updates it has found available to
this Operating System. If you want you can sort by any of the column
headings, for example click on Bulletin ID to see what are the latest
Bulletin ID’s being made available to Offline Servicing.
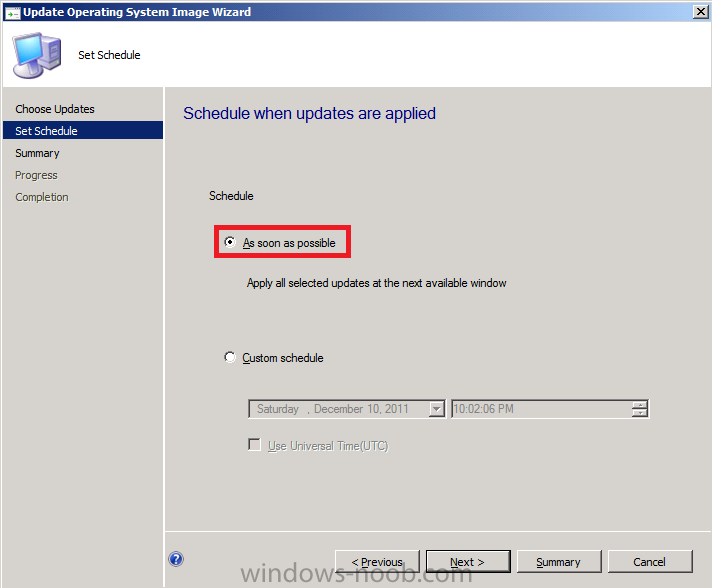
click next, and you are presented with the Set Schedule screen, this is
great for ConfigMgr admins as it means you can decide when your server
will do the Offline Servicing work (disk intensive) so for example you
could schedule it to occur on Saturday evening when everyone is home. If
you want to set a schedule click on Custom Schedule, however as we are
in a LAB we will choose As soon as possible.
Note: Injecting updates
into the WIM images offline is disk intensive so you should not perform
this operation except when the server is ‘at rest’. Also allow for free
space on your Configmgr Server drive as the WIM image will be
duplicated (backup copy created) during this process.
you’ll be presented with a summary of Updates offered to the Offline Servicing Process
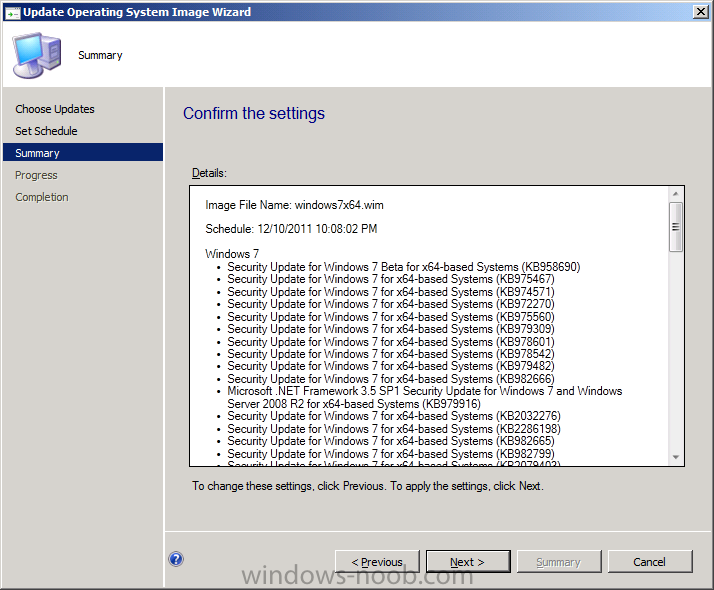
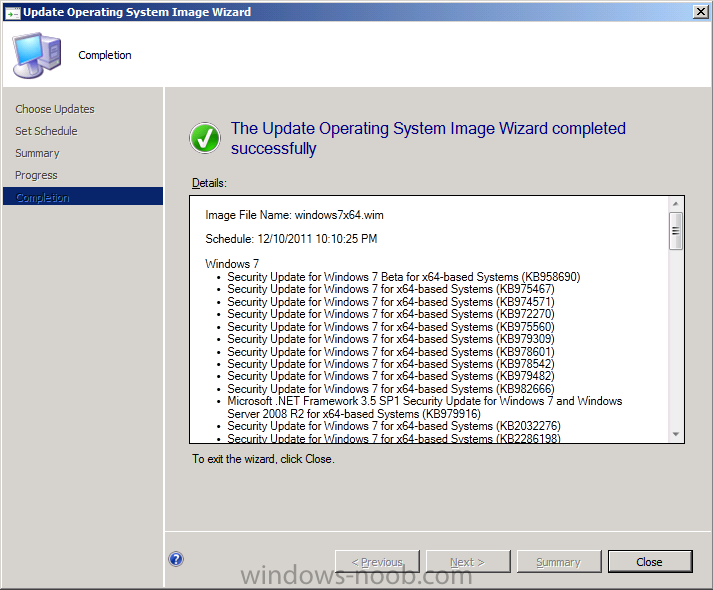
click next to continue and review the completion screen, the wizard is quick, the injection however takes time as you will see.
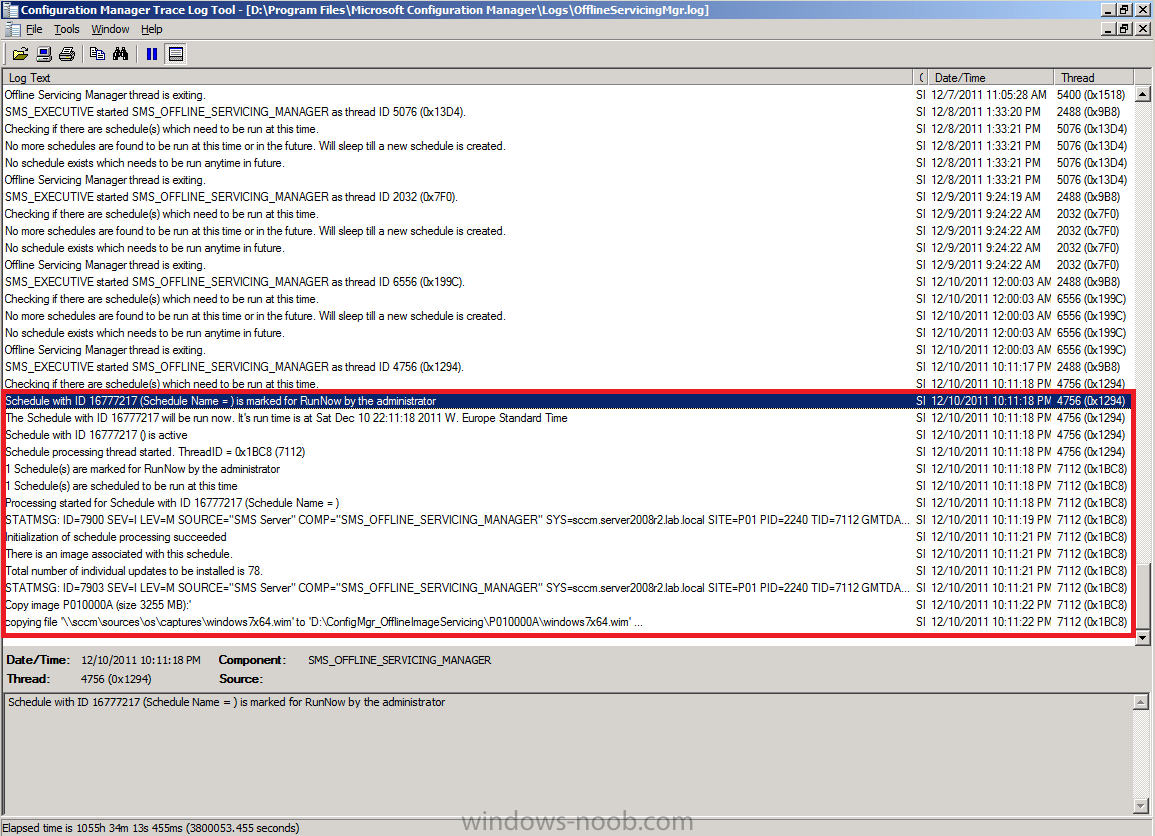
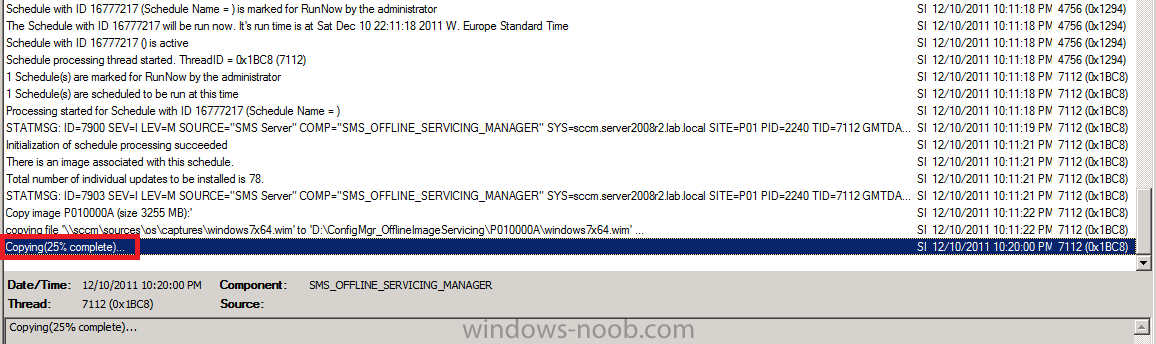
Step 4. Monitor the Progress with the OfflineServicingMgr.log file
Perform the following on your SCCM 2012 server as SMSadmin.
ConfigMgr 2012 introduced some new logs one of which is the OfflineServicingMgr.log file, open it in CMTrace so that we can monitor the progress of our Offline Servicing. You will note it mentions copying our current WIM image to a temporary folder called ConfigMgr_OfflineImageServicing, and
it’s at this point your ConfigMgr server will become slower to use
(especially in a LAB as typically your hardware isn’t that fast in a LAB
and this is very disk intensive).
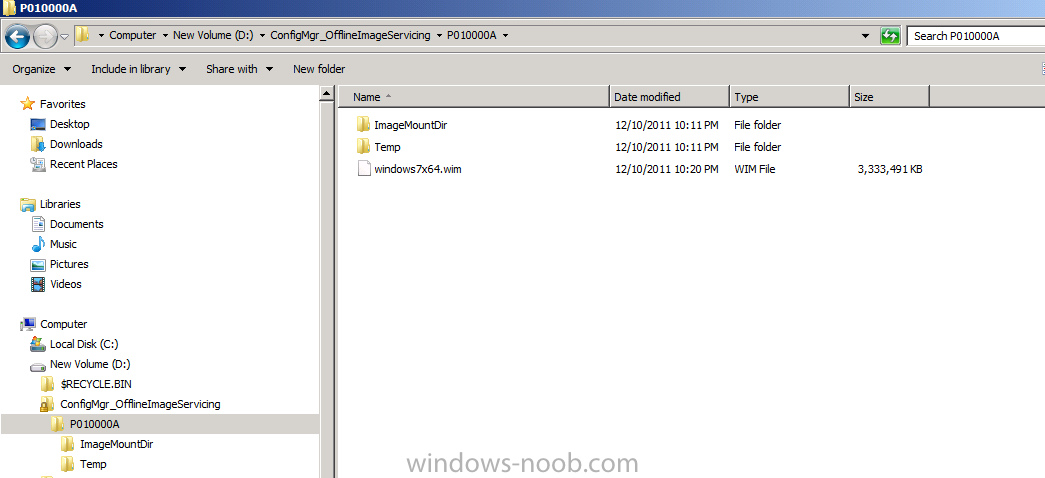
if you browse this temp folder in Windows Explorer you can see the WIM
file and some other temp folders used for the CBS injection process (via
DISM)
Note: make sure to
close Windows Explorer or browse to a different folder than the one
above as if you are browsing it during Commit, then the process will
fail to delete the temp files/folders.
keep watching the log in CMTrace as it will tell you what percentage is done, for example, 25% of the copying is completed
once it’s done copying the WIM file it mounts it to inject the CBS updates
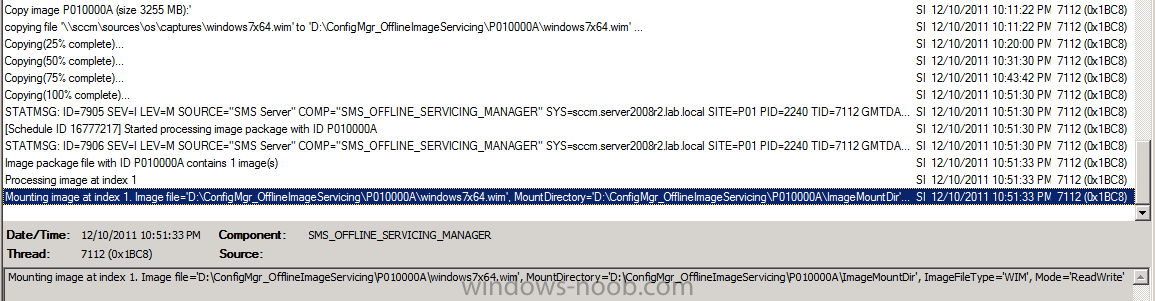
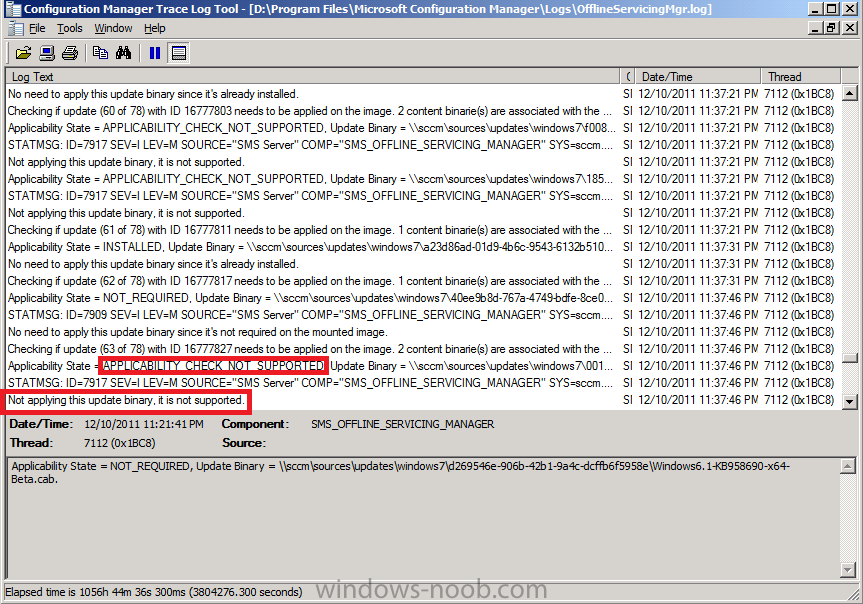
and after some time it will check all available updates to see if they are applicable or not, each update will have an Applicability State which can be listed as any of the following:-
- NOT_REQUIRED
- INSTALLED
- APPLICABLE
- APPLICABILITY_CHECK_NOT_SUPPORTED
finally you can see how many updates are being applied to the mounted image
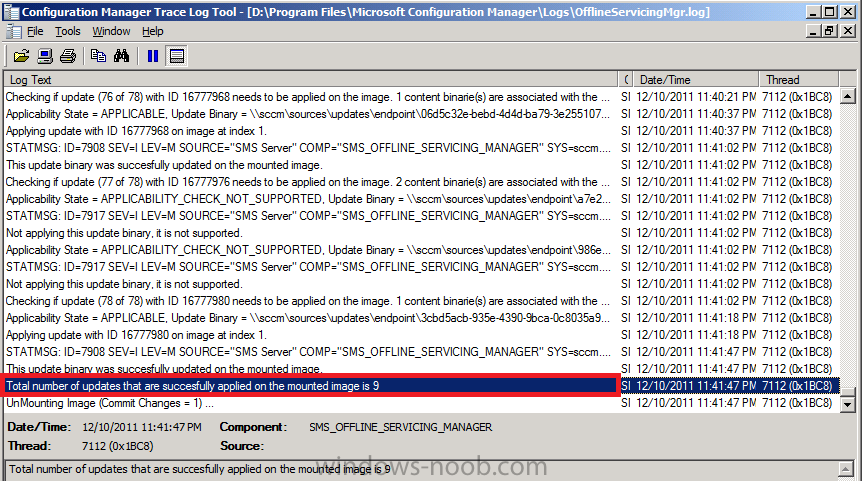
and then it commits those changes, verify that all is well in the OfflineServicingMgr.log
file before continuing, note that in addition to unmounting the image
(commiting changes) it then creates a backup copy of the original WIM
file (with a file extension of BAK). Also look for the line saying Schedule Processing Completed, this notifies you that all is done.

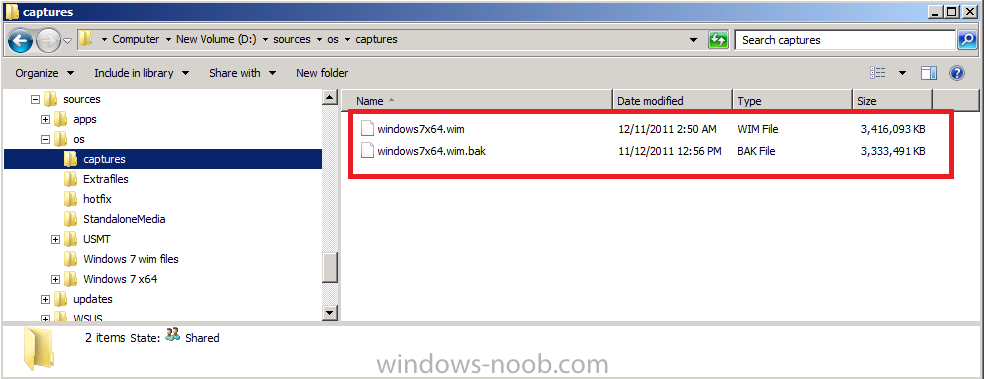
Now Browse to where your original captured WIM file is stored and you
should see the original WIM file is renamed to BAK and the new file
(larger file as it has updates applied) is in it’s place. If you need to
keep the original file copy it elsewhere or give it a new name.
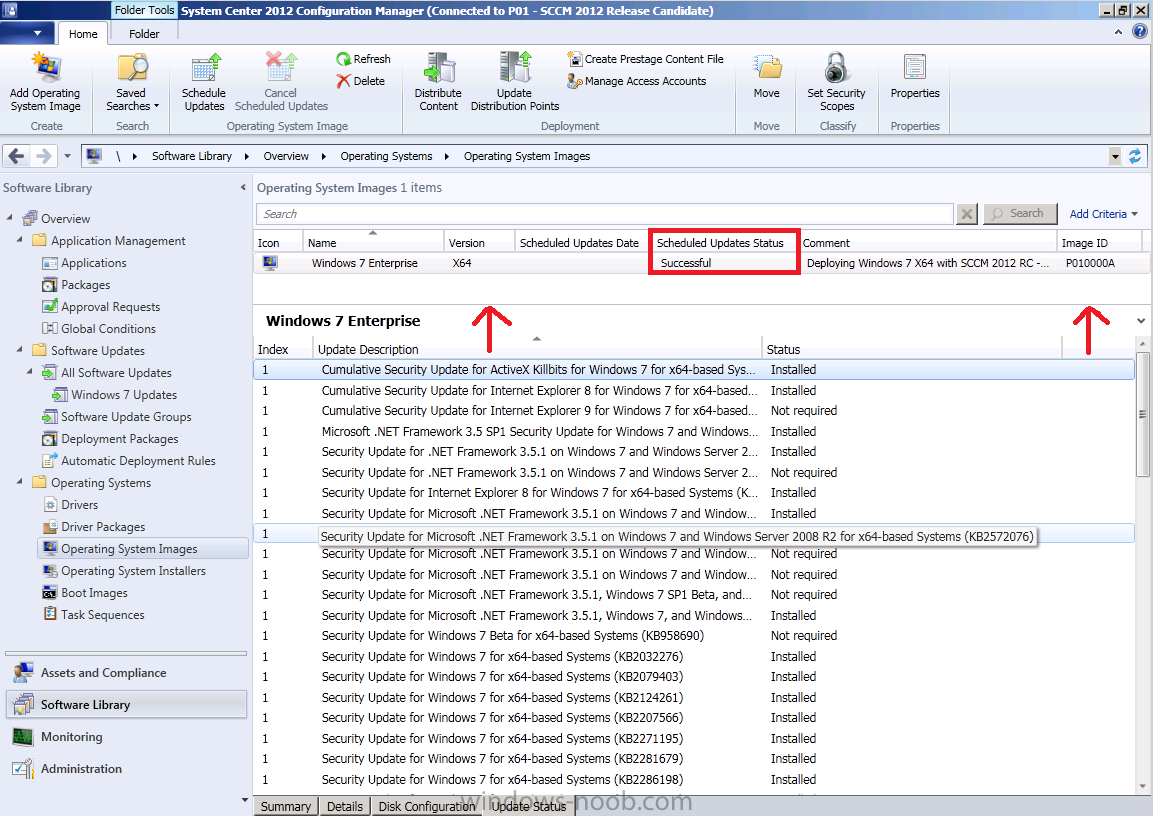
Step 5. Review our updated Image in the ConfigMgr Console.
Now that the OfflineServicing process is complete, lets examine the WIM
file in Operating System Images (click refresh to update the display).
You should see that the Scheduled Update Status says Successful, and
that the Update Status tab lists the state applicability of the 78
updates it referenced in the OfflineServicingMgr.log file.
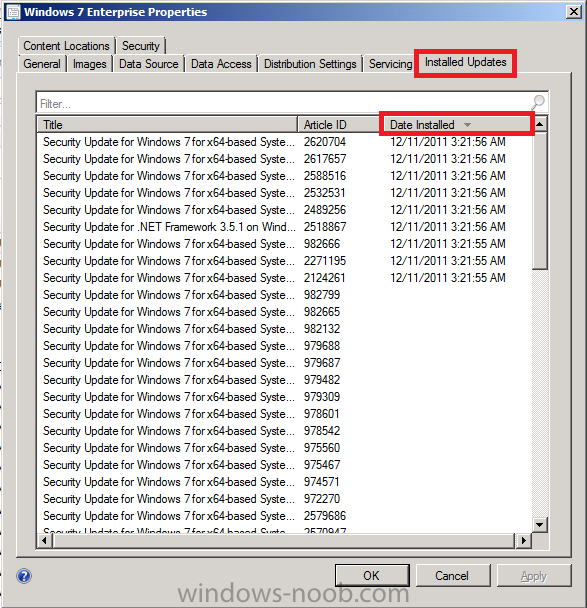
Right click on our Windows 7 X64 Enterprise image and choose Properties, click on the Installed Updates
tab, here you can see when any updates were added via Offline Servicing
(in our case, it was 9 updates and they are indeed listed in the Date Installed column.
Step 6. Update your image to your Distribution Points
The last part of this process is to update your newly updated image to our Distribution Points,
this is not done automatically you must do it yourself, this means that
the scheduled task can run (Offline Servicing) and when it’s done, you
have to review the changes made before you decide if you want to update
the image to your DP’s or not.
Select our image and click on Update Distribution Points in the ribbon

click ok When prompted

That’s it, you’ve now injected Windows Updates (CBS) using a new feature
in ConfigMgr 2012 called Offline Servicing, once the WIM image has
completed updating to the DP’s your Task Sequence will reference the New
updated image and your Enterprise (LAB) will be using the most secure,
most up to date image available.
The original post is here on windows-noob.com
