

In Part 1 of this series we created our new LAB, we got the System Center 2012 Configuration Manager ISO and extracted it, then copied it to our Active Directory server. We then created the System Management container in AD, delegated permissions to the container, extended the Schema for Configuration Manager. We then opened TCP ports 1433 and 4022 for SQL replication between sites, installed some prerequisites like .NET Framework 4.0, added some features and then downloaded and installed SQL Server 2008 R2 SP1 CU6. We then configured SQL Server using SQL Server Management Studio for security and memory configurations prior to running the Configuration Manager 2012 setup to assess server readiness. Finally we installed a central administration site (CAS).
In Part 2 we setup our Primary server with SQL Server 2008 R2 SP1 CU6. We then installed Configuration Manager 2012 on our primary server (P01) and verified that it was replicating to our central administration site (CAS) server. Then we configured Discovery methods for our Hierarchy and then configure Boundaries and Boundary Groups. In Part 3 we configured Discovery methods and configured boundaries and created a boundary group, we then configured them for Automatic Site Assignment and Content Location.
In Part 4 we added the Application Catalog roles to our Hierarchy. We then configured Custom Client Device Settings and then deployed those settings to the All Systems collection on site P01. After that we created Custom Client User Settings and deployed them to the All Users collection in order to allow users to define their own User and Device affinity settings.
In Part 5 we installed the WSUS server role (it is required for the Software Update Point role). We then installed the Software Update Point role on our CAS and Primary servers and we configured the SUP to support ConfigMgr Client Agent deployment which is a recommended Best Practice method of deploying the Configuration Manager Client Agent. In Part 6 we prepared our server for the Endpoint Protection Point role, and installed that role before configuring custom client device settings and custom antimalware policies. We then deployed those custom client device settings and custom antimalware policies to our newly created Endpoint Protection collections.
In Part 7 we added operating system deployment ability to our hierarchy by adding Windows 7 X64. We used the Build and Capture process to capture a WIM image which we can later deploy to targeted computers using network boot (PXE). PXE boot requires specific settings on our distribution points and the boot images used to deliver the operating system WIM images were therefore also enabled for PXE support.
In Part 8 we added Applications to our Software Library and configured the requirements in the Deployment Type to add new abilities to the application delivery process. We monitored the approval process of our applications and saw how requirements can influence whether an application is installed or not and we noted the difference between deploying to Users versus Devices. Now we will take a look at how Automatic Deployment Rules can be used to automate the deployment of windows updates on Patch Tuesday using a recurring schedule to patch your infrastructure using Software Updates.
Step 1. Create some Folders and Collections.
Perform the following on the CAS server as SMSadmin
To make the management of Software Updates easier we will first create some Folders and populate them with Collections. You can do this manually in the Assets and Compliance workspace or you can do it in an automated way using PowerShell. The below script will create a nice Folder and Collection structure sorting the Client Operating Systems and 3 Windows Server Operating Systems, in addition, the server Operating Systems are further divided into Automatic patching, Manual patching and Maintenance Windows collections. Here’s the script (kindly provided by a colleague of mine, Niklas Landqvist), I’ve customized the XML file to create the Folders and Collections we want for this part of the series.
 powershell scripts.zip 5.35K 5 downloads
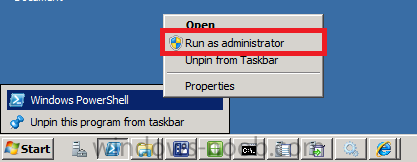
To use the script open a Windows PowerShell session as administrator by right-clicking on the Windows PowerShell icon and choosing Run As Administrator as in the screenshot below.
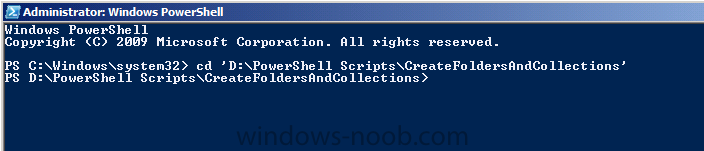
Change to the Directory where you’ve unzipped the script using CD (to change directory).
Once done we need to Set the Execution Policy to allow this script (RemoteSigned) to run.
Set-ExecutionPolicy RemoteSigned
and answer Yes to the prompt.

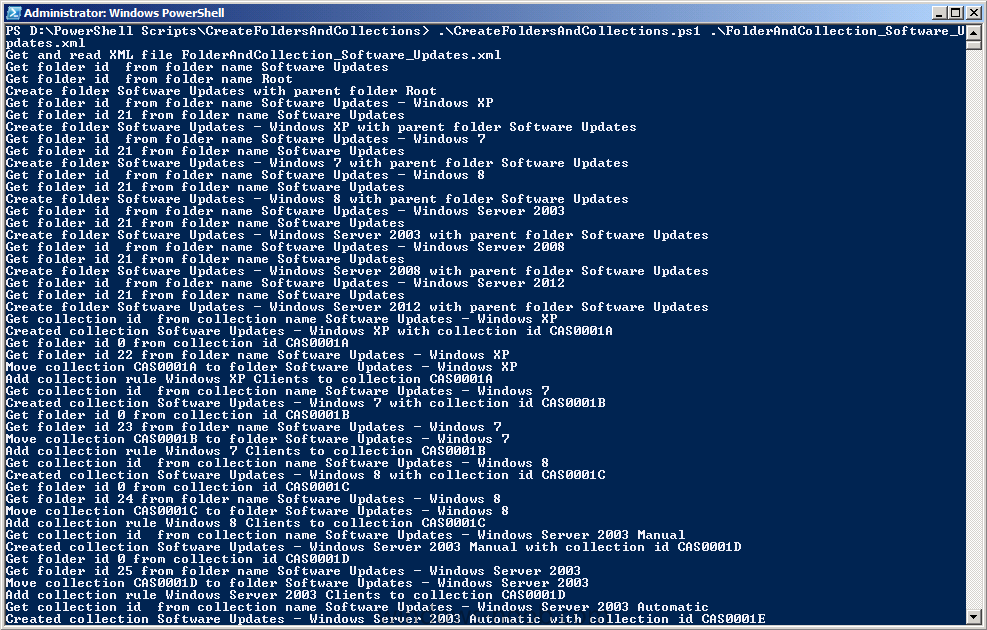
and then run the script as follows:-
.\CreateFoldersAndCollections.ps1 .\FolderAndCollections_Software_Updates.xml
the screen will update once you press enter…
and once the script is complete you can open the console in Assets and Compliance and refresh, you’ll see the following Folders and Collections are already created.
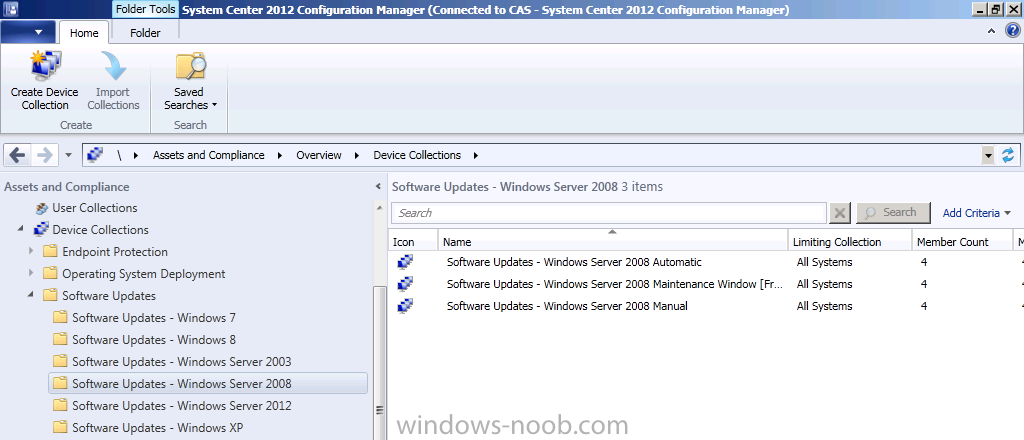
Note: All of the collections have Membership queries to automatically populate the collections based on Operating System version. You may want to edit the queries further in order to exclude (or include) computers otherwise you will have overlap between those three Windows Server Collections where servers show up in all three of the respective collections.
Step 2. Perform a SUP Sync.
Perform the following on the CAS server as SMSadmin
Before starting our activity we want to make sure that the updates that we are looking at are current and relevant therefore we’ll synchronize our Software Update Point with Microsoft Windows Update.
Tip: There are two types of sync, Full or Delta. A Full sync is performed on schedule (as defined in the Software Update Point scheduled synchronization), whereas a Delta sync occurs when you initiate a sync in the console. If a sync fails for whatever reason then it will be retried every 60 minutes.
Note: In a hierarchy, when you trigger a sync it will affect all sites in the hierarchy starting with the CAS.
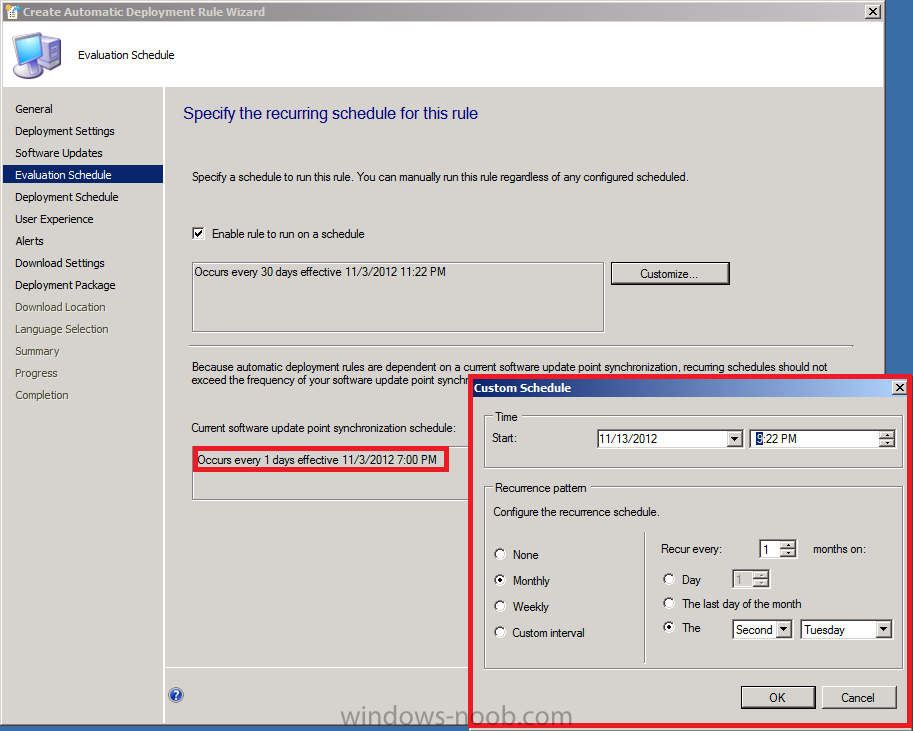
To trigger a Full Sync in the Administration workspace, select Sites, select the CAS server, right click and choose Configure Site-Wide components, and select Software Update Point. Select the Schedule tab and click on Custom Schedule (in Part 5 we configured this to synchronize every 1 day, however setting a Custom schedule allows you to not only sync once a day but to decide what time that sync occurs at).
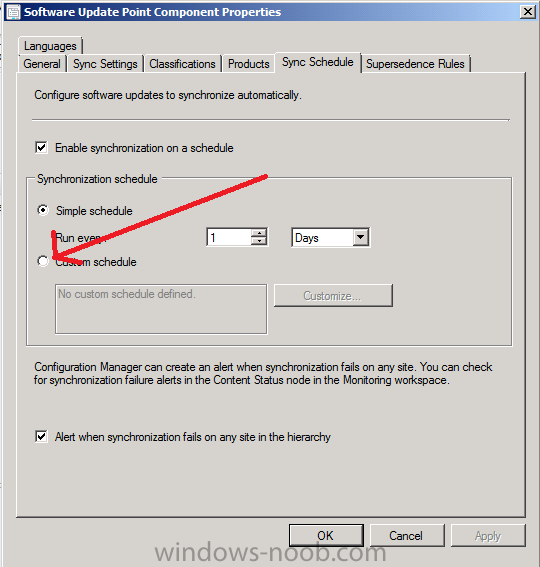
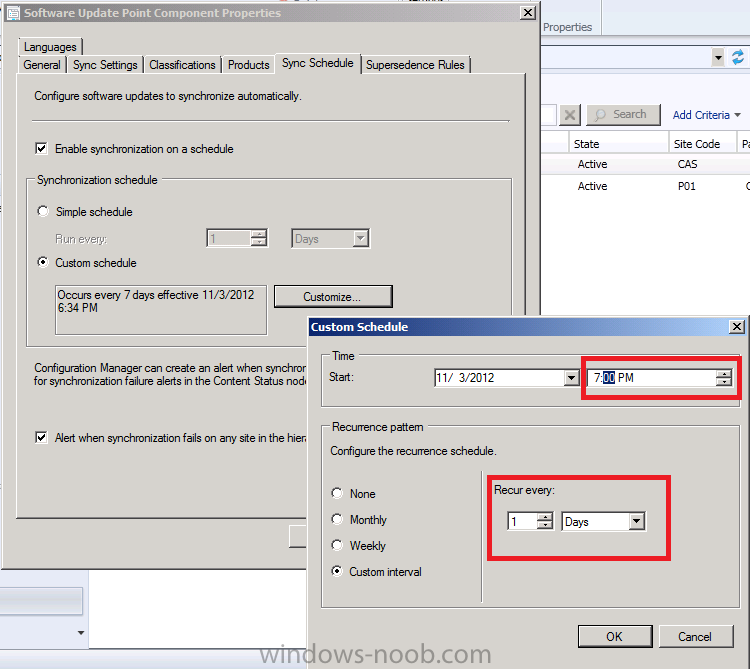
Click on Customize and set the Custom Schedule to Every 1 day at 7:00 pm as in the screenshot below. This will force a full sync at 7:00pm (if you want it to happen now, then set the schedule time to approx two minutes after the current time.)
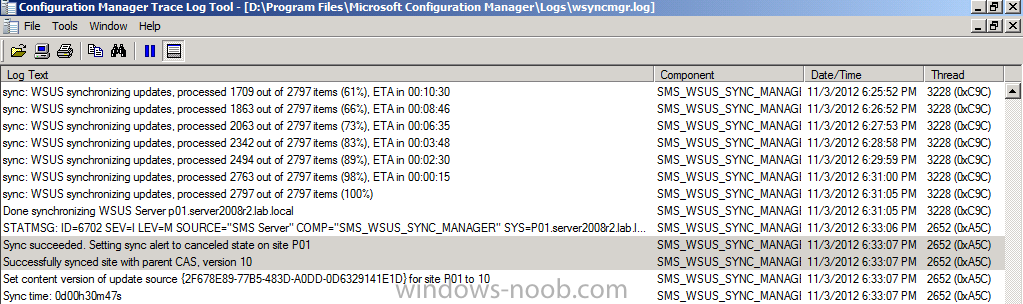
To monitor a syncs progress open the WsyncMgr.log. Before continuing, confirm that the sync has succeeded on your CAS server by looking for the following line in WsyncMgr.log
Quote
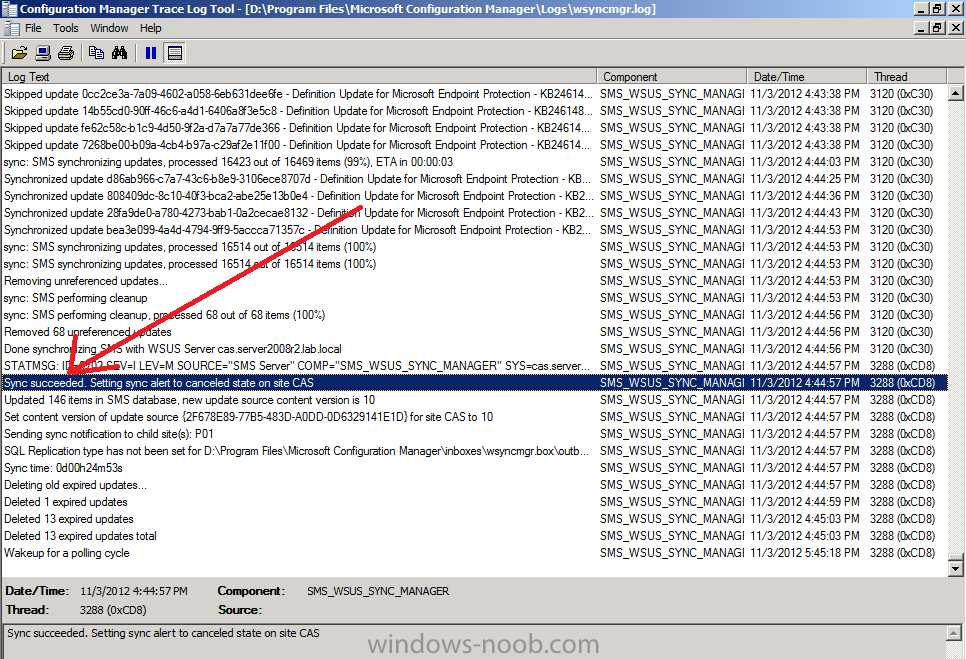
Once the Sync has succeeded on CAS it will trigger a signal on the primary site P01 to Sync to it’s upstream server (CAS). You can verify this by opening the WsyncMgr.log file on the Primary server and look for the following lines:
Quote
Performing sync on parent request.
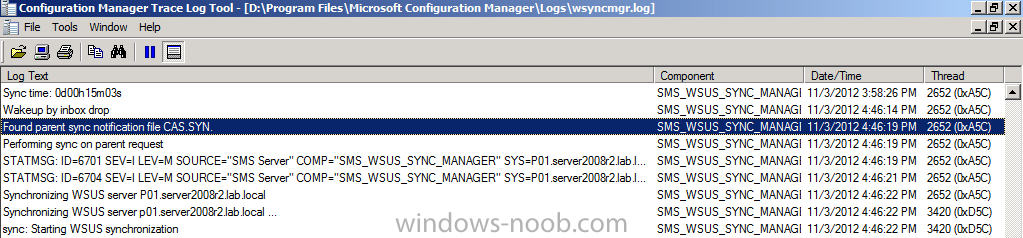
Once the Primary server has finished syncing from it’s parent server (CAS) it will log the fact. Look for the following lines in WsyncMgr.log on the Primary server P01 for evidence of a succesful sync.
Quote
Successfully synced site with parent CAS, version 10.
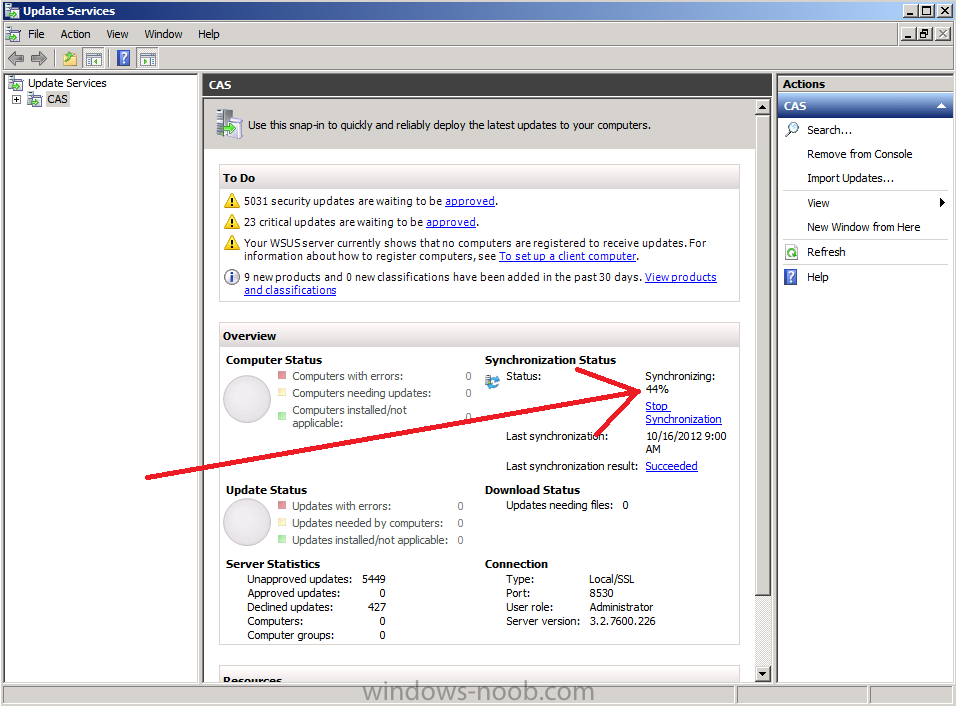
Tip: To watch the sync in real-time you can start the Windows Server Update Services Console, this will show you any error messages pertaining to the synchronization process (such as services that are not started when they should be) and will give you a percentage reading as the sync takes place.
At this point we are confident our SUPs are synched and we can go ahead and start deploying Updates.
Step 3. Deploying Updates automatically using an ADR
Perform the following on the CAS server as SMSadmin
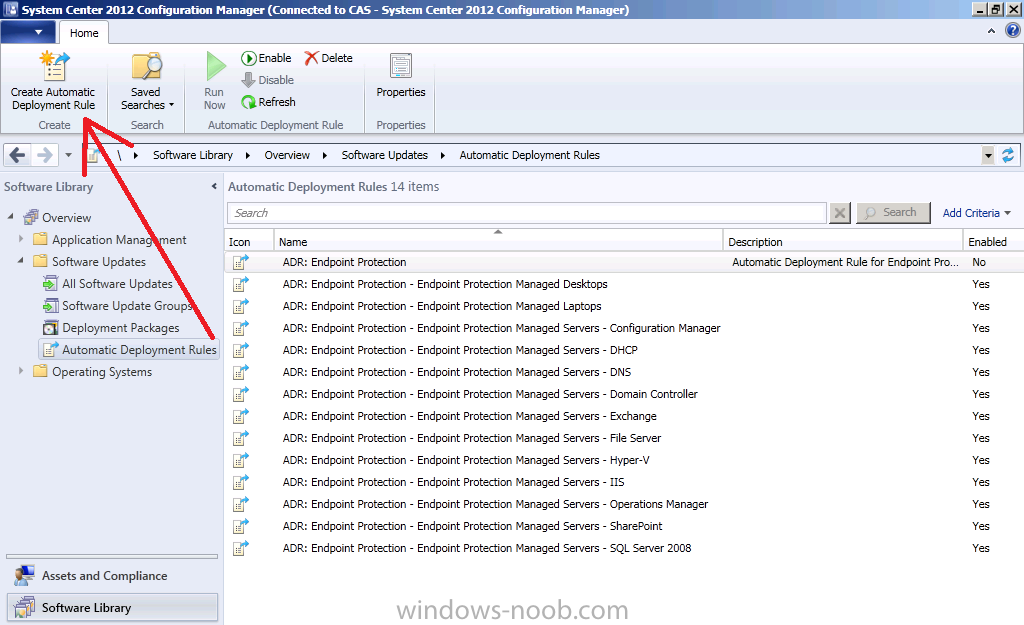
We’ve already created some ADR’s previously for Deploying Endpoint Protection definition updates in Part 6 of this series, but now we will create a new ADR to automatically deploy Windows 7 Updates once a month on a recurring schedule (after patch Tuesday, Microsoft releases new updates every month on the second Tuesday of the month). Once you understand how this works you can customize it to suit your needs to keep your systems patched in an automated way on a recurring schedule.
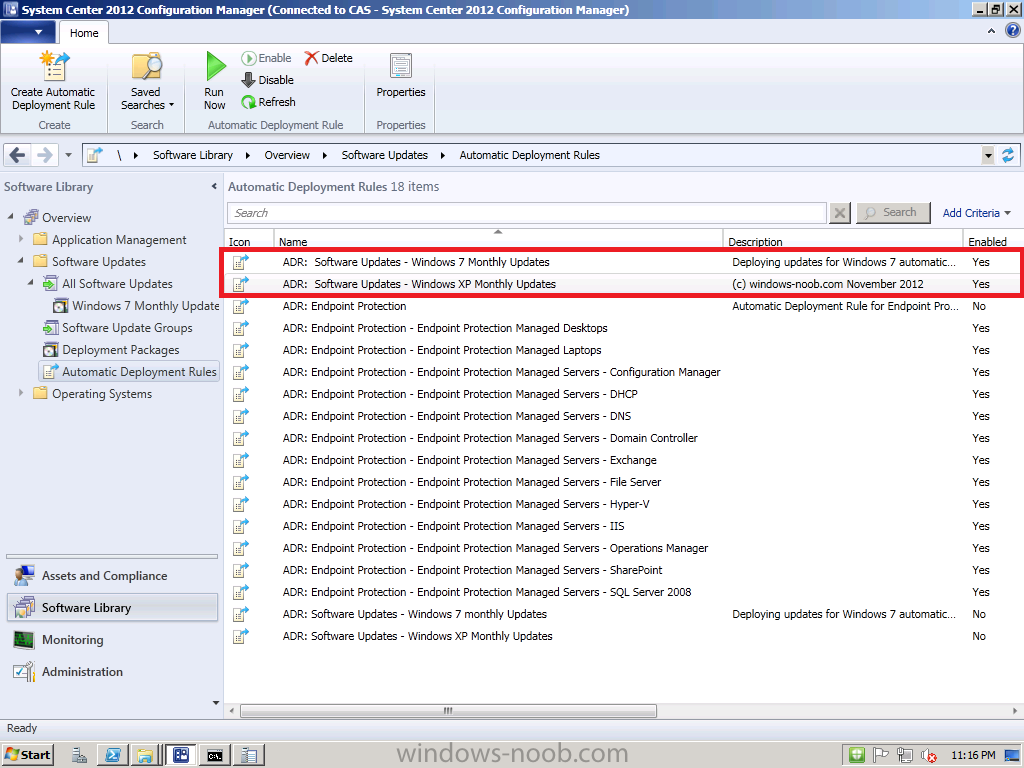
In the Software Updates section of the console, select Automatic Deployment Rules and in the ribbon click Create Automatic Deployment Rule.
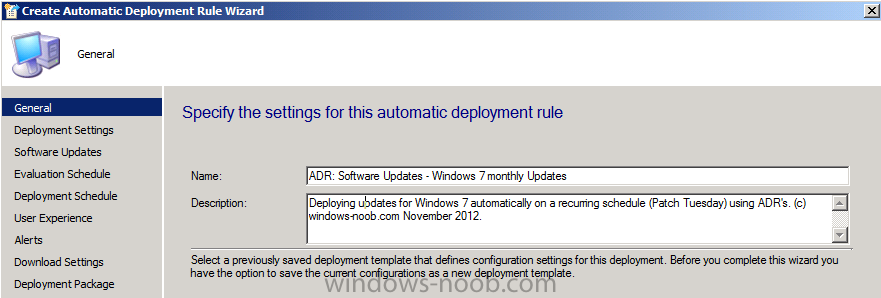
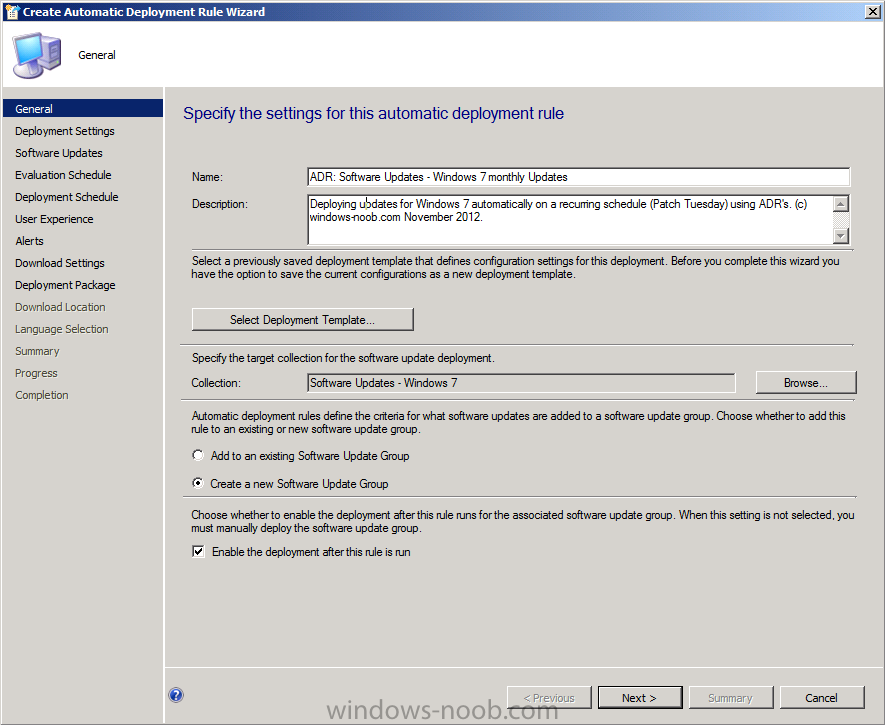
when the wizard appears give the ADR a suitable name (I like to Pre-pend ADR: Software Updates so they are easy to see in Deployments/Monitoring) such as ADR: Software Updates – Windows 7 monthly Updates.
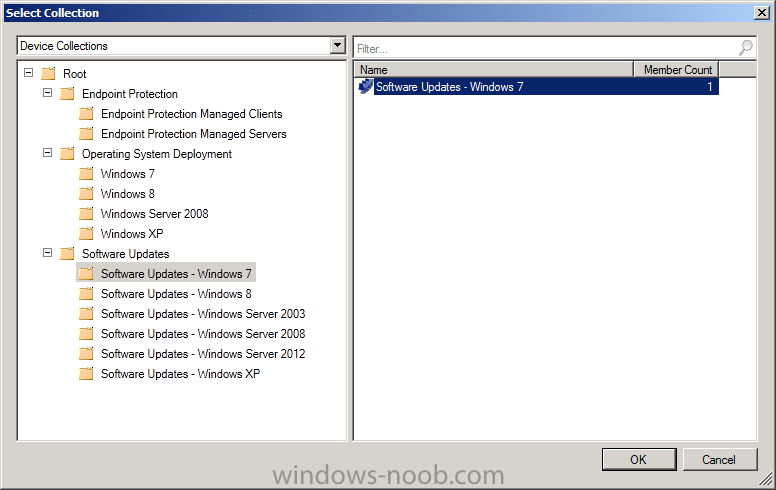
for Collection click on browse and you’ll notice our nice folder and collection structure makes it easy to select the right collection, select the Software Updates – Windows 7 collection.
As this ADR is for Patch Tuesday and occurs on a recurring schedule every month, we will choose to create a new software update group every time it runs, this means that we can have a single software update group to measure compliance against when the rule runs.
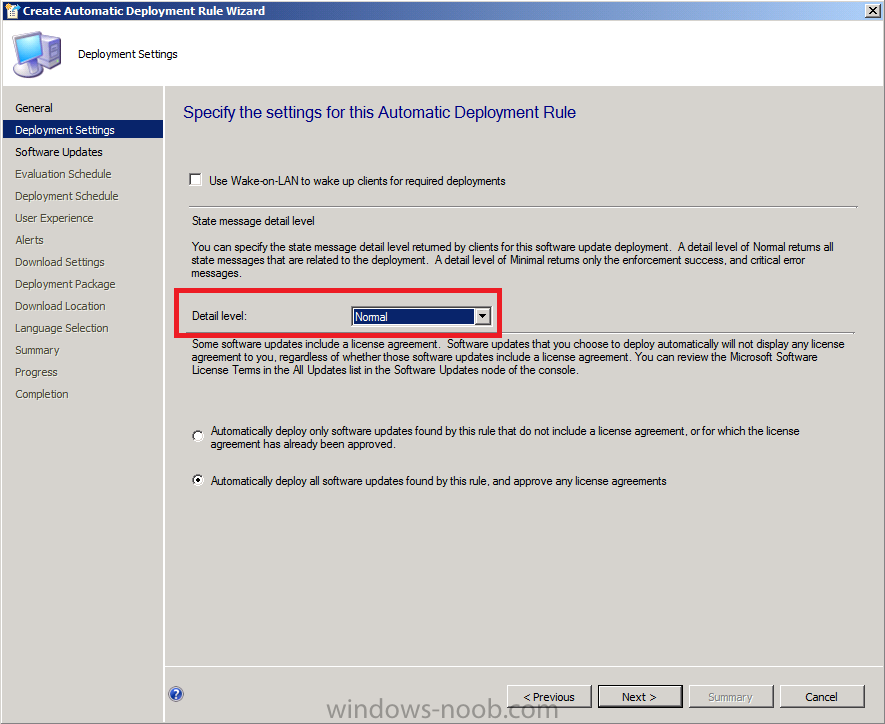
for Deployment Settings set the verbosity level of state messages to Normal (default is minimal) as we want to be able to determine what went wrong if some computers are not compliant after the rule is run and having all those state messages will help.
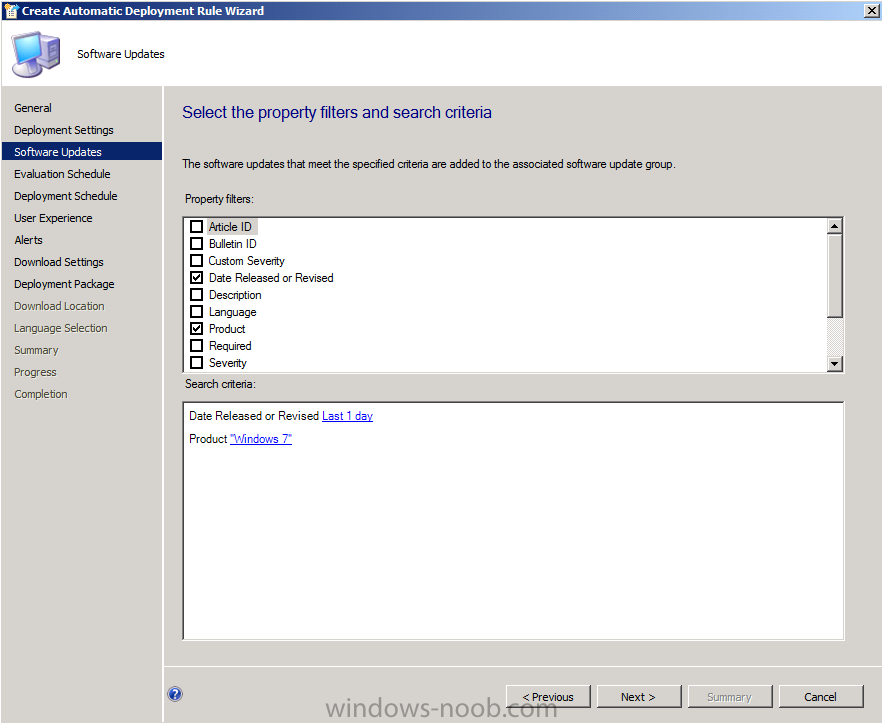
for the software Updates screen select the following options:-
- Date release or revised Last 1 day
- Product Windows 7
this means that when the rule runs it will find all Windows 7 updates released in the last 1 day, this wil become clearer in the next step
on the Evaluation Schedule screen click on Customize and set the schedule accordingly, set it to start running on the second Tuesday of the current month, and to recur monthly on the second Tuesday of every month at least two hours after the SUP has synched (which should give it time to sync). You can see that the SUP sync time is highlighted and that helps you to plan your ADR deployment.
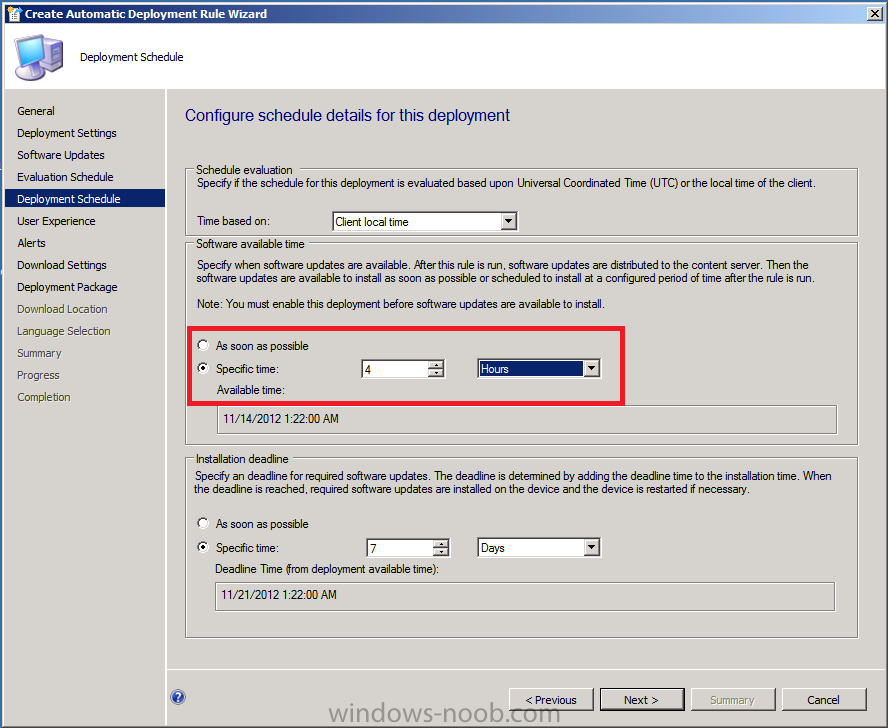
For the Deployment Schedule screen set the Software Available Time to be at least 4 hours after the rule has run in order for the actual software updates deployment packages to reach the destination distribution points.
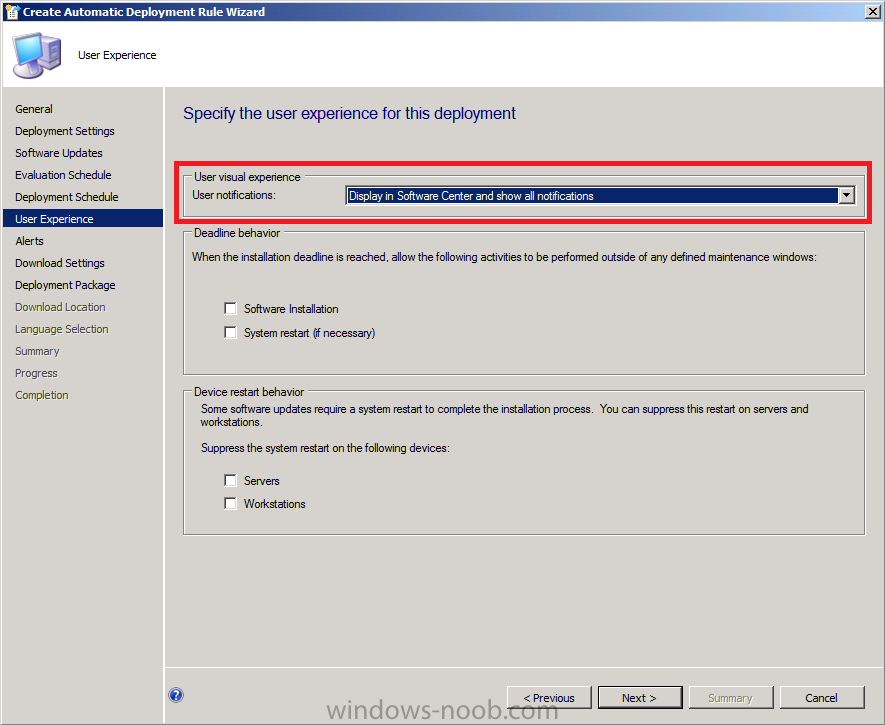
On the User Experience screen, as we want out users to interact with the Deployment of software updates on Patch Tuesday, for User Notification select display in software center and show all notifications. If you wanted to hide these notifications you can select that ability here also. In this guide we are deploying Windows 7 updates therefore we don’t need to surpress any system restarts, however if you were targetting server operating systems with automatic deployment rules then you’d probably want to supress the system restart.
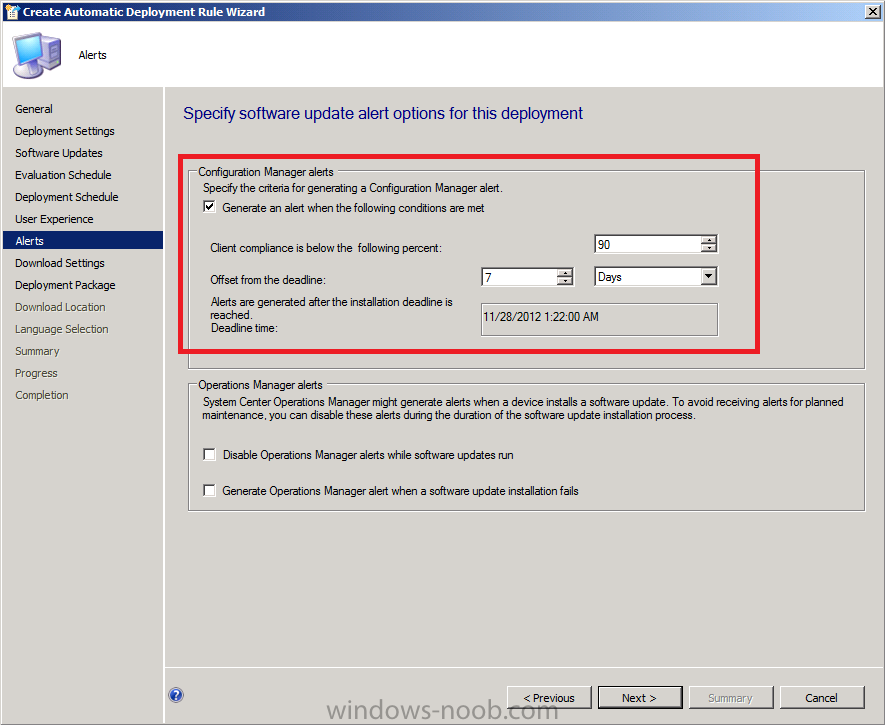
If you want to be alerted when the compliance threshold is below the desired compliance level then select the next option on the Alerts screen.
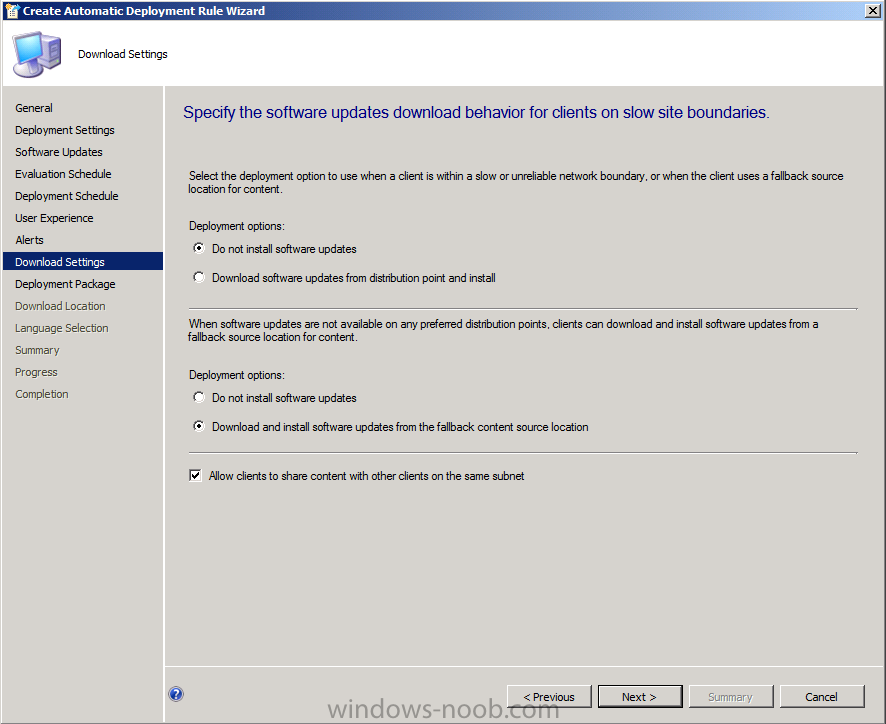
for Download Settings, leave it as default
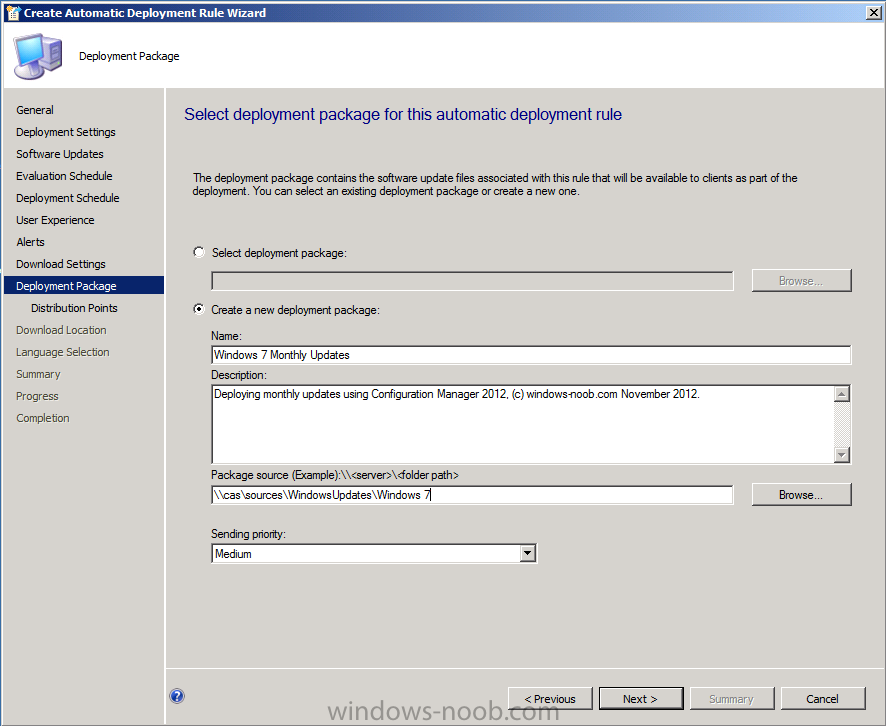
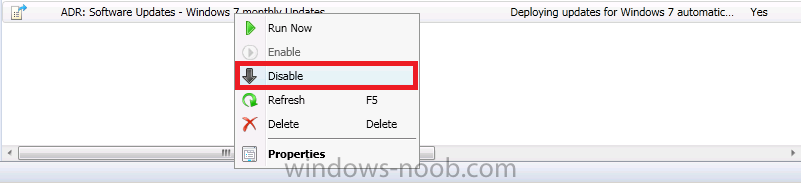
The first time you run this ADR select to create a new deployment package (as none will exist that we want to use). Once it has run, you can retire that rule by disabling it (right click on the ADR, choose Disable) and then you should recreate an identical rule except in the replacement rule, for Deployment Package choose the previously created package (Windows 7 Monthly Updates) so that it re-uses the package every month.
So Below screenshot is from the first run of the ADR.
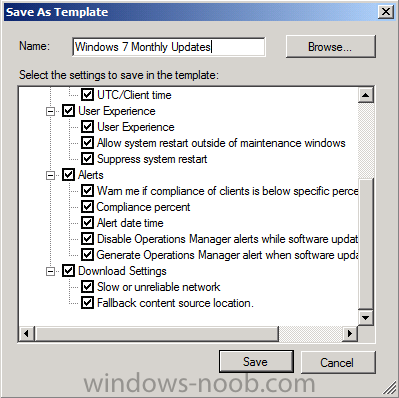
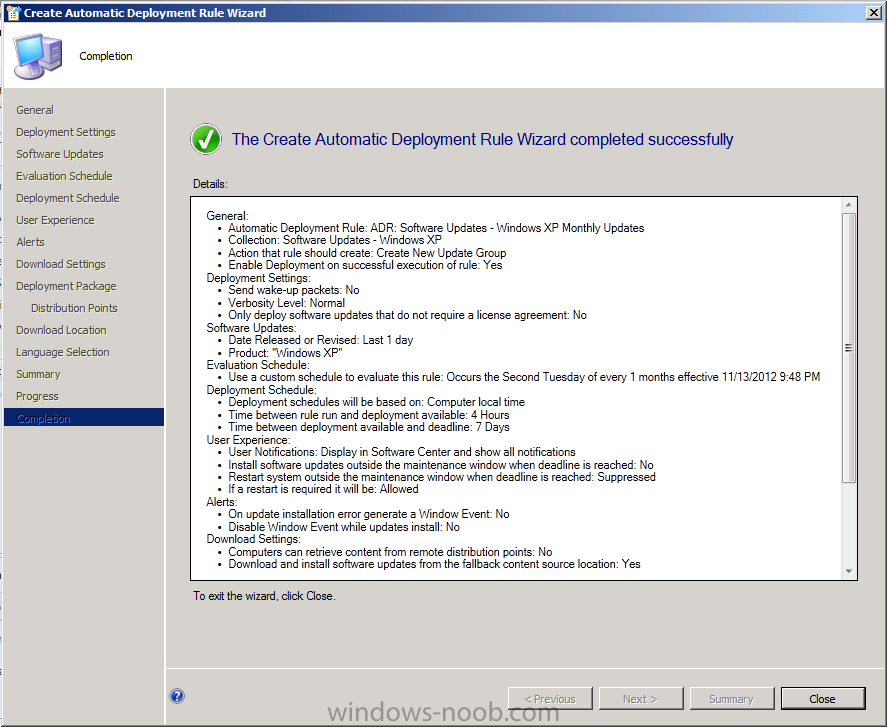
continue through the rest of the wizard through to the Summary screen, on that screen click on Save as Template so that you can reuse the settings.
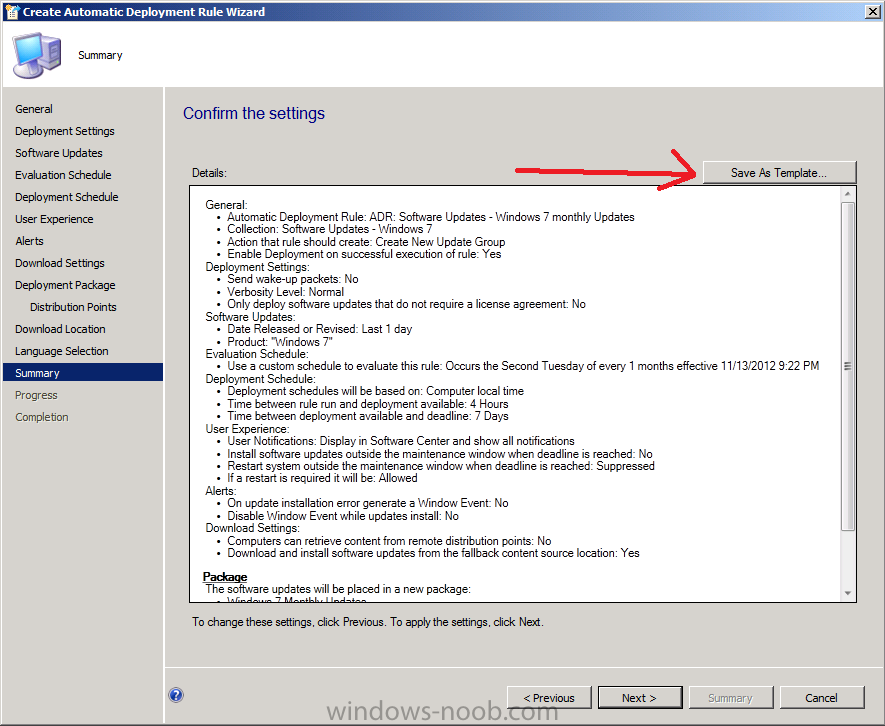
call the template Windows 7 Monthly Updates
right-click on the newly created ADR and choose Run Now, we do this to create the Deployment Package.
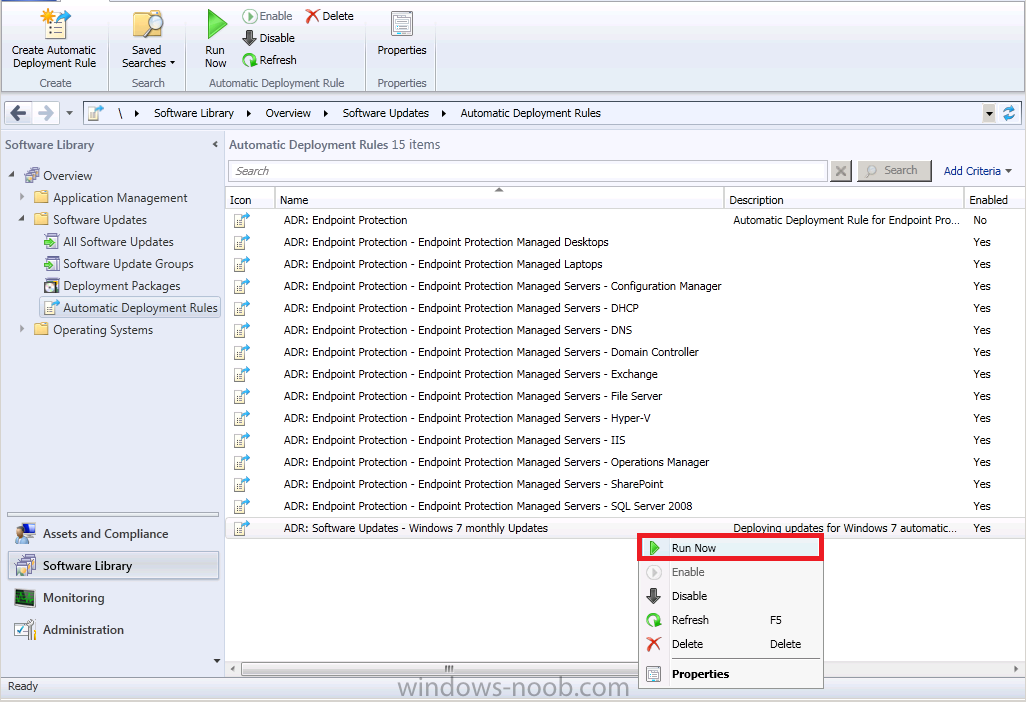
After running the rule, verify that the Deployment Package is indeed created and when done, right click on the ADR again, and choose Disable.
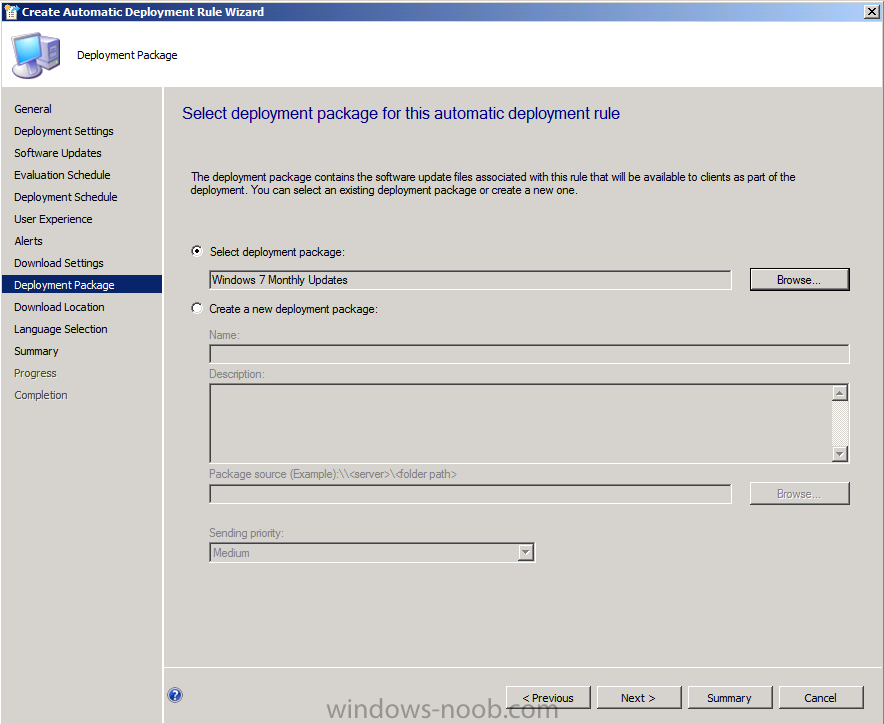
Once done recreate the rule (the ADR) but this time point to that package during the wizard in the Select Deployment Package option like in the screenshot below.
Repeat the above for your Windows XP clients just as we’ve done for Windows 7, except obviously change the Product name from Windows 7 to Windows XP and point the collection to the Windows XP equivalent…
At this point your ADR’s are created and you are ready to sit back and watch as your Windows XP and Windows 7 clients get automatically patched on Patch Tuesday. Awesome.
Later in this series (after Patch Tuesday) I’ll show you what happens on the clients, and I’ll explain how we can patch our servers using Maintenance windows.
Until then, adios,
cheers
niall.

Thanks for such a good “step by step” guide on setting up and deploying monthly updates onto the client’s machines. I have few questions to ask and I was wondering if you can answer them for me please.
1. During the first ADR run new deployment package (as none exist just yet) will be created inside the package source locations (in my example, \\server5\WindowsUpdates\Windows7). Am I right?! In my case ADR rule successfully run but I don’t see any new files or folders inside package source locations?! Looking at ruleengine.log I can see lines:
…
0 update(s) need to be downloaded in package “DO100008” (\\server5\sources$\WindowsUpdates\Windows7)
…
No new update was added to the package. Package “DO100008” would not be updated.
…
My targeted Windows 7 device collection definitely has half a dozen laptops with missing security updates. Why nothing has been downloaded?
2. My second question here is that when I create new ADR for Windows XP computers (and later will do for the Windows 2008 Servers) do I select existing “Windows 7 Monthly Update” package located on \\server5\WindowsUpdates\Windows7 or I need to create new one?! If I don’t need to create new package and new folder why you don’t call package source folder with more generic name, let’s say “Windows Updates”
Thanks in advance.
PS. Please finish your series because I really needs to know (and probably other hundreds of users) what happen on the client and how to patch servers with maintenance windows
After changing ‘Date Released or Revised Last 1 day’ to ‘Last 1 month’ in ADR Software Update I can see that new software update group has been created after running ADR manually. So, if this rule will automatically run once a month why did you choose ‘Last 1 day’ in your settings?
Pingback: Using System Center 2012 Configuration Manager « MS Tech BLOG
Hi Nail,
I have a question regarding the recomended way to deploy software updates when you have an SCCM 2012 CAS and Primary server within the infrastructure. I understand a CAS syncs the software update meta-data from mircosoft, but when downloading and deploying software updates, are the updates “Downloaded” and “deployed” from the Primary?? I have tried to setup a lab environment which contains a CAS and Primary SCCM 2012 servers and confirmed replication and syncronisation is working between them. I have made sure that the primary SCCM 2012 is configured to retrieve updates from an upstream server which is the CAS. But the only way i can deploy updates to the clients is by first performin a sync on the CAS, waiting for all software update metadata to replicate to the Primary, then selecting all the updates on the Primary and selecting download, then once they have downloaded, only then can i deploy them to my clients. Downloading the updates from the CAS directly and pushing them to my primary dist point and then deploying to my clients doesnt work