
Introduction
At the start of this series of step by step guides you installed System Center Configuration Manager (Current Branch), then you configured discovery methods. Next you configured boundaries to get an understanding of how automatic site assignment and content location works. After that you learned how to update ConfigMgr with new features and fixes using a new ability called Updates and Servicing and you learned how to configure ConfigMgr to use Updates and Servicing in one of these two modes:
To prepare your environment for Windows 10 servicing (this guide) you learned how to setup Software Updates using an automated method (via a PowerShell script) or manually using the ConfigMgr console. Next you used a PowerShell script to prepare some device collections, then you configured client settings for your enterprise and finally you’ll deployed the ConfigMgr client agent using the software updates method which is the least intensive method of deploying the Configuration Manager client agent.
As System Center Configuration Manager (current branch) is being delivered as a service now, version 1602 was made available (March 11th, 2016) and you used Updates and Servicing to do an in-place upgrade to that version as explained here. Next you learned about how to use the Upgrade task sequence to upgrade your Windows 7, Windows 8 (and 8.1) and even your Windows 10 devices to a later build of Windows 10. In this guide you’ll take a look at the new Windows 10 servicing features in ConfigMgr (Current Branch).
A short introduction to Windows 10 servicing
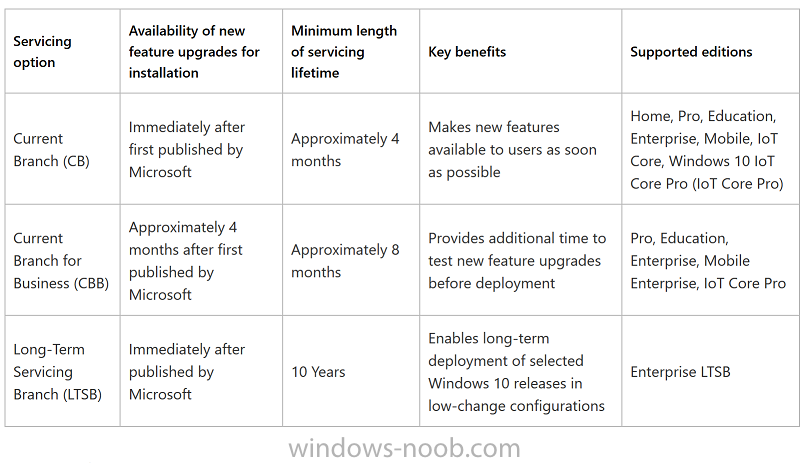
Windows 10 servicing is a broad category (discussed at length here on Technet) which includes different options for applying updates and upgrades to Windows 10 devices using a variety of different methods available. In this guide we are primarily interested in looking at Windows 10 servicing options within ConfigMgr (Current Branch) so that will be the focus. In a nutshell there are three Windows 10 servicing options we need to consider:
- Current Branch
- Current Branch for Business
- Long Term Servicing Branch
Each branch has its’ own properties. If you are using Current Branch, then updates and upgrades are made available as soon as they are released from Microsoft and the key benefits are that it makes new features available to users as soon as possible. Current Branch for Business allows more time (4 to 8 months depending on your Defer Updates and Upgrades preferences) to ‘wait and see’ how those updates (and upgrades) can impact your environment. The key benefit here is it provides additional time to test new feature upgrades before deployment which is useful in a business scenario. Long Term Servicing Branch is aimed at low-change configurations (Operational Technology for example) where changing functionality can impact production. This is all neatly explained in the following table from Technet.
Note: Be aware of the Dual Scan issue and how it may impact your update strategy.
Familiarizing yourself with the Windows 10 servicing dashboard
Note: All screenshots taken here were from System Center Configuration Manager version 1602 (Current Branch). As ConfigMgr (Current Branch) is evolving at a fast rate based on UserVoice and production development it is very likely that abilities and even UI elements shown here will change in later versions of the product. In order to populate information on the dashboard and test Windows 10 Servicing, this lab already contains two Windows 10 computers, one is version 1507 and the other is version 1511.
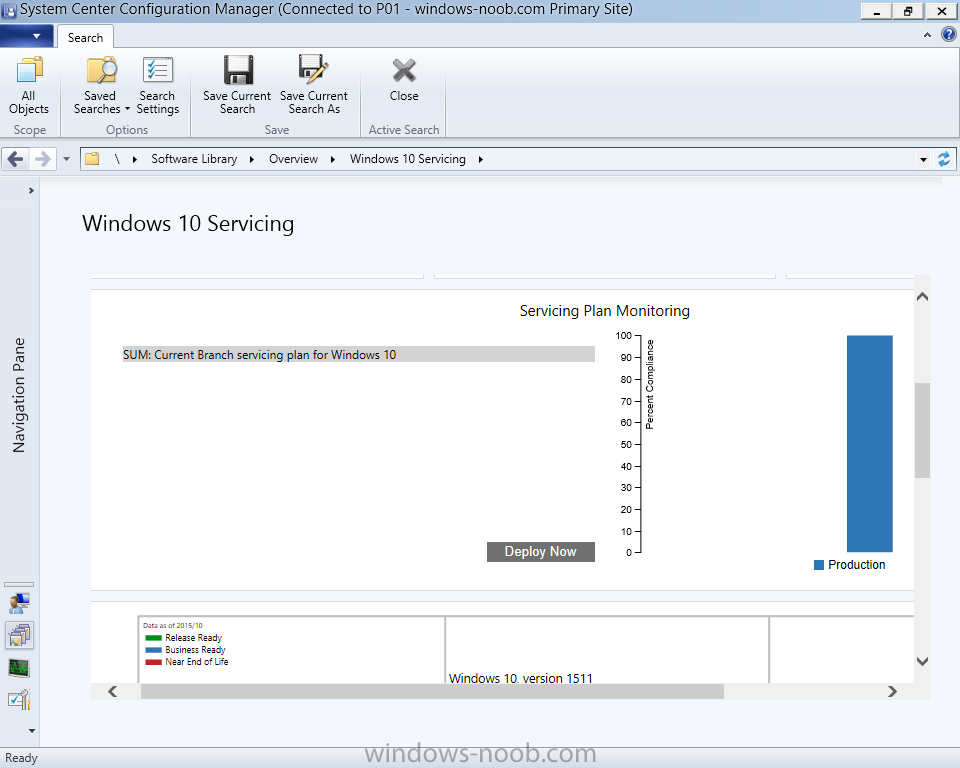
In the ConfigMgr console select Software Library and expand Windows 10 Servicing. A dashboard similar to the below screenshot should appear.
The first thing you’ll notice in the tiles displayed are the two doughnuts which contain visual clues about the versions and branches of Windows 10 in your organization.
Note: You will notice similar colors used throughout the tiles in the dashboard, however they don’t necessarily match up between different tiles. This behavior will more than likely change in a later release of ConfigMgr (a bug has been raised and Microsoft is working on it).
Windows 10 Usage
Within the first tile is a doughnut called Windows 10 Usage.
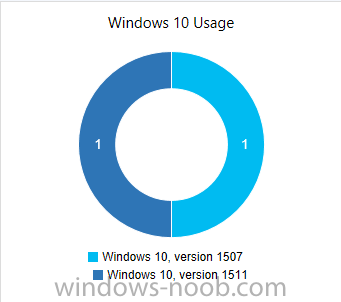
This tile should give you an estimate of the different Windows 10 build versions encountered by ConfigMgr in your organization. If you have any Windows 10 Insider Preview versions, they’ll be listed as Other.
Windows 10 Rings
Within the second tile is a doughnut called Windows 10 Rings.
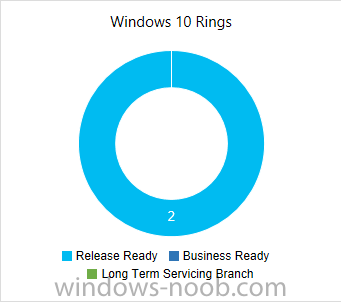
This tile is used to give you an overview of the Windows 10 Branches in use and their readiness state, however instead of referring to those branches as explained in the table above, they have alias’s. The following Table should clear that up:
- Release Ready : Current Branch
- Business Ready : Current Branch for Business
- Long Term Servicing Branch : Long Term Servicing Branch
In addition to the two doughnuts in the first two tiles you have another two tiles which allow you to Create Servicing plan and monitor Alerts along with a big tile reminding you to Please define servicing plan for Windows 10.
Note: Creating a servicing plan directly from within the dashboard will create a basic servicing plan which only prompts you for name, collection, deployment package, and readiness state (along with associated limitations for the last two). All other values will be default. If you want custom options, create the servicing plan directly from the ConfigMgr console.
Windows 10 Build
To see more information you either need a large resolution monitor or simply scroll down to reveal the Windows 10 Build tile which is a graph that plots out the versions of Windows 10, their readiness state and an approximate EOL.
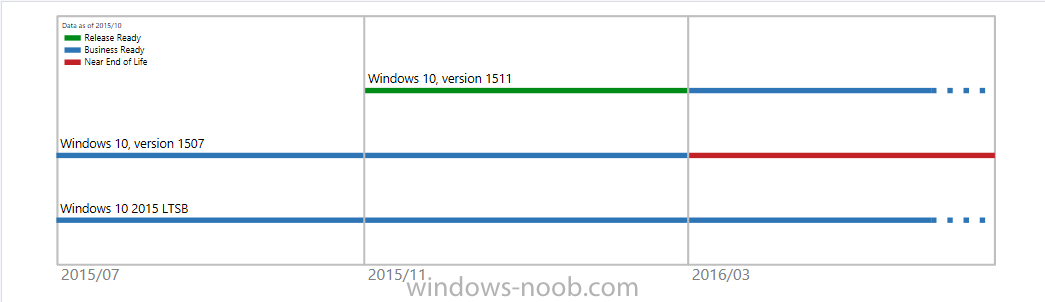
What you can see from the above is that Windows 10 version 1507 is classified as Business Ready (Current Branch for Business) from the date it was released, and from approximately March 2016 Windows 10 version 1511 takes over that spot (while Windows 10 1507 heads into EOL). In fact, Windows 10 version 1511 was declared Current Branch for Business on the 8th of April 2016.
Ok so now that you’ve seen the dashboard, let’s get on with the business of creating a servicing plan.
Step 1. Synchronize Software Updates
Before you create your servicing plan, make sure that the data you are using is up to date. To do that you need to synchronize with Microsoft Update. To perform a sync do as follows:
In the ConfigMgr console select the Software Library workspace, select Software Updates, right click on All Software Updates and choose Synchronize Software Updates. Answer Yes to the popup.
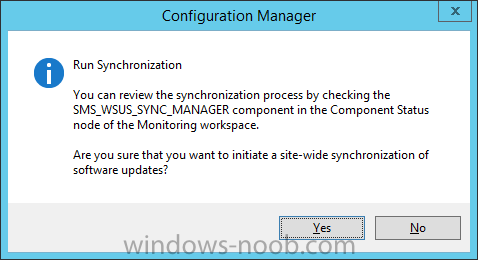
Using CMTrace, monitor the sync progress in <ConfigMgr Installation Path>\Logs\Wsyncmgr.log. Look for the Sync succeeded. Setting sync alert to canceled state on site <your_site_code> text in the log file to notify you of a successful sync.

Step 2. Creating a servicing plan
Servicing plans are akin to Automatic Deployment Rules (ADR) in Software Updates in that they can automatically download, and deploy updates to a collection based on the settings you define in the rule. Servicing plans however allow you to define what Windows 10 branches are in user in your environment and then monitor them in the servicing dashboard. From version 1602 onward, servicing plans are also tied so that you can manage the behavior for high-risk deployments.
Note: Servicing plans are designed to upgrade Windows 10 versions from one build to another build only. They are not designed for upgrading Windows 7 or Windows 8.1 to Windows 10. If you need to upgrade your Windows 7 or Windows 8.1 computers to Windows 10 use the Upgrade Task Sequence instead.
In this example you will create a servicing plan for Windows 10 Current Branch. In the ConfigMgr console select Software Library and expand Windows 10 Servicing. Select Servicing Plans and in the ribbon click on Create Servicing Plan.
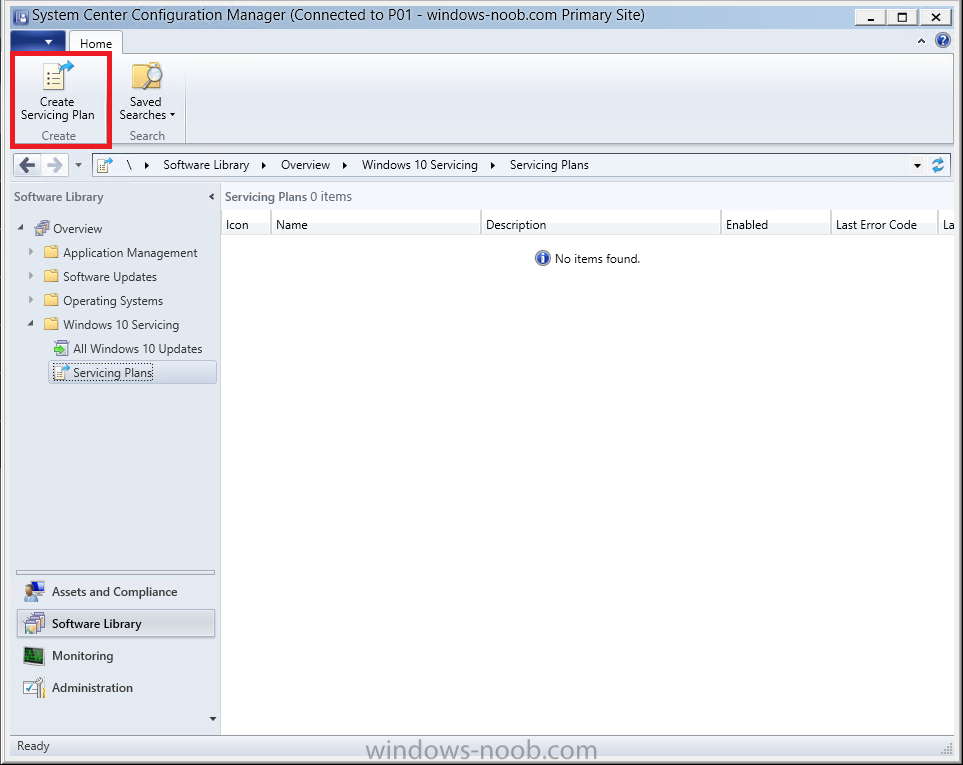
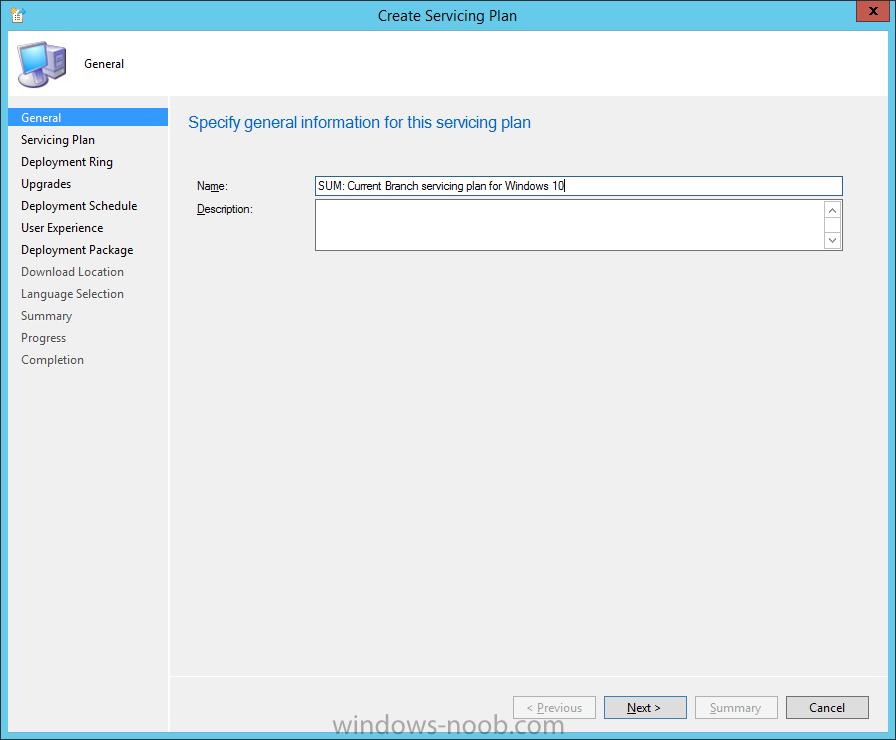
When the wizard appears, give the Servicing Plan a suitable name like SUM: Servicing Plan for Windows 10 (The SUM prefix is so that you can clearly see that the deployment is for software updates in the monitoring console later.)
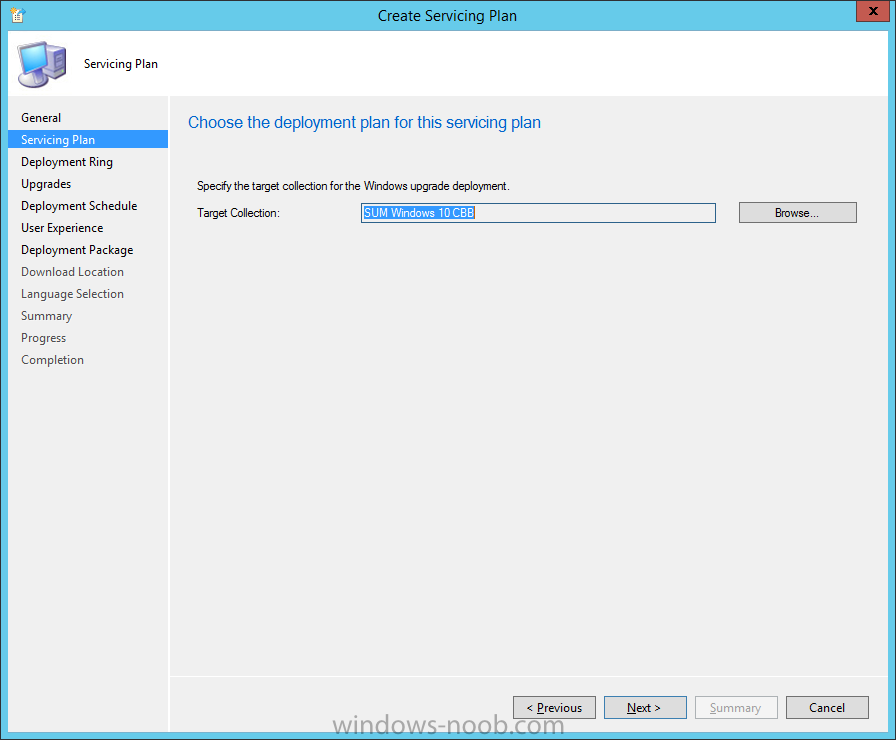
Next, point it to your target collection, this collection should contain Windows 10 computers that are suitable for this servicing plan.
Note: In production you’d want to create a hierarchy of test collections prior to releasing upgrades to the masses, this is in order to verify that your critical applications are not affected by the upgrade. How you populate those collections is up to you.
Next you get to choose which Deployment Ring you’d like to use. The Deployment Ring refers to the Windows readiness state that applies to this servicing plan, and once again you get to choose between Release Ready (Current Branch) or Business Ready (Current Branch for Business). Depending on which state you choose, you will see different results in the console, so it’s a good idea to use the Preview button on the Upgrades screen particularly when moving the days (to wait) slider.
This servicing plan is aimed at Current Branch computers so select the first option.
Note: Even though Windows 10 version 1511 was declared as Current Branch for Business (CBB) on April 8th, 2016, that information has not yet trickled down to ConfigMgr as of 2016/4/10 therefore if you select the Business Ready deployment ring and 0 days, you will not see any suitable upgrades listed.
On the Upgrades screen select the three checkboxes and set the search criteria to
- Language=English
- Required=>=1
- Title= Upgrade to Windows 10 Enterprise
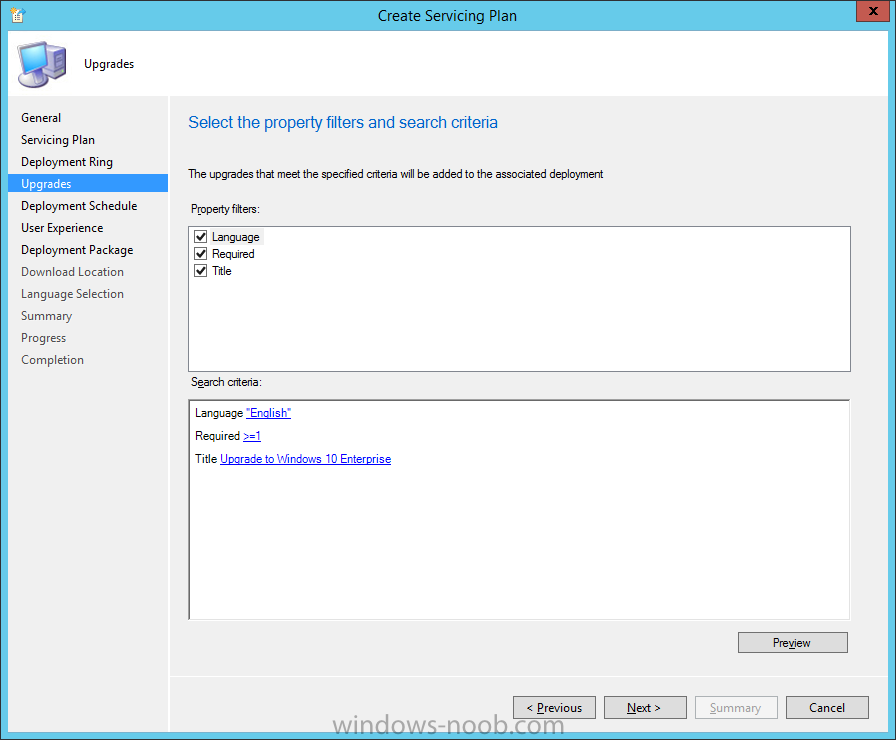
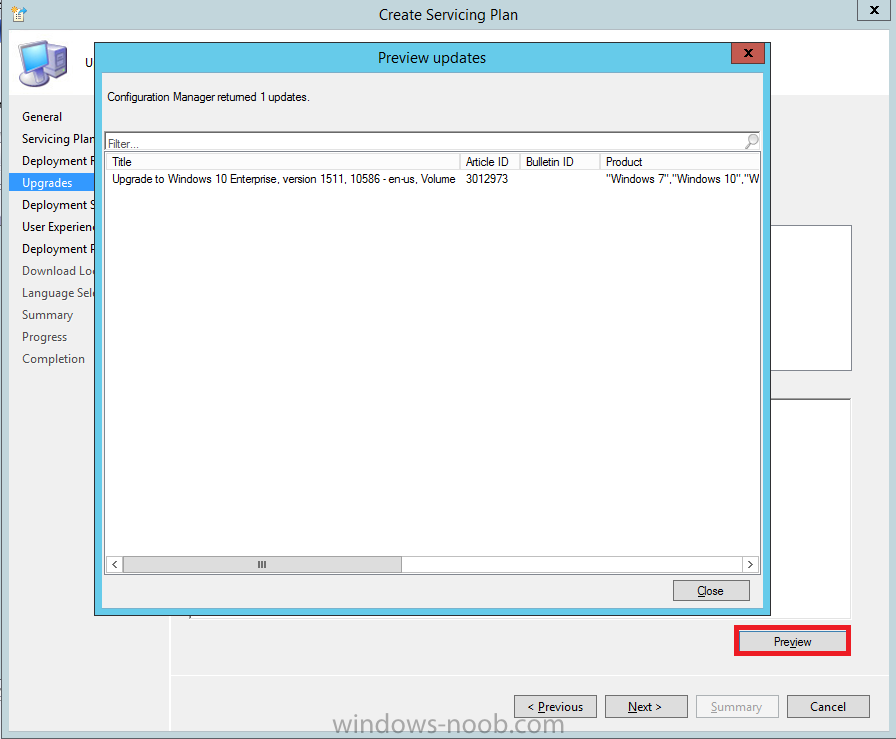
Next, click on the Preview button, this will show what updates the wizard found that match your criteria
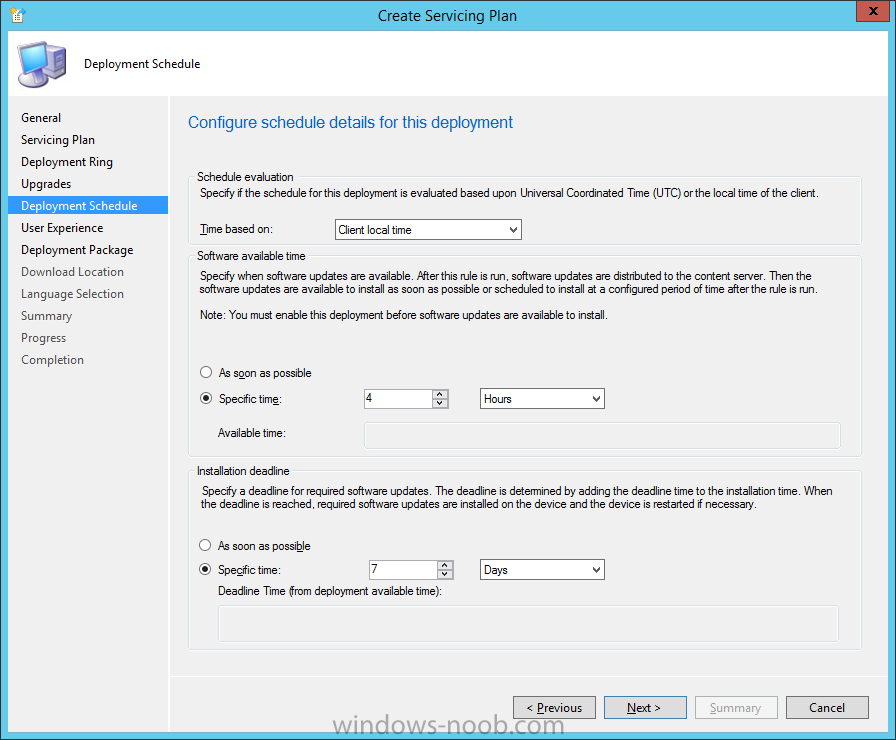
For the Deployment Schedule screen set the Software Available Time to be at least 4 hours after the rule has run in order for the actual software update deployment packages to reach the destination distribution points. In a slow wan, increase that time. For Installation Deadline, the deadline is the displayed deadline time plus a random amount of time up to 2 hours, this is to reduce the load generated by all computers in the collection downloading the updates at the same time.
On the User Experience screen, for User Notifications select Display in Software Center and show all notifications. For Deadline behavior, place a checkmark in Software Update Installation and System Restarts.
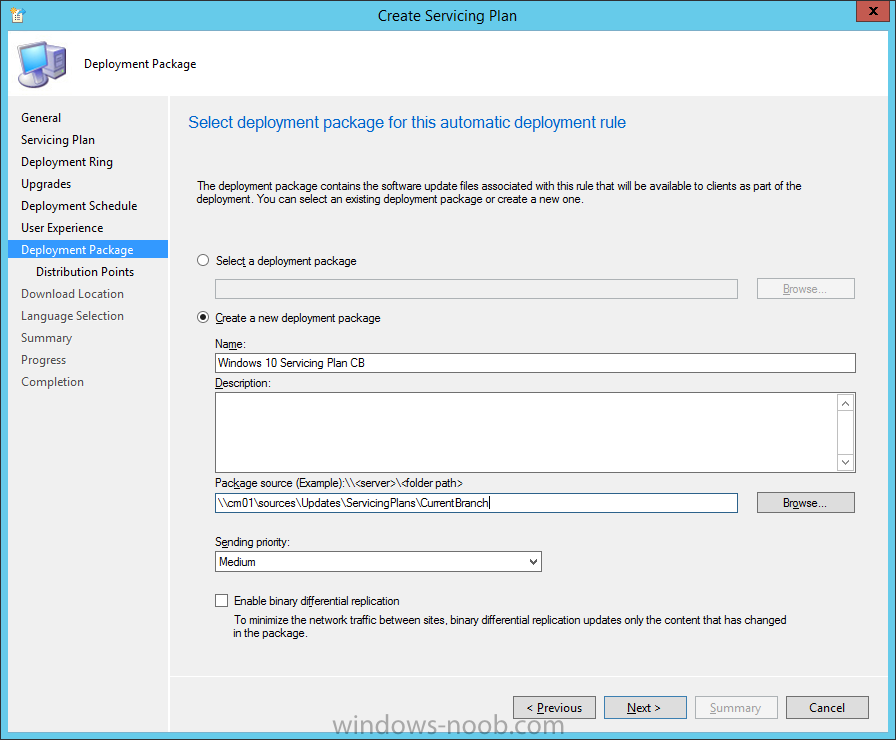
On the Deployment Package screen choose Create a new deployment package and fill in the details as appropriate
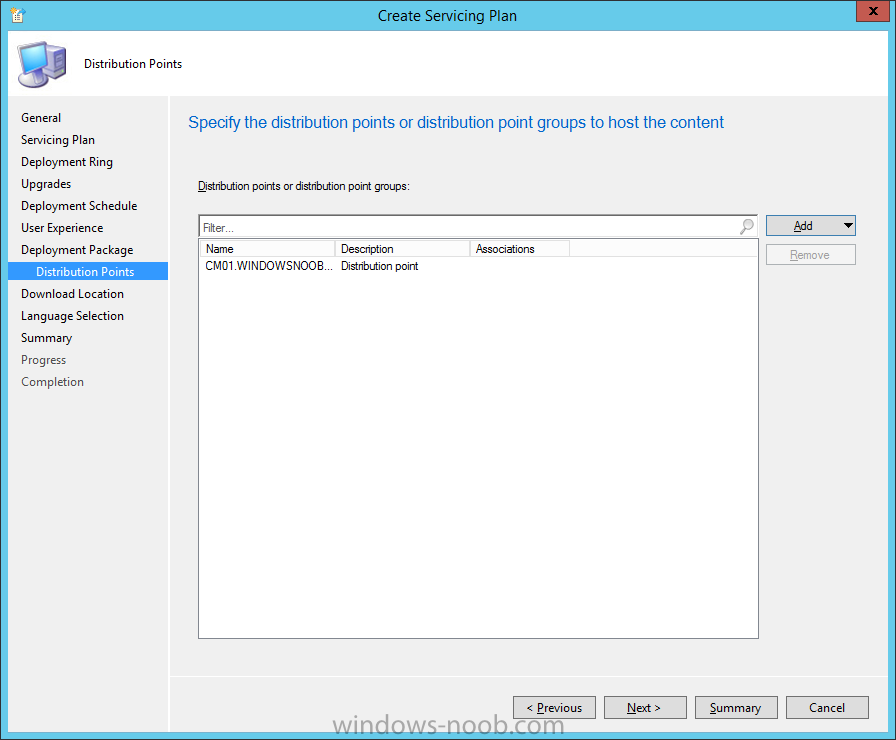
Next add the Distribution Points you want the package distributed to
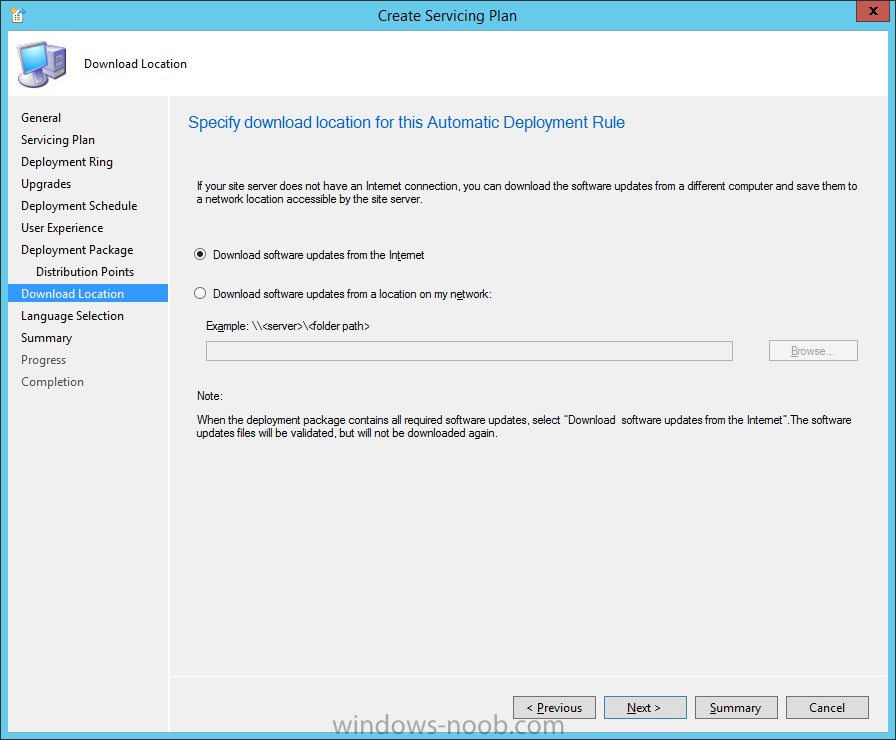
select where to download the content from
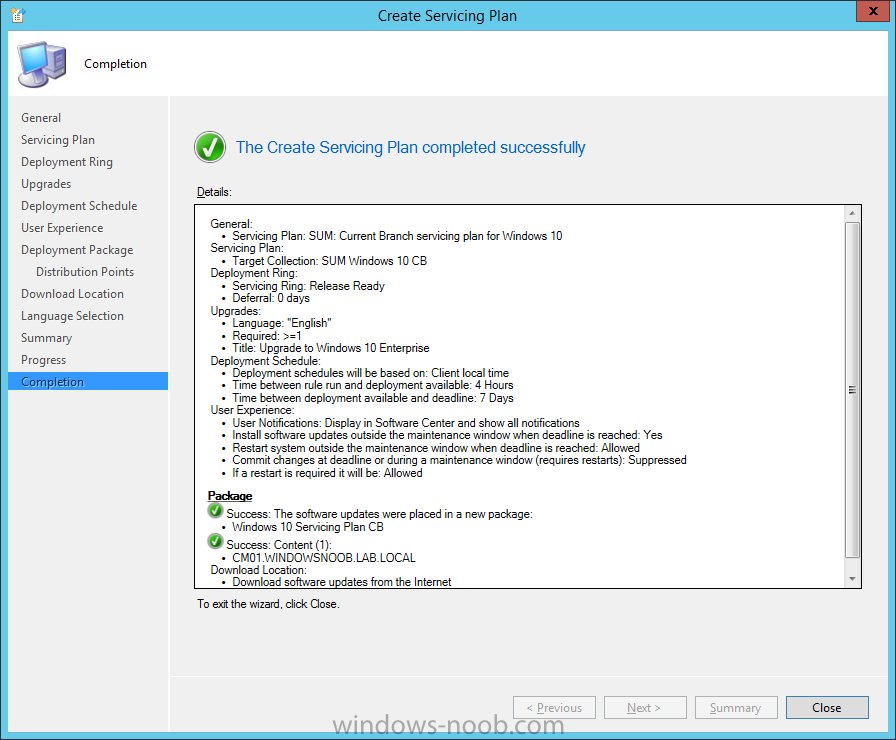
and click through to the completion screen.
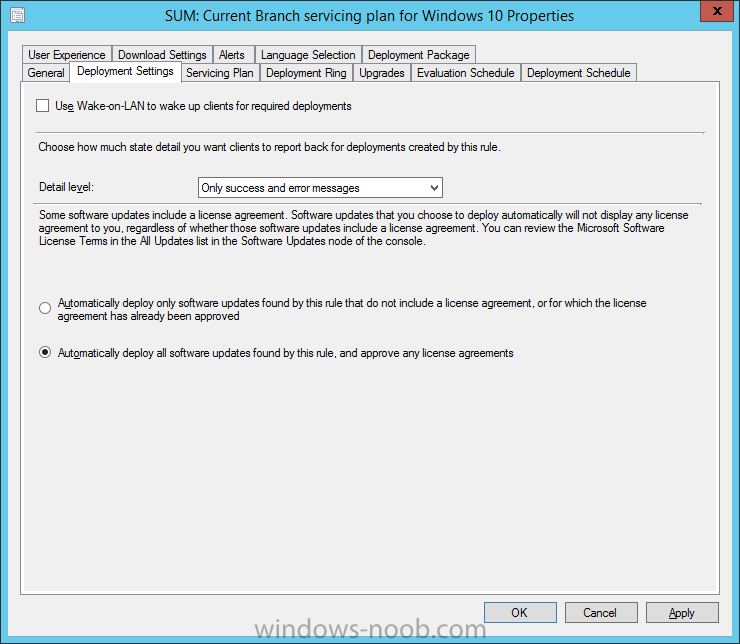
Step 3. Review additional servicing plan properties
Now that the servicing plan is created, highlight it in the console, right click and choose Properties.
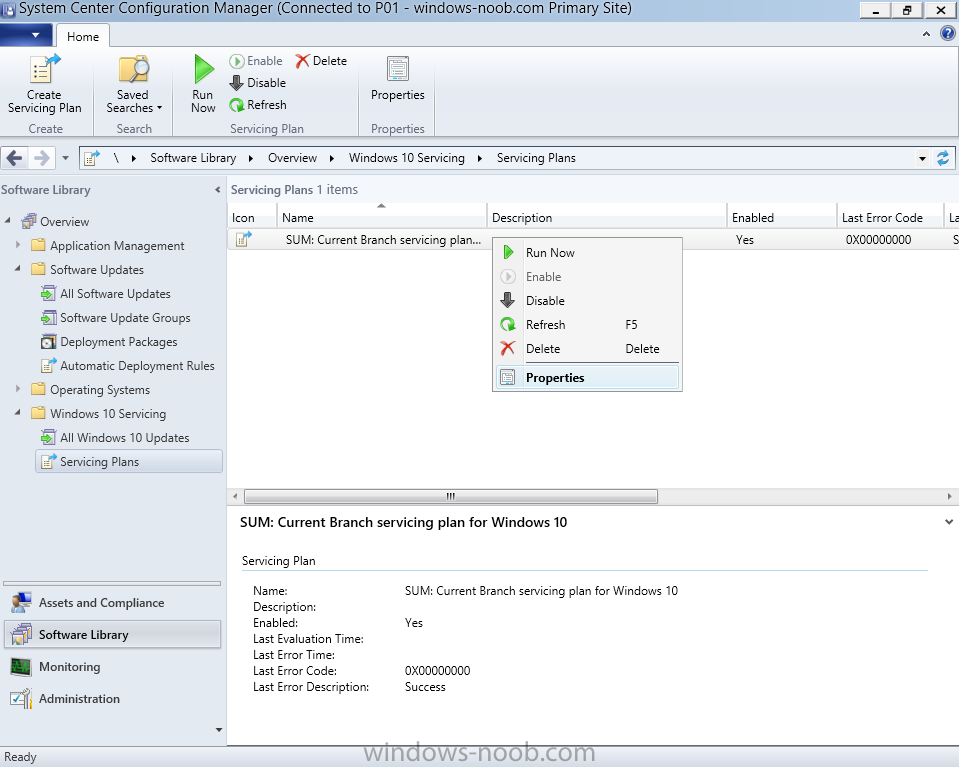
Select the Evaluation Schedule tab, as you can see by default it’s set to run after every SUP sync, if you want to change that behavior modify it here.

You can also review the Download Settings for the client in the Download Settings tab.

In Deployment Settings set the amount of detail to Only success and error messages
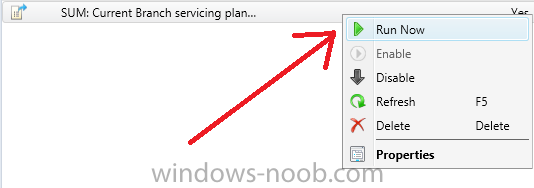
Step 4. Run the servicing plan and monitor
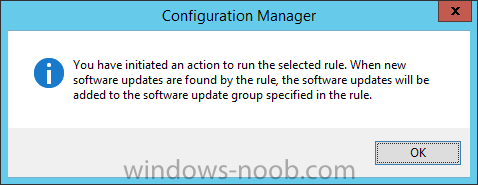
Now everything is in place, you could sit back and wait for things to happen or kick off a test run. To trigger the servicing plan into running you need to initiate a SUP sync (as specified by the Evaluation Schedule), or right click on the Servicing Plan and choose Run Now.
click OK to the message
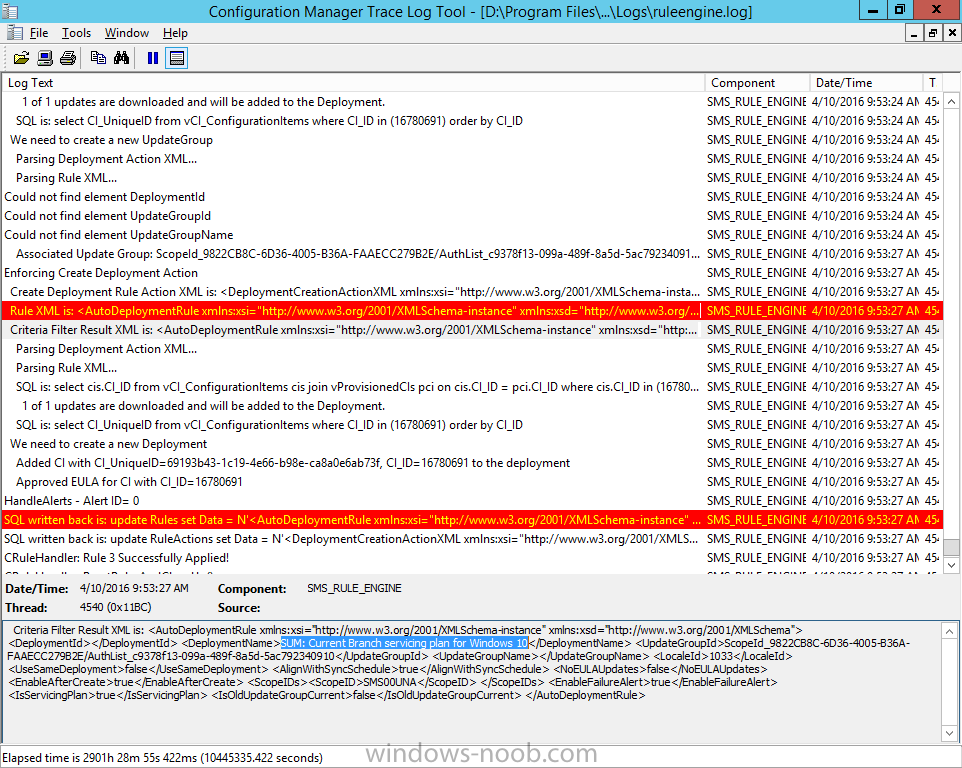
Using CMTrace, monitor the download progress in <ConfigMgr Installation Path>\Logs\PatchDownloader.log. If you are connecting to the console using terminal services check C:\Users\<username>\AppData\Local\Temp\2\PatchDownloader.log. You can even determine how much of the download is remaining based on the percent complete value as shown in this screenshot below:
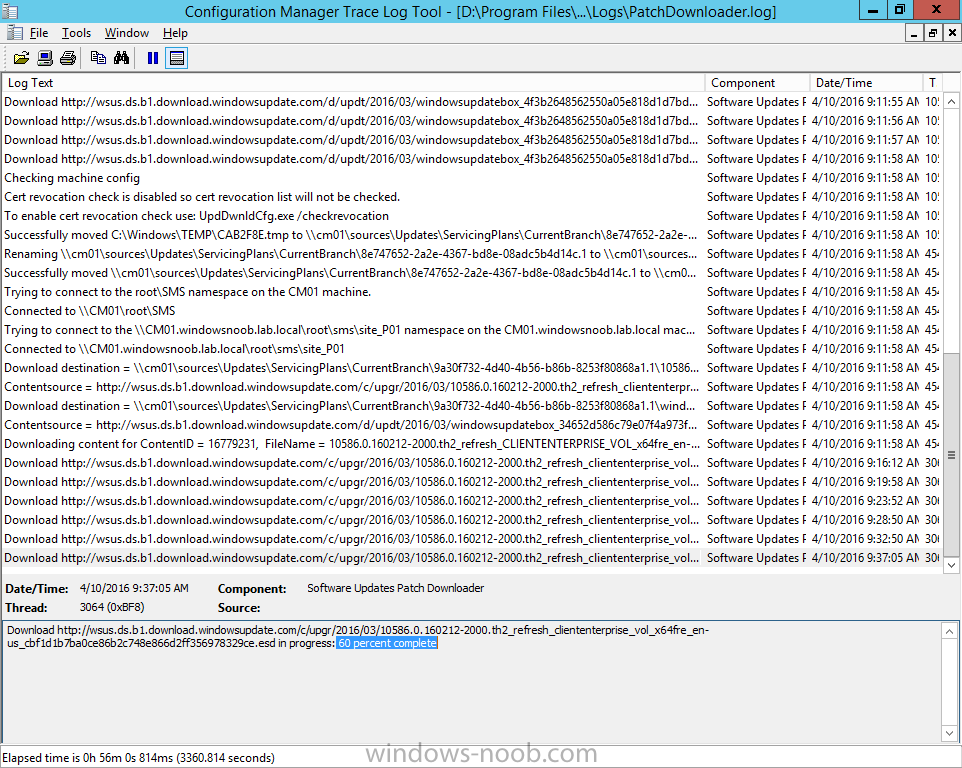
Note: Each Upgrade selected for download contains two architectures (X86 and X64) and their associated files. It is currently not possible to decide which Architecture to download.
Using CMTrace, you can review the servicing plan progress in <ConfigMgr Installation Path>\Logs\RuleEngine.log
After the download has completed successfully the Servicing Plan will be deployed (and the content distributed to the distribution points) and then show up in the ConfigMgr console in the Monitoring workspace, under Deployments.
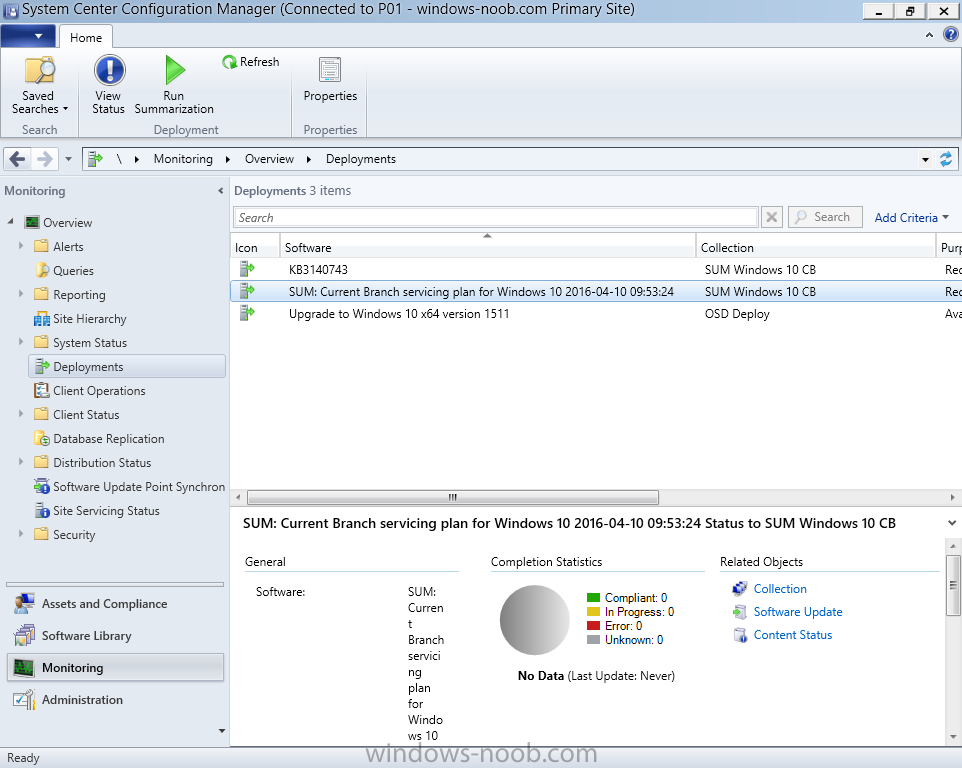
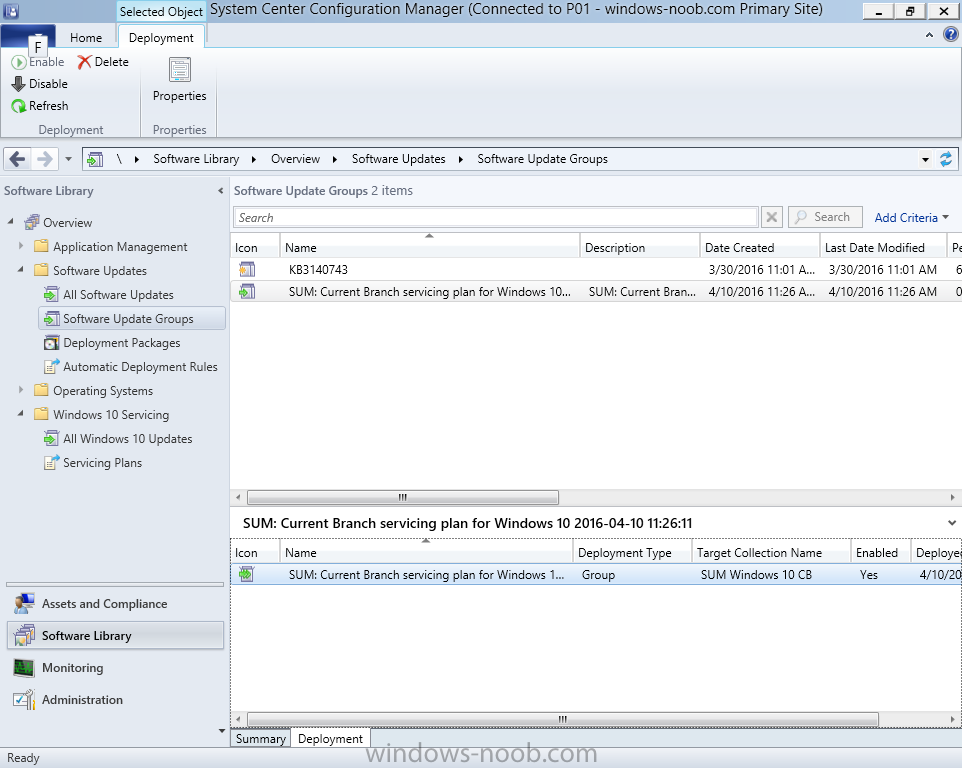
You can also review Software Update Groups where the servicing plan will be listed along with its’ Deployment.
Step 5. Review the Upgrade process on your Windows 10 devices
Note: Ensure that one or more applicable Windows devices are in the collection used when creating the servicing plan. Also note that if you are just testing the servicing plan, and you used the settings above that it may take up to 4 hours to show up on the client, adjust the servicing plan as necessary and choose Run Now again to re-deploy it with the new settings..
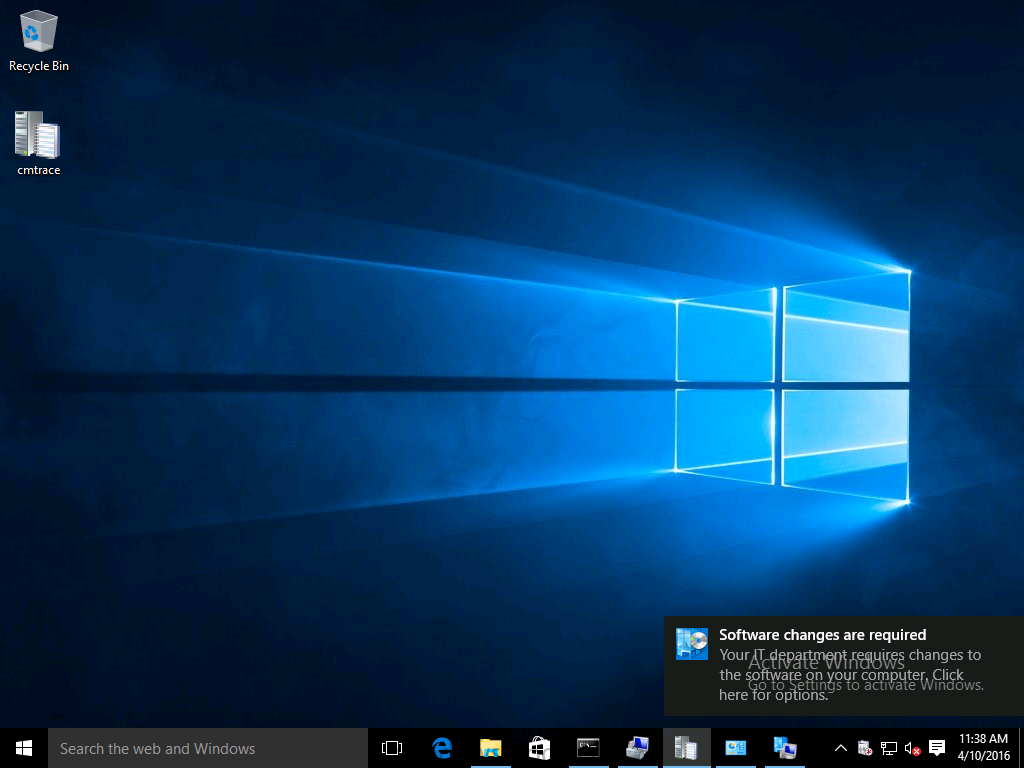
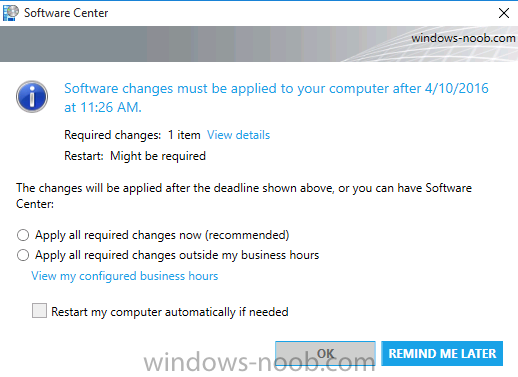
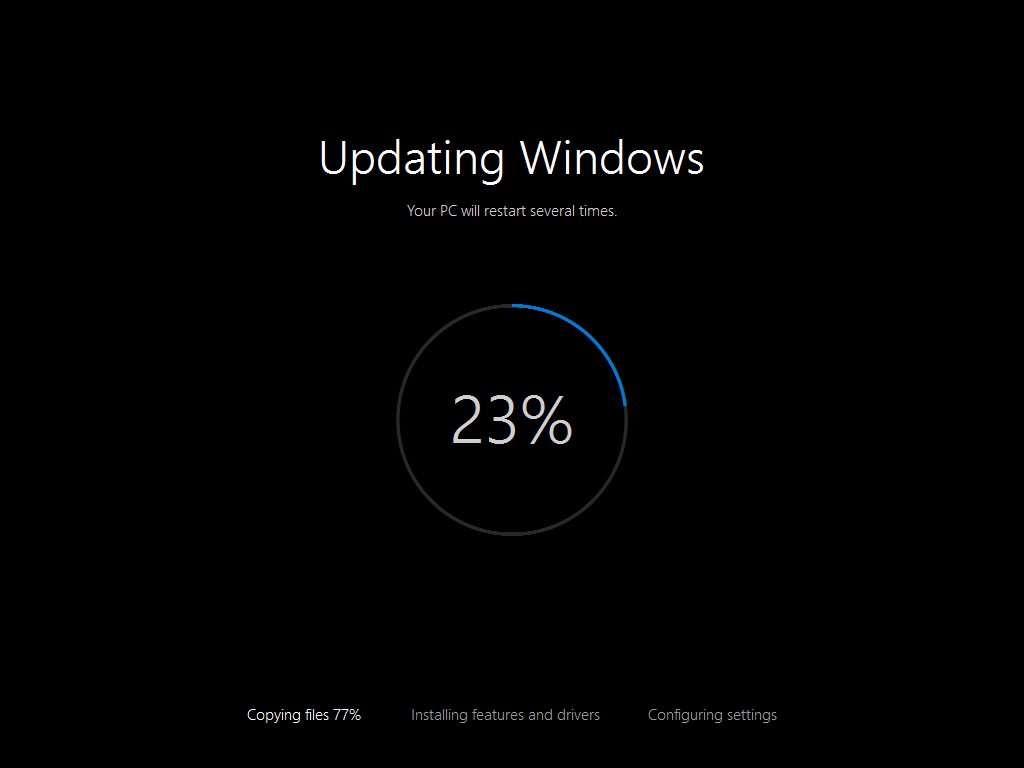
Now everything is in place for the Windows 10 servicing to begin. For this section you can review what happens on a Windows 10 version 1507 client. The first thing the client will see is a familiar notification in the systray informing the user that Software Changes are required.
clicking on that shows you these options
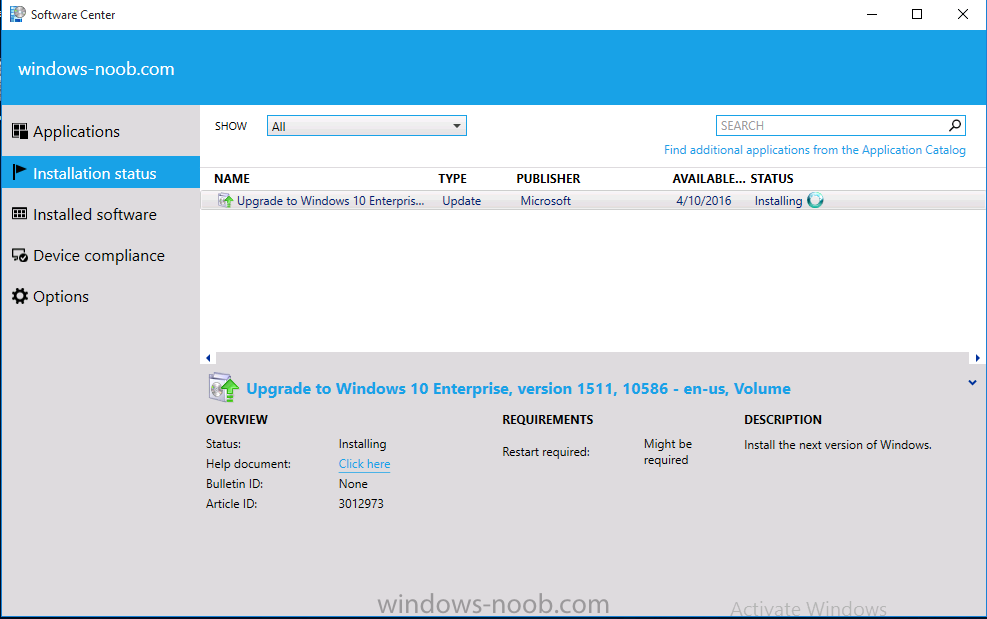
and before long it starts downloading and then installing the Upgrade
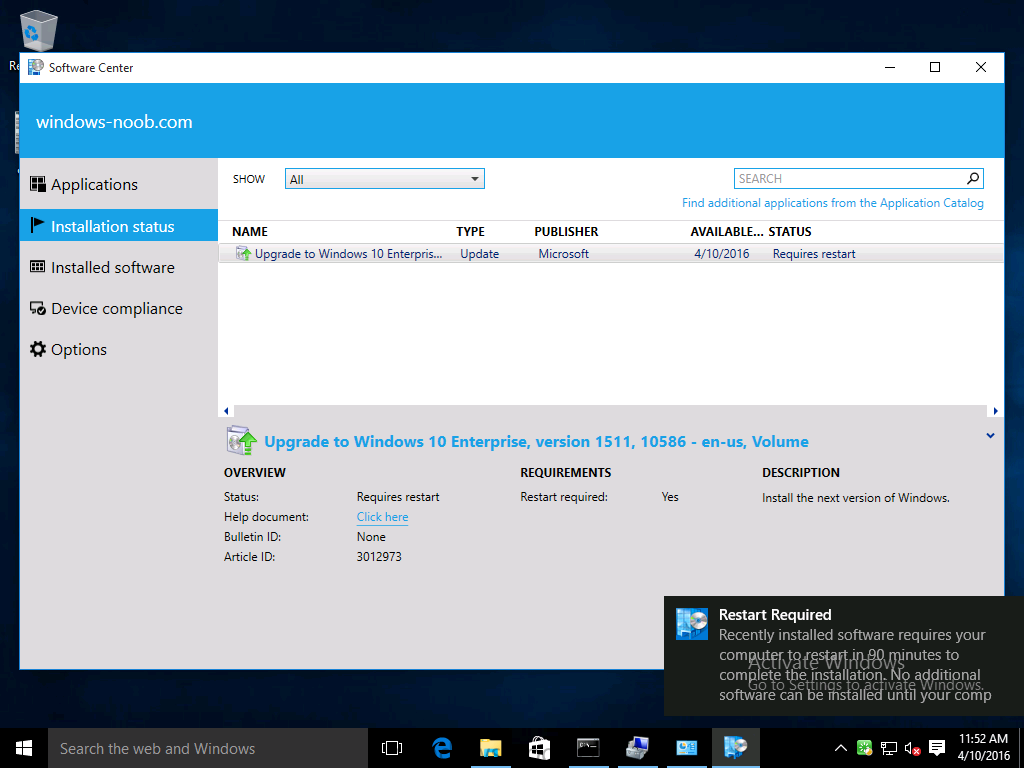
as the Servicing Plan was configured for all notifications, the user will be notified of the pending restart
at which time Windows will get updated
after everything is complete, log in to Windows to see this…
note the new version after the upgrade ?
Job done!
After confirming the success of the upgrade methodology, you can hop back to the ConfigMgr console and review the Windows 10 Servicing Dashboard.
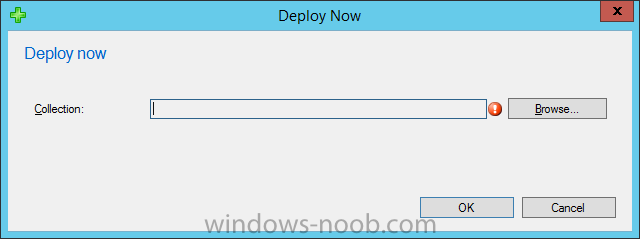
Notice the Deploy Now button, that allows you to further deploy the same Servicing Plan to more collections.
until next time, adios !
Summary
Upgrading Windows 10 devices to a later release of Windows 10 is made easier with servicing plans defined at a schedule that suits you. While servicing plans won’t take care of earlier versions of Windows such as Windows 7 or Windows 8.1, you can upgrade those devices with the upgrade task sequence method instead. Client side language packs are important to keep in mind as Servicing Plans do not deal with languages on the client side (if any are installed). A lot of functionality has improved and changed between the ConfigMgr 1511 and ConfigMgr 1602 Current Branch releases based on feedback from UserVoice and connect.microsoft.com. I strongly expect the next release of ConfigMgr will be even more fine tuned and feature rich particularly in the area of Windows 10 servicing.
Related Reading
- Plan for Windows 10 deployment – https://technet.micr…dows/plan/index
- Windows 10 servicing options for updates and upgrades – https://technet.micr…ws-10-servicing
- Manage Windows as a service using System Center Configuration Manager – https://technet.micr…y/mt627931.aspx
- Windows 10 1511 is now a Current Branch for Business (CBB) release – http://blogs.technet…bb-release.aspx
- Windows 10 release information – https://technet.micr…ocid=wc-ext-aka

This is good info. I’ve followed your steps and have created a couple of servicing plans. I’m curious about the doughnut wheels under Windows 10 Servicing. Should I be able to click on the wheel to see which machines are running which version? For example, I show that I have 1 Windows 10 1507 and 12 Windows 10 1602. I’d like to be able to click on the wheel to check which machine is the 1507, but clicking on it doesn’t seem to do anything.
at present clicking on the doughnuts does nothing, but this will change in later editions
Sounds good. Thanks for the quick reply!
I’m having an odd issue. When setting up the Upgrade Property Filters, when I pick the Language, Required, or Title, no matter what search criteria I put in, I only get the upgrades starting with “Windows 7 and 8.1” The actual “Upgrade to Windows 10 Enterprise,” upgrades do not show up. Even if I specify just the title “Upgrade”, only the Windows 7 and 8.1 upgrades show up. These are the ones I don’t want to show, at all. Any thoughts? SCCM 1602 (CB)
are you selecting Current Branch (Release Ready) or Current Branch for Business (Business Ready)
Current Branch
Ok, got the others under CBB. Seems we don’t have a CB upgrade currently?
I’m having the same issue and found this: https://support.microsoft.com/en-us/kb/3159706
I haven’t tested it yet, but will try to reboot my server overnight and see if that is the issue.
I’m getting stalled after deploying it to a test collection of just 1 client PC. Deployments are staying in Unknown -> “Client check passed/active”. Upgrade never shows up on client machine in Software Center. Any ideas where to look?