
In Part 1 of this series we created our new LAB, we got the System Center 2012 Configuration Manager ISO and extracted it, then copied it to our Active Directory server. We then created the System Management container in AD, delegated permissions to the container, extended the Schema for Configuration Manager. We then opened TCP ports 1433 and 4022 for SQL replication between sites, installed some prerequisites like .NET Framework 4.0, added some features and then downloaded and installed SQL Server 2008 R2 SP1 CU6. We then configured SQL Server using SQL Server Management Studio for security and memory configurations prior to running the Configuration Manager 2012 setup to assess server readiness. Finally we installed a central administration site (CAS).
In Part 2 we setup our Primary server with SQL Server 2008 R2 SP1 CU6. We then installed Configuration Manager 2012 on our primary server (P01) and verified that it was replicating to our central administration site (CAS) server. Then we configured Discovery methods for our Hierarchy and then configure Boundaries and Boundary Groups. In Part 3 we configured Discovery methods and configured boundaries and created a boundary group, we then configured them for Automatic Site Assignment and Content Location.
In Part 4 we added the Application Catalog roles to our Hierarchy. We then configured Custom Client Device Settings and then deployed those settings to the All Systems collection on site P01. After that we created Custom Client User Settings and deployed them to the All Users collection in order to allow users to define their own User and Device affinity settings.
In Part 5 we installed the WSUS server role (it is required for the Software Update Point role). We then installed the Software Update Point role on our CAS and Primary servers and we configured the SUP to support ConfigMgr Client Agent deployment which is a recommended Best Practice method of deploying the Configuration Manager Client Agent. In Part 6 we prepared our server for the Endpoint Protection Point role, and installed that role before configuring custom client device settings and custom antimalware policies. We then deployed those custom client device settings and custom antimalware policies to our newly created Endpoint Protection collections.
In Part 7 we added operating system deployment ability to our hierarchy by adding Windows 7 X64. We used the Build and Capture process to capture a WIM image which we can later deploy to targeted computers using network boot (PXE). PXE boot requires specific settings on our distribution points and the boot images used to deliver the operating system WIM images were therefore also enabled for PXE support.
Now we will add Applications to our Software Library and learn how to configure the requirements in the Deployment Type. We will monitor the approval process of our applications and see how requirements can influence whether an application is installed or not.
In this post I am specifically referring to Configuration Manager 2012 RTM and will not cover the changes coming in Service Pack 1. That will be covered in a future post when the service pack is released in Early 2013.
Applicationsare new in System Center 2012 Configuration Manager and have the following characteristics:
- Applications contain the files and information necessary to deploy a software package to a computer or a mobile device. Applications contain multiple deployment types that contain the files and commands necessary to install the software. For example, an application could contain deployment types for a local installation of a software package, a virtual application package or a version of the application for mobile devices.
- Requirement rules define conditions that specify how an application is deployed to client devices. For example, you can specify that the application should not be installed if the destination computer has less than 2GB RAM or you could specify that a virtual application deployment type is installed when the destination computer is not the primary device of the user.
- Global conditions are similar to requirement rules but can be reused with any deployment type.
- User device affinity allows you to associate a user with specified devices. This allows you to deploy software to a user rather than a device. For example, you could deploy an application so that it only installs on the primary device of the user. On devices that are not the primary device of the user, you could deploy a virtual application that is removed when the user logs out.
- Deployments are used to distribute applications. A deployment can have an action which specifies whether to install or uninstall the application and a purpose which specifies whether the application must be installed or whether the user can choose to install it.
- System Center 2012 Configuration Manager can use detection methods to determine if a deployment type has already been installed on a device by using product information, or a script.
- Application management supports the new monitoring features in System Center 2012 Configuration Manager. The status of an application deployment can be monitored directly in the Configuration Manager console.
- Packages and programs from Configuration Manager 2007 are supported in System Center 2012 Configuration Manager and can use some of the new deployment and monitoring features.
- You can now deploy a task sequence on the Internet, as a method to deploy a script, for example, prior to installing a package and program. It is still not supported to deploy an operating system over the Internet.
- Software Center is a new client interface that allows users to request and install applications, control some client functionality, and to access the Application Catalog, which contains details about all available applications.
Recommended reading:
Introduction to Application Management in Configuration Manager – http://technet.micro…y/gg682125.aspx
Planning for Application Management in Configuration Manager – http://technet.micro…y/gg699370.aspx
How to Create Applications in Configuration Manager – http://technet.micro…y/gg682159.aspx
How to Create Deployment Types in Configuration Manager – http://technet.micro…y/gg682174.aspx
Configuring the Application Catalog and Software Center in Configuration Manager – http://technet.micro…y/hh489603.aspx
Step 1. Create an Application
Perform the following on the CAS server as SMSadmin
Applications are new to Configuration Manager 2012 and give us new abilities over the Packages and Programs that we were used to in Configuration Manager 2007. You can still use the legacy method of Packages and Programs by adding packages in the Packages part of Application Management but you won’t be able to avail of many of the new abilities in the new application model in Configuration Manager 2012.
To understand the new application model in Configuration Manager 2012 you should deploy some applications, and in order to do that, you first have to add them. These applications can be in any of the following formats in the RTM release of Configuration Manager 2012.
- Windows Installer (Native) – (.MSI)
- Microsoft Application Virtualization – (Microsoft Application Virtualization Manifest *.xml)
- Windows Mobile Cabinet – (.cab)
- Nokia Sis file – (.sis .sisx)
Alternatively you can use a script based (.vbs for example) or executable program (.EXE) by manually specifying that information when creating the application.
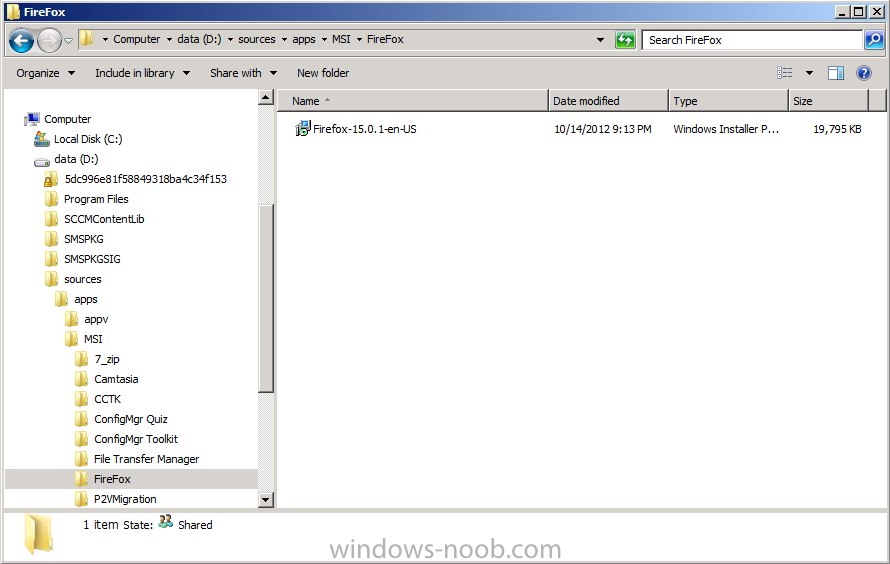
In this guide we will create a Windows Installer native application using a MSI packaged version of FireFox. You can download a pre-packaged MSI of Firefox from here (the files contained in this MSI are the official binaries with no modifications). Save the application in your sources share (I have shared a root folder on D:\ called Sources with sub folders within, one is called Apps, in that folder i have several other folders one is called MSI, and in that folder I create a new folder for each MSI based Application, for example FireFox).
Copy the downloaded FireFox MSI file to a subdirectory of your sources\apps\msi share just like I have done in the screenshot below.
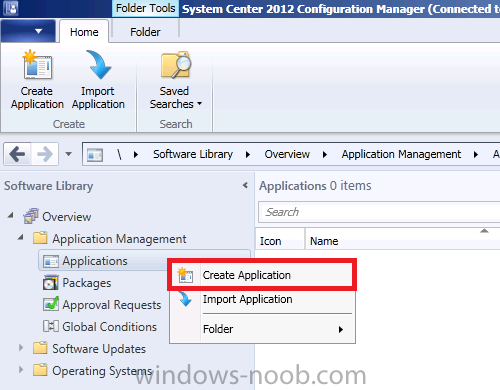
and in the Configuration Manager console, navigate to Software Library then select Application Management and expand Applications. It will be empty as we haven’t added any application yet.

Right click on Applications and choose Create Application
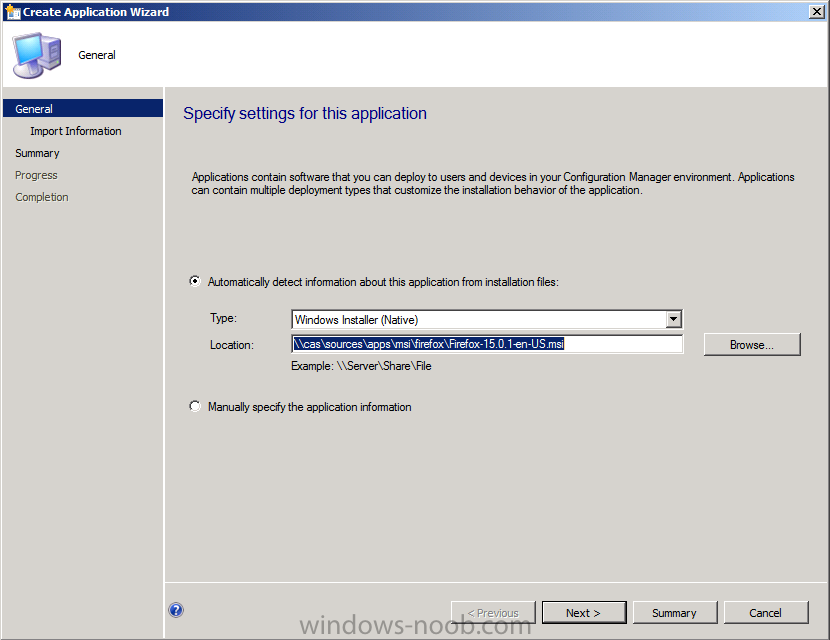
Choose Windows Installer (Native) as the application type and browse to the UNC location of the Firefox MSI, click next when ready
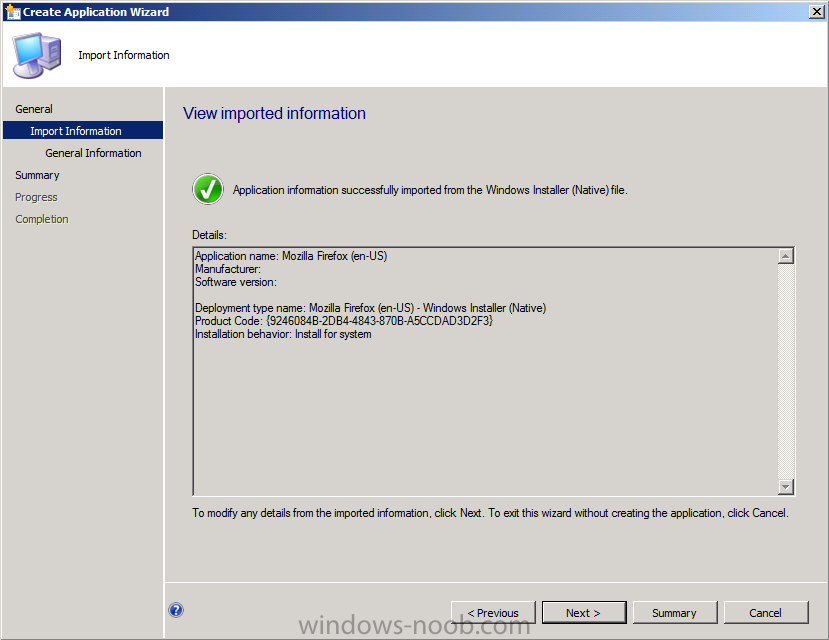
the View imported information screen is displayed which contains information about the application it has detected from the MSI properties
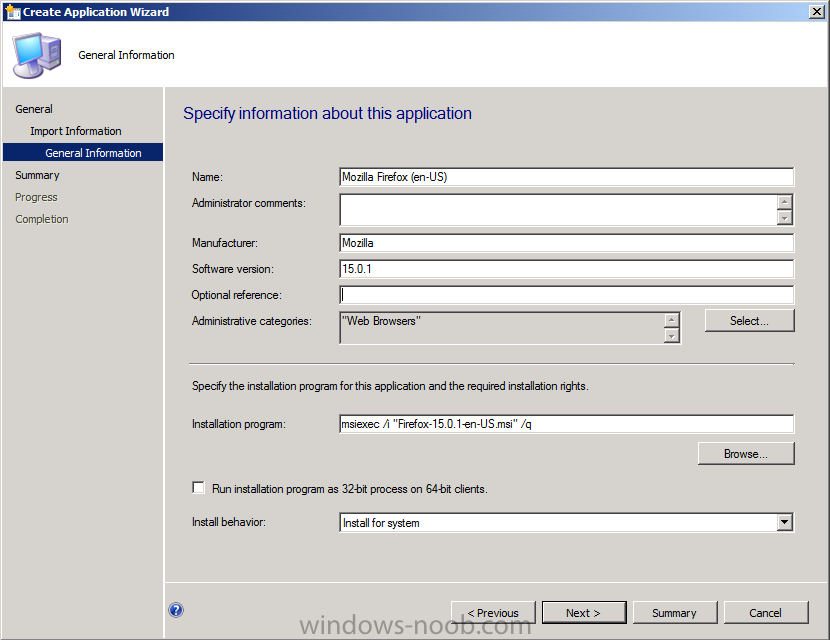
On the General Information screen you can specify information about the application, I’ve manually added the Manufacturer, some version info and created an Administrative category called web browsers but apart from that the information listed is provided by Configuration Manager via the MSI properties.
Notice that the installation program already has some switches (i=install, q=quiet), if you want to add some additional switches you can, just make sure to test them first. Also note that the installation behaviour is set to Install for System which basically means that this application will be installed in System context. If you want the application to install in the Users context select Install for User instead, however if the user does not have administrative permissions they may fail to install the application depending if it requires administrative permissions.
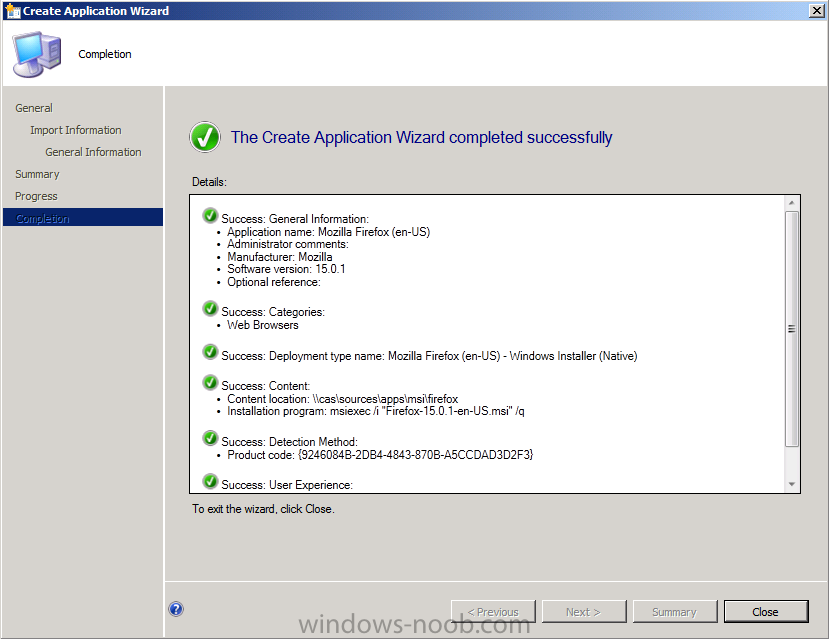
Click through the rest of the wizard till completion and then close the wizard.
Step 2. Edit the Deployment Type
Perform the following on the CAS server as SMSadmin
Now that we’ve created our application it comes with one Deployment type (you can add many more depending on your needs). This deployment type defines how the application is installed (or not) based on requirements, dependencies and other criteria which we can specify. In this guide we will set some requirements for this deployment type so that it only installs if the User logged on is the Primary user as defined via User Device Affinity.
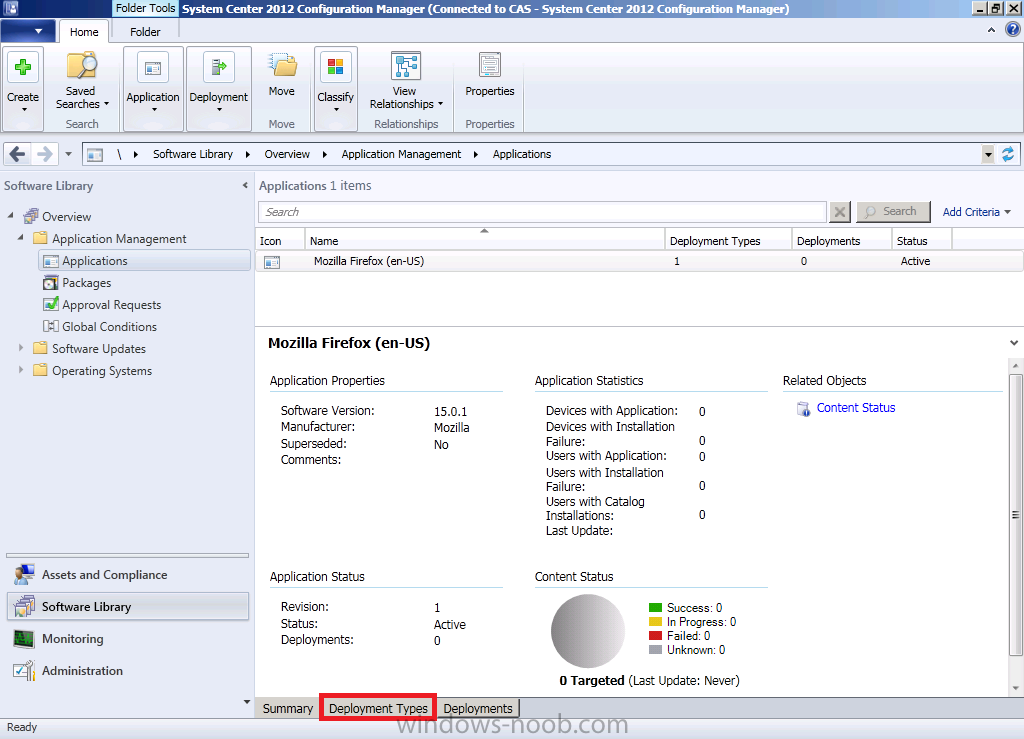
In Applications, select our newly created application and click on the Deployment Types tab beneath. Notice the detailed information about our application already made available to us in the console.
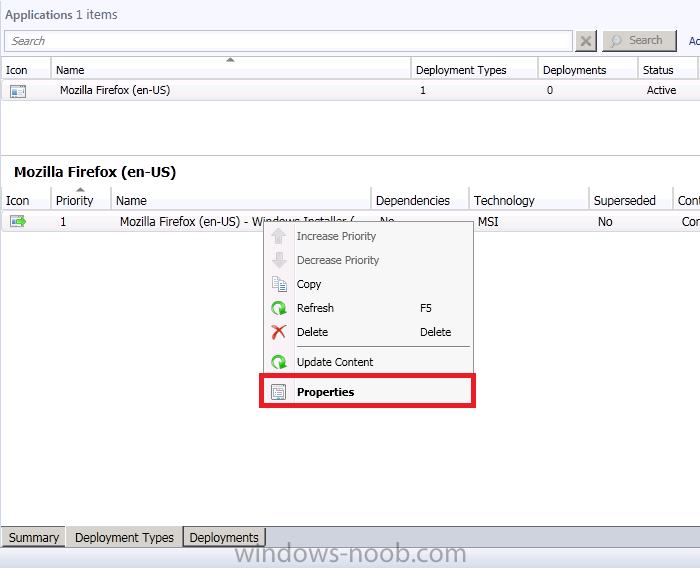
on the Deployment Types screen, right click on our deployment type and select Properties.
When the Deployment Type properties appear, click on the Requirements tab.
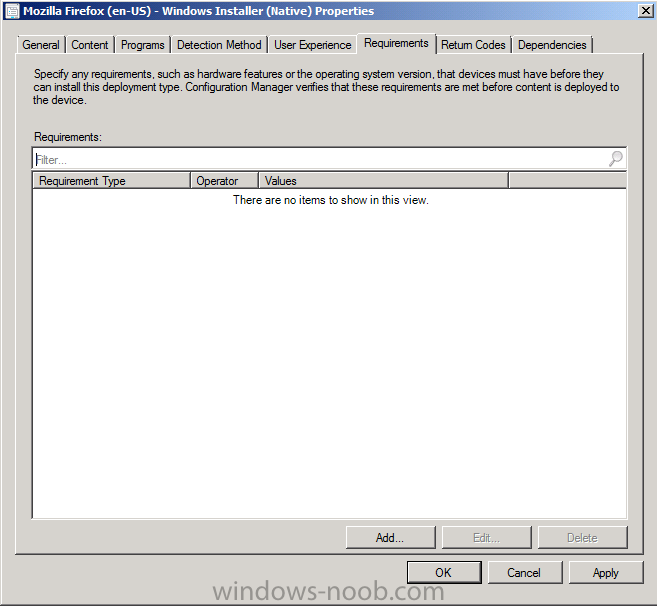
click on Add to create a requirement and in the drop down Category menu select User the rest can remain as default
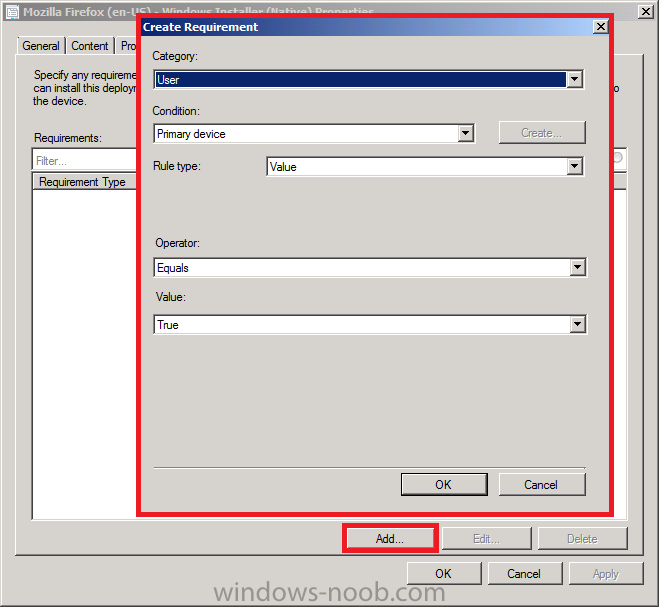
This deployment type requirement tells our application to only deploy if the user is the primary user of a device
go ahead and click add again and this time add a requirement so that the operating system must be Windows 7 X64 as per the screenshot below
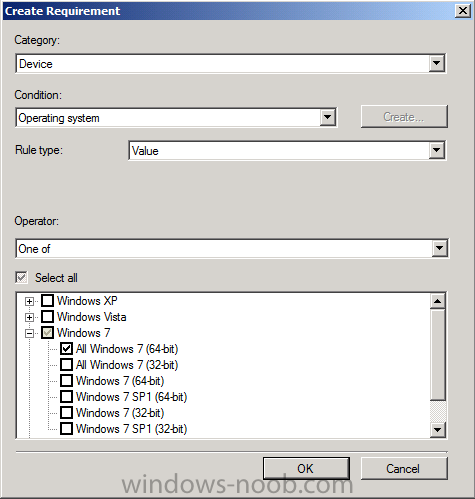
If you are feeling adventurous you can go ahead and add some more requirements. The key here is that this deployment type only works if the requirements (and other criteria) are met, otherwise it won’t run. You can create several deployment types using this methodology to target applications to different types of users/devices.
Step 3. Deploy the Application to All Users
Perform the following on the CAS server as SMSadmin
Note: You can deploy required applications (install and uninstall), but not packages or software updates. Available applications, which users request from the Application Catalog, are not supported for mobile devices. Mobile devices also do not support simulated deployments.
Now that we have created our application and modified the requirements in the deployment type we will deploy it with an available purpose (available means that it is optional and that means that the application will not be forcefully installed, if you want to force the installation of an application, change the Deployment purpose to Required).
Tip: By making the deployment available (optional) and targetting it to All Users it will show up in the Application Catalog, if you make the deployment required (mandatory) and target All Users it will show up in Software Center instead, required applications do not show up in Application catalog.
In this example we want our application available to all users (that meet our requirements in our deployment type) using the Application catalog.
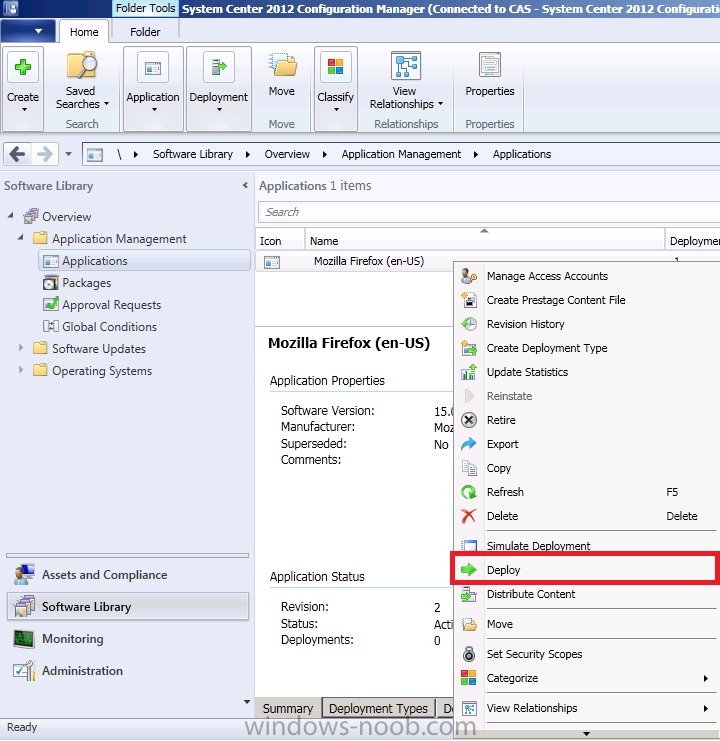
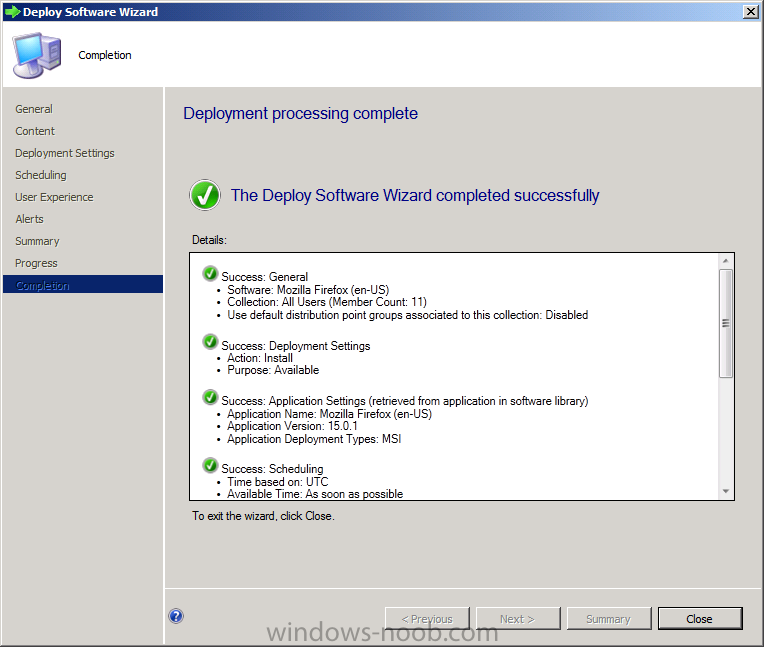
Right click on the FireFox application and select Deploy.
for collection browse to All Users
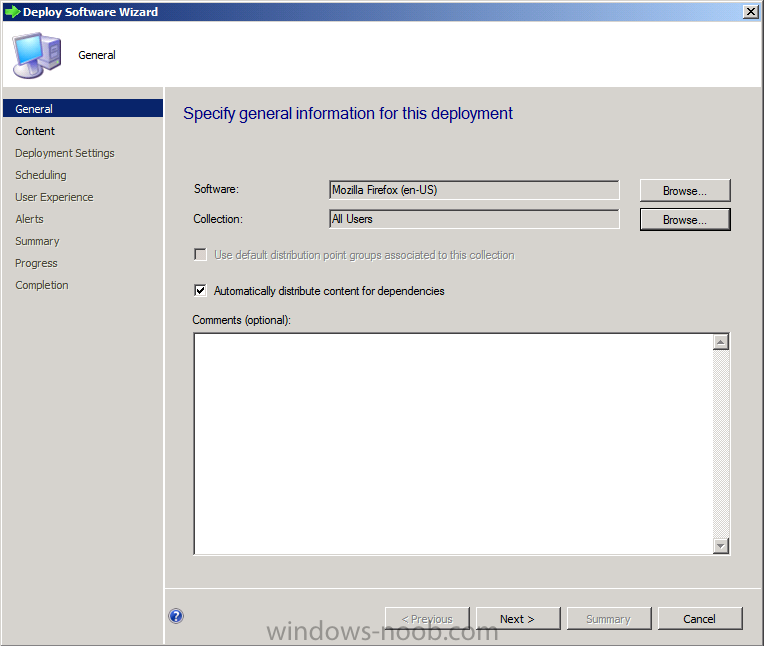
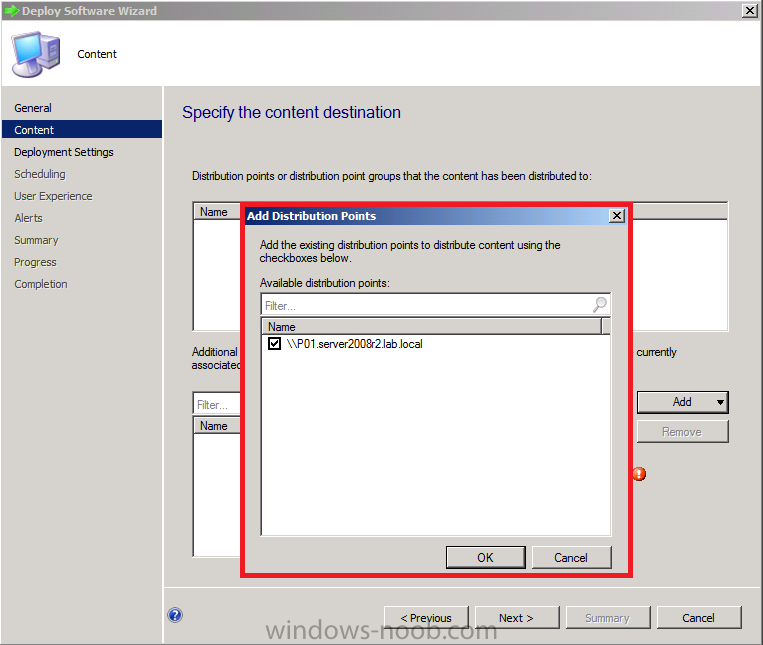
click next and you need to decide what distribution points will deliver this application, click Add, select distribution point and then select your Distribution Point on the Primary server P01.
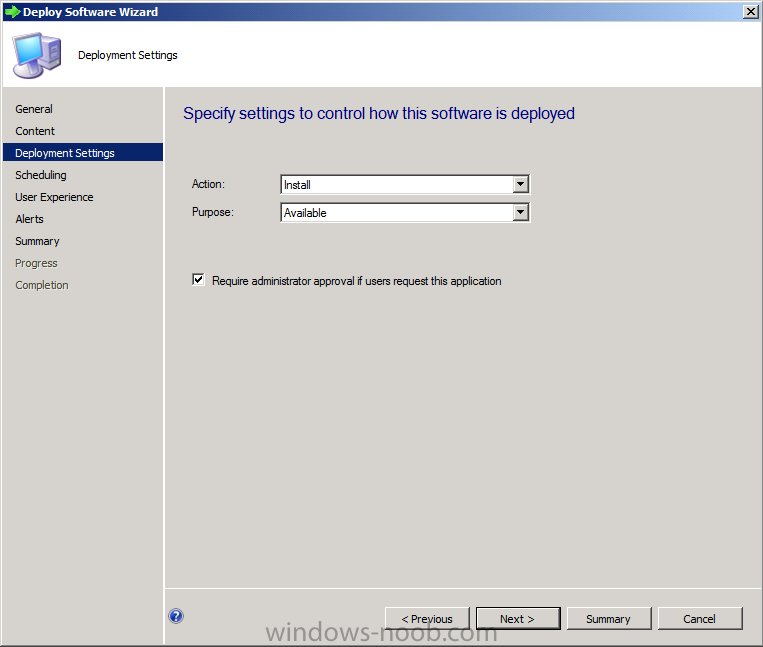
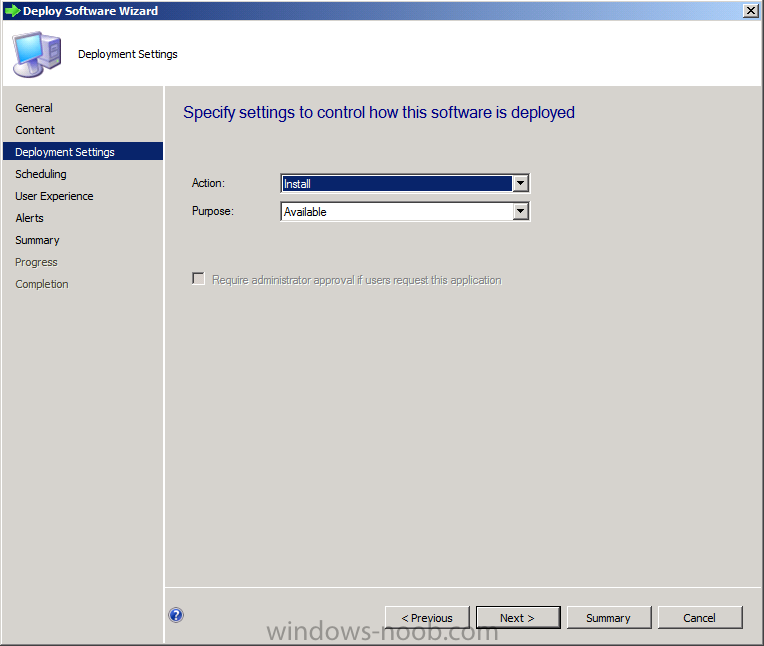
click next, on the Deployment Settings screen leave it as Action: Install and Purpose: Available. If you want to add administrator approval for this application via Application Catalog then now is your chance, so select the checkbox. You should really only use this option for software that is perhaps expensive to License and therefore want finer control over who gets to install it. The downside to this functionality is lack of email alerts to the administrator in question when a request comes in (can be resolved via Orchestrator) meaning that an administrator must approve the application in the Configuration Manager console prior to a user getting it.
Note: You cannot request Administrator Approval for Required Applications (Mandatory deployments). If you want to use the administrator approval process then you must deploy the application with an Available purpose.
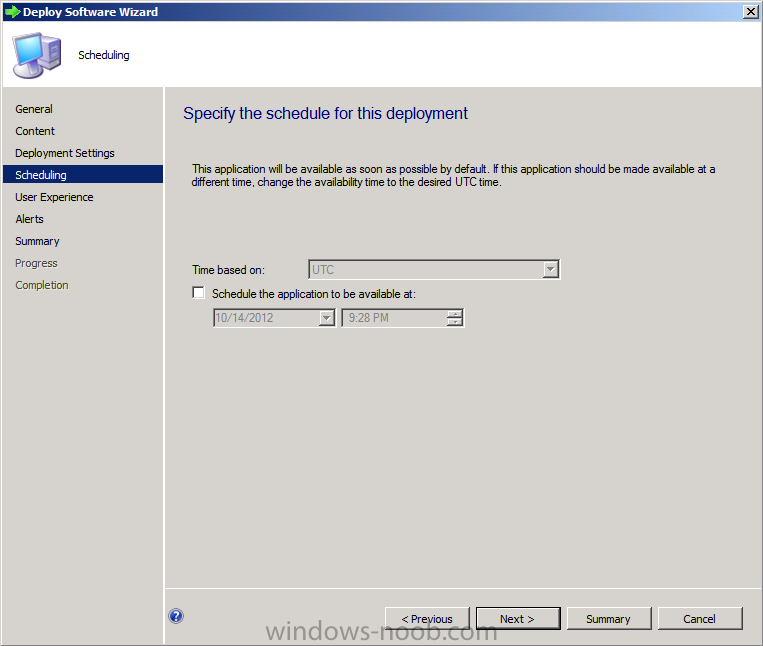
If your application was large (Office) and you wanted time for it to distribute to all your distribution points prior to users seeing the deployment notification, you can schedule it’s availability here. If you want to force the schedule to be available as soon as possible and to force an installation deadline then change the deployment purpose to required to see those options.
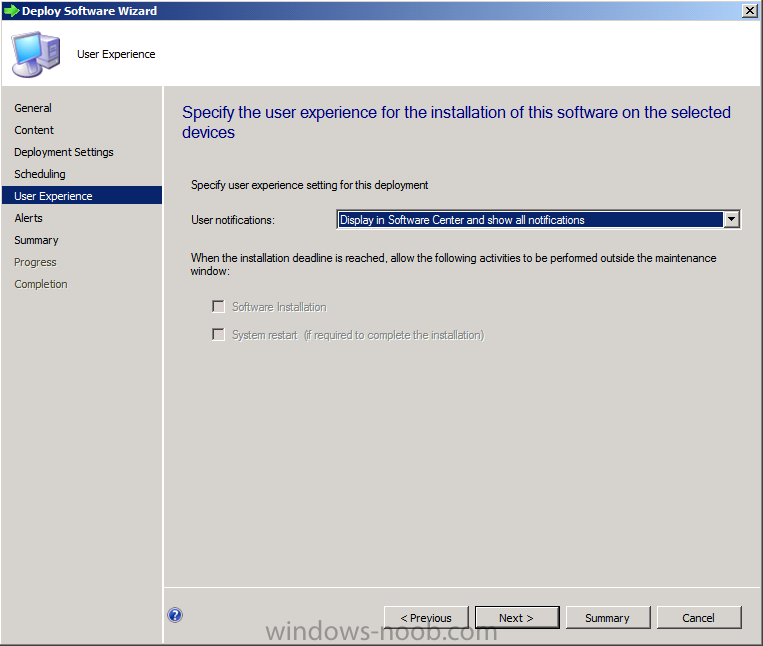
you may also want to specify settings for your users in the User Experience screen
Note: Some options may be greyed out or missing completely (for example the hide in software center and all notifications option is missing in Available Deployments but visible in Required deployments) depending on the Deployment purpose (Available versus Required).
click your way through the rest of the wizard to completion.
Step 4. Verify the User Experience
Perform the following on a Windows 7 client computer as testuser
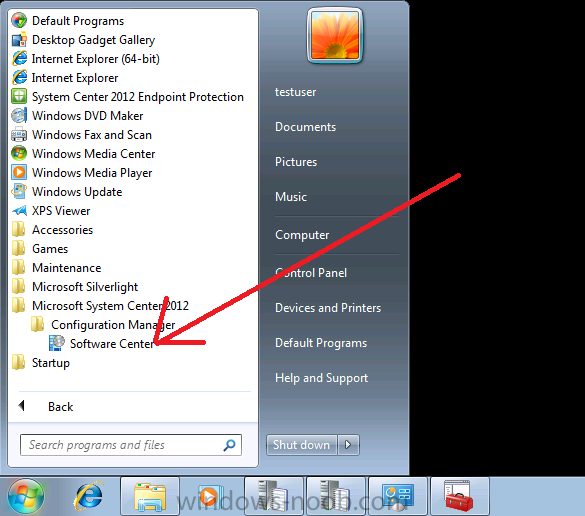
Once the deployment to All Users is created, Login to a client computer running Windows 7 X64 as a standard domain user (testuser), click on the start menu and select Software Center from the Microsoft System Center 2012 menu, Software Center is the new version of Run Advertised Programs that you are used to from Configuration Manager 2007.
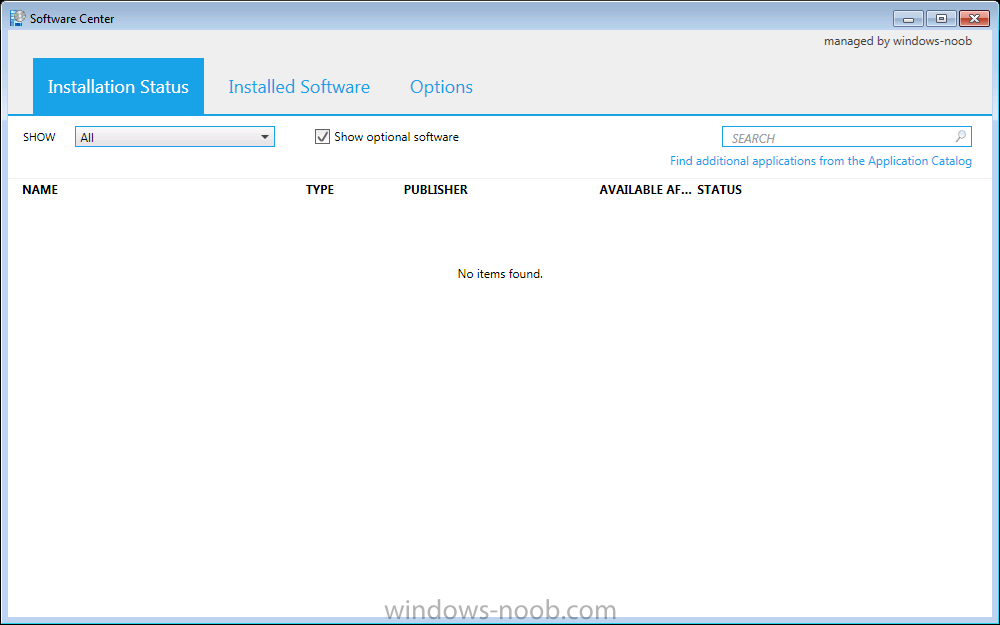
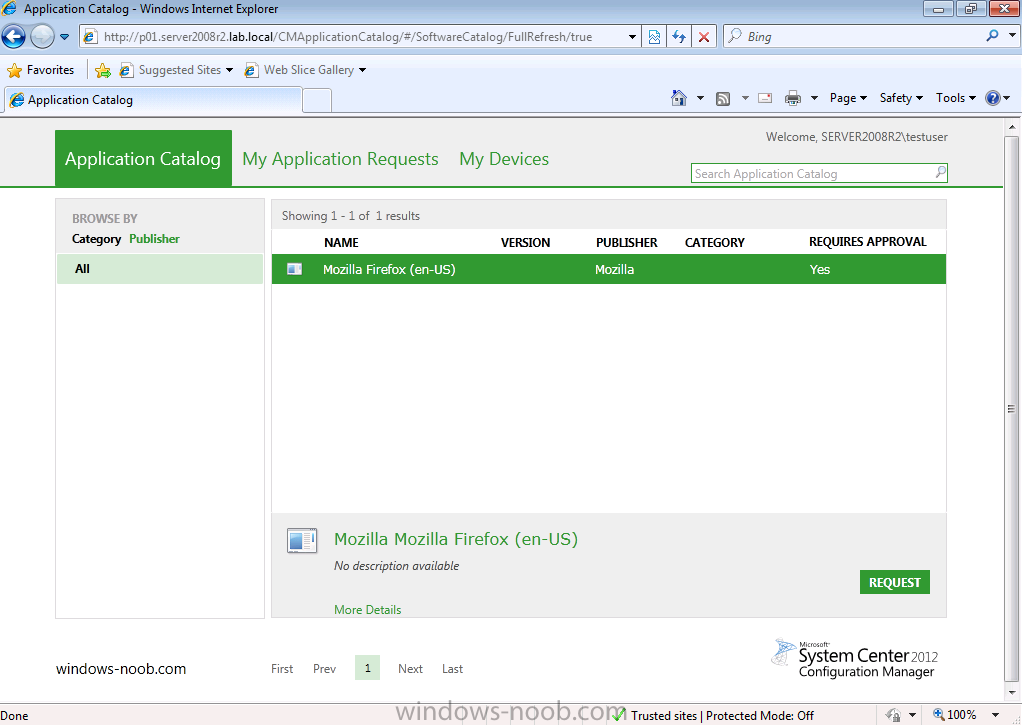
As you can see Software Center is currently empty, however click on the link to the Application Catalog in the top right corner.
The Application Catalog opens and you should see the Mozilla Firefox application listed, note also that it requires approval.
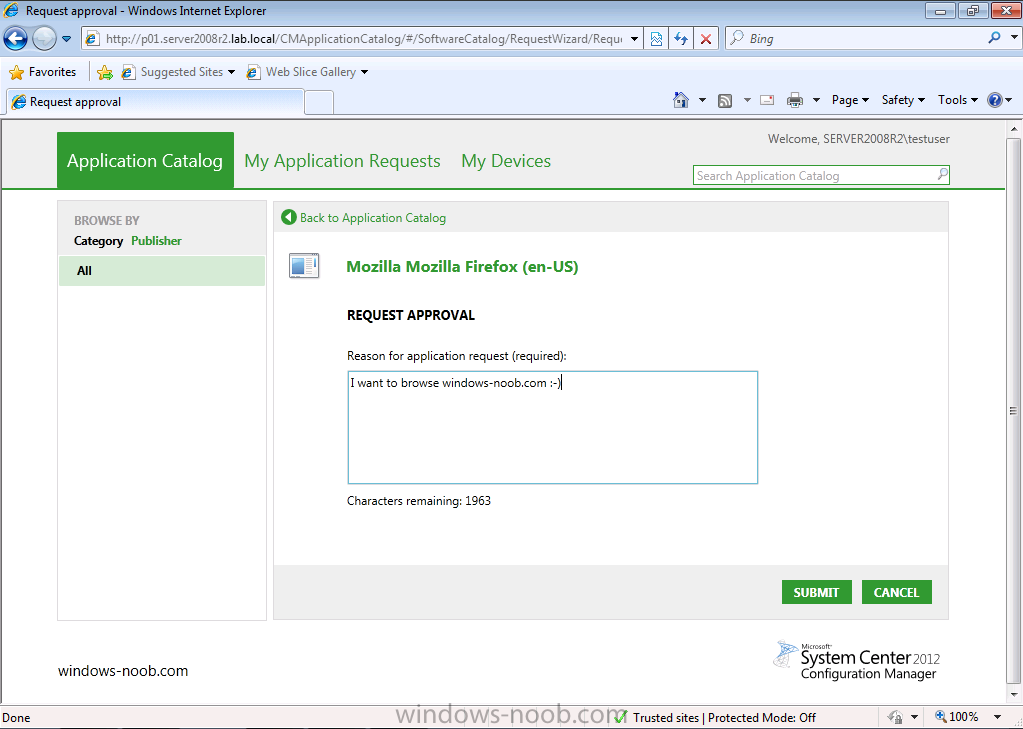
so go ahead and click on Request and fill in some useful information before clicking submit
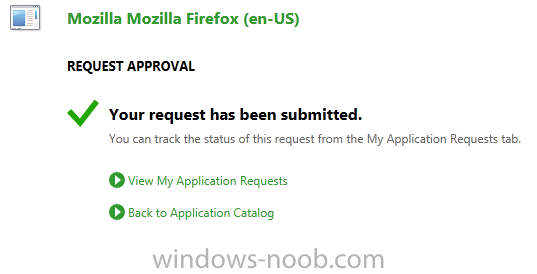
you’ll get notified of the request submission
Step 5. The Approval process
Perform the following on the CAS server as SMSadmin
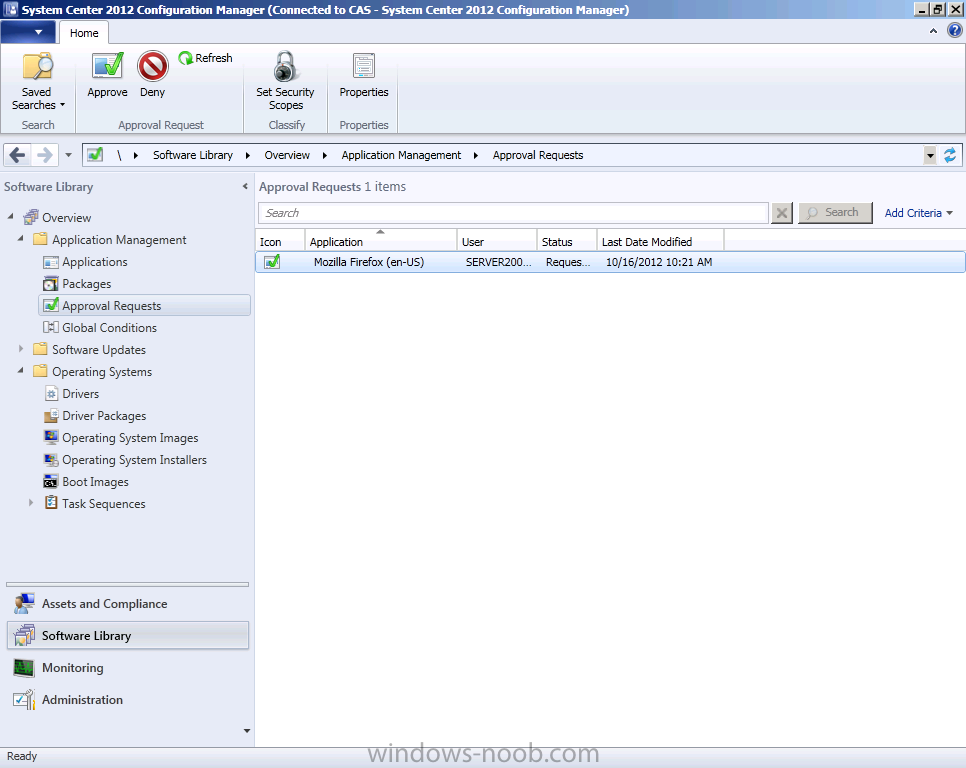
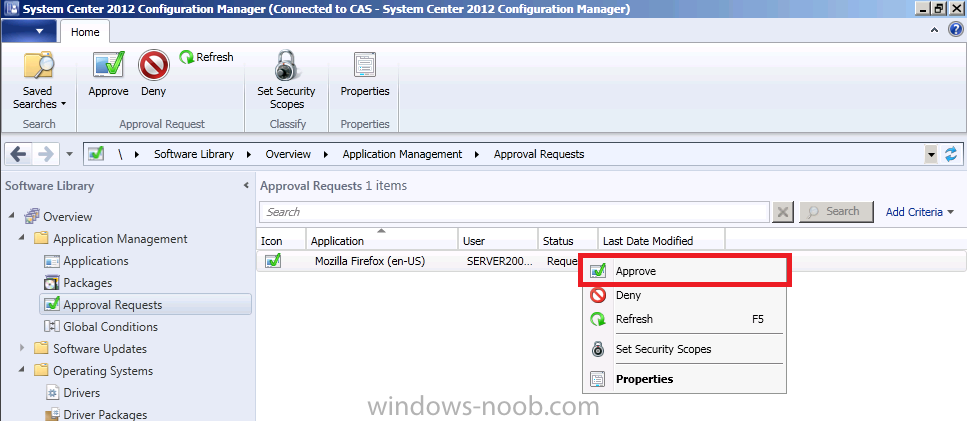
Navigate to the Software Library, click on Approval Requests, notice the Mozilla Firefox request is listed.
right click on the request and choose Approve
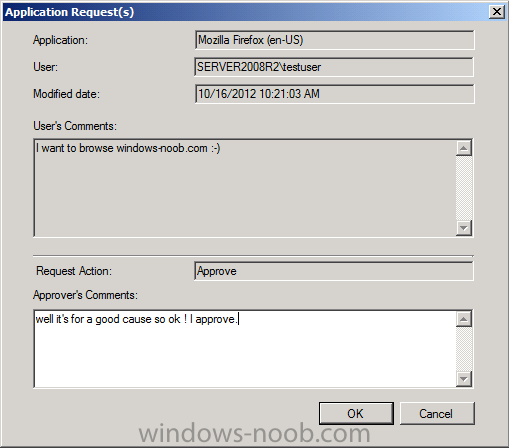
The application request details are listed, you can fill in some text to be included with the approval.
Step 6. Getting the Application installed
Perform the following on a Windows 7 client computer as testuser
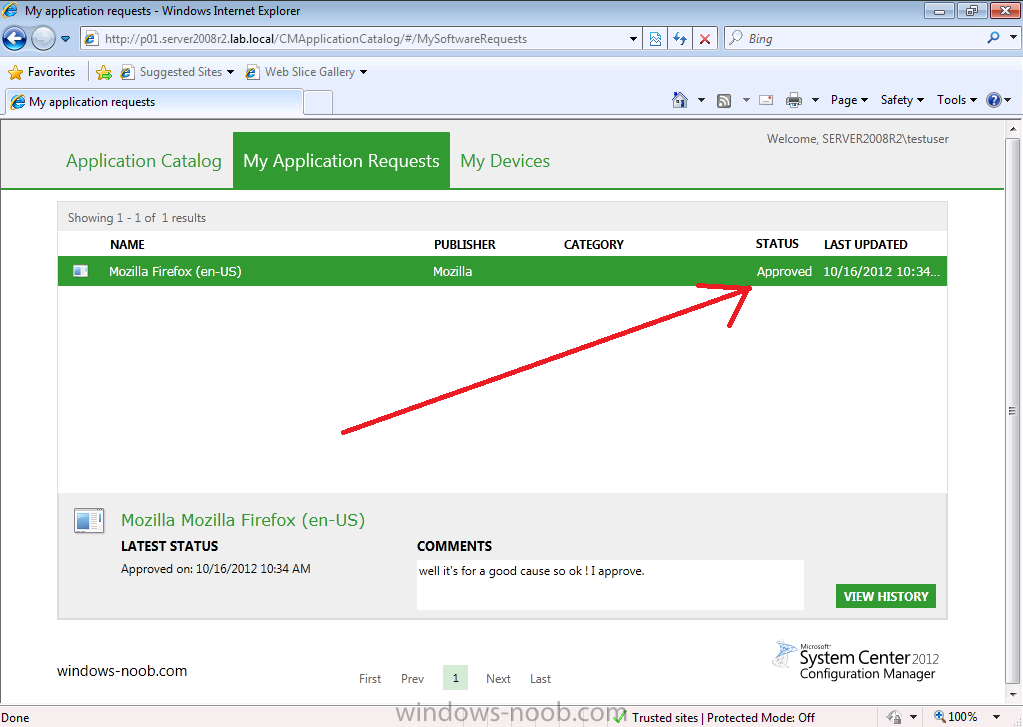
The Application has been approved and should now be ready to install, in the Applicatiation Catalog you can click on the Approval Requests tab and refresh (f5) you should see that your application is now approved.
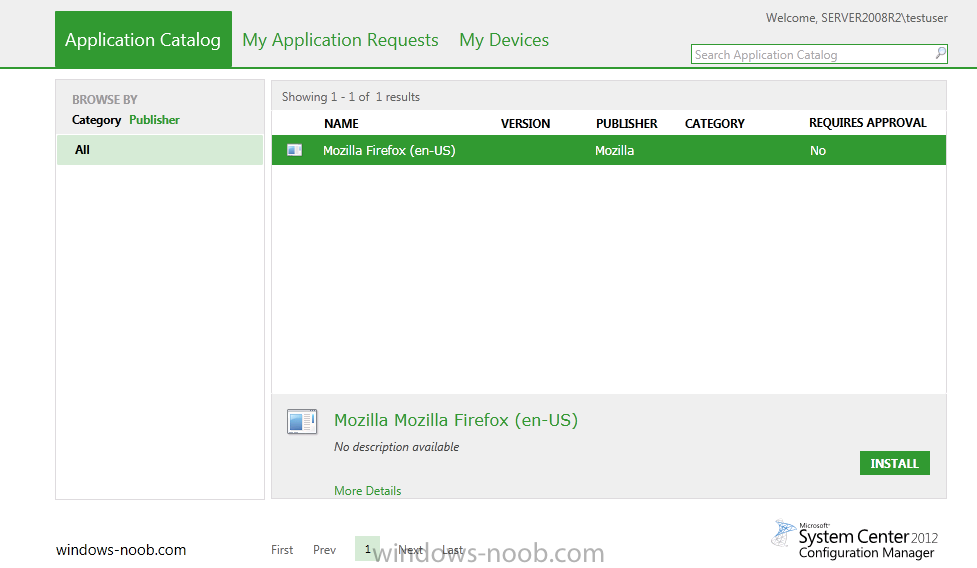
and switch back to the Application Catalog tab, notice you have an Install button, click on it.
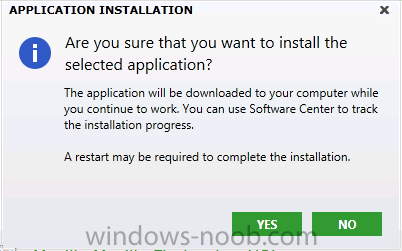
An Application Installation window pops up, click on Yes to continue
before finally getting an Application Installation not started message, this is expected behaviour as we have not met all the requirements on the Application as defined in the requirements tab of the Deployment Type. No need to panic. User Device Affinity can be defined in 6 different ways, we will use one method below to associate this computer with this user.
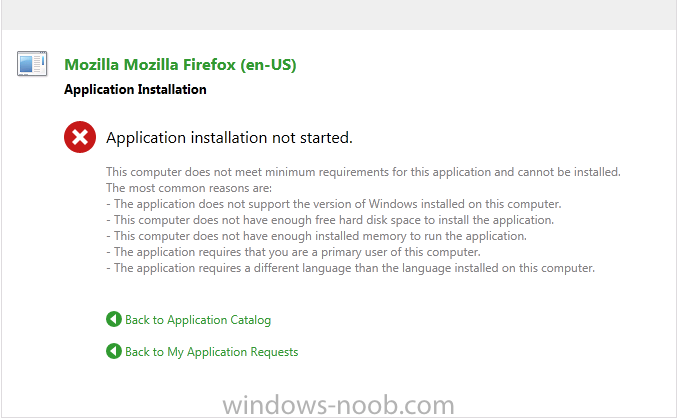
So what we see happening here is the application is listed in Application Catalog but the requirements are not actually verified until we attempt to install the application.
To resolve this problem click on the My Devices tab in the Application Catalog (if you remember in Step 4 of Part 4 of this guide we created custom client user settings and allowed the users to define their own User Device Affinity.)
You’ll see that this computer is not set as a primary computer for this user, place a checkmark in the checkbox
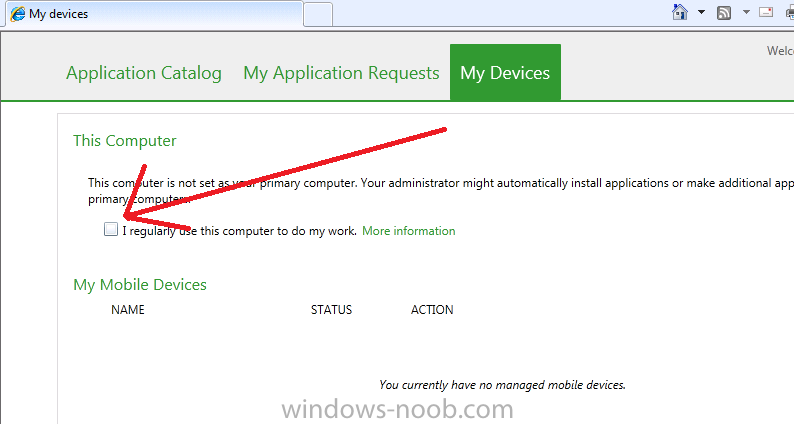
so that is set as your primary computer like so…

go ahead and click on Install again in the Application Catalog tab, this time it will work as the requirements in the Deployment Type are now satisfied 🙂
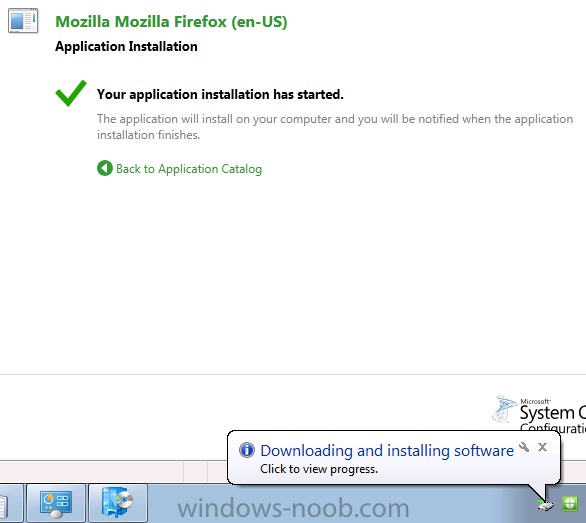
and the software get’s installed..
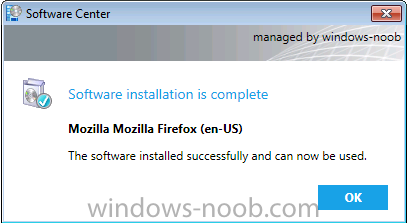
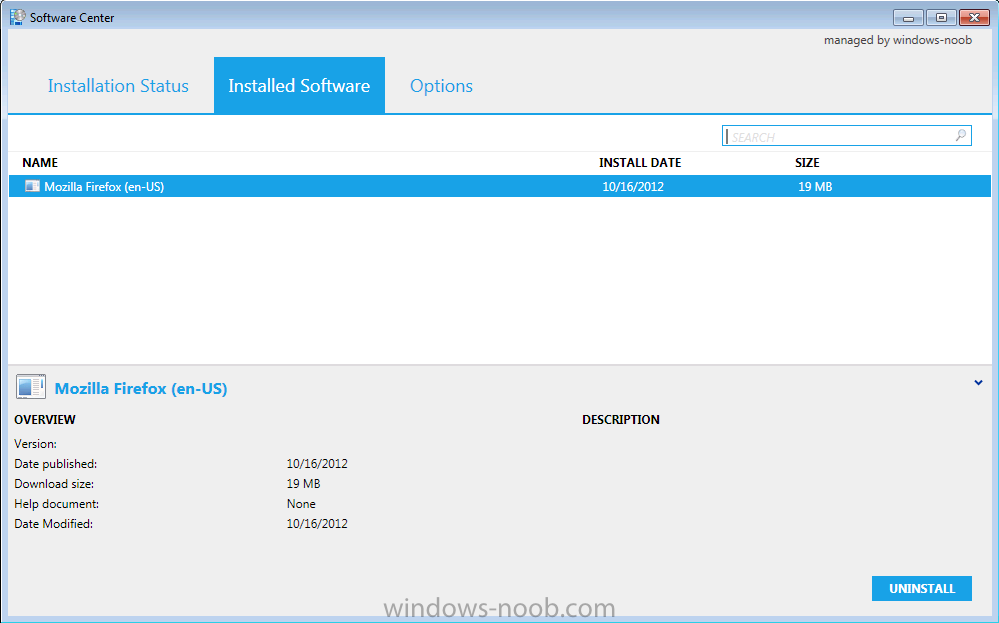
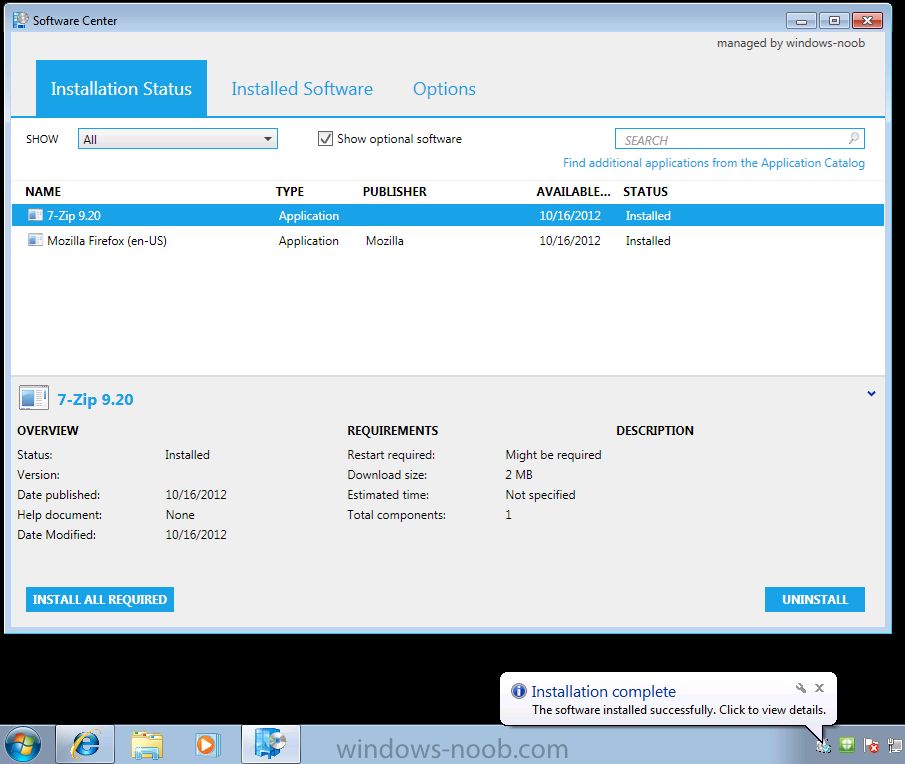
If you open Software Center now, the application is listed in the Installed Software tab and you can even choose to Uninstall it.
Step 7. Add another application and Deploy it to a Device Collection
Perform the following on the CAS server as SMSadmin
Note: In production if you want to target several computers, create a suitably named collection and use Query based membership rules to populate the members of that collection. Try to avoid deploying to the All Systems collection as that will target everything in your hierarchy.
Device collections contain devices like computers, and as a result targeting devices means the available deployment will show up in Software Center.
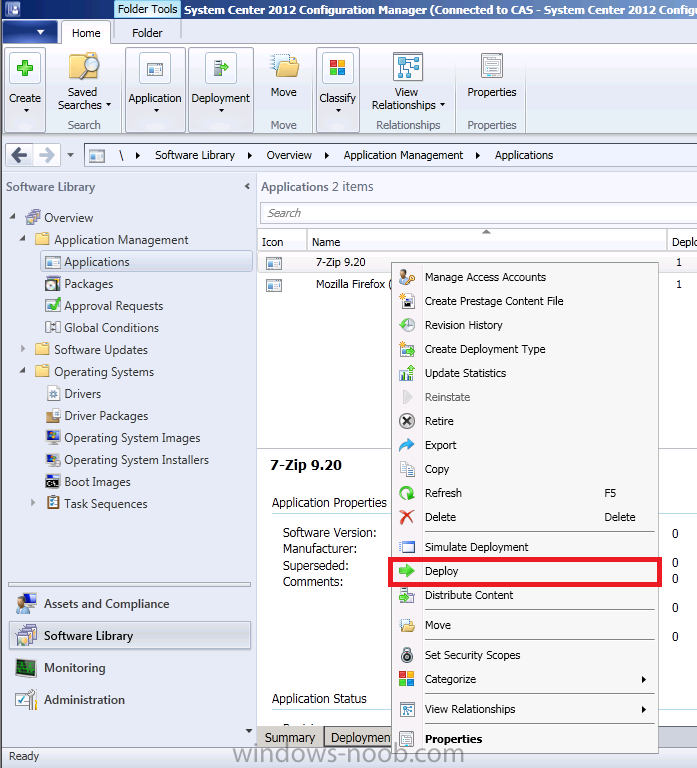
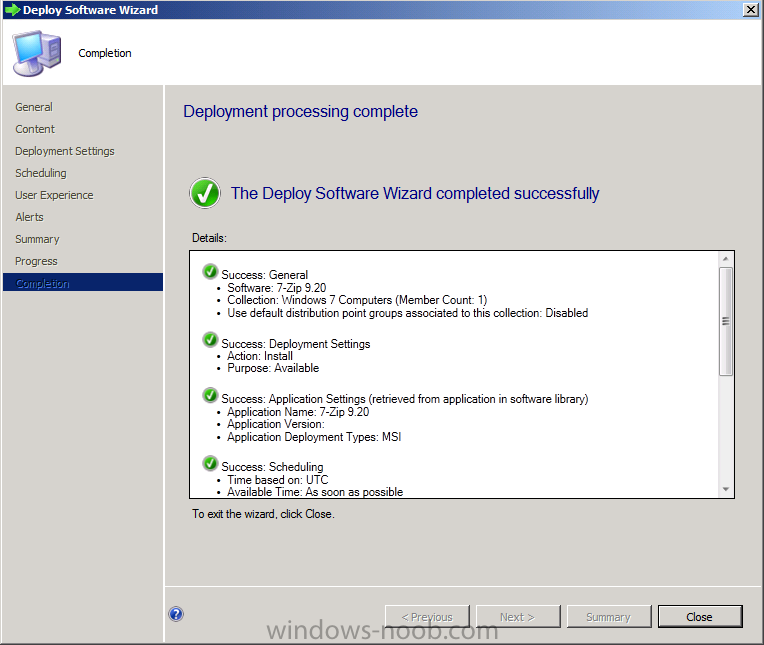
If you want your application to be made available to all computers via the Software Center then by deploying it to Device collections instead of User collections will produce a different result to the above. In my example below I’ve added a new application called 7Zip (MSI in X86 and X64 format available from here) to the Applications part of software library.
I have also created a query based Device Collection called Windows 7 computers.
Right click on our newly added 7Zip application (you will have added it just like we did above) and choose Deploy
In the drop down menu choose Device collections, select your appropriate device collection, in my example I have chosen Windows 7 computers.
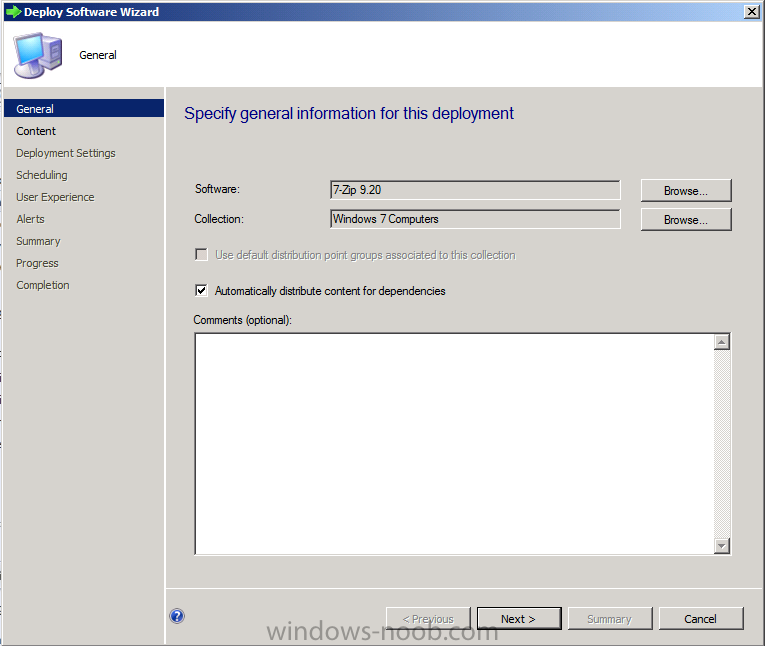
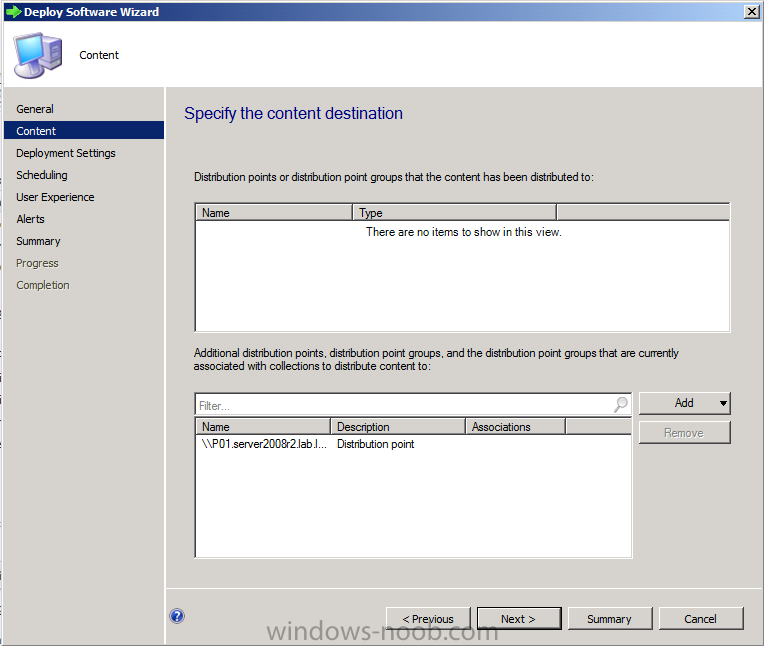
add your distribution point(s)
and notice the difference ? the ability to request approval is greyed out as we are targetting devices and not users
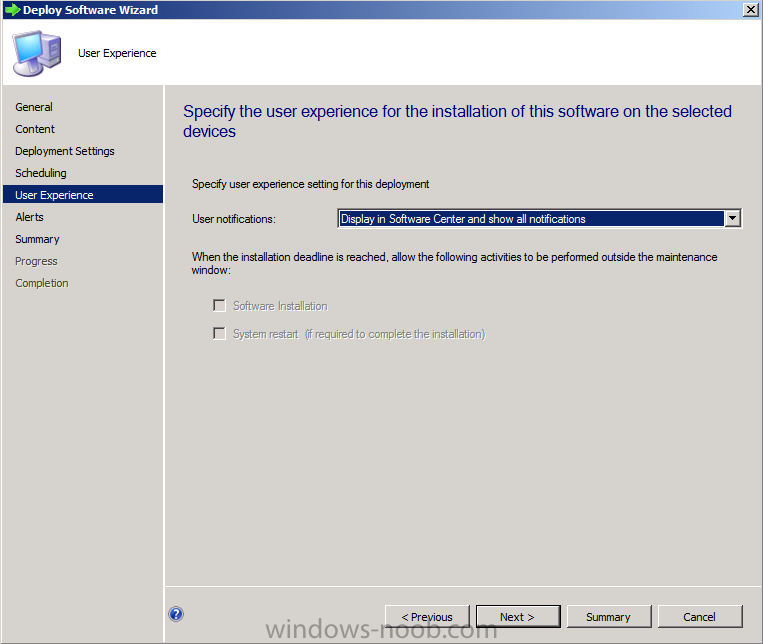
click through to User Experience, and select Display in Software Center and show all notifications
click through the rest of this wizard to completion.
Step 8. Getting the application via Software Center
Perform the following on a Windows 7 client computer as testuser
Login to a Windows 7 computer that is a member of the device collection which you targetted the 7Zip application to. You should see the following New Software is available notification appear in the system tray
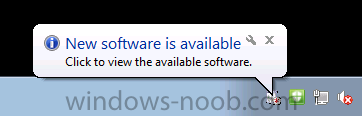
click on the notification or open software center manually and you should now see the 7Zip application listed in Software Center.
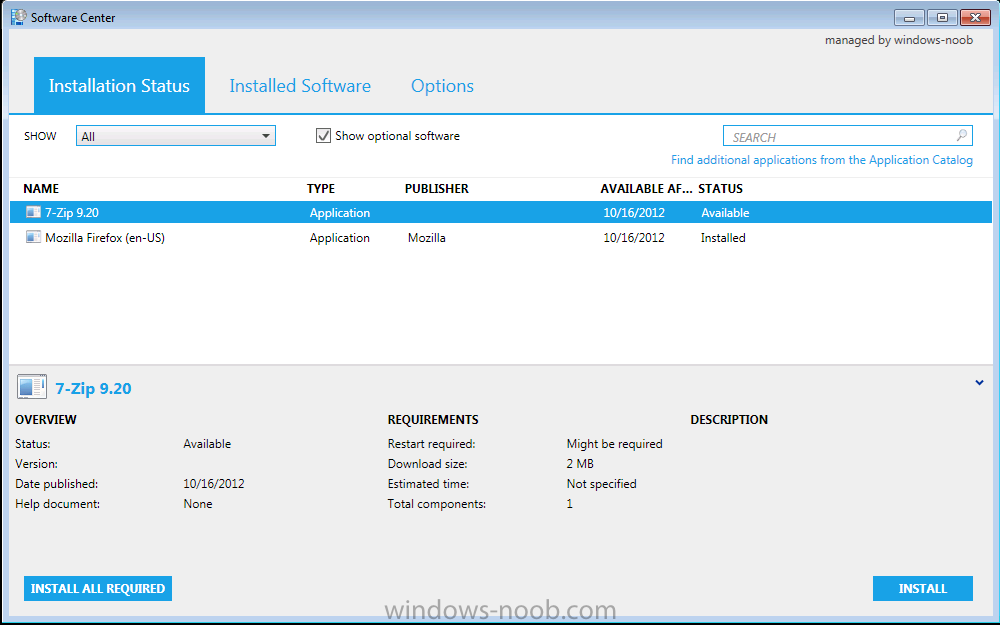
Note: If you are feeling curious you can open the Application Catalog, the 7Zip application will not appear there as we have only targetted this available deployment to Computers (and not users).
Click on Install in Software Center and the 7Zip application will be installed.
So there you have it, you’ve learned how to target applications to computers and users and how editing the deployment type and specifying requirements can impact how an application is installed. In addition, you’ve seen the benefit of using User Device Affinity by associating a user as the primary user of a device via the Application Catalog.
Troubleshooting:
If you want to troubleshoot applications installation then refer to the following log files
- AppDiscovery.Log – found in C:\Windows\CCM\Logs
- AppIntenteval.Log – found in C:\Windows\CCM\Logs
- ConfigMgrsoftwareCatalog.Log – found buried in the %UserProfile%
- SCClient_Domain@user_1.log – found in C:\Windows\CCM\Logs
- SCNotify_Domain@user_1.log – found in C:\Windows\CCM\Logs
The ConfigMgrSoftwareCatalog log file is found in hidden directories, deeply buried in some random folders such as:
C:\Users\niall\AppData\LocalLow\Microsoft\Silverlight\is\0rglkc4j.syl\fucg35en.q1m\1\s\rwl0r0fam4nbpyvap0mkobagvrar1b3pwcrkul0pggwb3o3mp5aaadca\f\ConfigMgrLogs\ConfigMgrSoftwareCatalog.log

Pingback: Using System Center 2012 Configuration Manager – Part 8. Deploying Applications | SCCM