

Introduction
In a previous post I showed you how you can change the video resolution while in WinPE to fix resolution issues on Lenovo hardware when using UEFI network boot. As there is more and more hardware capable of using UEFI mode the next logical step was to make this more dynamic without having the need to update packages to distribution points. This issue will only affect you if you are displaying HTA’s while still in WinPE (Hyper Text Applications such as this one) and if those HTA’s are bigger than the screen resolution that WinPE defaults to in UEFI mode. This problem may occur on more manufacturers than Lenovo and if i see it occuring on other manufacturers i’ll change the script accordingly to deal with them, but for now, it’s Lenovo only.
Note: The issue that this resolves only occurs in UEFI network boot scenarios, the same hardware, same task sequence, same boot image will not show the same behaviour for USB boot.
Solution
The solution is a couple of PowerShell scripts I wrote, one of which detects the Lenovo model, and based on that searches for a folder matching the model name (eg: ThinkPad X230) in a predefined network location and if it exists uses drvload to load the inf file in the root of that folder. This means that you do not have to create any package containing the video drivers, and you only need to copy the video drivers for affected models to the pre-defined location.
To implement the solution, follow the steps below:
Step 1. Create some folders and a share
On a server of your choice, create a share called hidden$. Create a bunch of subfolders in the format VideoDrivers\Lenovo <Model> where model is the model name, eg: ThinkPad X230, you should create one folder for each Lenovo model you support for UEFI deployments. The following PowerShell will do that for you just change the DataDrive variable and run the script with Administrator credentials. If you already have a share called hidden$ you can run this script anyway to create the folders.
#
# creates some folders for the UEFI Video fix and shares the hidden folder as hidden$
# specify the drive letter that you want the folders created on using $DataDrive
# niall brady 2015/4/27
#
$DataDrive = "D:"
# create some folders
# create array of folders to create
     $strfolders = @("Hidden", "Hidden\VideoDrivers", "Hidden\VideoDrivers\ThinkPad X1", "Hidden\VideoDrivers\ThinkPad 10" ,"Hidden\VideoDrivers\ThinkPad Yoga", "Hidden\VideoDrivers\ThinkPad Helix" ,"Hidden\VideoDrivers\ThinkPad T420" ,"Hidden\VideoDrivers\ThinkPad T430" ,"Hidden\VideoDrivers\ThinkPad T440" ,"Hidden\VideoDrivers\ThinkPad T450" ,"Hidden\VideoDrivers\ThinkPad W520" ,"Hidden\VideoDrivers\ThinkPad W530" , "Hidden\VideoDrivers\ThinkPad W540","Hidden\VideoDrivers\ThinkPad X220","Hidden\VideoDrivers\ThinkPad X230","Hidden\VideoDrivers\ThinkPad X240","Hidden\VideoDrivers\ThinkPad X250")
foreach ($objItem in $strfolders) {

if (Test-Path $DataDrive\$objItem){
    write-host "$DataDrive\$objItem exists, skipping."
    }
    Else
    {
    write-host "$DataDrive\$objItem doesn't exist, creating folder."
    New-Item $DataDrive\$objItem -ItemType Directory | out-null
    }
     }

# create a share
write-host "sharing $DataDrive\hidden as hidden$ ."
New-SmbShare –Name Hidden$ –Path $DataDrive\Hidden -FullAccess EVERYONE -ErrorAction SilentlyContinue
write-host "All done !"
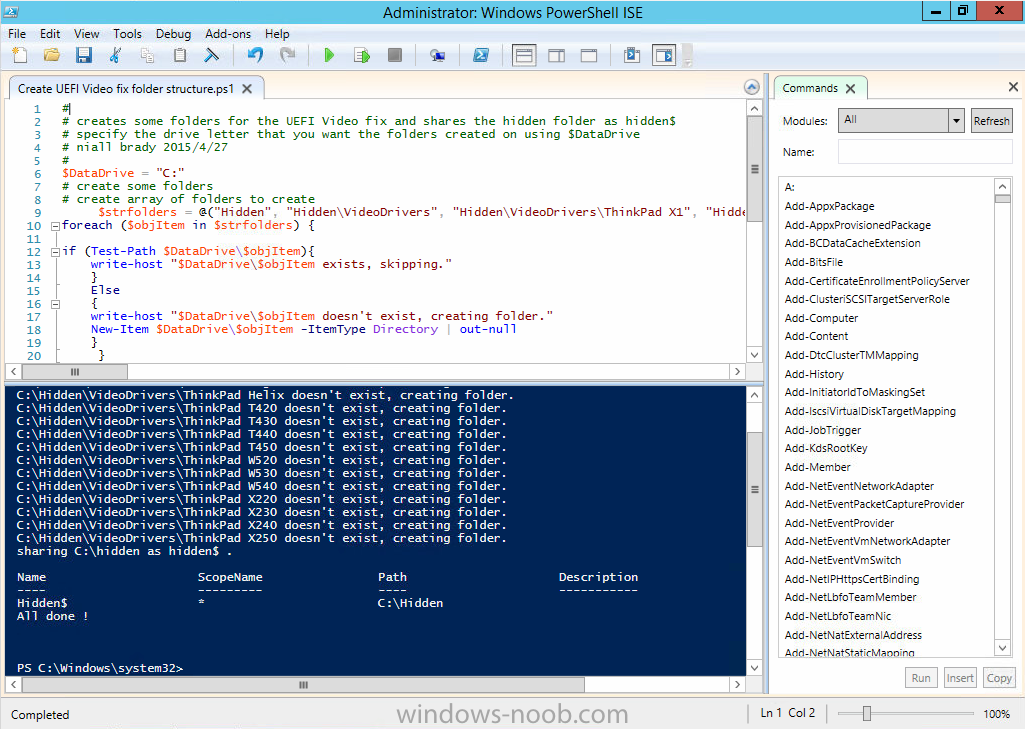
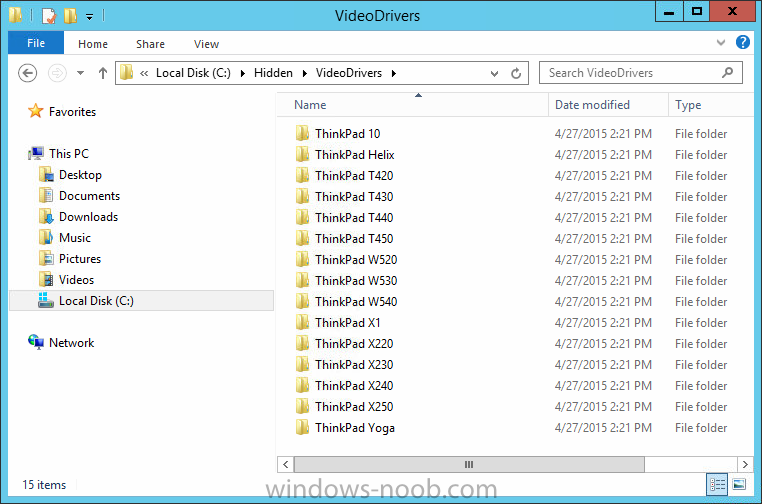
After the script is done running, you can review the folder structure it has created
Step 2. Populate the folders with video drivers for each model
Using Lenovo’s support.lenovo.com website, search for a model and select the Component called Display and Video Graphics and then download the Windows 8.1 video drivers for each model you intend to support.

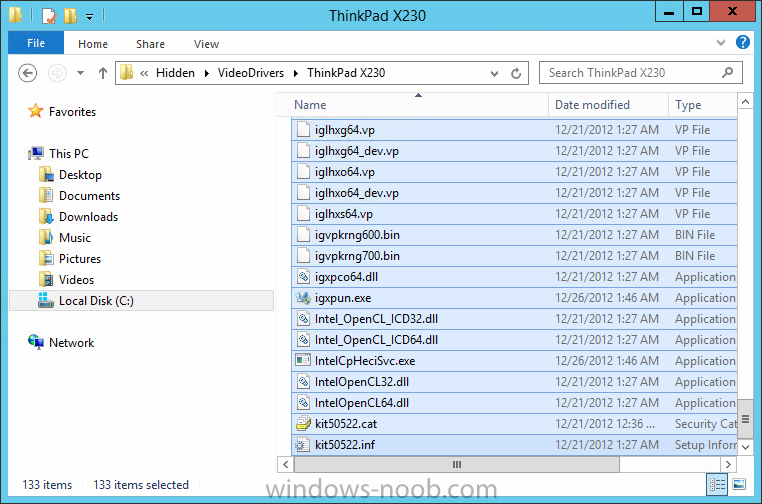
The extracted files (for Lenovo ThinkPad X230 are shown below)
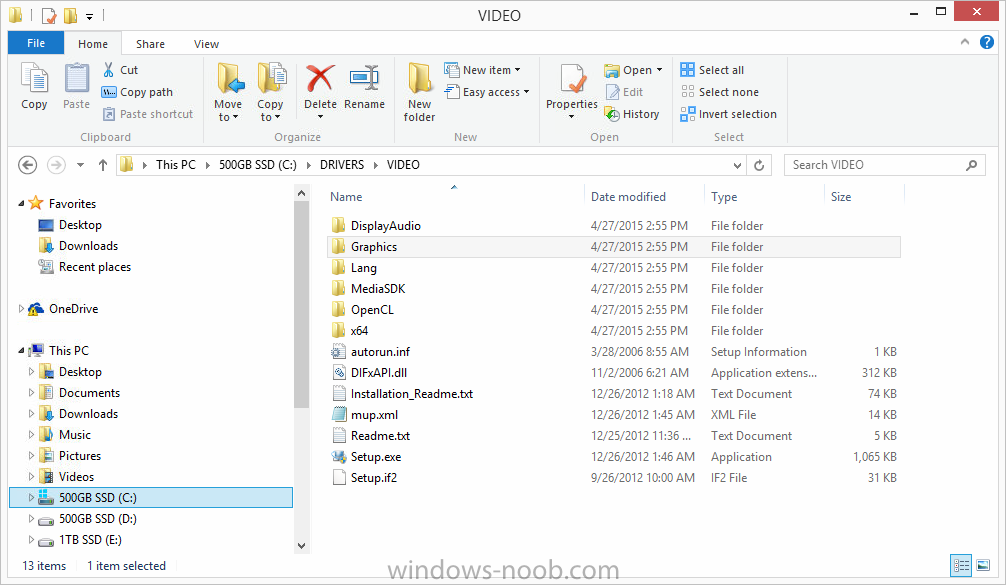
However this is not what we need, do NOT simply copy/paste the drivers directly from the video drivers download. We need the actual driver usually located in the Graphics folder as shown below
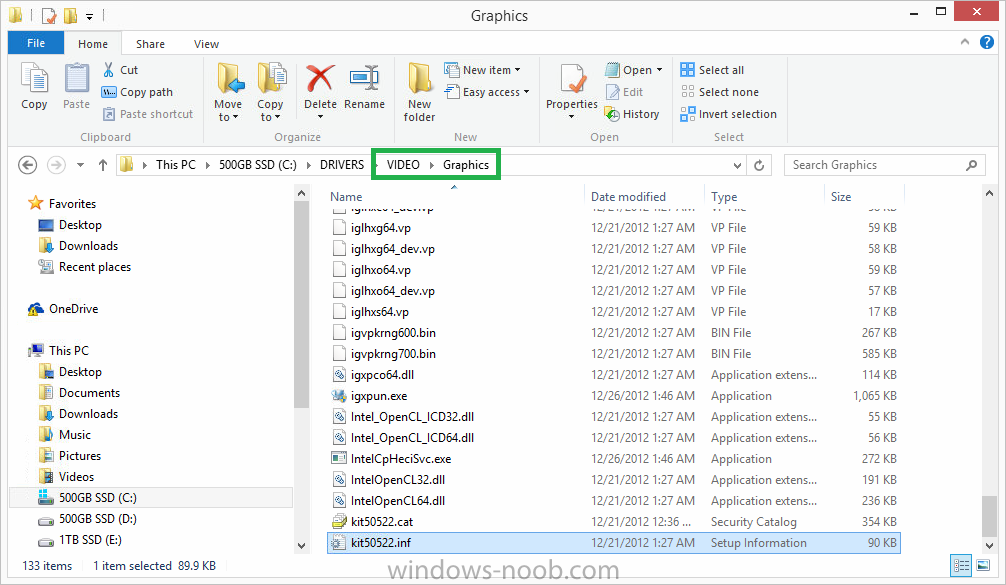
Copy that folder and all files/folders within to the corresponding model folder in the hidden folder structure
Repeat the above process for any models you wish to support using this method, remove any folder names that don’t contain any drivers.
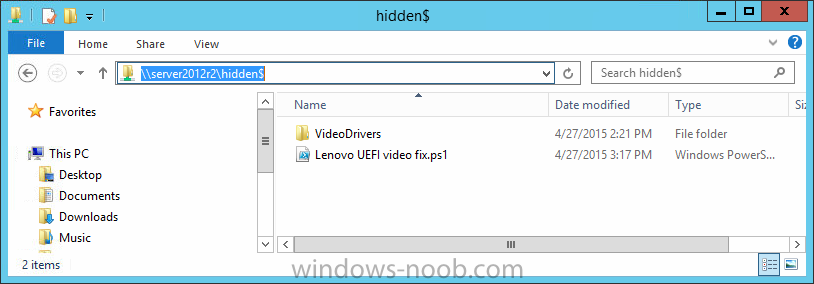
Step 3. Download the script
The PowerShell script to dynamically install the video driver is available here  PowerShell.zip 1.89KB 143 downloads.
Extract the script to the hidden$ share root as shown below.
Step 4. Edit the Task sequence
In the ConfigMgr console, in Software Library, Operating Systems, Task Sequences, right click and edit a previously created Deploy task sequence and add the following New Group, called Dynamic UEFI Video fix, by clicking on the Add drop down menu and selecting New Group. Make sure the New Group occurs before displaying any HTA.
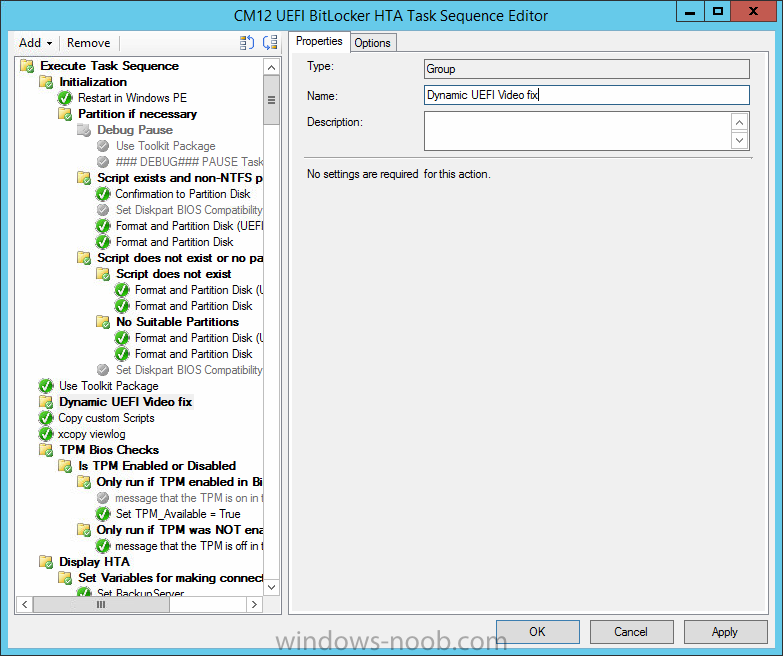
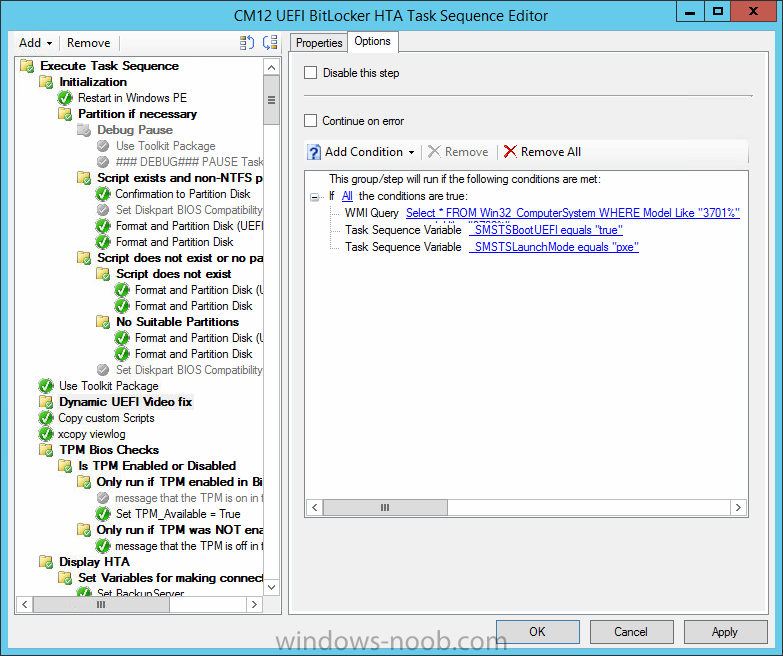
In the New Group, click on the Options tab and add the following options:
* If All the conditions are true
* WQL Query:
Select * FROM Win32_ComputerSystem WHERE Model Like "3701%"
or model like "3702%"
or Model Like "20C3%"
or Model Like "20C0%"
or Model Like "20cg%"
or Model Like "20ch%"
or Model Like "20BS%"
or Model Like "20BT%"
or Model Like "2344%"
or Model Like "2349%"
or model like "2356%"
or Model Like "20B7%"
or Model Like "20AW%"
or Model Like "4236%"
or Model Like "4177%"
or Model Like "2344%"
or Model Like "2349%"
or model like "2356%"
or Model Like "20B7%"
or Model Like "20AW%"
or Model Like "4282%"
or Model like "4284%"
or Model Like "4282%"
or Model like "4284%"
or Model Like "20BH%"
or Model Like "4291%"
or Model like "4299%"
or Model Like "20AM%"
or model like "20AL%"
or Model Like "20CL%"
or Model Like "20BU%"
or Model Like "2325%"
or Model Like "2447%"
* Task Sequence Variable: _SMSTSBootUEFI Equals True
* Task Sequence Variable: _SMSTSLaunchMode Equals PXE
as per the screenshot below
Next, click on the Add drop down again, select General, then select Run Command Line, the step uses the following settings:
Name: remove any existing network connections
Command Line: cmd.exe /c “net use * /del /yes”
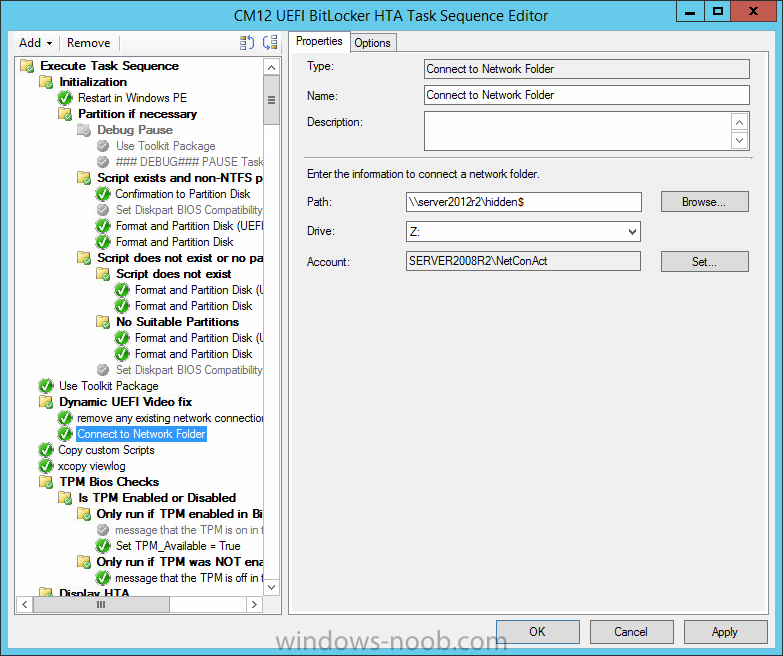
Again, click on the Add drop down again, select General, then select Connect to Network Folder, the step uses the following settings, change Domain\User to use the domain credentials of a user account that you want to make the connection:
Name: Connect to Network Folder
Drive: Z:
Account: Domain\User
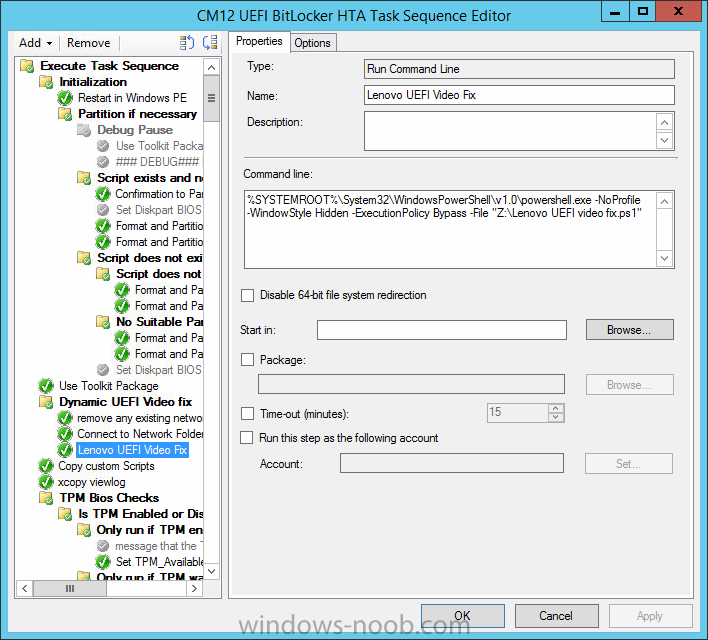
finally, click on the Add drop down again, select General, then select Run Command Line, the step uses the following settings:
Name: Lenovo UEFI Video Fix
Command Line: %SYSTEMROOT%\System32\WindowsPowerShell\v1.0\powershell.exe -NoProfile -WindowStyle Hidden -ExecutionPolicy Bypass -File “Z:\Lenovo UEFI video fix.ps1”
as shown below:
Tip: If you don’t want to use a connect to network folder step, then you can package the PowerShell script above into it’s own package and run the script directly from the package.
Apply the settings and you are ready to test the results.
Step 5. Verify the results
After making the changes above you can now UEFI network boot any of those Lenovo devices and you should see the change kick in once the group runs. To make things easy for you I’m including a video of what that process looks like. To see the video see below.
Troubleshooting
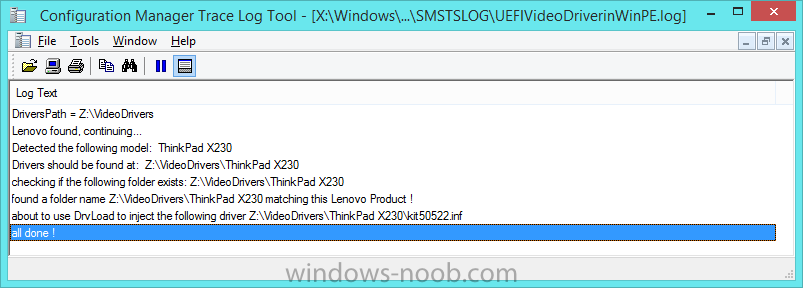
To troubleshoot this script, check out the logfile generated by the script X:\Windows\Temp\SMSTSLOG\UEFIVideoDriverinWinPE.log. Below is a screenshot of a successful dynamic UEFI video fix.
Summary
Deploying operating systems on UEFI devices using UEFI network boot is even better when using PowerShell and dynamic solutions in System Center 2012 R2 Configuration Manager.

This is a great option to have, but it doesn’t take effect until you’ve started a TS, right? The loading screens before that will still be low res.
I discovered that by swapping wdsmgfw.efi and bootmgfw.efi on the distribution points remoteinstall\smsboot\, that my Lenovo’s will load winPE using a much higher resolution. That creates other problems, but it indicates to me that loading these drivers shouldn’t be necessary.
https://social.technet.microsoft.com/Forums/windowsserver/en-US/32669390-a4a5-40e4-8c0e-58f7e7a7ad54/screen-resolution-when-pxe-boot-from-wds-vs-install-windows-81-from-usb?forum=winserversetup
correct, however this could be implemented as a prestart and therefore before any task sequence, your point however is interesting, what happens when you switch those files, what problems do you see ?
Hi,
we have been using your solution without any Problems till we upgraded to SCCM 1511. Since then the solution is not working any more 🙁
According to the logfile everything is done but the Resolution is not changing. Do you know if there is anyproblem with the 1511-SCCM-Version or the new bootpe file?
Thanks for any hint