

Introduction
In Part 1 of this mini series we integrated Windows Intune with System Center 2012 R2 Configuration Manager. In Part 2 we added Support for iOS devices (Iphone, iPad). In Part 3 we learned the difference between App Package for iOS (*.ipa file) and applications from the Apple App Store. We learned how to deploy them to iOS devices and configured the deployment type so that the applications were made available to the user based on the iPhone or Ipad operating system version, in addition we also checked device Ownership information and deployed the application based on those requirements.
In Part 4 we learned how to use and configure compliance settings in order to enable or disable certain configurable features on iOS devices. We enforced a Password requirement and enforced a minimum password length as this is a common requirement for organizations. Now we will enable support for Windows 8.1 devices (both Windows RT 8.1 and Windows 8.1 Enterprise) to be managed via System Center 2012 R2 Configuration Manager integrated with Windows Intune. Configuration Manager adds to the application experience with Windows 8.1 modern UI apps by adding some new features listed below:-
- Windows 8.1 introduces the app bundle (or .appxbundle package) to help optimize the packaging and distribution of Windows Store apps and resource packages. Configuration Manager extends the existing Windows app package deployment type to recognize .appxbundle package files.
- The create application wizard includes a new option that allows you to configure featured applications. These applications are displayed prominently in the company portal.
- You can specify a privacy link for each application that users can review before they install the application.
- You can configure an application to automatically open a VPN connection if a VPN profile has been configured. For more information, see VPN Profiles in Configuration Manager.
Step 1. Verify your CNAME DNS settings are working
In Step 3 of Part 1 you should have created a CNAME DNS entry for your public domain name that redirects EnterpriseEnrollment.yourpublicdomainname.com to manage.microsoft.com. The CNAME record is used as part of the enrollment process.
We will now do a quick test to verify that it’s working. In a web browser, type in the following URL.
- http://EnterpriseEnrollment.yourpublicdomainname.com
Replace yourpublicdomain.com with your own public domain name, so for example if your public domainname is windowsintunenoob.com then for the url above use http://EnterpriseEnrollment.windowsintunenoob.com
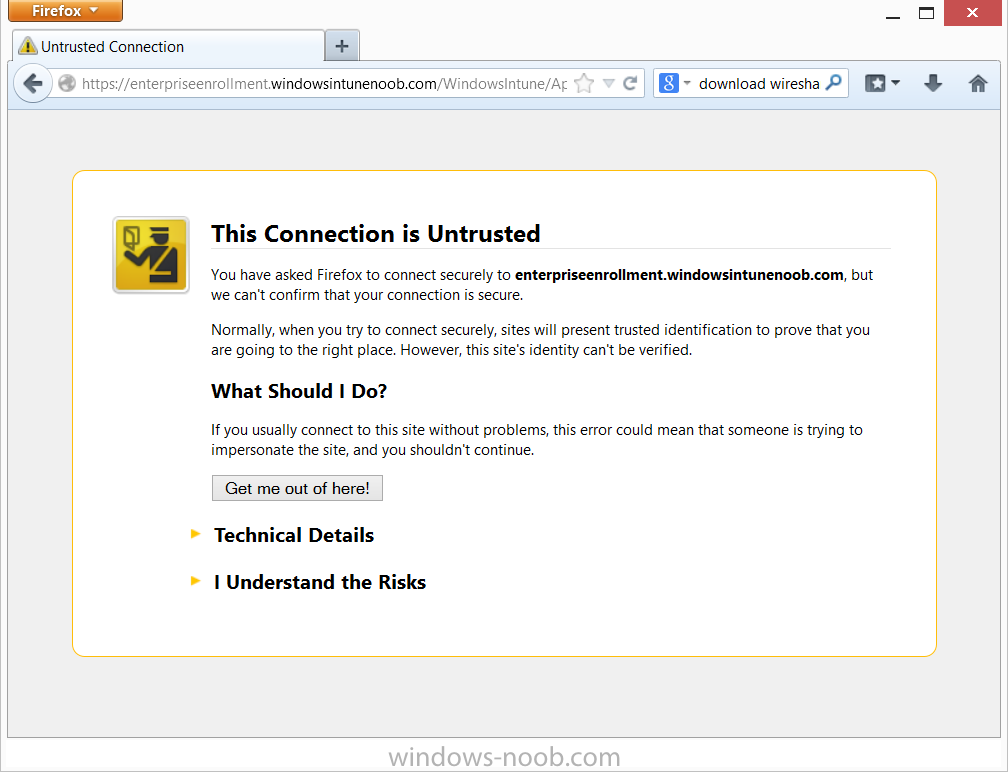
If your CNAME DNS entry is working then the redirection will show something like the following:-
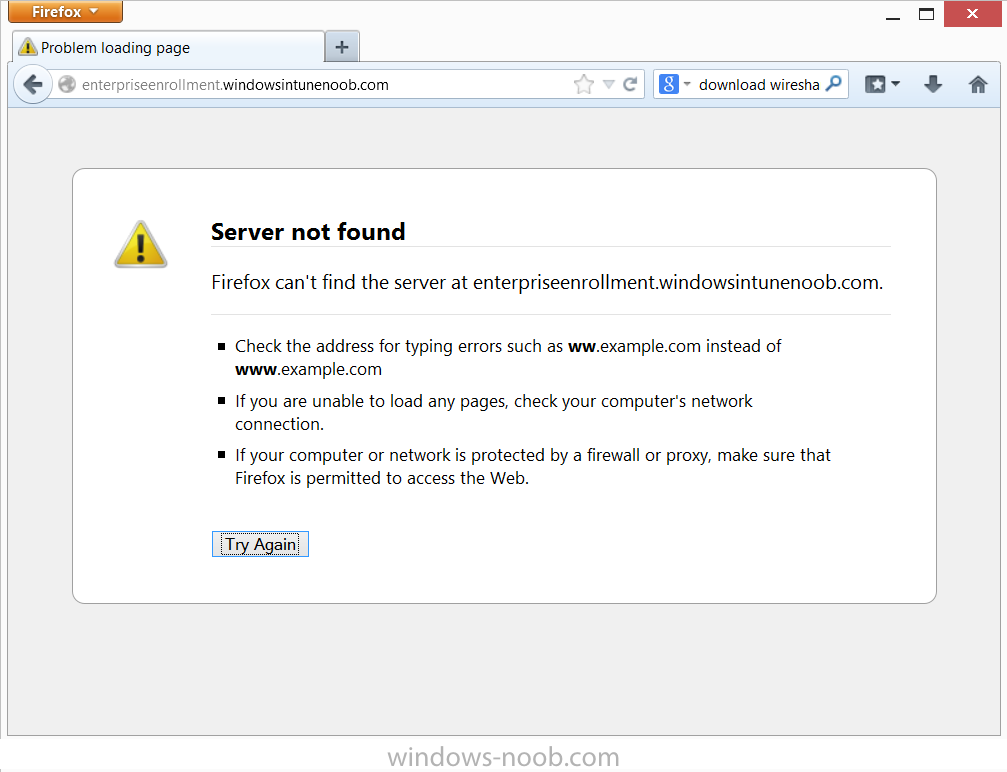
If the CNAME DNS entry hasn’t taken yet or hasn’t been done at all, or was done incorrectly you’ll see something like the below:-
If you are testing and cannot change the CNAME settings you can install a Registry key on your Windows 8.1 client to help with the above redirection. The registry key is shown below
WindowsRegistryEditorVersion5.00[HKEY_LOCAL_MACHINE\SOFTWARE\Policies\Microsoft\Windows\CurrentVersion\MDM]"DiscoveryService"="manage.microsoft.com"
Step 2. Enable Windows RT, Windows RT 8.1, and Windows 8.1 Enrollment
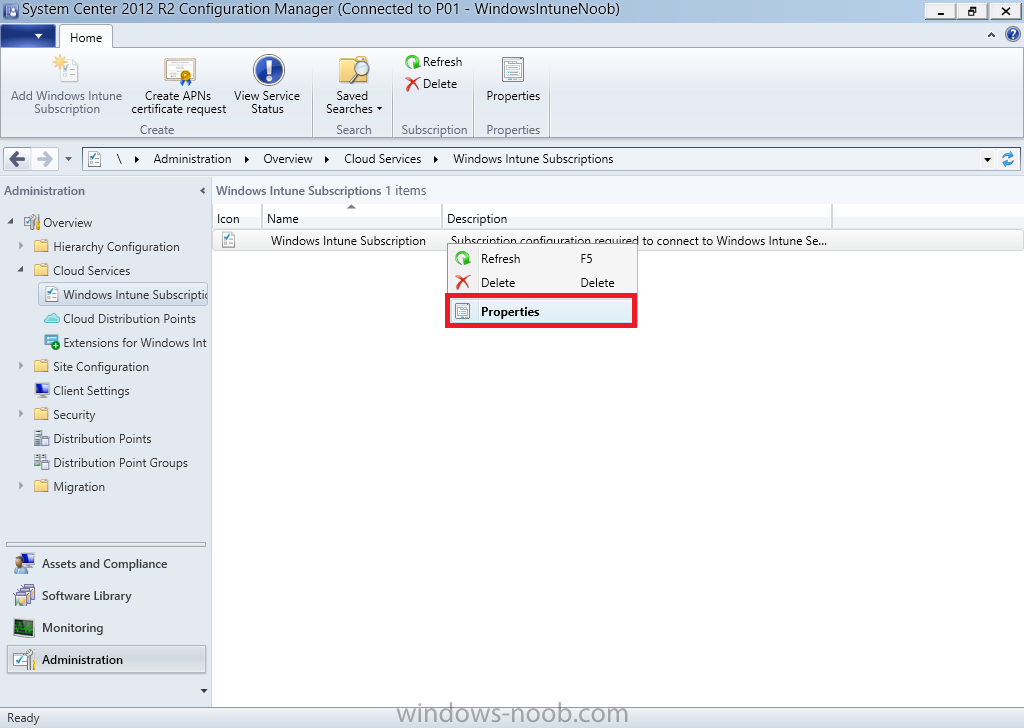
In the Configuration Manager console browse to Cloud Services, select Windows Intune Subscriptions and right click on the previously created subscription, choose Properties.
Select the Windows tab and place a check mark in the box provided to Enable Windows Enrollment.
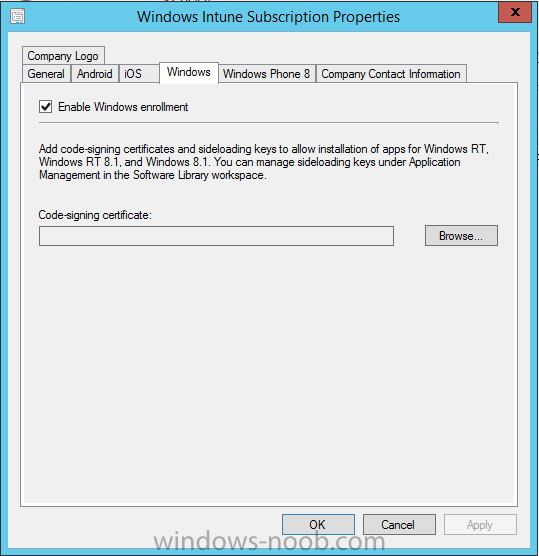
At this point if you wish you can click on Apply and Ok and you’ll be able to move to the next step. If however you want to deploy Windows Modern UI type applications (Metro…) then you’ll need to install an appropriate code-signing certificate by clicking on the browse button and selecting your code-signing certificate.
Note: To distribute line-of-business apps to Windows RT users, you must also ensure that the apps are signed with a certification authority that is trusted by the users’ devices. You can either obtain a non-Microsoft public certificate, or use a code-signing certificate from your organization’s certification authority. For information, see Acquire a Code Signing Certificate.
For Windows RT or Windows 8.1 devices, you can deploy line-of-business apps using a process known as sideloading, or you can deploy links to apps in the Windows Store (deeplinking).
Note: Although sideloaded applications do not have to be certified by the Windows Store or installed through the Windows Store, they can only be installed on sideloading-enabled devices. To enable a Windows RT device for sideloading, you must first obtain sideloading product activation keys. For information about how to obtain sideloading product activation keys, see Microsoft Volume Licensing.
Step 3. Enroll the device
In this step we will actually enroll the device with Windows Intune, but the method depends on what version of Windows you are using. If you are using
- Windows RT 8
Select Start, and type “System Configuration”, and click the dialog box to open the Company Apps. Enter your company credentials and the device will be enrolled.
Note: I don’t have a Windows 8 RT device so cannot show that process, I hope everyone has upgraded to Windows RT 8.1 at this point and that process is shown below.
- Windows RT 8.1, Windows 8.1 (workgroup joined, no Configuration Manager client installed)
Note: If you are trying to enroll a Windows 8.1 device then make sure it is Workgroup Joined (not joined to a domain) and that there is no Configuration Manager client installed.
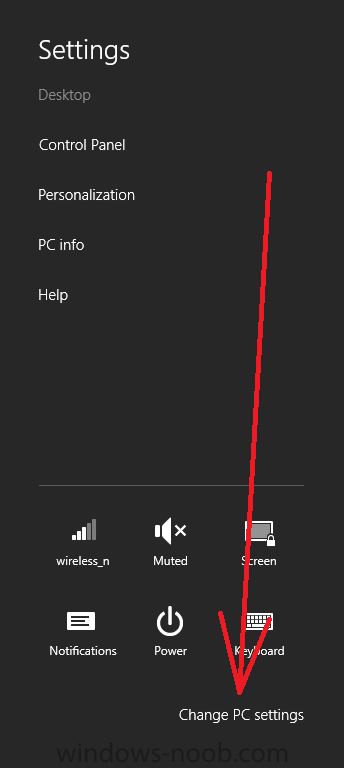
Swipe in from the right and choose Settings

Click on Change PC Settings
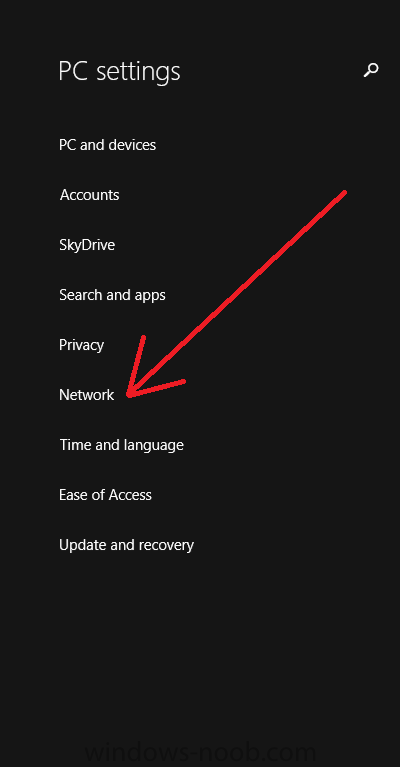
Select Network
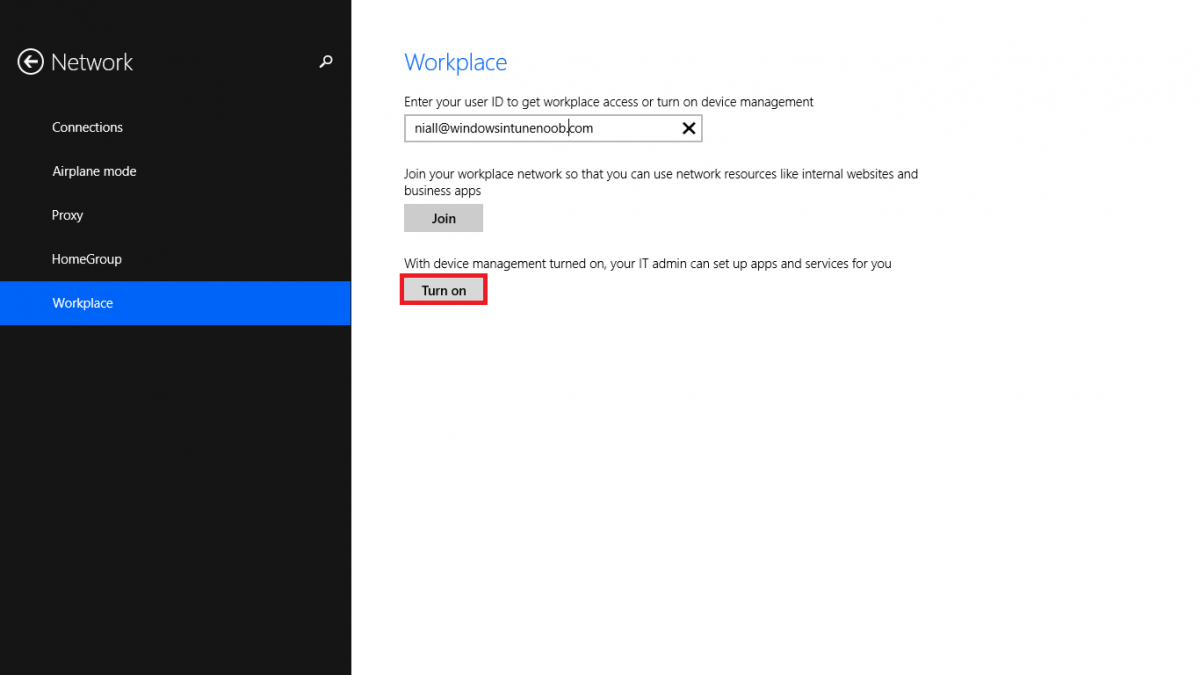
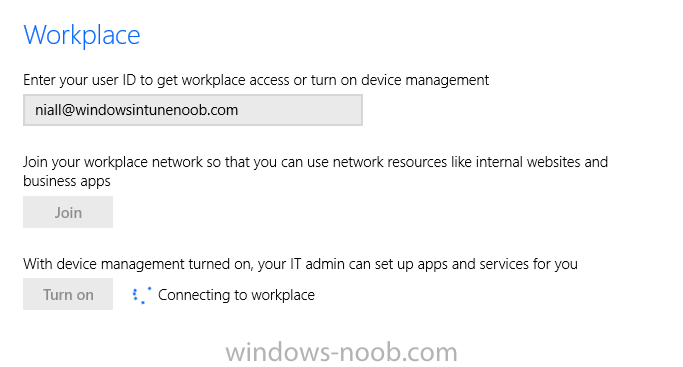
Select Workplace and enter your company credentials, then click on Turn On (do not select Join.)
it should say connecting to workplace.…
if it doesn’t and you get an error such as
Quote
Confirm that you are using the correct sign-in information and that your workplace uses this feature. Also the connection to your workplace might not be working at the moment. Please wait and try again.
then review the following and more importantly Step 1 above.
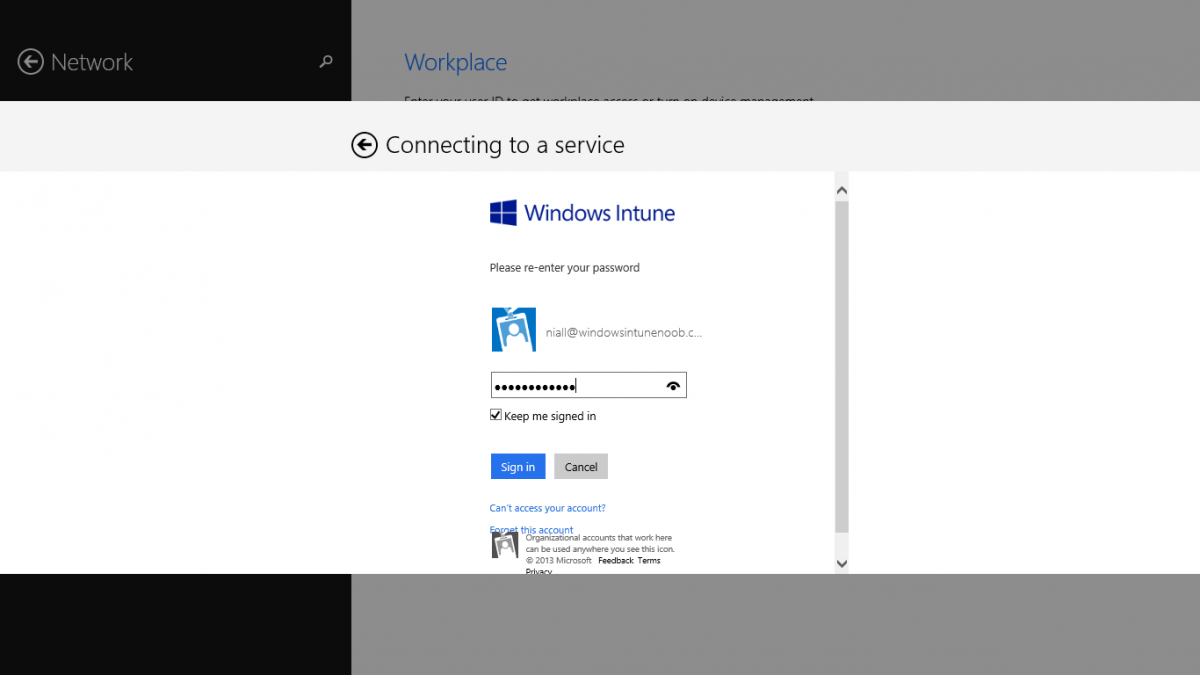
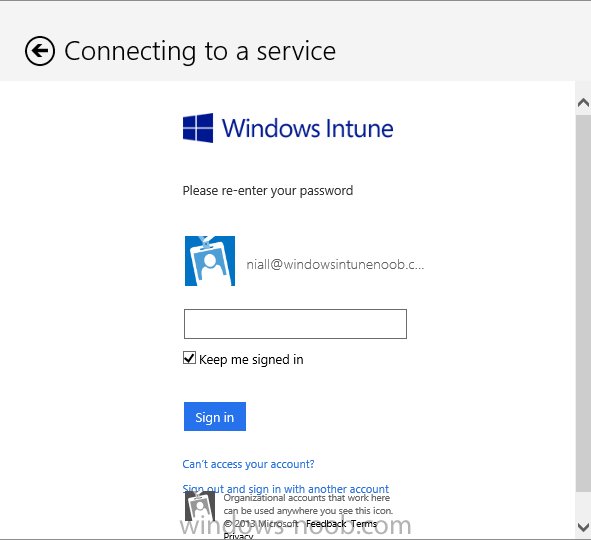
Assuming all went ok, a Connecting to a service screen appears, enter your password when prompted to do so and click on Sign In
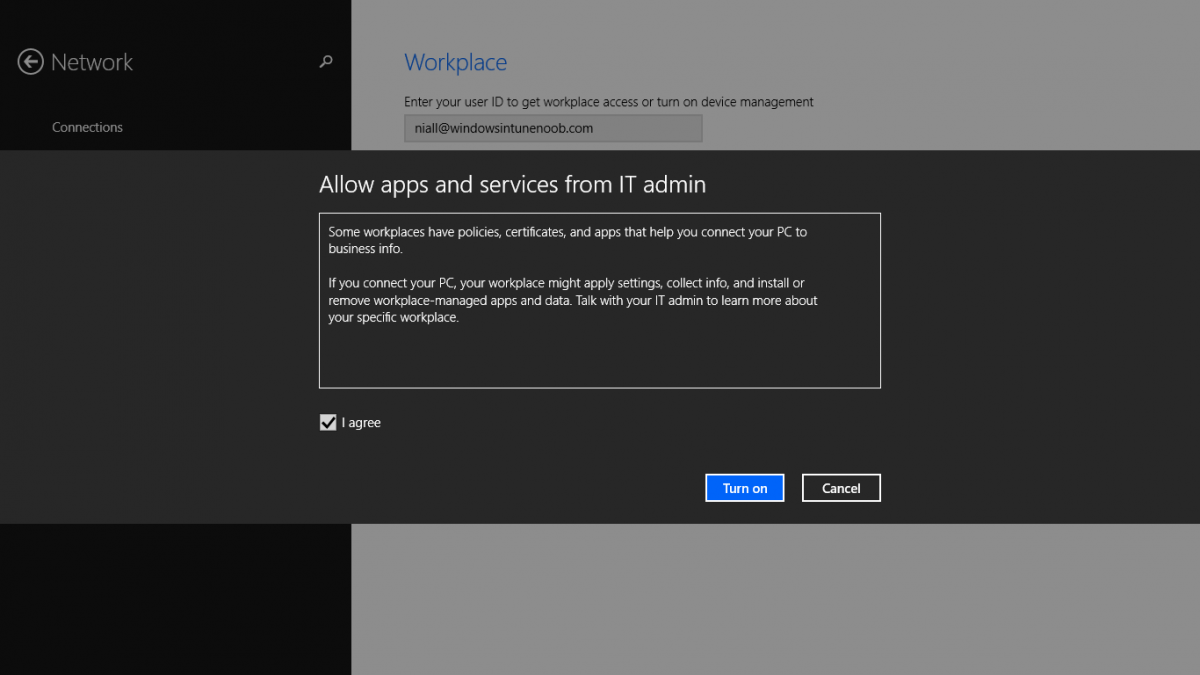
you’ll be prompted to accept an agreement, place a checkmark in the I agree box and click on Turn On.
At this point your device is enrolled and the only option shown should be Turn Off (don’t select that).
Step 4. Install the Company Portal
Start the Windows Store and search for Company Portal
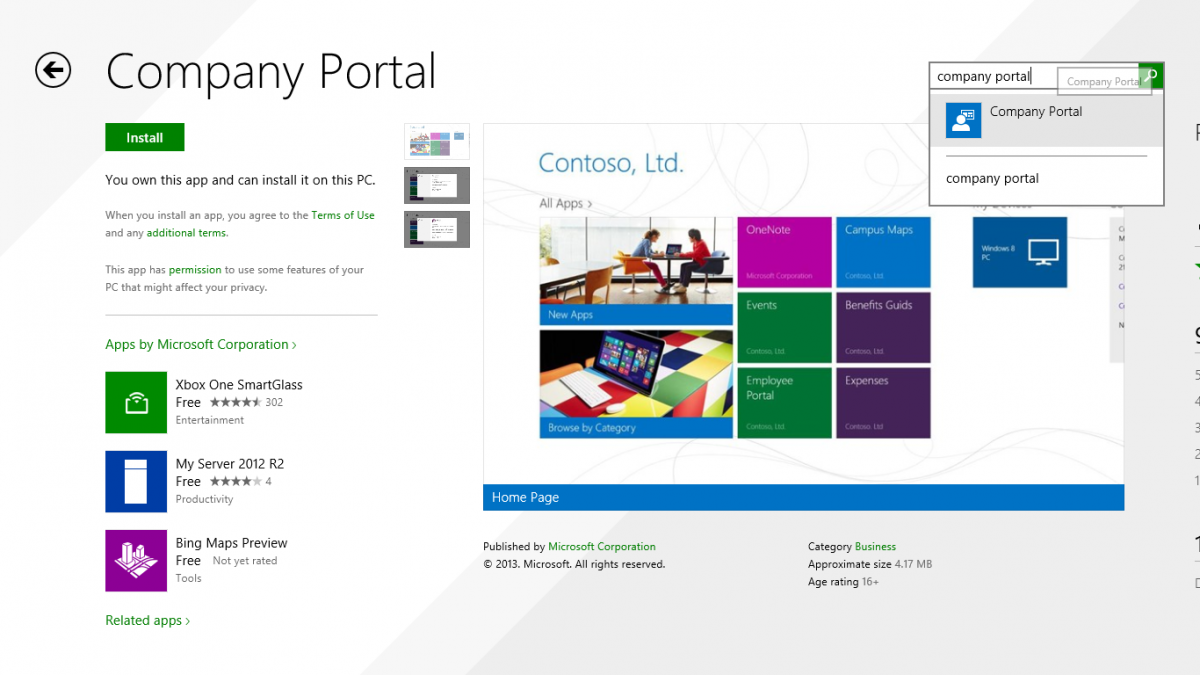
choose Install
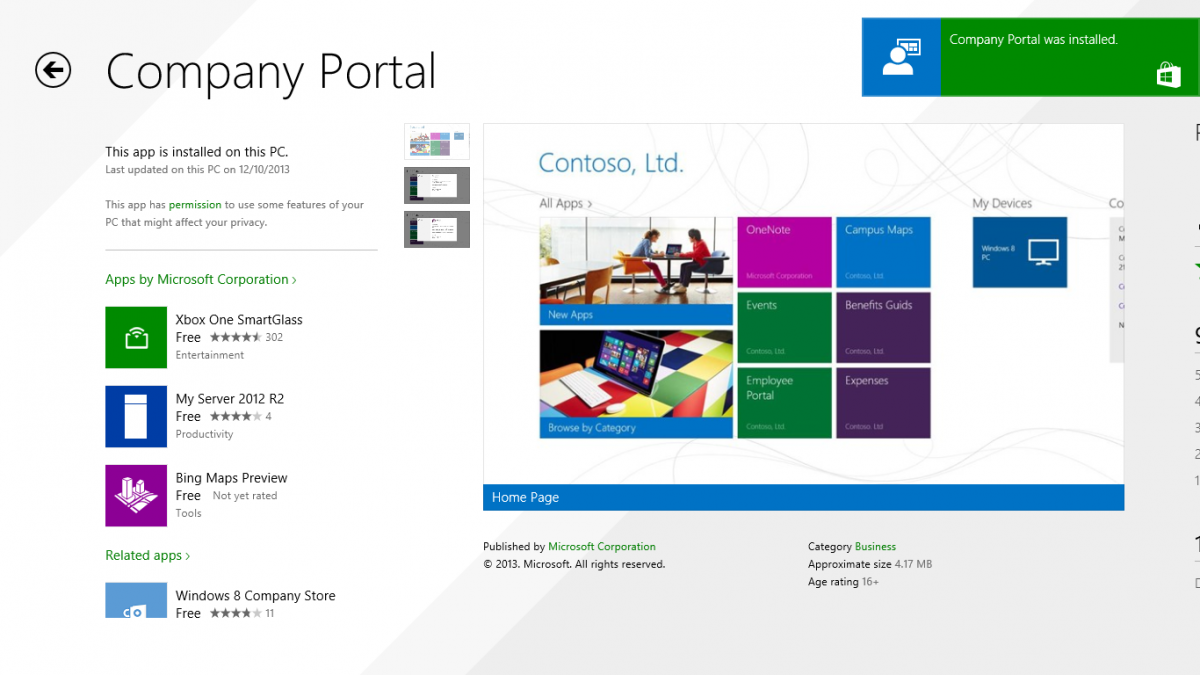
once installed, start the application, you’ll be prompted for your password, enter it and click on sign in.
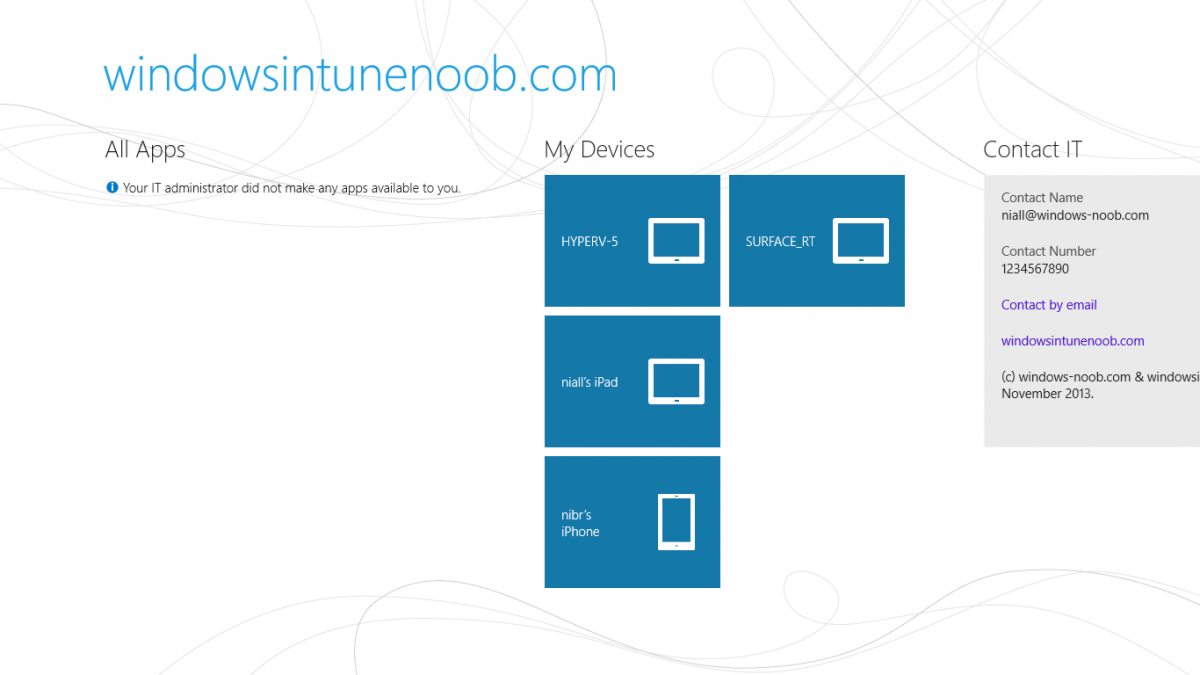
The Company Portal should appear and any devices you have previously enrolled should be listed. In the screenshot below you can see both a Windows 8.1 device (workgroup joined, no Configuration Manager Client installed) called Hyperv-5 and a Windows RT 8.1 device.
Job done !
until next time, adios.
Recommended Reading
- What’s New in Windows 8.1 – http://technet.micro…s/dn140266.aspx
- How can I manage modern devices using System Center 2012 R2 Configuration Manager ? – Part 1
- How can I manage modern devices using System Center 2012 R2 Configuration Manager ? – Part 2
- How can I manage modern devices using System Center 2012 R2 Configuration Manager ? – Part 3
- How can I manage modern devices using System Center 2012 R2 Configuration Manager ? – Part 4
Summary
In this post we’ve enabled support for Windows 8 RT, Windows RT 8.1 and Windows 8.1 devices by enabling the option in our Windows Intune Subscription within Configuration Manager 2012 R2. We’ve learned how to easily check if our CNAME DNS entry is working and seen the enrollment process in detail. In our next post we’ll look at deploying applications to the company portal for users of Windows 8.x devices.