

Imagine the scenario, you deploy some Windows 7 laptops but receive
feedback from the users that they don’t like the power management
default settings,
to get around this you could use Group Policy
or if that’s not possible due to time constraints or other issues, you
could import the power management settings directly into your image
based on whether the target pc is a Laptop or Desktop.
The default power management plans in Windows 7 are pretty good, but
also quite aggressive, so you will probably want to configure them in
some way,
View current PowerScheme
First of all you will need to understand how to ‘see’ them. On a Client
Laptop (not a VM or desktop, as they won’t show the profiles we are
interested in) open a administrator command prompt and type powercfg -list
Quote
Existing Power Schemes (* Active)
———————————–
Power Scheme GUID: 381b4222-f694-41f0-9685-ff5bb260df2e (Balanced) *
Power Scheme GUID: 8c5e7fda-e8bf-4a96-9a85-a6e23a8c635c (High performance)
Power Scheme GUID: a1841308-3541-4fab-bc81-f71556f20b4a (Power saver)
from the above we can see the the Balanced power plan is selected currently.
Export current PowerScheme
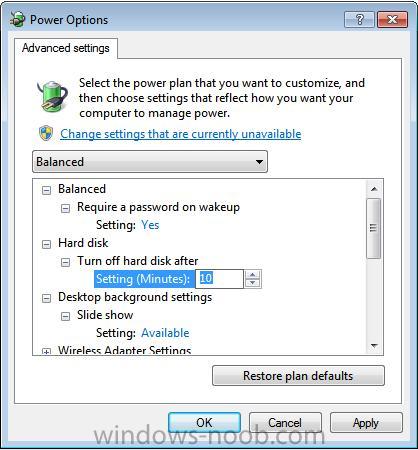
Now let’s make some changes to our Power scheme (as a test, change the values for hard disc time out in advanced properties of the current plan).
Once you have power management the way you want, we will export our settings using powercfg -export
Quote
Import a previously exported PowerScheme
Now that we have our pow settings saved, let’s import them (on another computer) using powercfg -import
Quote
Imported Power Scheme Successfully. GUID: b20406da-dd0d-432e-859b-399e994c7aff
and verify
Quote
Existing Power Schemes (* Active)
———————————–
Power Scheme GUID: 381b4222-f694-41f0-9685-ff5bb260df2e (Balanced) *
Power Scheme GUID: 7d67c408-0a5b-4bfe-a2e8-19bcb22cf21e (Balanced)
Power Scheme GUID: 8c5e7fda-e8bf-4a96-9a85-a6e23a8c635c (High performance)
Power Scheme GUID: a1841308-3541-4fab-bc81-f71556f20b4a (Power saver)
Power Scheme GUID: cba55b22-5cdc-4a45-b095-225d34a60e99 (Balanced)
Power Scheme GUID: b20406da-dd0d-432e-859b-399e994c7aff (Balanced)
Note that even though the scheme is imported, it’s not set as default, to do that we have to use the powercfg -set command.
Set current PowerScheme
Ok now that we know how to import it, let’s set a powerscheme, to do so use powercfg -setactive guid
Quote
let’s verify the change
Quote
Existing Power Schemes (* Active)
———————————–
Power Scheme GUID: 381b4222-f694-41f0-9685-ff5bb260df2e (Balanced)
Power Scheme GUID: b20406da-dd0d-432e-859b-399e994c7aff (Balanced) *
Power Scheme GUID: 8c5e7fda-e8bf-4a96-9a85-a6e23a8c635c (High performance)
Power Scheme GUID: a1841308-3541-4fab-bc81-f71556f20b4a (Power saver)
It Worked and now our powerscheme is set to our custom scheme.
read the rest of the post here